Scheduling
Creating blocks and appointments on your schedule.
- Blocks
- Saving Block Styles and Using Them
- Scheduling an appointment
- Checking In
- The Checkin Transaction
- Check in without recording a transaction
- Canceling Appointments
- Waiting Lists
- Squeeze Appointments
- Day Notification
- Recording a note prior to checkin
- Text message appointment reminders
- Text Reminders: Codes Key
- Reverse A Checked-In & Paid-For Appointment
- Move an appointment with drag and drop
- Telehealth
- Patient Portal: No Available Indicator
Blocks
Blocks are the shifts within your schedule. When you create Blocks, you'll assign a practitioner, location, services, and start and end times. You can also set up Blocks at repeating intervals. Here's a video overview:
Adding a block 

Go to the day and location where you want to create the Block, then click the plus sign [+] in the group of block icons to the top right of the page. A form will popup in a modal window. You can either use a Saved Block or Create A New Block:
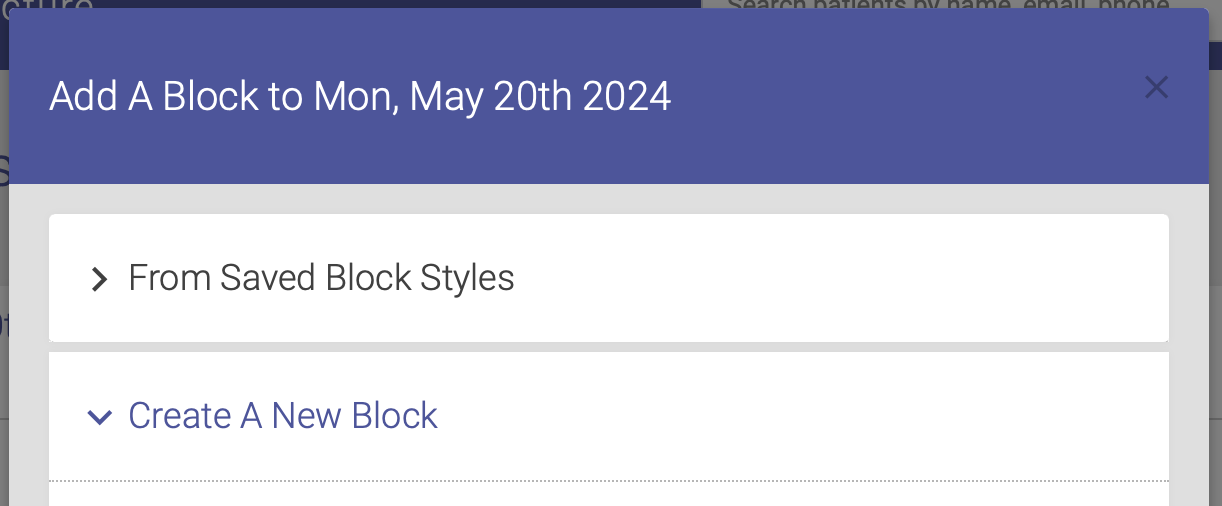
Using a Saved Block:
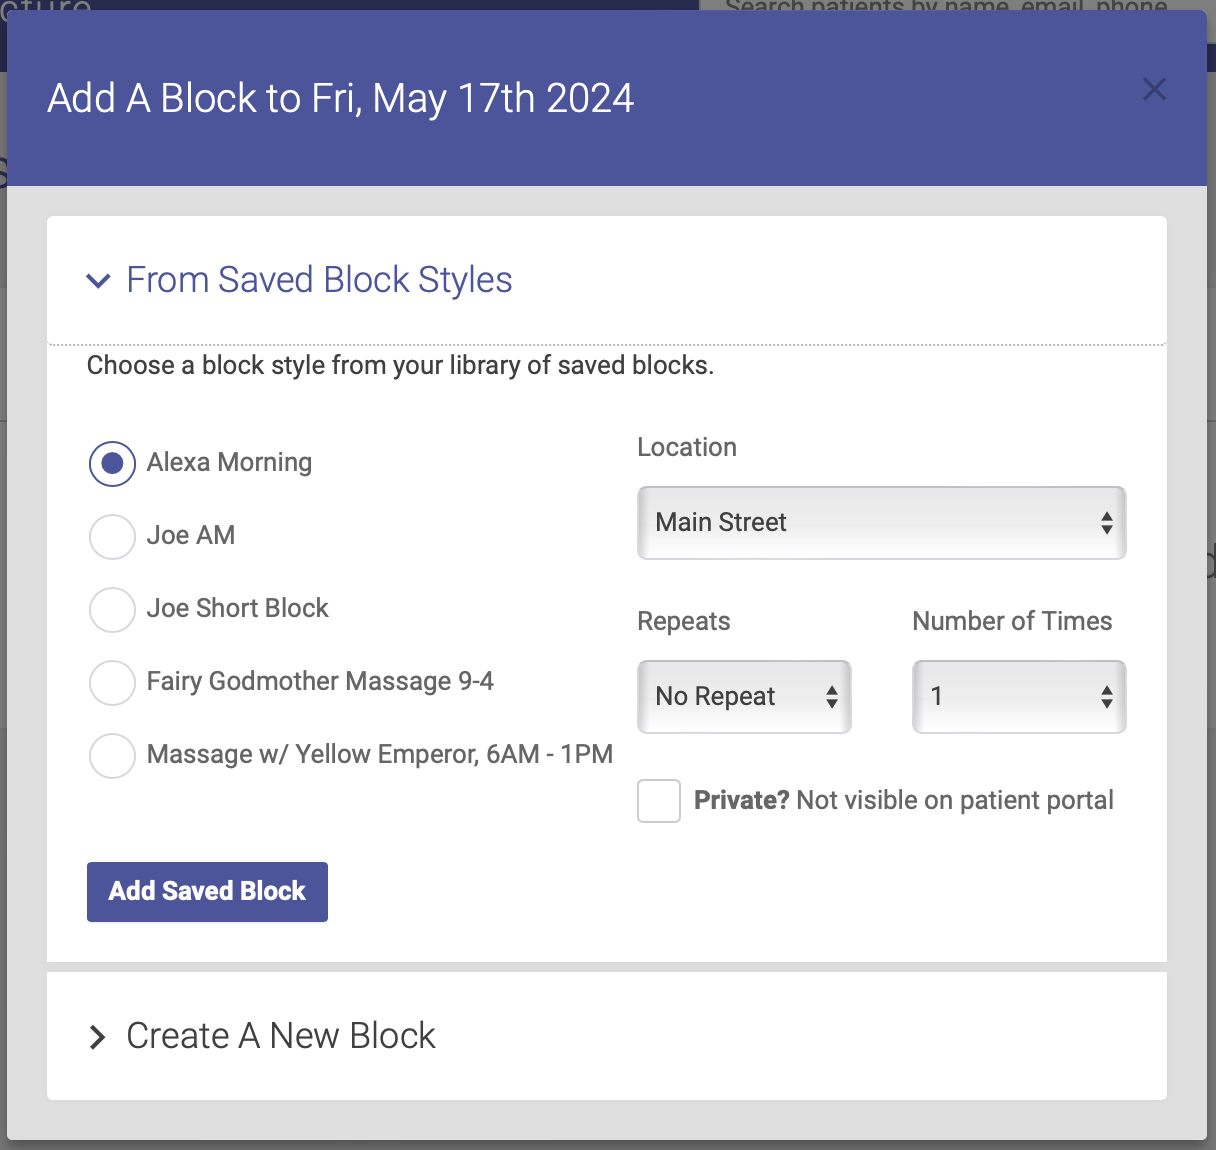
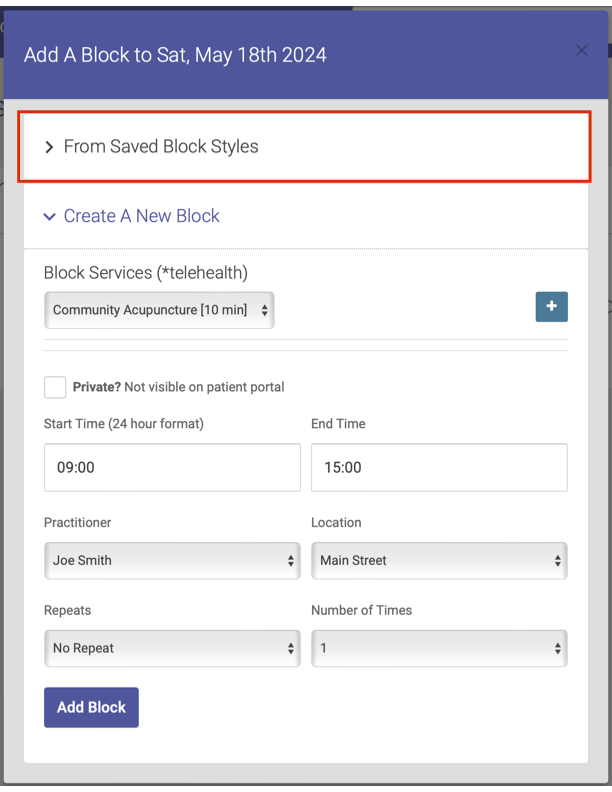
- Select "From Saved Block Styles" to open the selection form (Create New Block is opened by default).
- Choose the block style you want to insert. Click here for detailed instructions on how to save blocks for later use.
- Click the Add Saved Block button. Your Block is now added to the schedule!
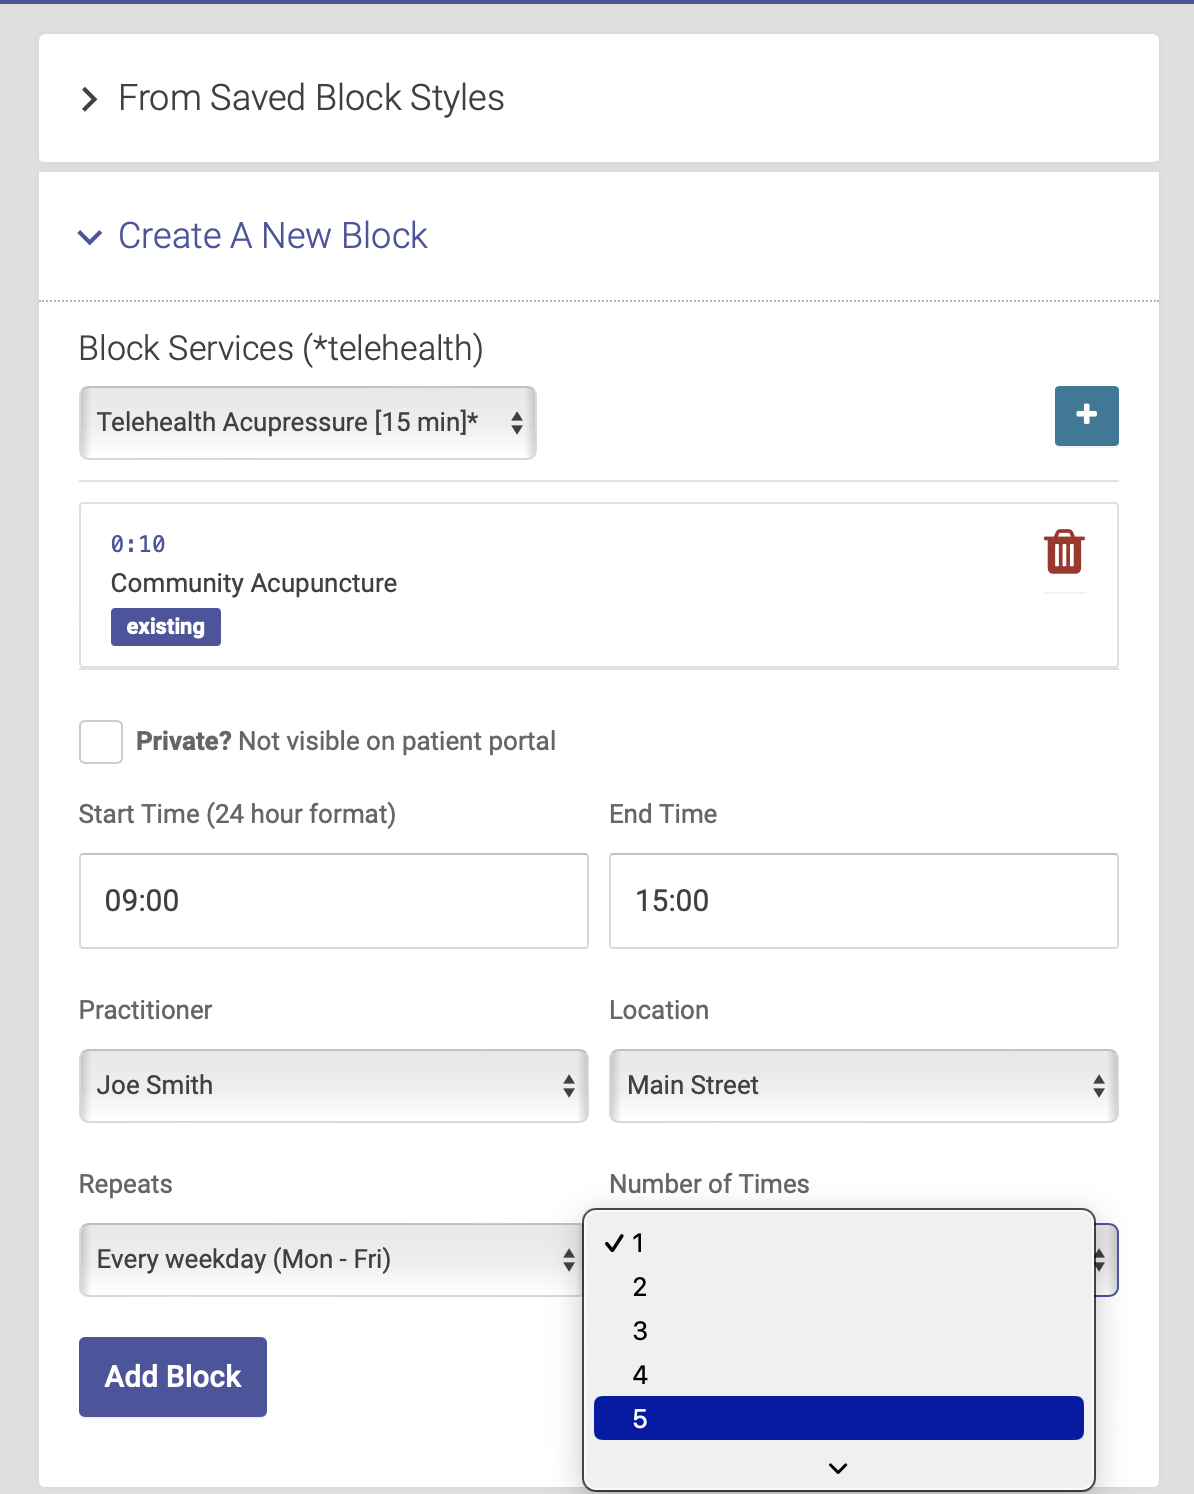
Create a New Block:
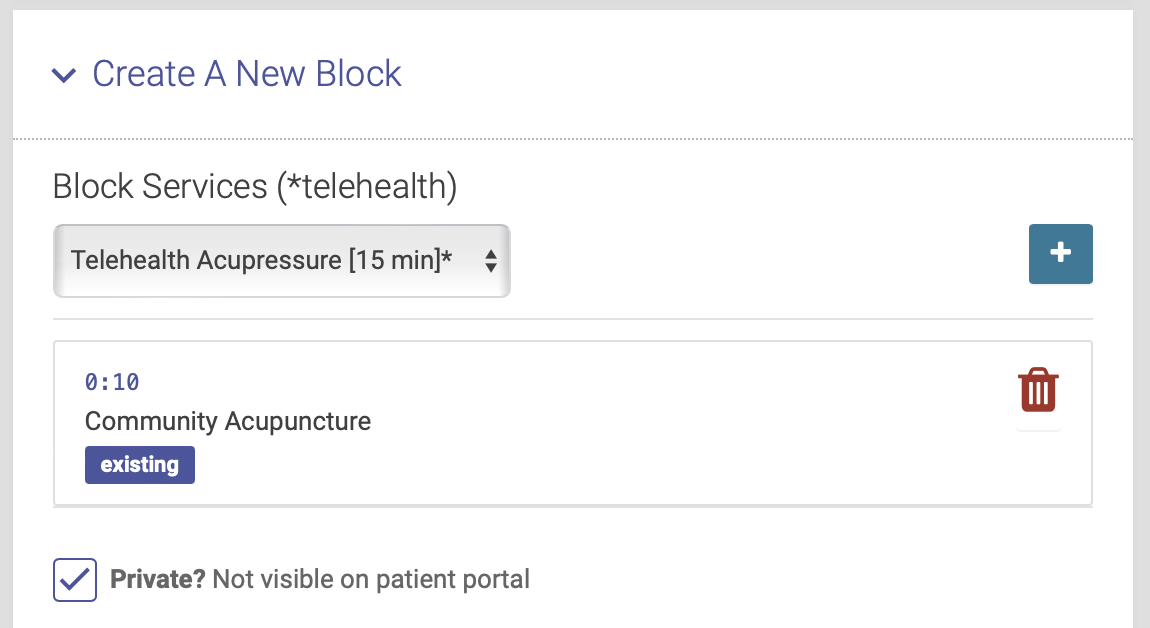
- Add the Service options you want to have available for this Block. Select the Service from the drop down menu, then click the plus icon [+] to add it. You can add multiple Services to any Block. When you add a Service, you'll see the Service title, slot length, and who can book. You can delete Services from a Block by clicking the red trash can icon.

- To make this block invisible on the patient portal, click the box next to Private. You will be able to view this block on the admin portal, but patients will not see it on the patient portal.
- Choose your start and end time.
- Select the Practitioner from the dropdown.
- Select your Location
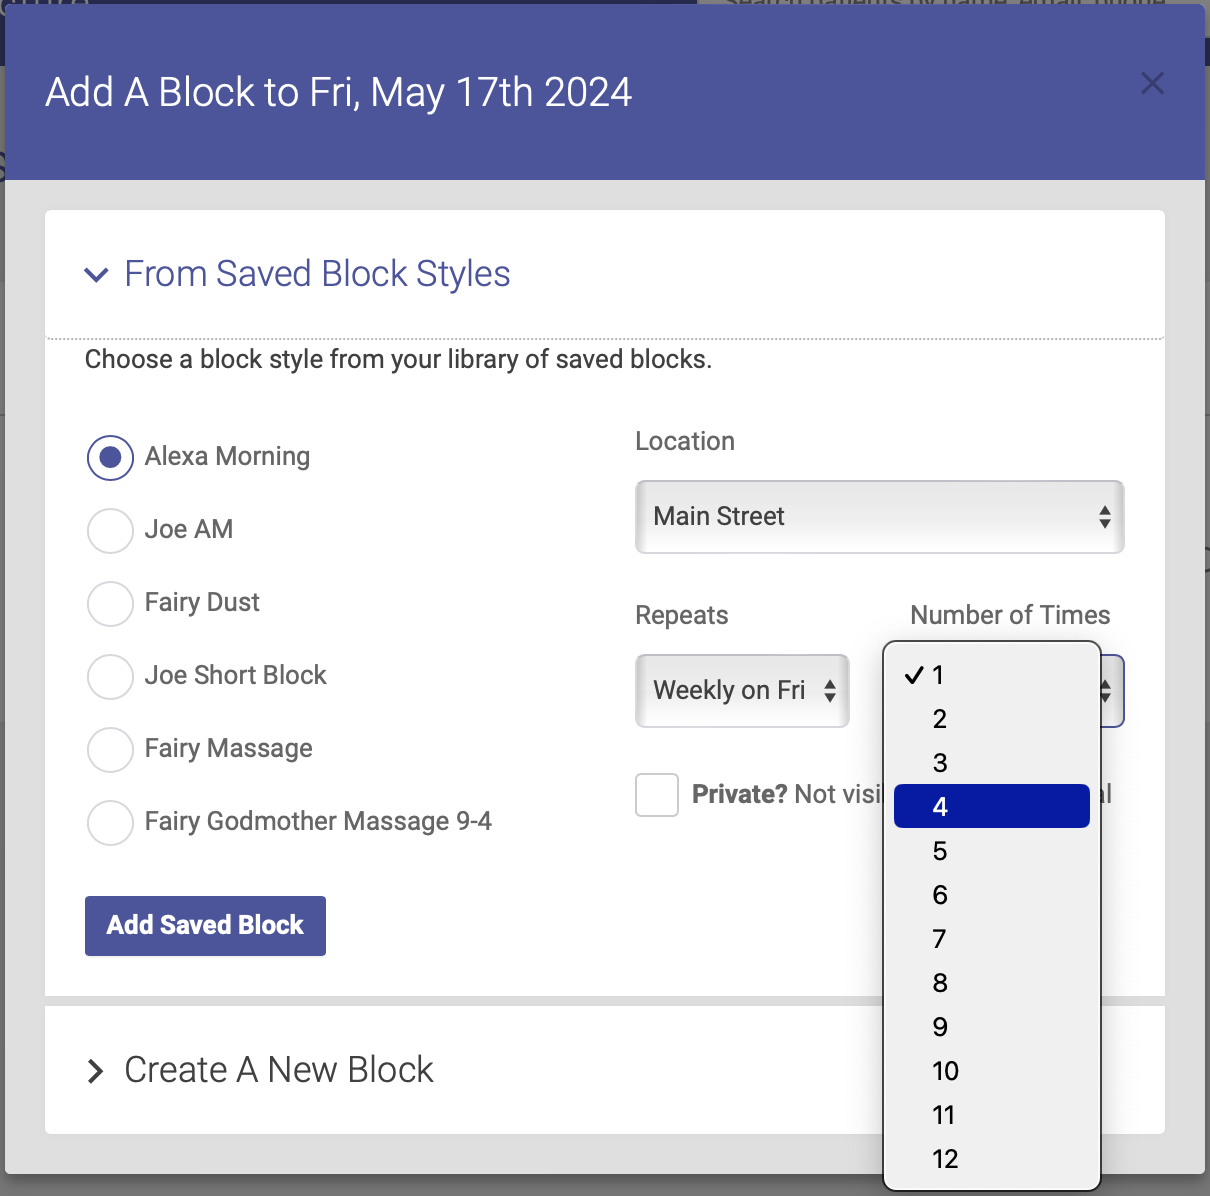
- If you want to repeat this block, select the repeat increment and number of repeats (more on repeating blocks below)
- Click the Add Block button. Your block is now added to the schedule!

Repeating blocks
When adding a block to the schedule, you can repeat that block on future dates. To repeat a block, click on the Repeats dropdown menu to select your interval. You can repeat a block on a daily, weekly or monthly basis. Then select the number of times you want to repeat that block.
You can use the Repeat function when you are adding a new block or adding one from your saved blocks:
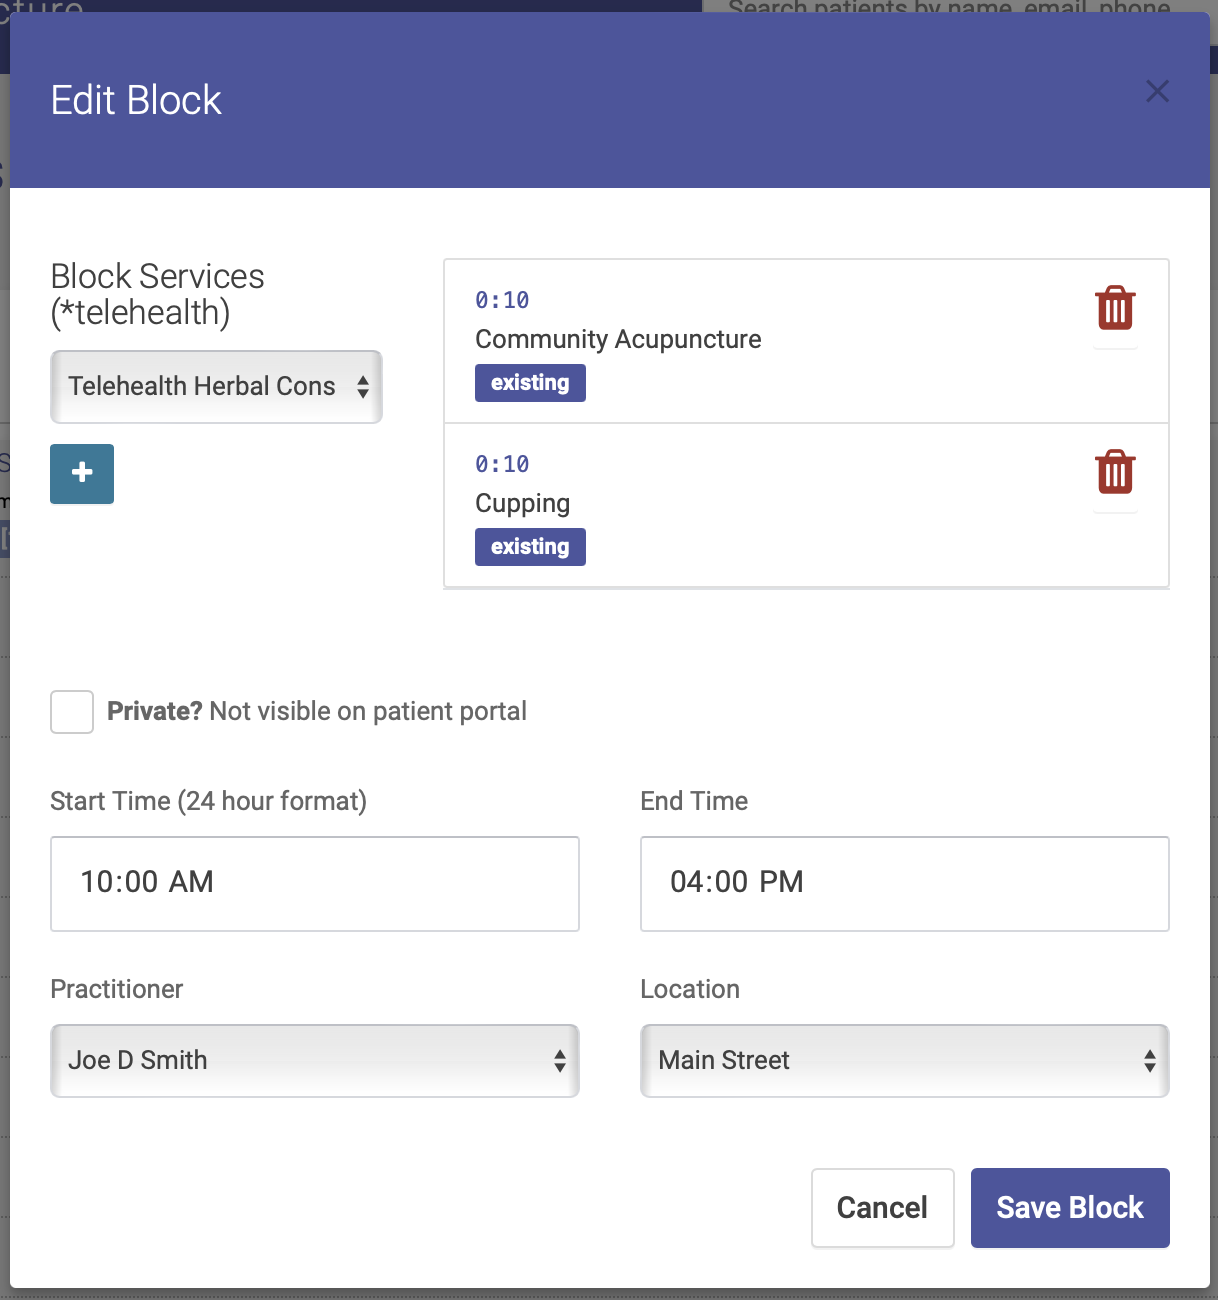
Edit a block 

- Click the pencil icon at the top right of the block.
- Change any of the parameters you used creating the block. This includes adding or deleting Services, or changing the start and end times, Practitioner and Location
- If you change the start or end time, and doing so cuts off any appointments:
- The appointments will be cancelled
- and they are added to the waiting list
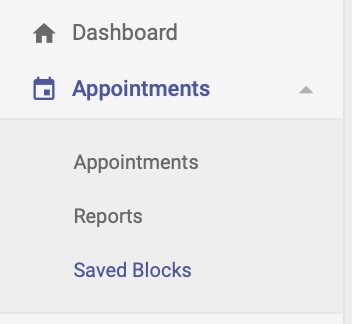
Editing or Deleting saved blocks
Click on Saved Blocks under Appointments on the main menu:
From here you'll select the saved block you want to edit or delete. Select your block to edit the title or delete the block:
Private Blocks
Private blocks are visible to schedule admins but do NOT appear on the patient portal, so patients are unable to schedule an appointment in a private block. Only admins can schedule an appointment in a private block.
If a patient has an appointment scheduled in a private block, the appointment WILL show up in their list of appointments on the patient portal.
To make a private block, click the "Private?" checkbox in the block options when creating a block:
The top of a private block will be highlighted in blue on the schedule:

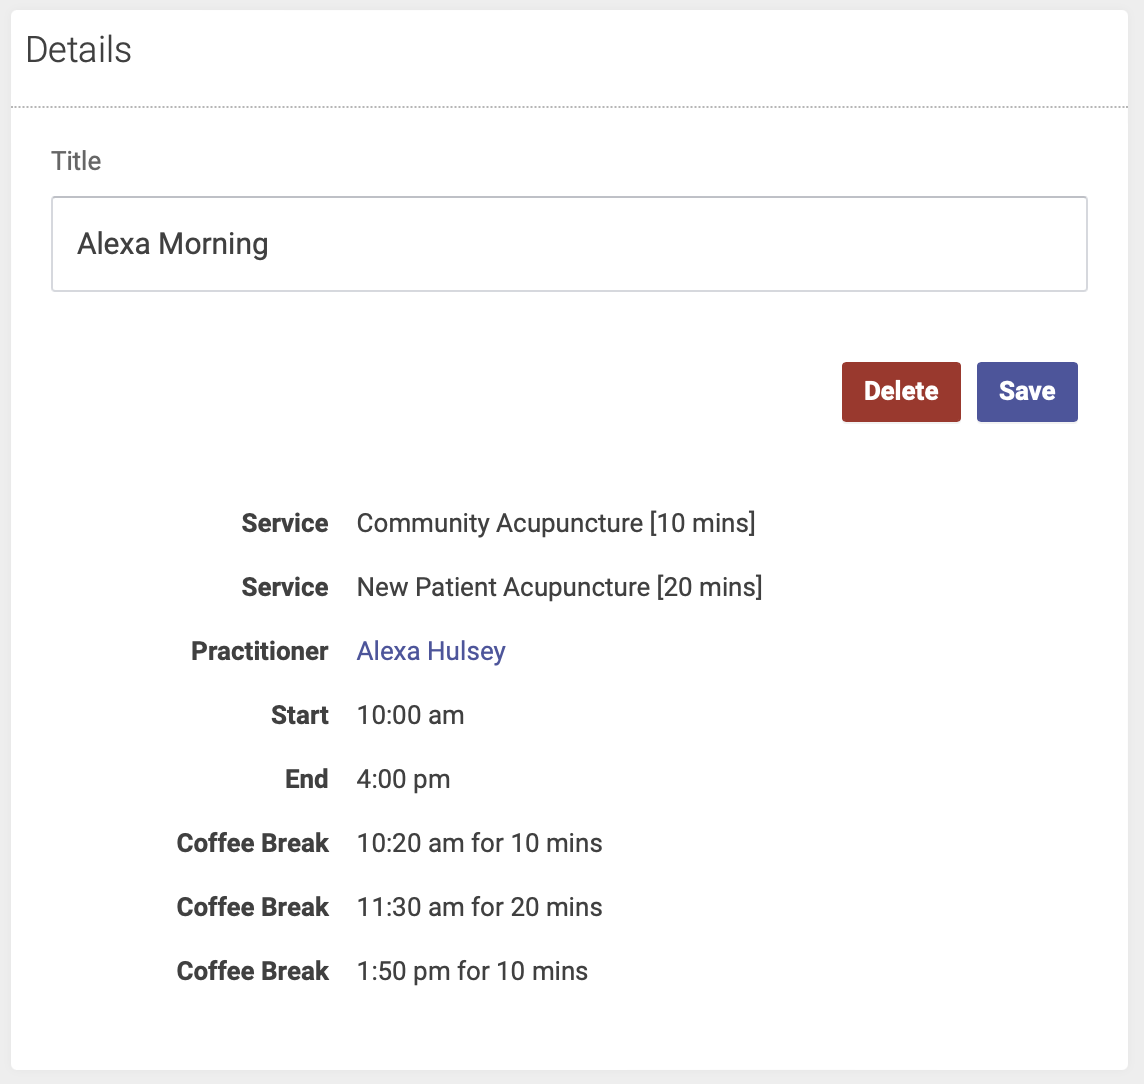
Saving Block Styles and Using Them
Any block can be used as a template of sorts, saving that block as a block style. Block styles include the practitioner, the service options, the start to finish times and any coffee breaks included. This is intended to make it easier to make blocks and to have fewer errors.
To create a block style
- Locate a block you want to save. It should have the start and finish times, Service choices, practitioner and coffee breaks you want.
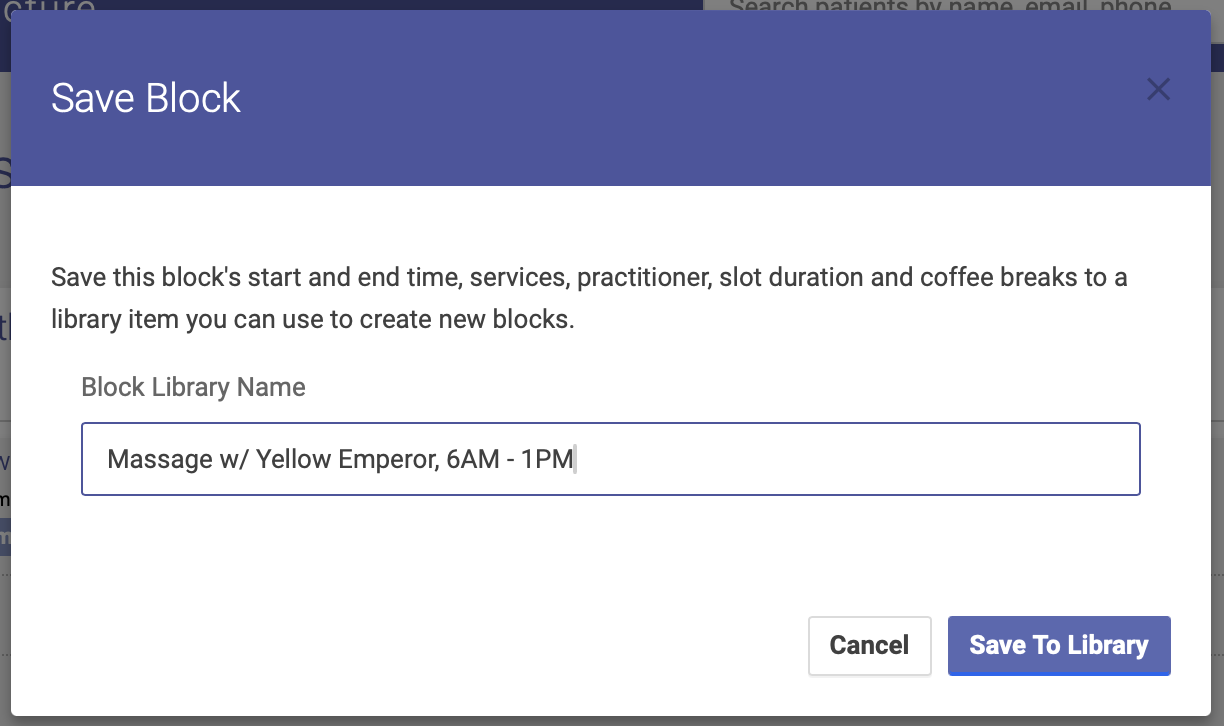
- Click the stacked plus icon in that block's edit icons.
- In the popup form give it a unique and descriptive name and click save.
- Now, when you create a new block the option of using your saved block styles is available.
You can save any existing block to be used again on any other day or location. This includes the practitioner, Service options, start and end times and all coffee breaks.
To Save a Block for Later Use
- Find a block in your schedule
- Click the [+] sign in the block header on the right.
- Give your block a unique and descriptive name (max 80 characters)
- Click Save
To Use a Saved Block
- Go to the day and location where you want to create the block.
- Click the [+] at the top right of the day header

- Select "From Saved Block Styles" to open the selection form (Create New Block is opened by default).
- Choose the block style you want to insert
- Click "Add Saved Block"

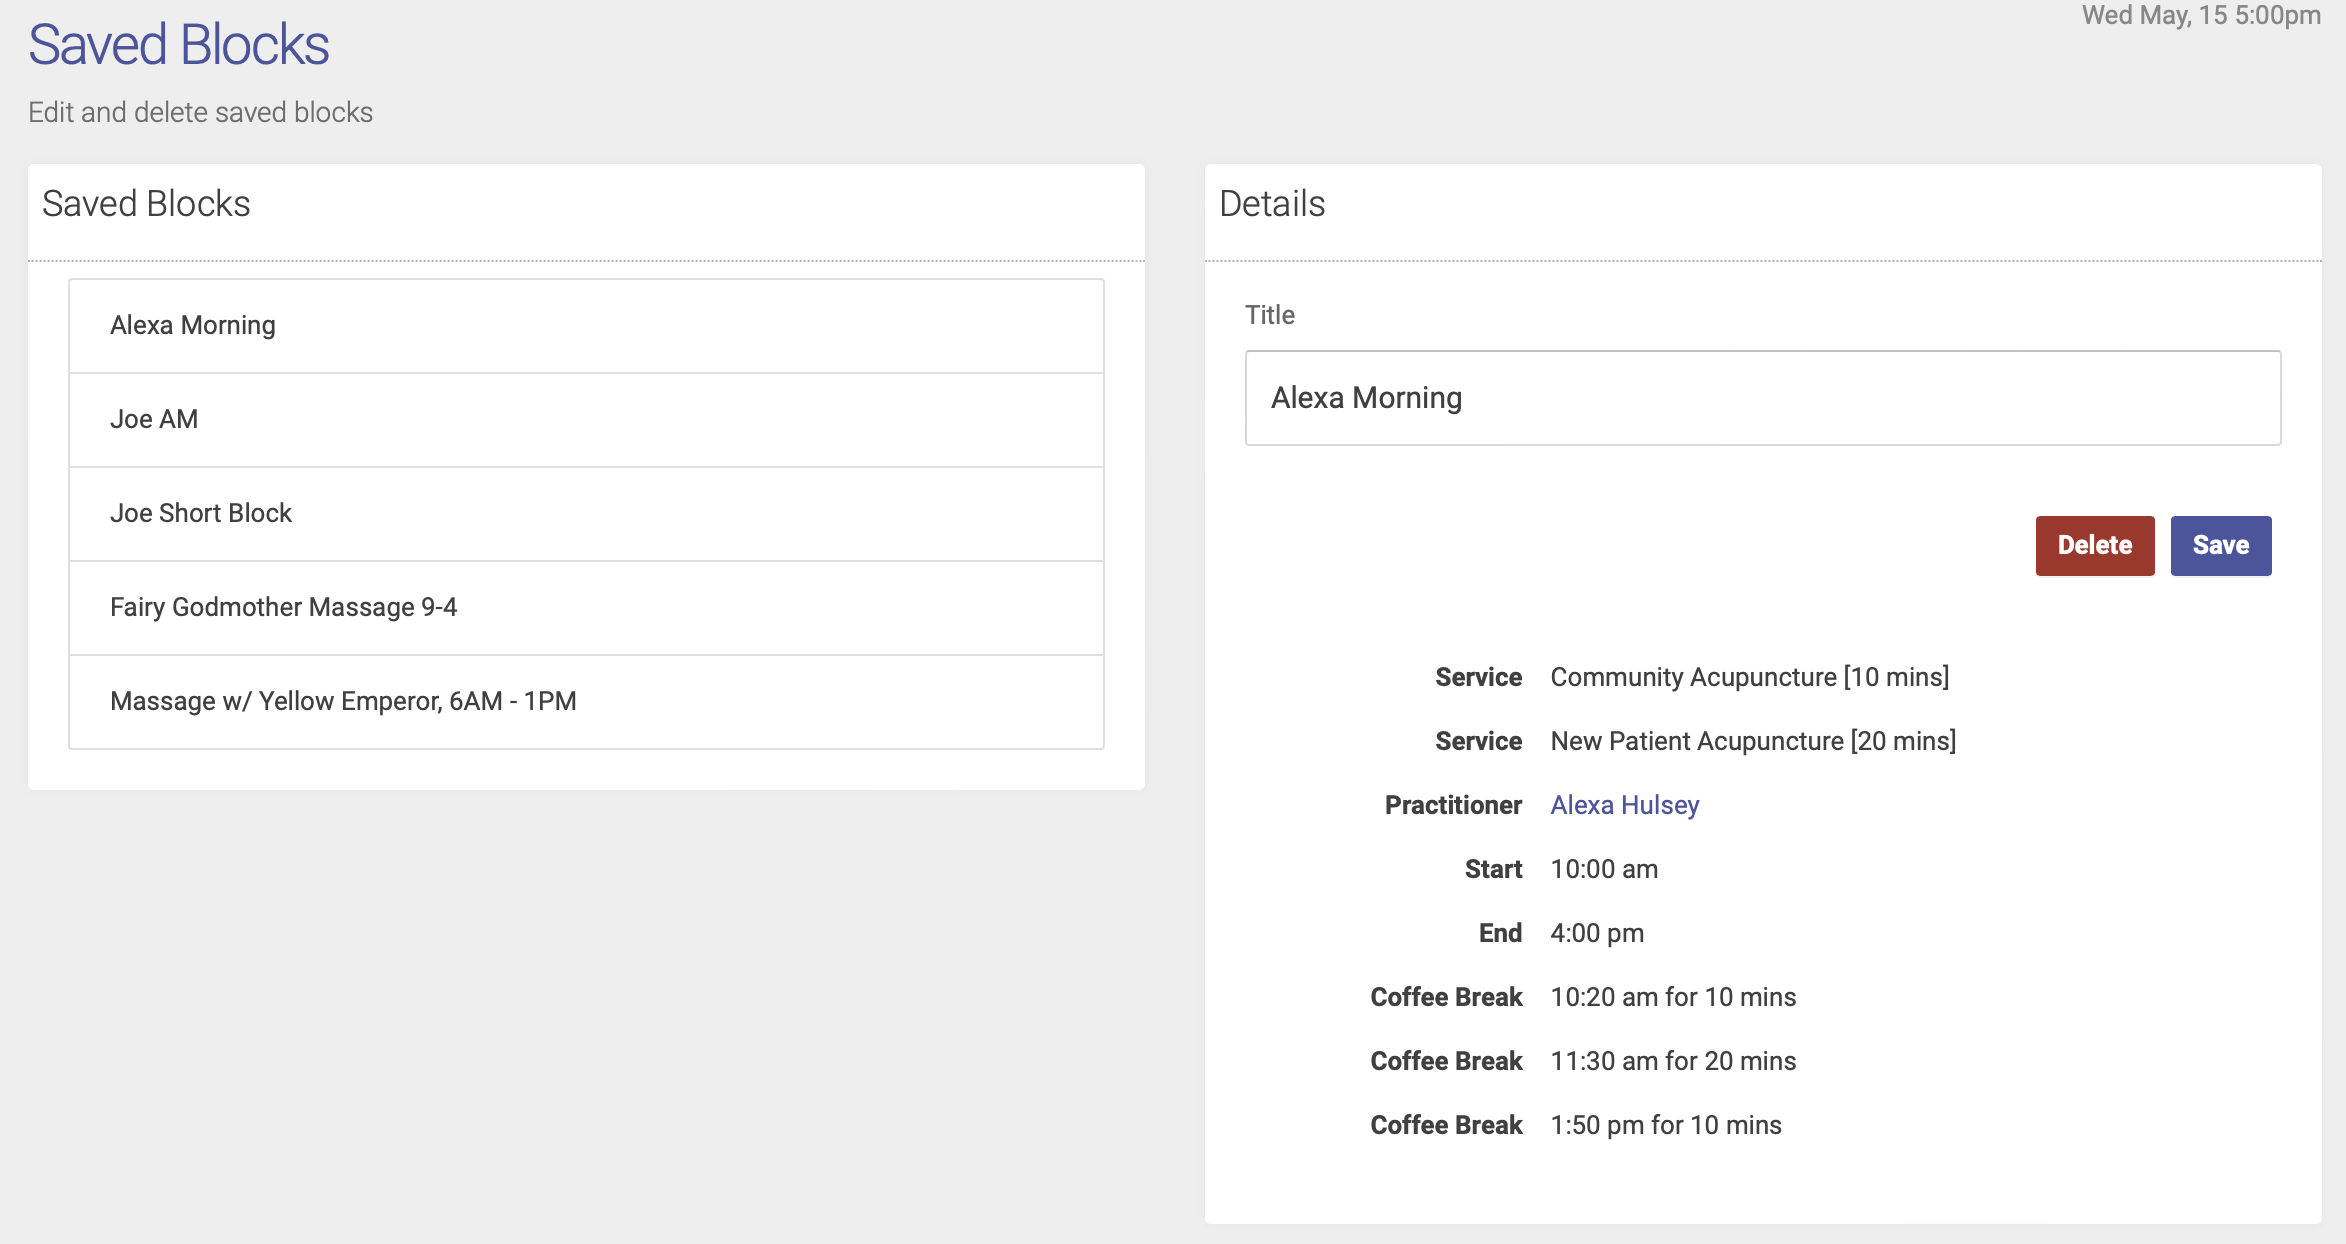
To View Your Saved Blocks
Under the Appointments tab on the left-hand side of the page, click Saved Blocks. This will bring up a list of your saved blocks. From here, you can change the title of a saved block or delete a saved block.
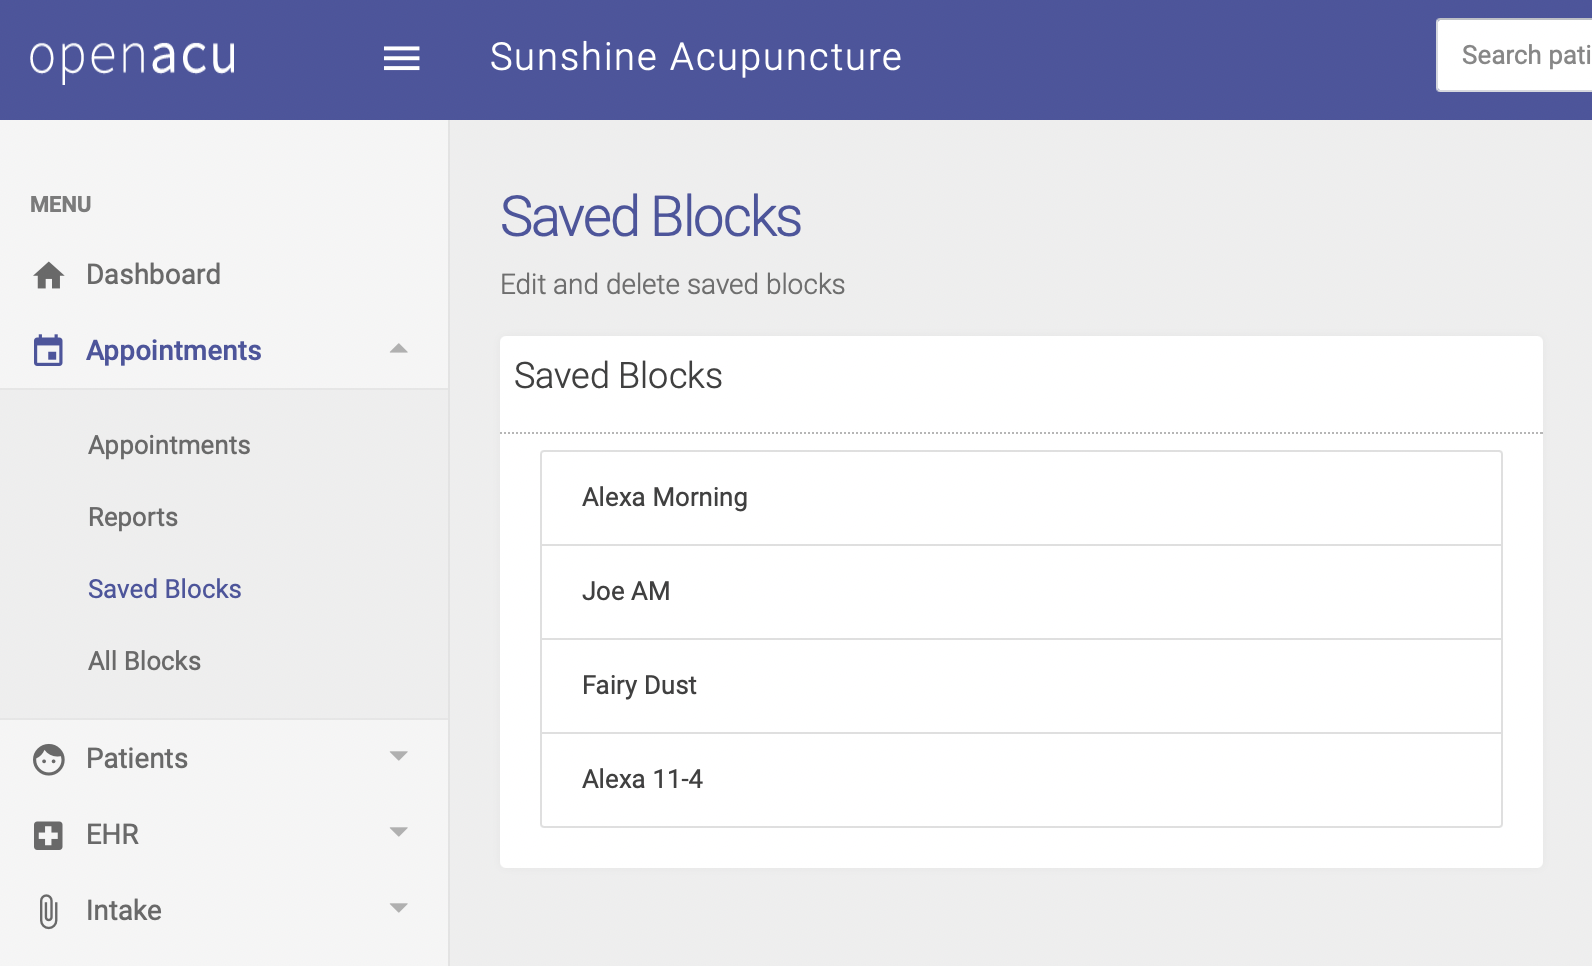
To Delete a Saved Block
From your Saved Blocks page, click on the name of the block you want to delete. The details of the saved block will appear to the right. Click Delete to delete the saved block.
To Edit a Saved Block
You can edit the title of a Saved Block but not any of the details. From your Saved Blocks page, click on the name of the block you want to edit. The details of the saved block will appear to the right. Enter your new title in the Title field and click Save.
Scheduling an appointment
If you have not created any blocks, please do so prior to scheduling any appointments. Open ACU lets you create appointments on a Block or shift based on the preset parameters of the block.
Here's a video overview of how to schedule an appointment:
Schedule an appointment on a block
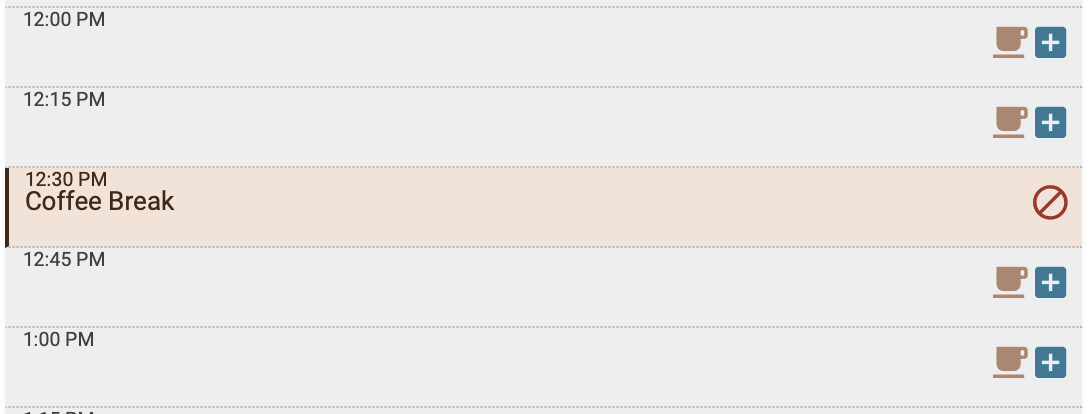
Find the slot you want to add the appointment to. It will have the time on the left and two icons on the right. The coffee cup icon is for adding a coffee break to the block. Click the [+] sign.
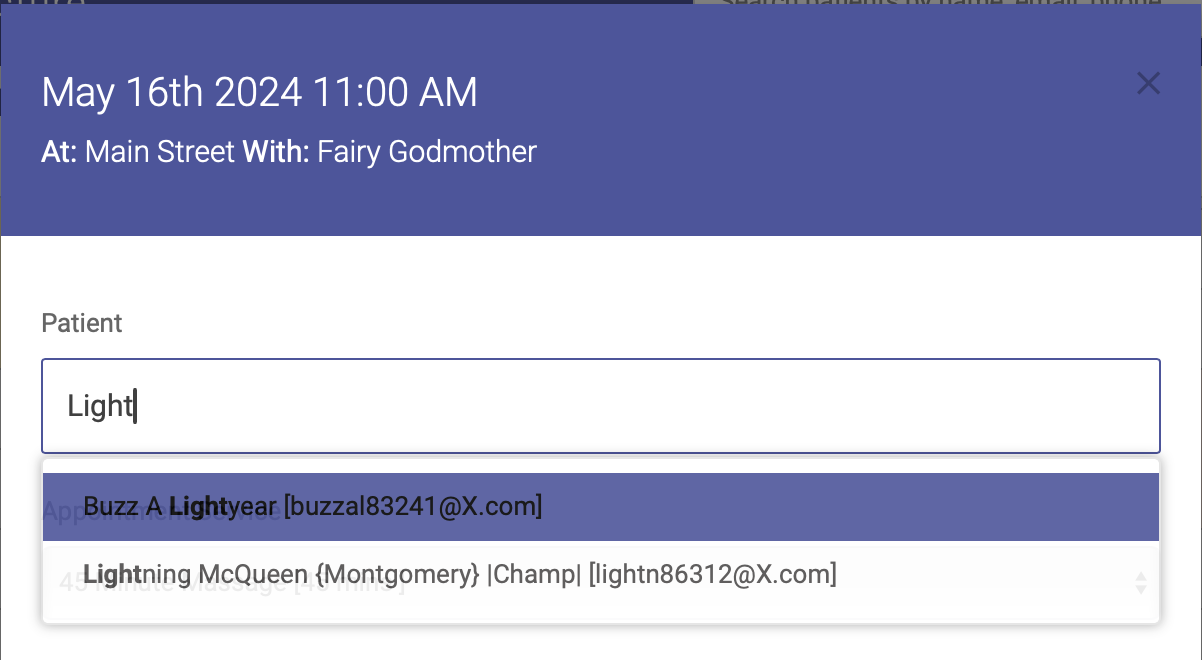
A popup form modal will appear. This is where you'll enter the appointment details:
- Choose the patient by typing their name or their email address in the field. A dropdown will appear, select the patient by clicking their name or arrowing down to the name:
- You'll then select the Service from the drop down menu (if only one Service is available for a Block, there will only be one option in the drop down menu):
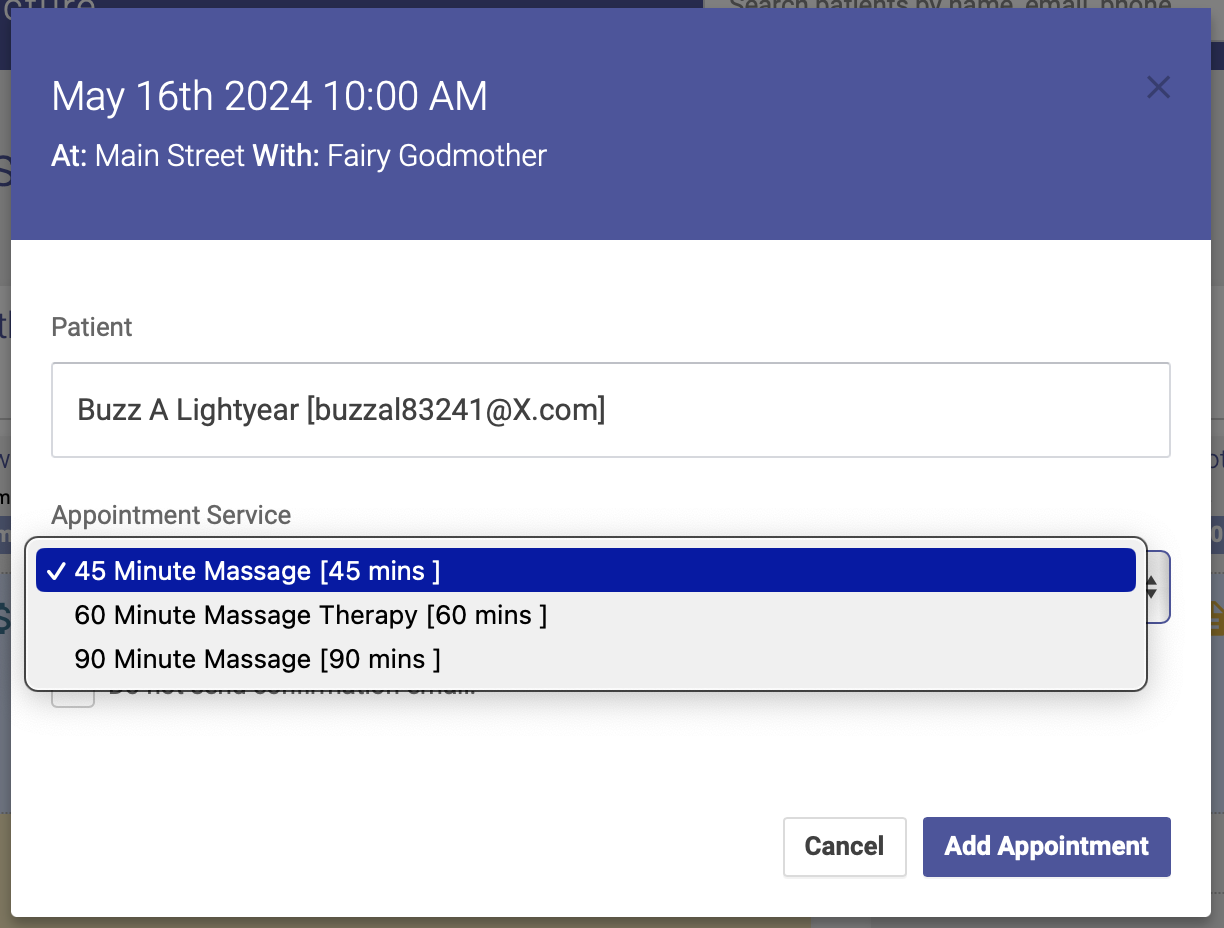
- Click the Add Appointment button. Your appointment is now scheduled! The Service name will appear under the patient's name on the schedule:
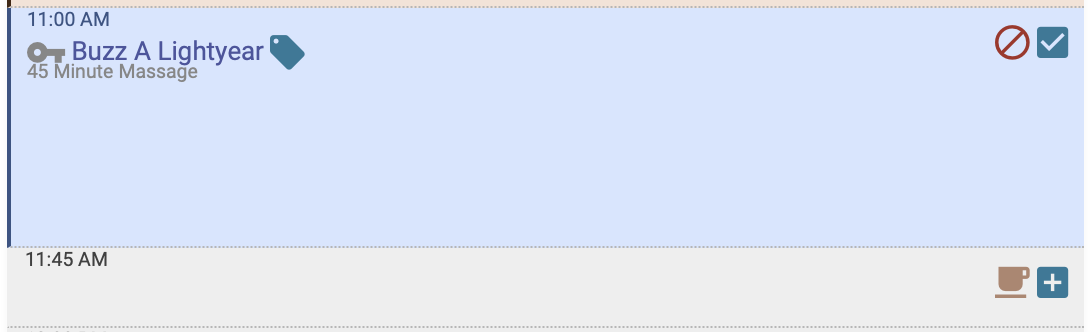
Checking In
Once an appointment is set by placing it on a block you are ready for patients to arrive. Upon arrival, in Open ACU you will check them in. This does two important things to your schedule and your patient's data. First it records a successful appointment, confirming the patient arrived. Second you can add transactional information to the appointment an therefore the patient.
Additionally, the practitioner will not be able to enter any treatment notes in the EHR until the patient has been checked in.
Checked In

Clicking the check icon at the far right of the appointment slot not only opens the transaction form modal, it records the fact that the patient showed up for their appointment. In your reports and in the patient record, plus on the schedule grid, it is clear which patients have shown up or not.
The check in also timestamps the checkin and the user who did so. All a part of the appointment log.
Check in Details
Once you click the check icon, a modal will appear where you will enter the patient's payment details:
Go to the next part of Checking In “The Checkin Transaction”.
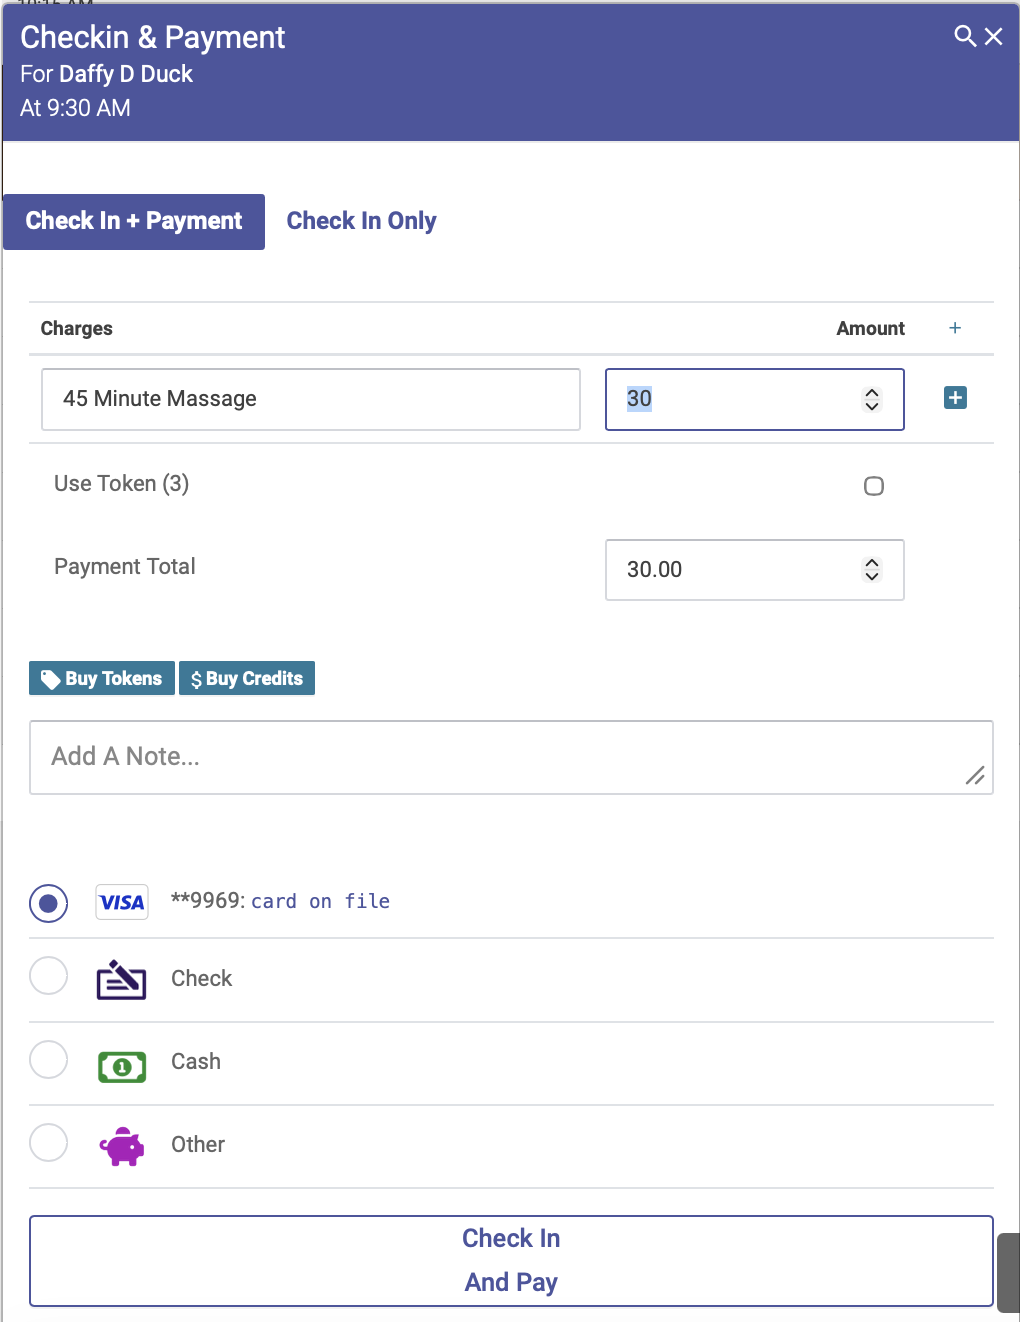
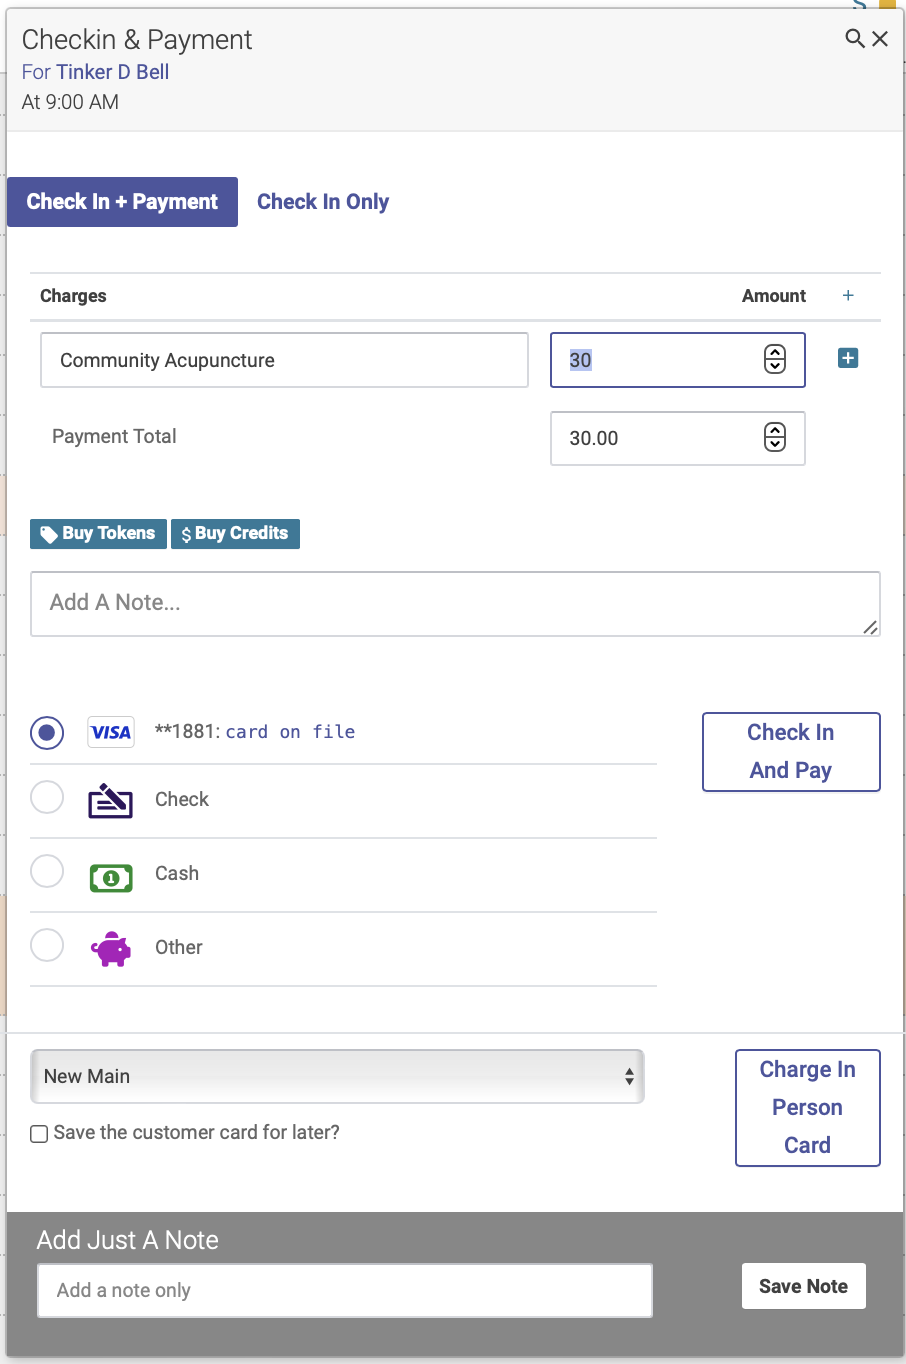
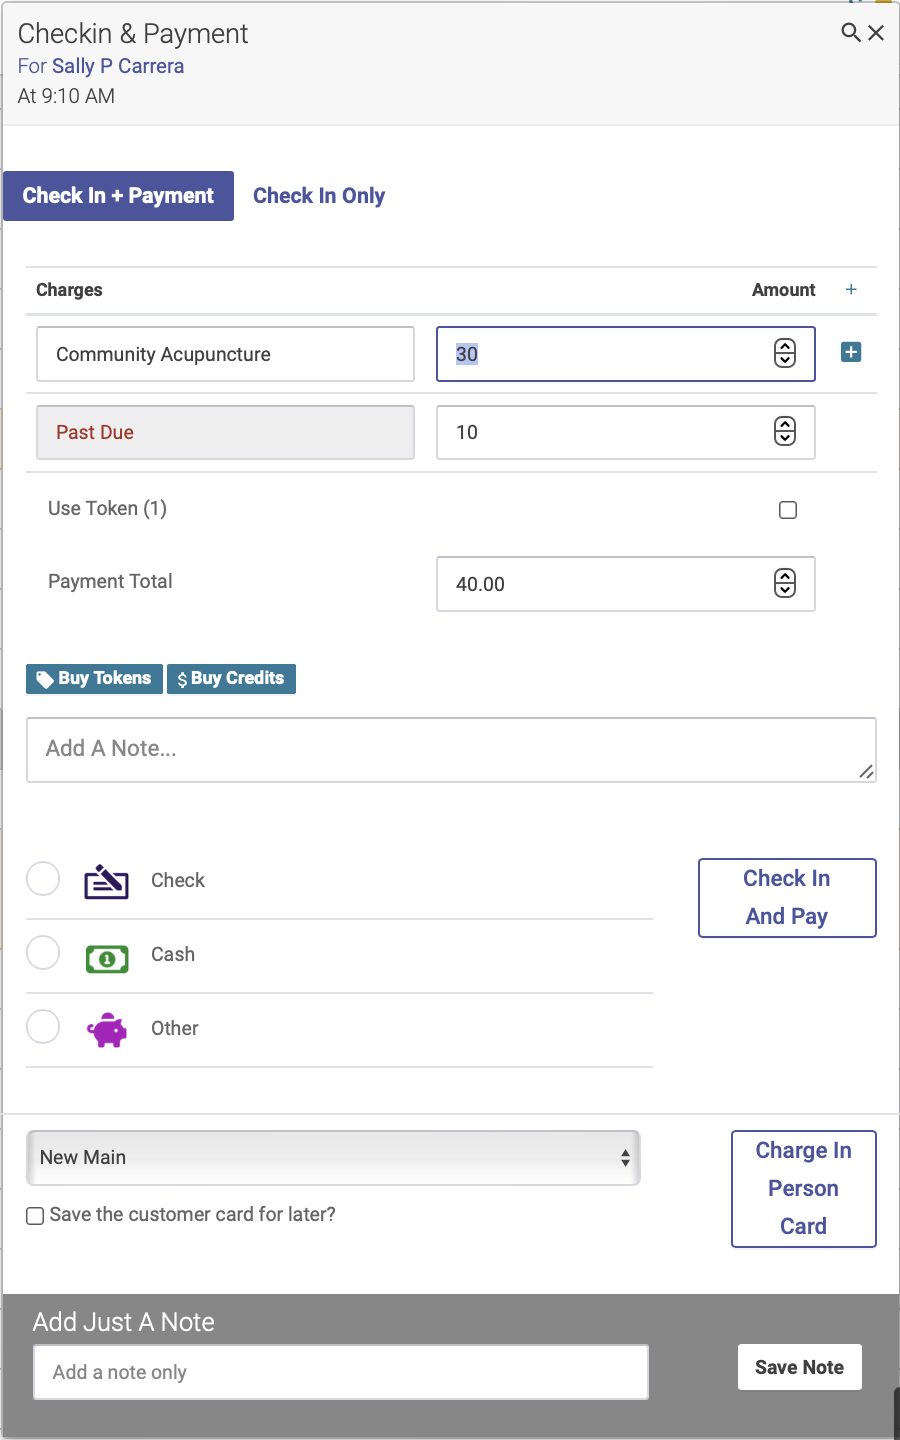
The Checkin Transaction
In Open ACU you cannot edit transactions, checkins or otherwise.
When you checkin a patient into the schedule you are confirming their arrival and creating a financial transaction for their visit. This transaction is a standard debit and credit system that is associated with a patient. Let's look at the basic checkin window. (Click on the image to enlarge)
Quick Checkin Tip 
- Enter the amount to charge for treatment (or leave it your default amount)
- Tab once to total field and hit return.
Checkin Transaction Fields
- Treatment Description. This first line is always the treatment line and it cannot be deleted.
- Treatment Amount. This is what you charge for a treatment. It is not advisable to enter 0.00 because you will want to adjust the fee for any treatment with patient tokens or credit.
- Payment Total. This amount will be calculated automatically and should typically not be changed. If you enter a number higher or lower than the real total it will add credit or debit to the patient's account.
- Add a Note. This is an optional field where you can add a note about a transaction. The note will appear on the receipt, and also on the transaction report.
- Payment Type. This is where you'll select your payment type: credit card, cash, check, or other. A few notes about payment types:
- You can select your default payment type on your Settings page, in the "Basics" section.
- If a patient pays with tokens or credits, the payment type will automatically default to "Other."
- If you are using our integrated payments via Stripe, and the patient has a card on file, you'll select the card on file and click "Check in and Pay."
- If you are using our integrated payments via Stripe, and the patient does NOT have a card on file, you'll select "Charge In Person Card," and then follow the steps on the card reader.
- If you do not use our integrated payments via Stripe, you'll just select "Credit Card" for your payment type, then click "Check in and Pay."
Adding Items to a Transaction
Sometimes you sell something other than a treatment to a patient when they visit. Open ACU allows a non-treatment transaction for when patients arrive and want to purchase something without having a treatment appointment. See the non-treatment transaction help for more. The transaction popup form allows additional lines to the transaction.

Click the plus sign at the right of the treatment amount to add lines. This will add a new line. You can add a description and price. Click the red minus sign to delete the line from the transaction.

These lines add to the total due. Using a token for the transaction will only apply to the treatment amount.
Use Patient Token to Pay For Treatment

If a patient has at least one token they can use one to pay the treatment amount as entered in the transaction. This will adjust the balance of the transaction. Added line items total will remain and will need to be paid. Clicking Save will reduce the patient's tokens by one.
Use Patient Credit to Pay

If a patient has credit it will appear in the transaction. Credit can be used to pay for the entire transaction including extras and the treatment. If the credit is less than the total it will reduce the total transaction by the amount of credit and the rest will need to be paid.
When a Patient Has a Debit
Patients may have accumulated debit on their account when they were either unable to pay (as noted above) or from a no-show cancellation. When this happens a debit amount appears in the transaction. The transaction amount is increased accordingly.
Check in without recording a transaction
You can check in a patient without recording a transaction by enabling the checkin without transaction feature.
Getting started
To turn on this feature, go to your Settings page. In the Basics section, click the Allow Checkin without a Transaction box:
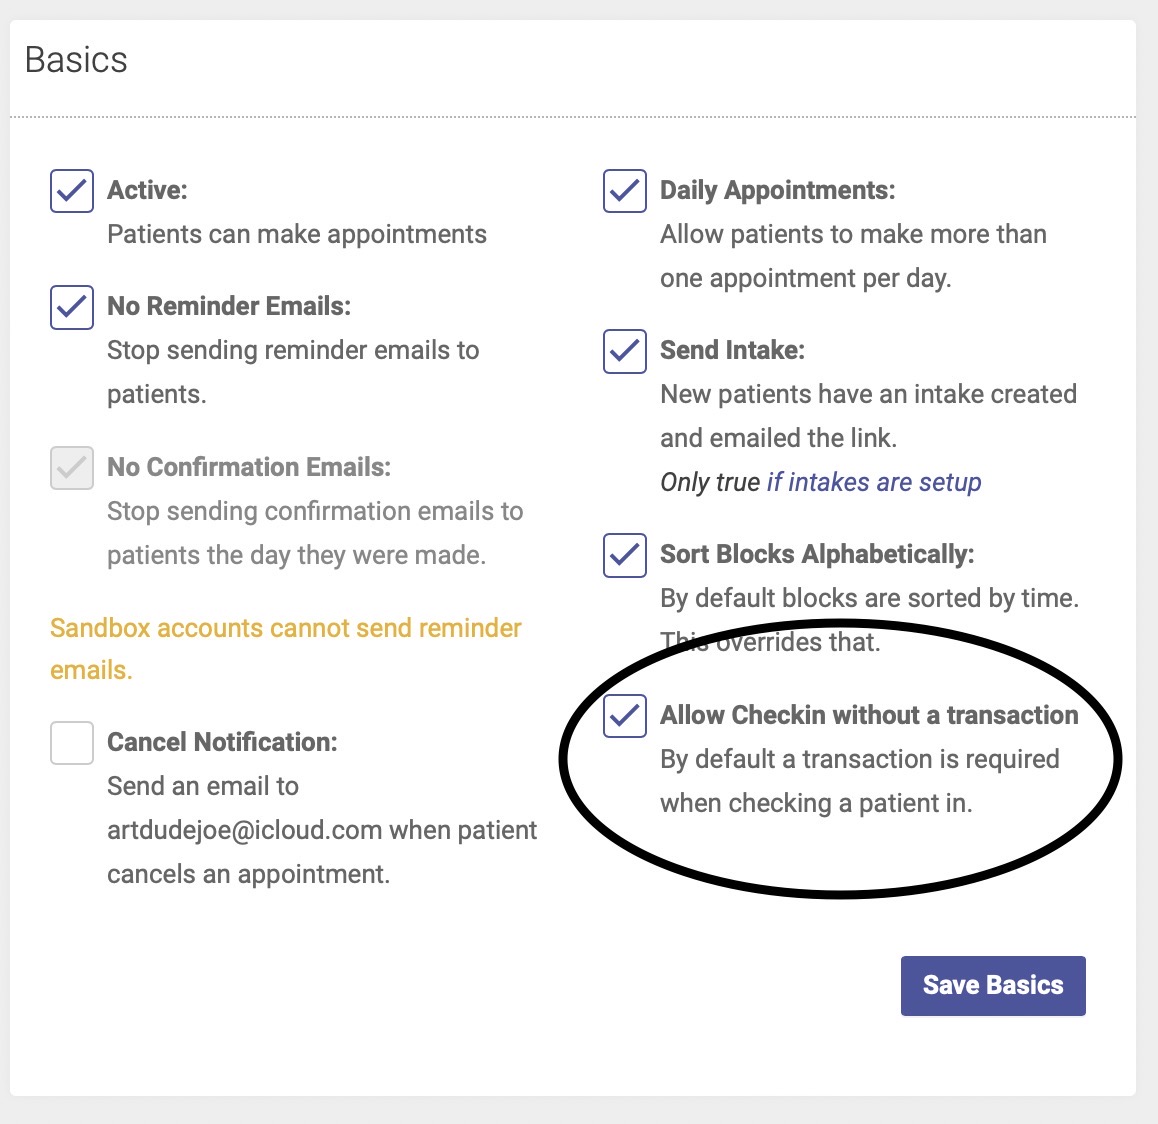
Note: the default setting is to require a transaction at the time of checkin. If you’d like to check in patients without a transaction, you’ll need to opt in to this feature.
Be sure to click Save Basics when you’re finished.
How to check-in without recording a payment
First, click the checkbox next to the patient’s name on the schedule. The popup that appears will show two options: Check In + Payment or Check In Only:
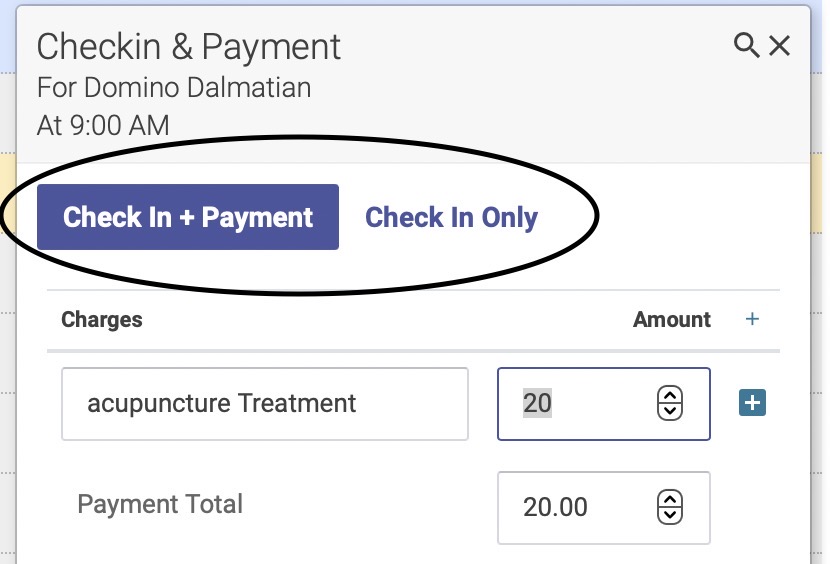
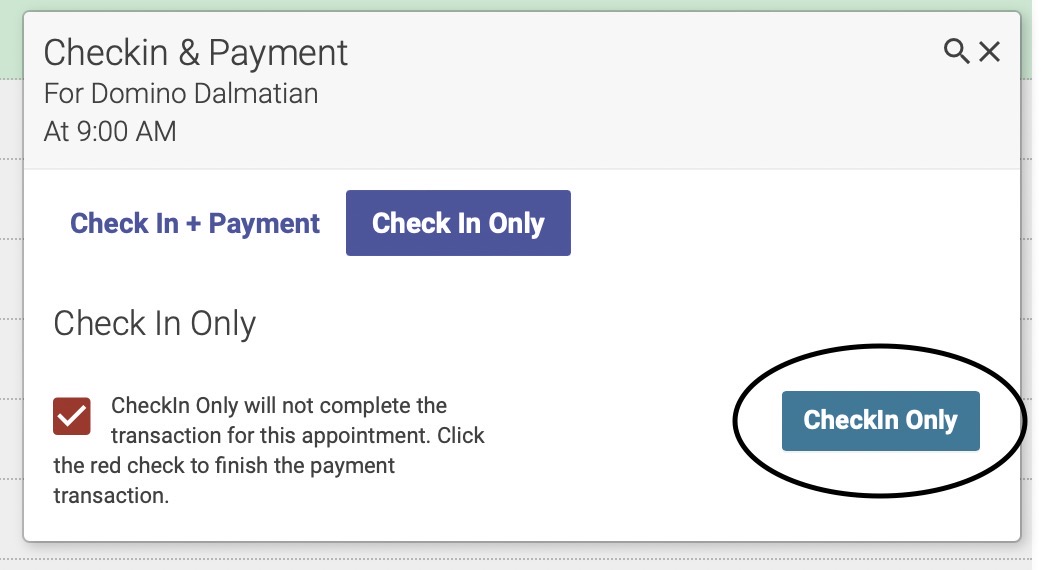
Click Check In Only—this will eliminate the payment and transaction boxes from the popup window. Then click the green Checkin Only button in the bottom right hand corner of the popup box:
The checkin check box next to the patient’s name will now appear in RED—this is your reminder that you still need to collect and record the patient’s payment:

When you’re ready to collect and record payment, click the red check box. This will bring up the popup window, where you can record the transaction (you also have the option here to reverse the checkin, if you checked in this patient by mistake):
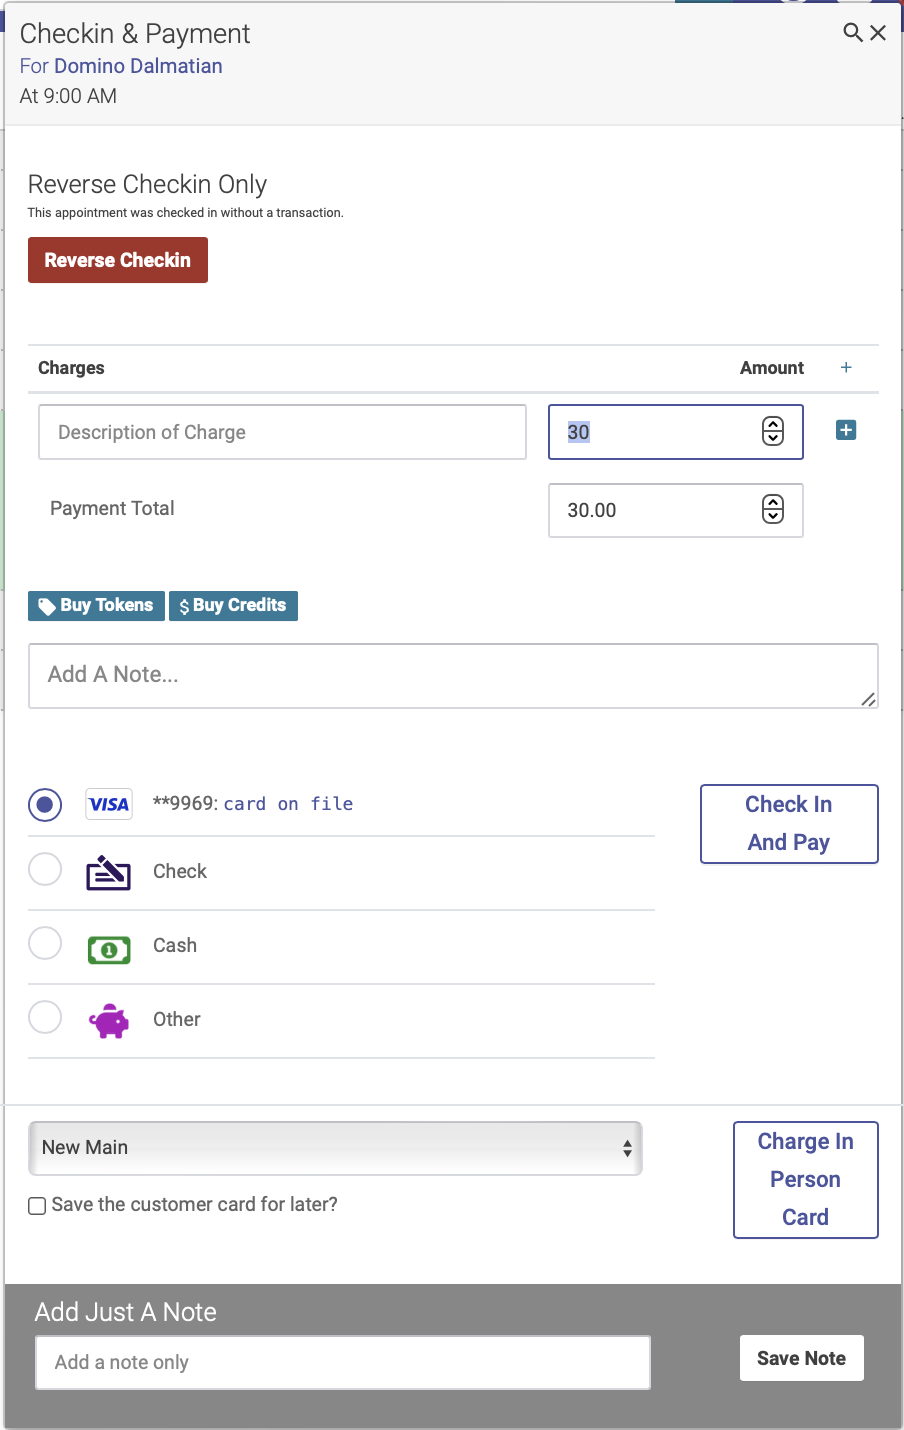
Once you’ve recorded and saved the payment, the patient will appear in yellow on the schedule:

Here's a quick screen recording showing how it works:
Canceling Appointments
Appointments can be cancelled by an admin under the following rules:
- If the appointment has not been checked in
- if it has you will need to reverse the appointment transaction.
- Appointments in the future or past can be cancelled, in effect removing it from the schedule
- There is a log kept for each cancelled appointment that you can see from the patient's page.
Patients can also cancel appointments via the patient portal
But, they are restricted by the number of hours the clinic has set in the preferences. This time is from 4 hours to 36 hours prior to the appointment.
How to cancel an appointment
Click the red cancel button next to the patient's name on the schedule:

When the admin cancels an appointment the cancel popup appears.
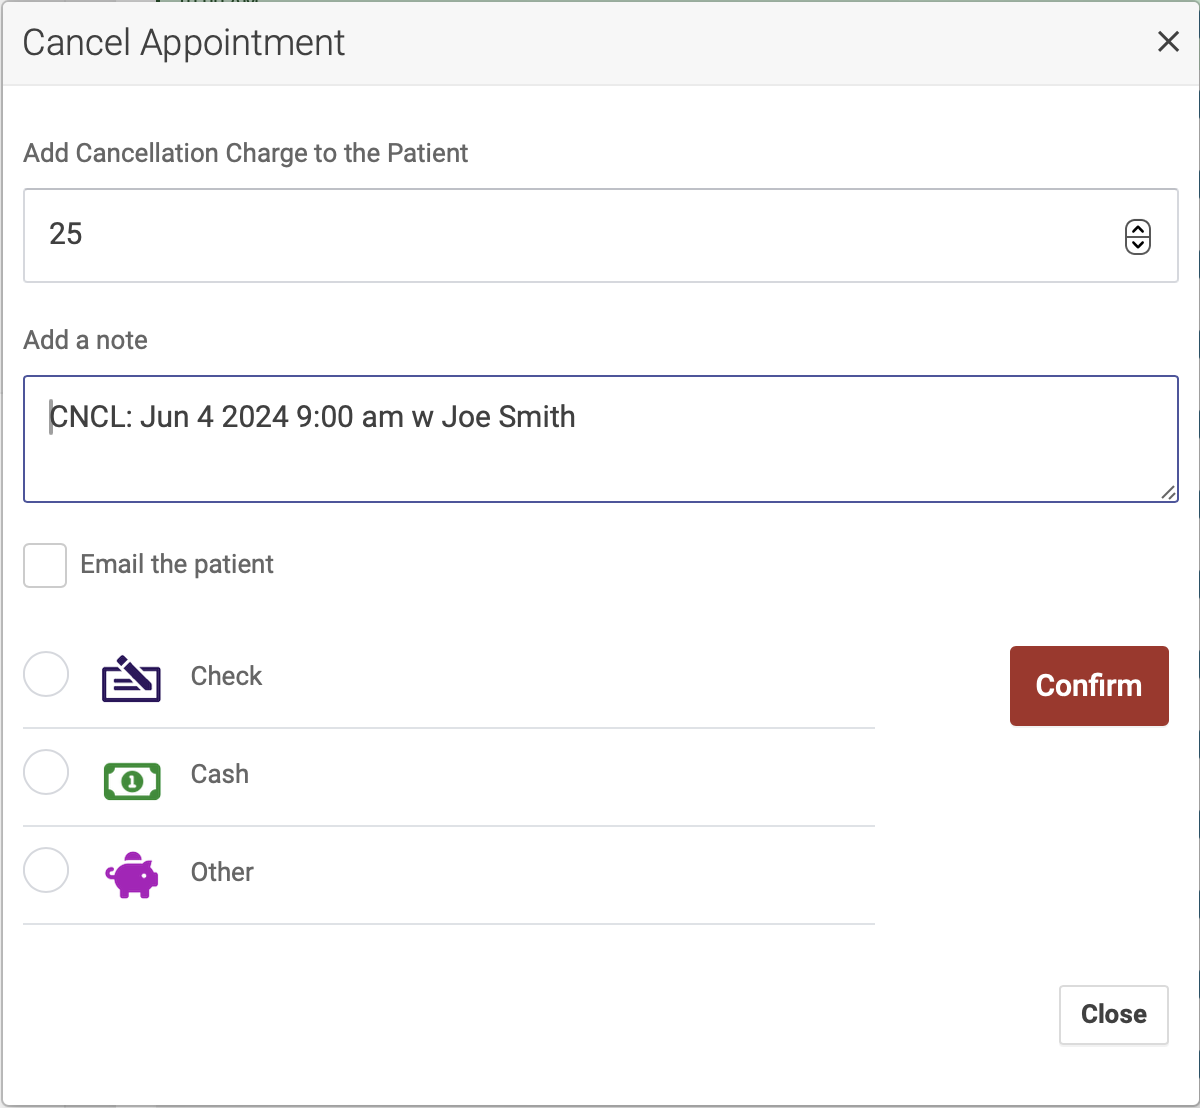
To charge the patient a no-show fee enter a dollar amount in the first field. A note is first for the appointment log and may also be used to send the patient an email. Checking the box sends that email with the details of their appointment cancellation. You may use the default values, no charge and the log note without sending an email.
When you charge a patient a cancelation fee, it will appear as a negative credit on their account. You can view their credit balance and history from their Patient Profile page:
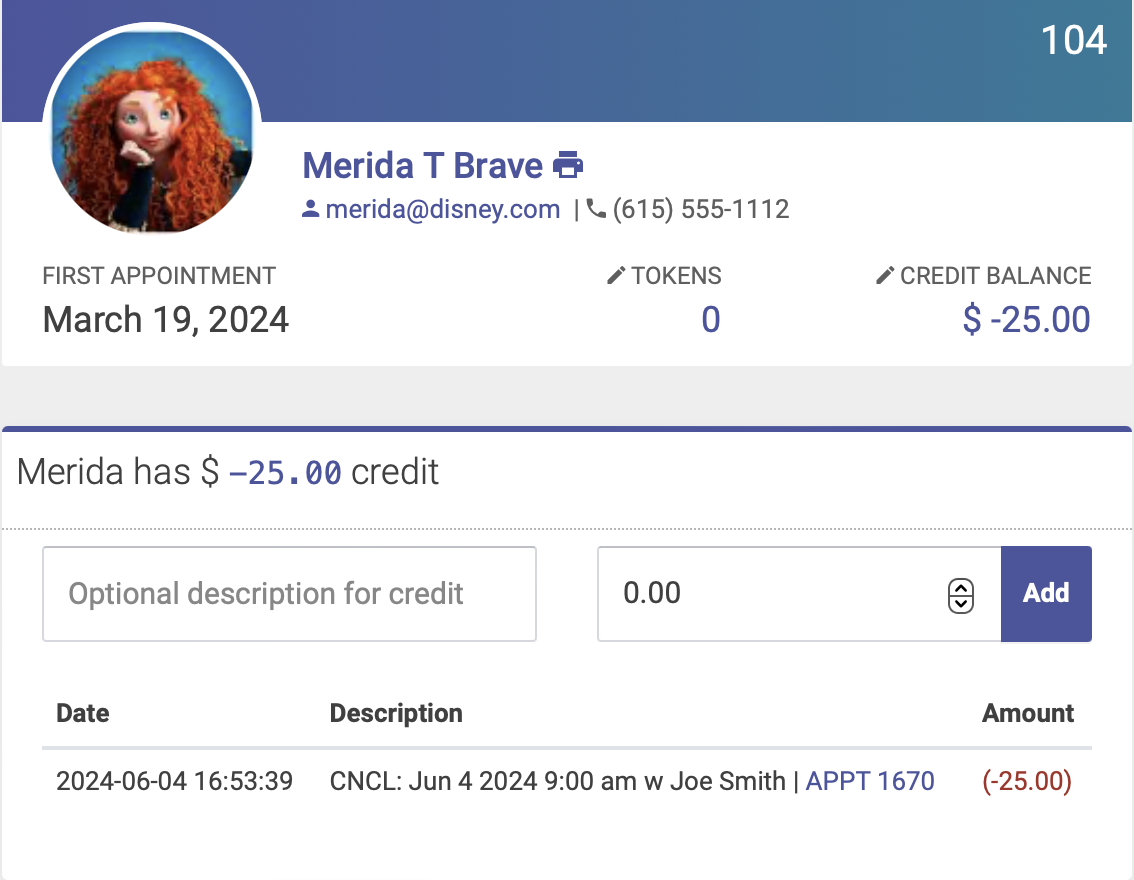
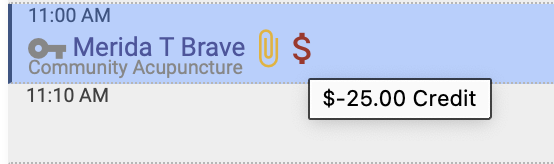
The negative credit balance will appear as a red dollar sign next to their name at future appointments, until the credit balance is paid:
How to charge the cancellation fee to a patient's credit card
If you're using our payments integration via Stripe, you can automatically charge the cancellation fee to a patient's credit card on file.
When you click the cancellation button and the cancel popup appears, you'll see an option to charge the card on file:
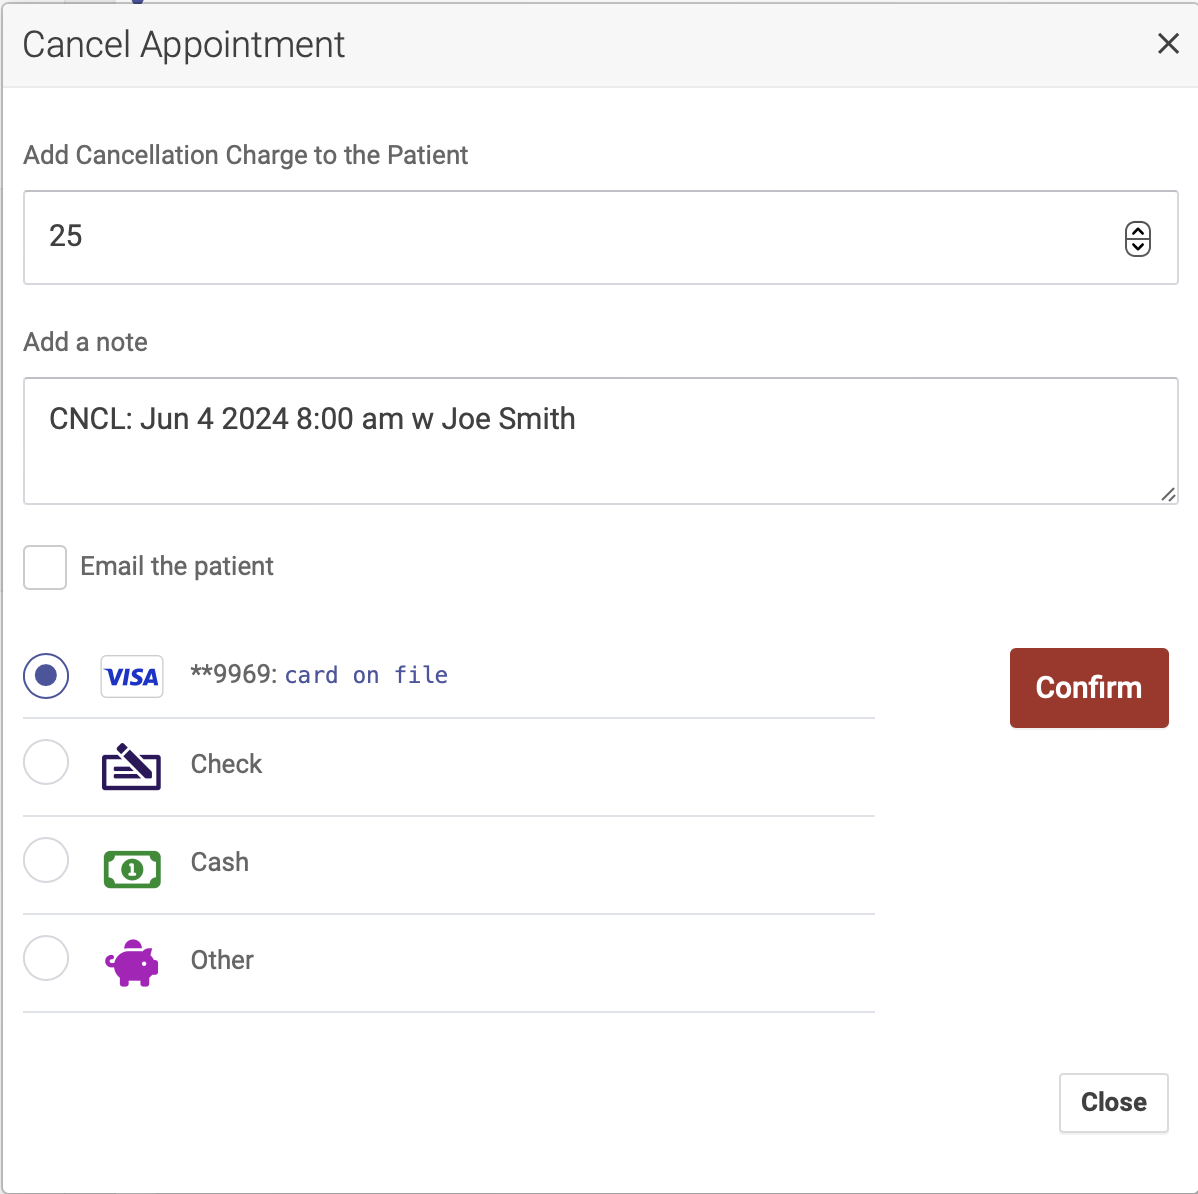
Select that option, then click Confirm. Their card has now been charged, and a negative credit balance will NOT show on their account.
Using tokens or credits to pay a cancellation fee
Tokens and credits can also be used to pay a cancelation fee.
Use Patient Token to Pay Cancelation Fee
Check the "take a token" box in the cancel popup - this will deduct one token from their account:

Note: You should only check this box if the patient has tokens in their account. Otherwise you'll give them a negative token balance.
Use Patient Credit to Pay Cancelation Fee
If a patient has a positive credit balance, the cancelation fee will automatically be deducted from their account when you confirm the cancelation and charge. The patient's credit history on their Patient Profile page will show when credit has been used to pay for treatments, cancelation fees, etc:

Waiting Lists
Each day / location combination can have a waiting list.
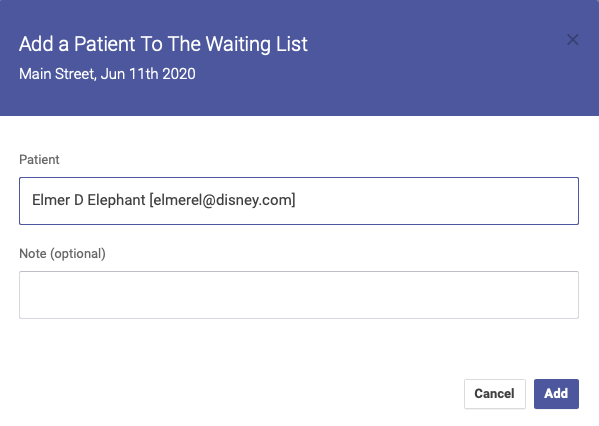
Adding a patient to the waiting list
First, click the plus sign next to Waiting List, located at the bottom of the left hand sidebar menu:

- In the modal window that opens start typing a patient's name and select (by clicking or arrowing down to) the patient you want to add the the waiting list.
- Add a note if you wish.
- Click Add
This will create a waiting list under the button, menu.
When deleting a block with appointments in it all those appointments will be cancelled but also added to the waiting list with a note stating who they were to see and what time.
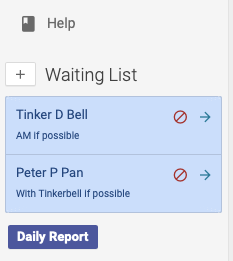
When one or more patients are on the waiting list for a given day, the number of patients on the waiting list will appear in gold at the top of the schedule, next to the date:
Adding appointments from the waiting list
Once there are patients in the waiting list you can easily add them to open slots on any block for that day / location.
If the slot is occupied with an appointment and you cannot select the slot to add from the waiting list as a squeeze, you will have to add that squeeze appointment conventionally.
- Click once on the appointment slot (not any of the icons) to select it. It will turn light green indicating that it has been chosen for a waiting list patient.

- Then click the right arrow next to the patient's name in the waiting list.

- A modal will popup.
- Confirm the slot information you are about to populate.
- Choose a slot time.
- Check the "Squeeze" checkbox if this is a squeeze appointment.
- Click "add"

Allowing patients to add themselves to the waiting list
You can enable the waiting list feature on the patient portal from your Settings page. If you want to allow patients to add their names to the daily waiting list via the patient portal, check the Allow Patient Portal Waiting List box and click Save to save your preference:

Patients will see a Wait List button at the top of the schedule:
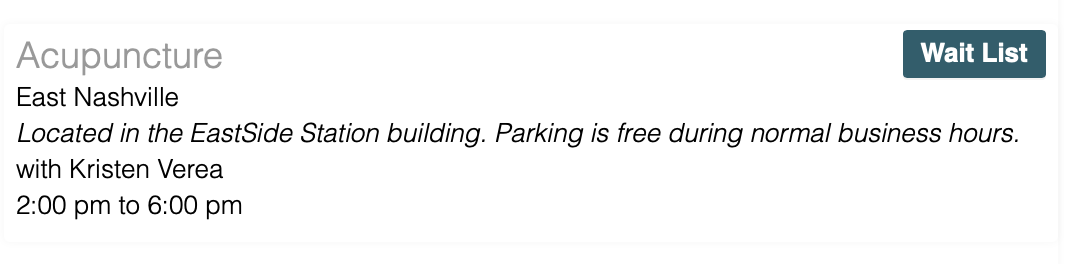
They can then add a note about their preferred appointment time. Their name will then show on the waiting list on the admin schedule.
Squeeze Appointments
Sometimes you have your schedule set, full of appointments and someone calls. What do you do? Squeeze them into your schedule. That's the idea behind Open ACU Squeezes. There are a number of scheduling strategies that utilize squeezing appointments which are outlined below. But first to how you create and manage squeeze appointments.
Adding A Squeeze Appointment
- Click the expanding icon in the block header to open the squeeze form modal.
- The expanding icon is the second icon. It is blue.

- The expanding icon is the second icon. It is blue.
- In the form start typing the name of a patient.
- Once you've entered 3 characters it will give you a list of names or email address that match.
- Arrow down or click on the patient you wish to squeeze into an appointment.
- Select a slot time.
- Squeezes cannot be double-time appointments
- The choices of slot times will not allow two squeezes on the same slot.
- The slot time can be occupied by a regular appointment, even if that appointment is double time.
- Click Add
- The squeeze appointment will appear on your schedule.


Squeeze Appointment Management
Squeeze appointments show up as a tab to the right. Clicking on the expand icon (not the checkin icon) expands the appointment slot view.

Clicking the "X" or hitting the escape key closes the slot view.
The expanded view works just like a regular appointment. You can cancel or checkin the patient.
Using squeezes in scheduling strategy
If your block slot times allow 6 appointments in an hour (10 min slots) you can expand that to more per hour using squeezes.
Since squeezes aren't available for patients to schedule through the patient portal you can add squeeze appointments for phone call ins or walk in patients. This leaves the regular slots available for the patient portal.
Day Notification
You can use the Day Notification to alert your patients and staff to any pertinent information that is specific to that day. For example, if the road in front of your clinic will be closed due to an event, use the Day Notification to communicate this.
The Day Notification does two things:
To add a Day Notification, click on the bell icon next to the date on the calendar:

Enter your subject and message:
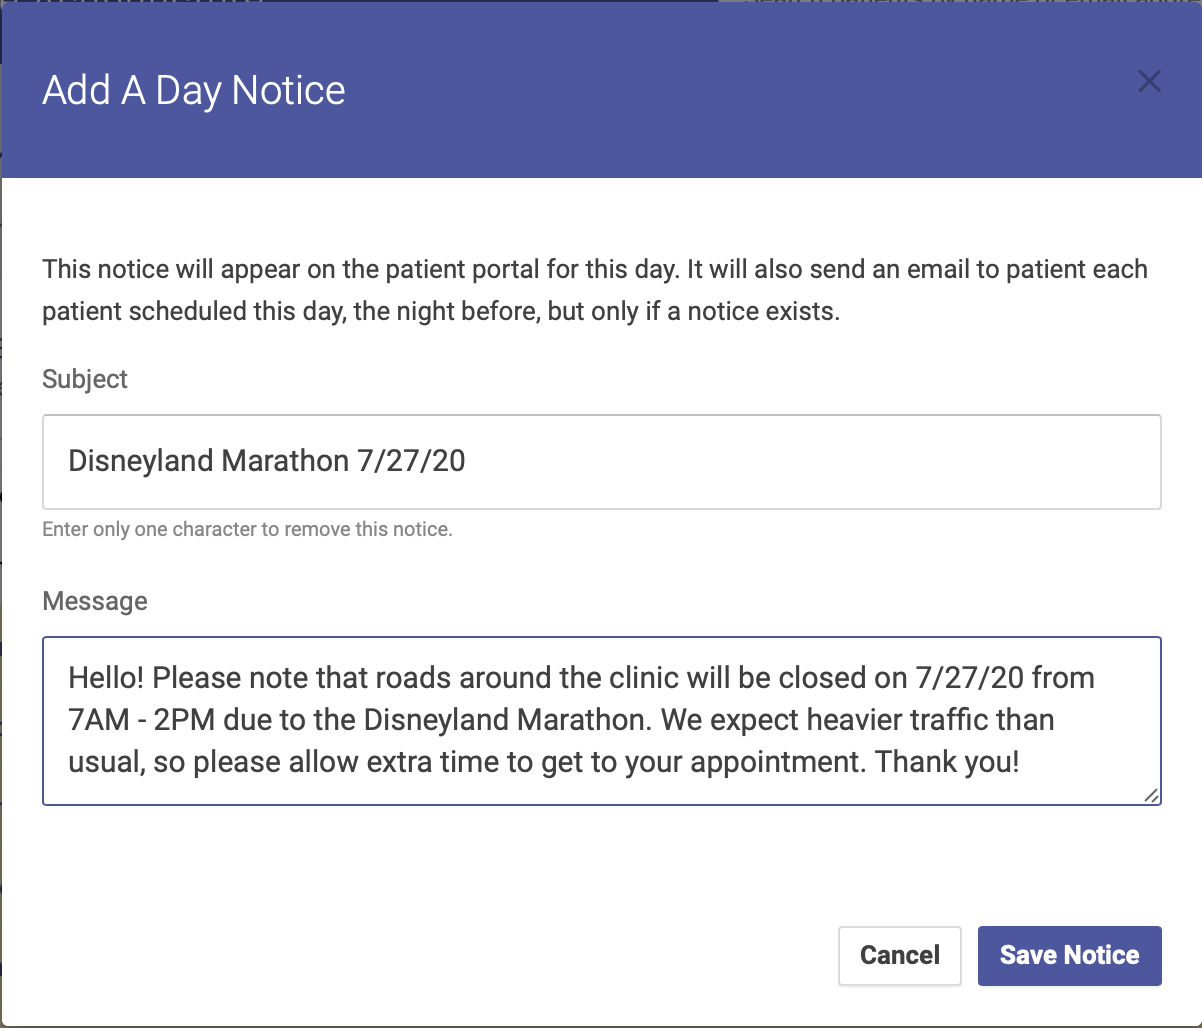
Click Save Notice to save your message.
Once you’ve saved your message, it will appear at the top of the day’s schedule:

Simply click the bell icon next to the notification subject to see the full message.
Recording a note prior to checkin
If you want to record a note on an appointment prior to the check-in, you'll click on the check-in icon next patient's name on the schedule as if you were going to check them in. However, don't enter any payment info. Instead, you'll add a note in the "Add note only" box at the bottom and click save:

Once you add the note and click Save, the checkin icon next to the patient's name on the schedule will turn yellow:
When you check in the patient, your recorded note will appear in the "Add a note only" box, and in the box above the payment method:

Here's a quick video showing how it works:
Text message appointment reminders
Your clinic has the option to send SMS/text message appointment reminders in addition to email reminders. Patients will need to opt in to receive text messages. They can opt in by logging in to the Patient Portal, or you can do it for them via the Patient Profile Page.
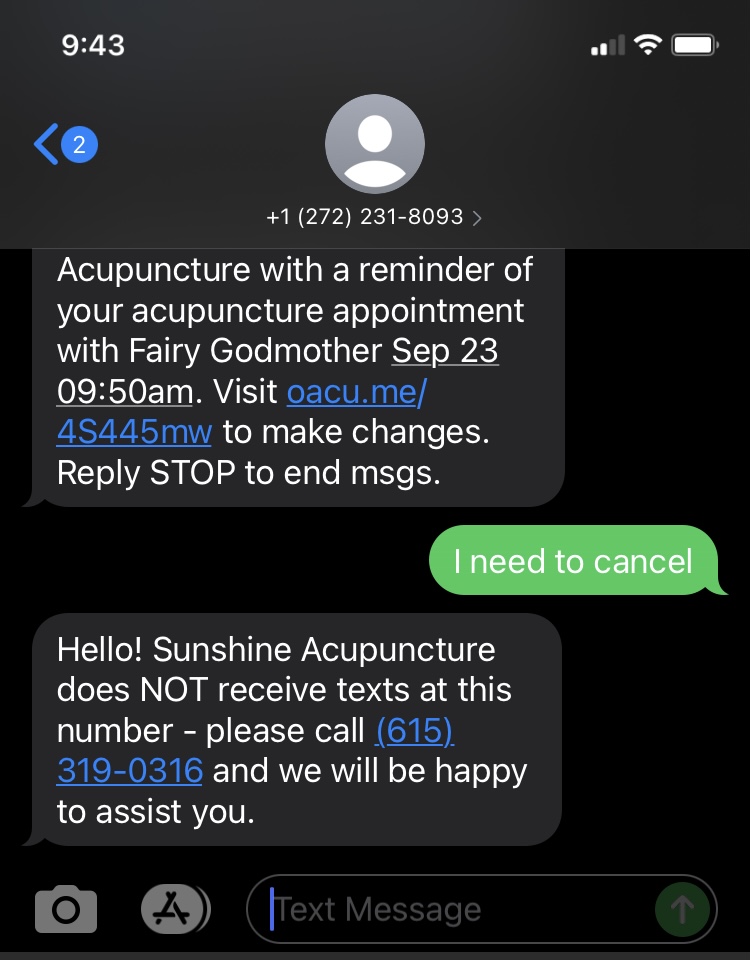
This feature does NOT include two way texting. If a patient replies to a reminder text with anything other than STOP, they'll receive a message directing them to call your clinic phone number for further assistance (see below for an example).
Setting up SMS reminders
To activate the SMS reminders feature and enter your settings, go to your Settings and Templates page. On the top right hand side you'll see a box for Text Reminders:
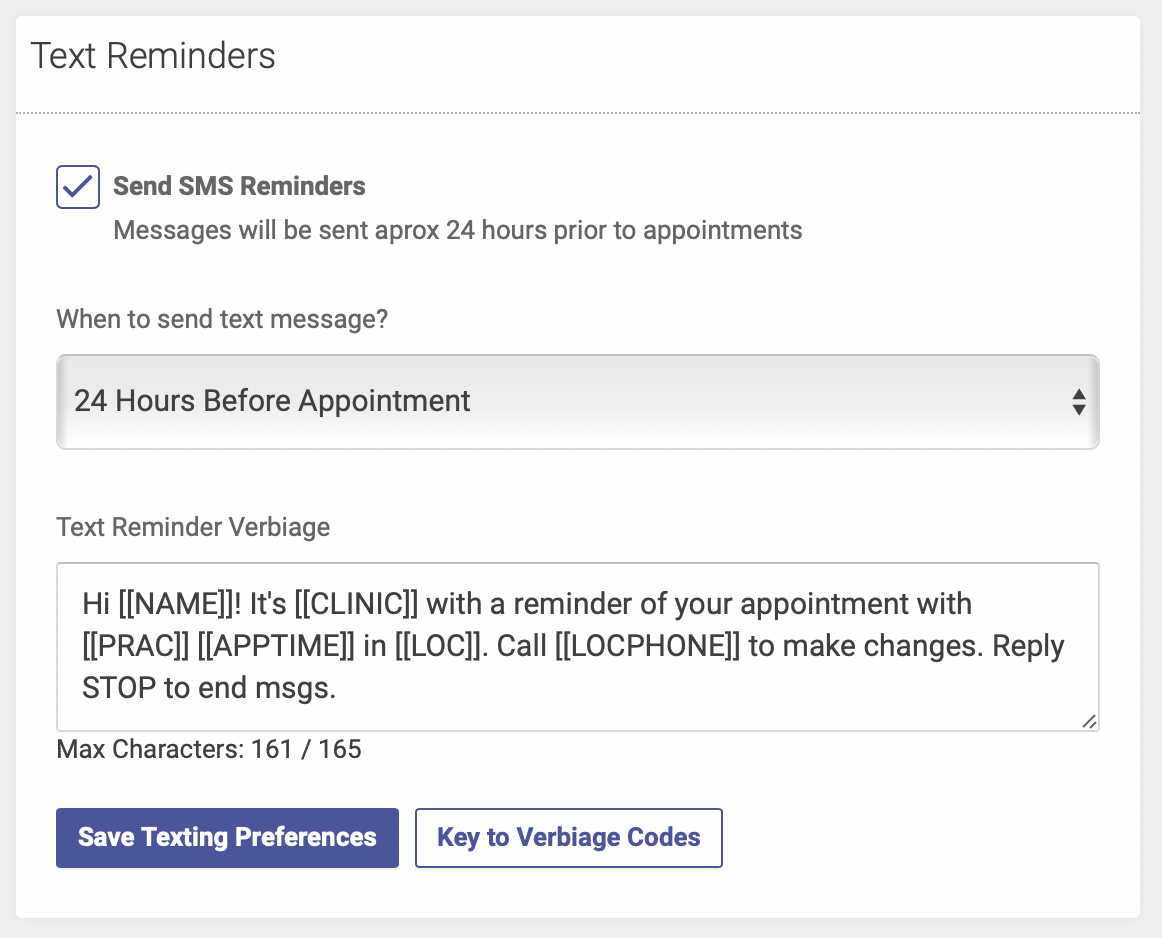
Complete the following steps to activate SMS reminders:
- Check the Send SMS Reminders box
- Select your preference for when text messages are sent - they can be sent either 24 or 48 hours before the appointment.
- Enter your verbiage for your text message - click the Key to Verbiage Codes button for options to customize your messages.
- Click Save Texting Preferences and you're done!
See this reference for the text code variables you can use or click the Key to Verbiage Codes button on your admin page.
Next, patients will need to opt in to receive text message reminders. They can opt in by logging in to the Patient Portal, or you can do it for them via the Patient Profile Page.
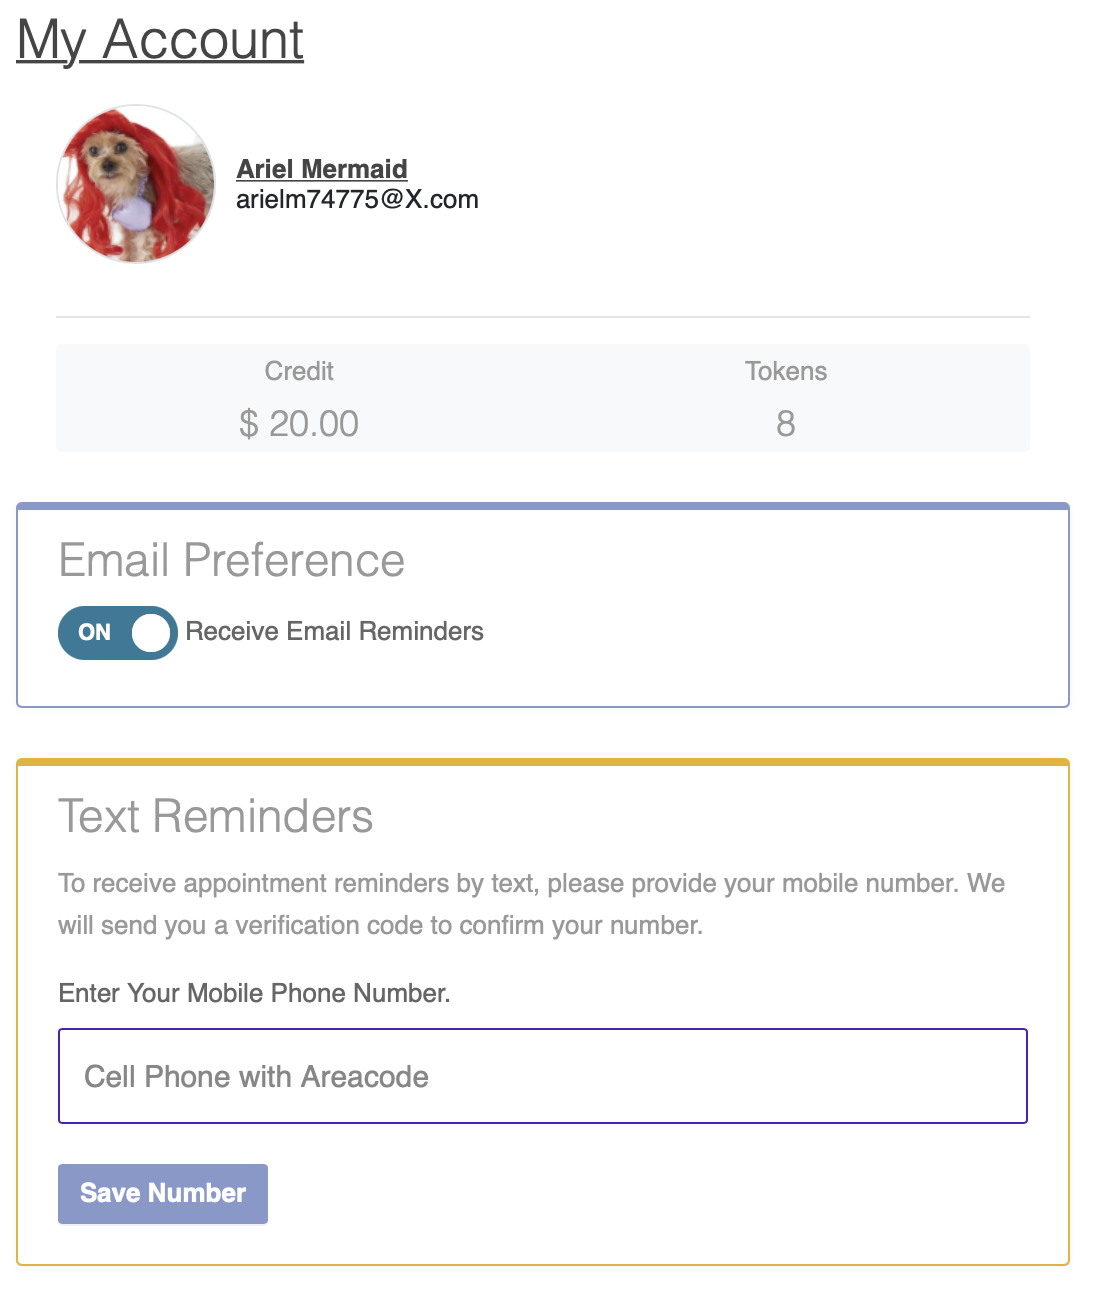
How to opt in via Patient Portal
The patient will need to log in to their account and click Your Account in the upper right hand corner:

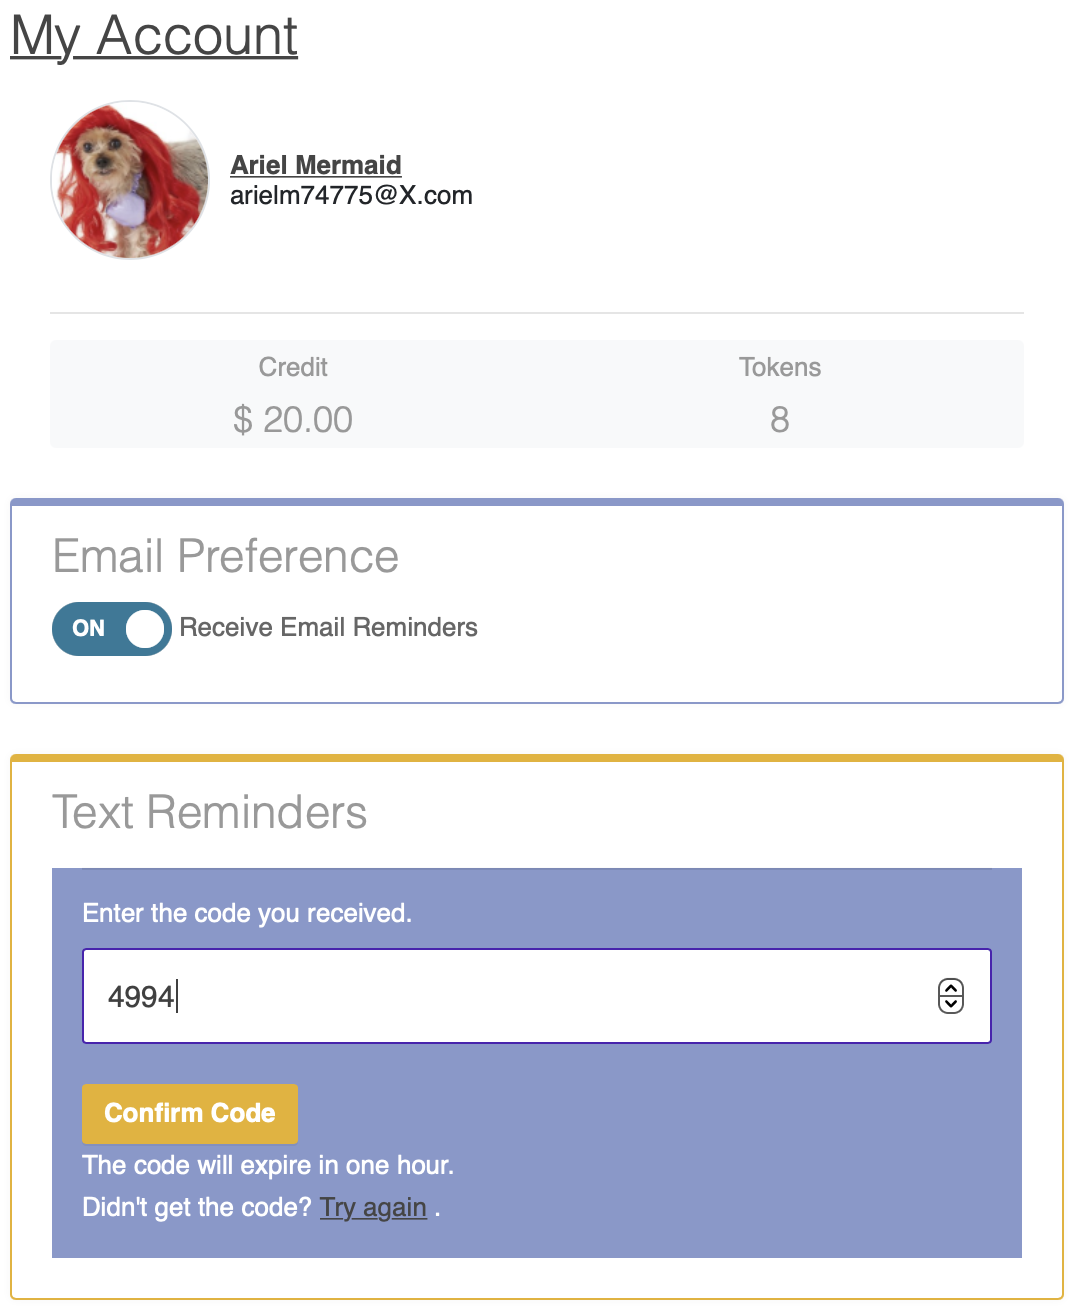
On the Account page there is a box under their name where they can enter the phone number where they'd like to receive messages:
Once they enter their number they'll get a confirmation code via text message:
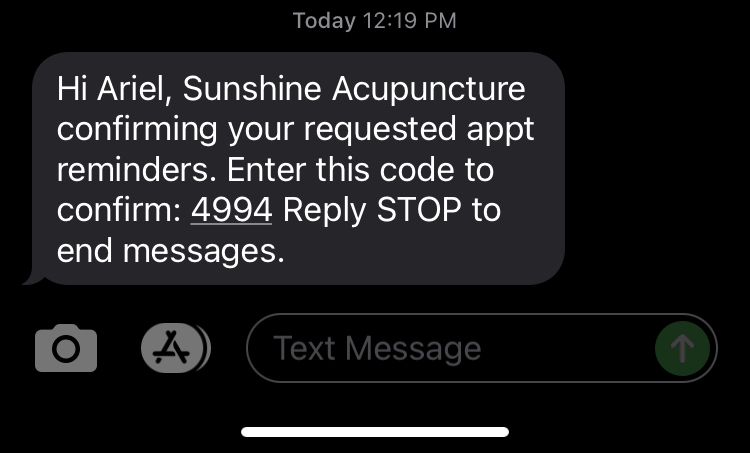
They'll need to enter the code to complete the process:
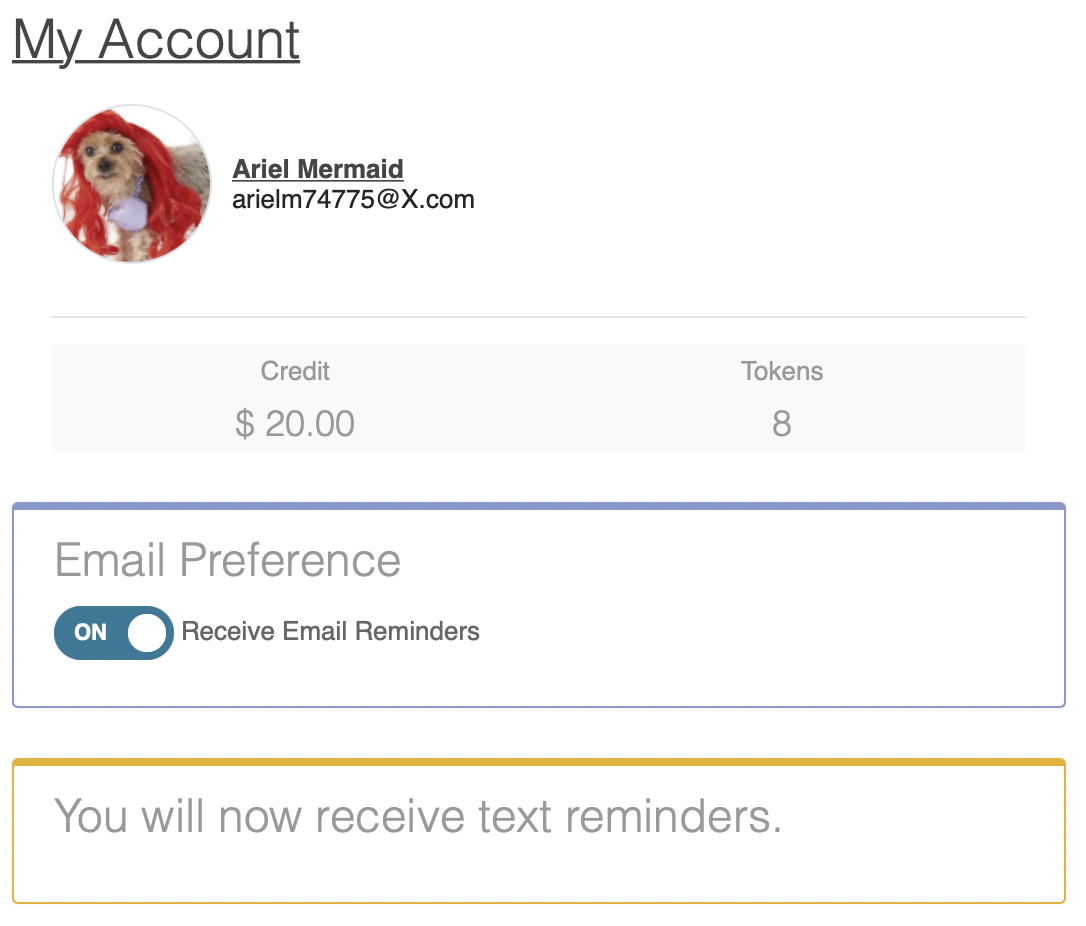
They'll see a confirmation message once they enter the code:
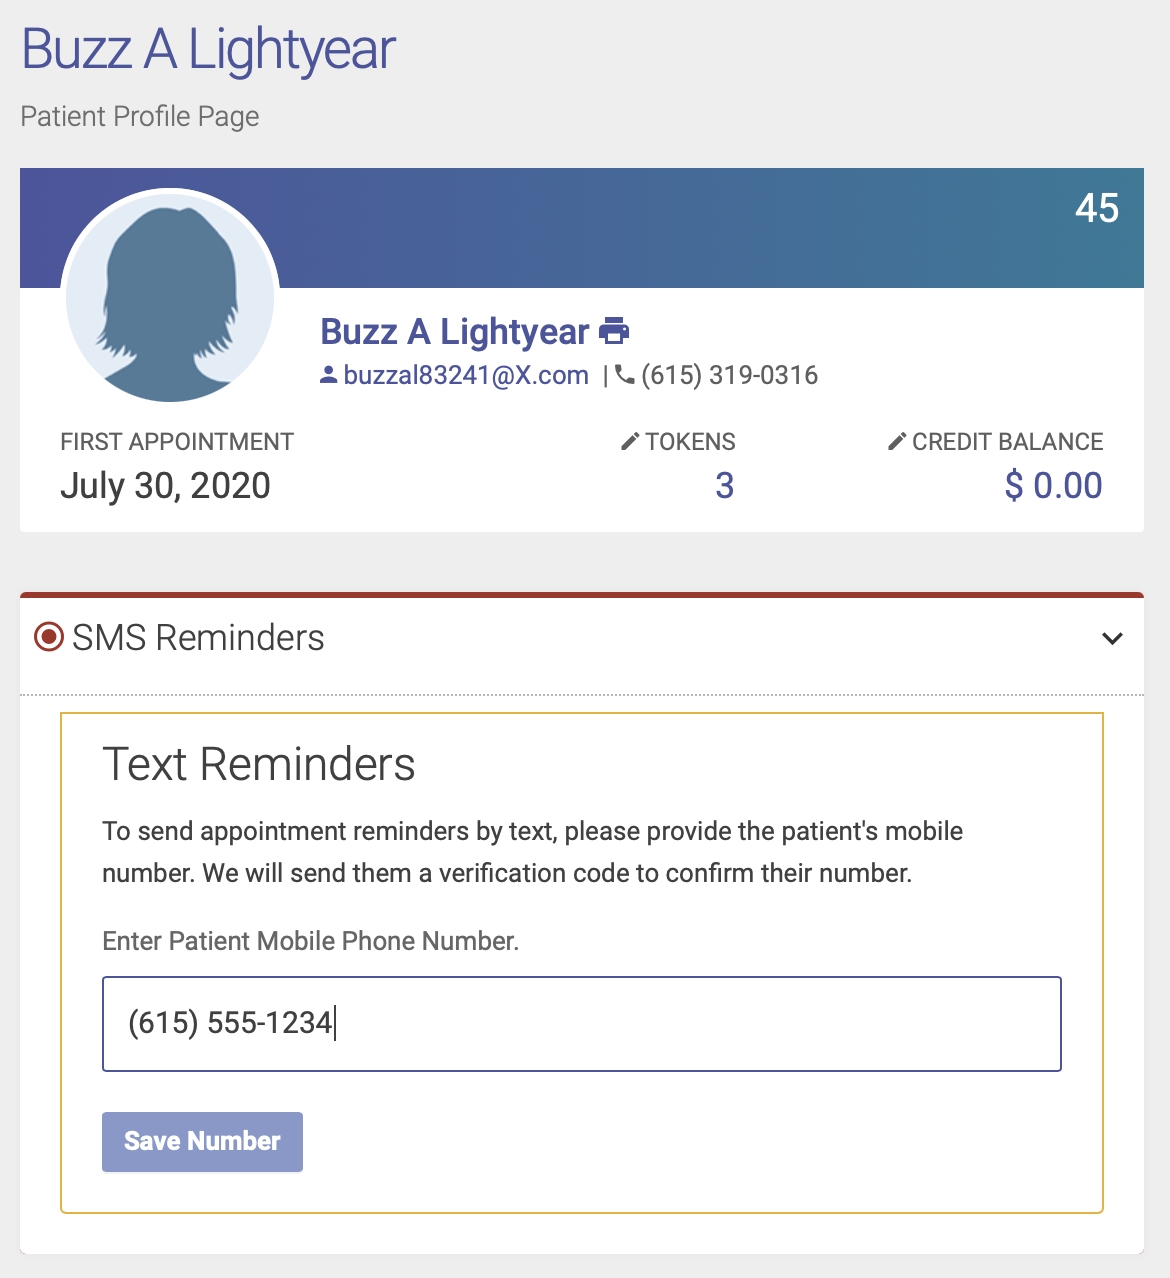
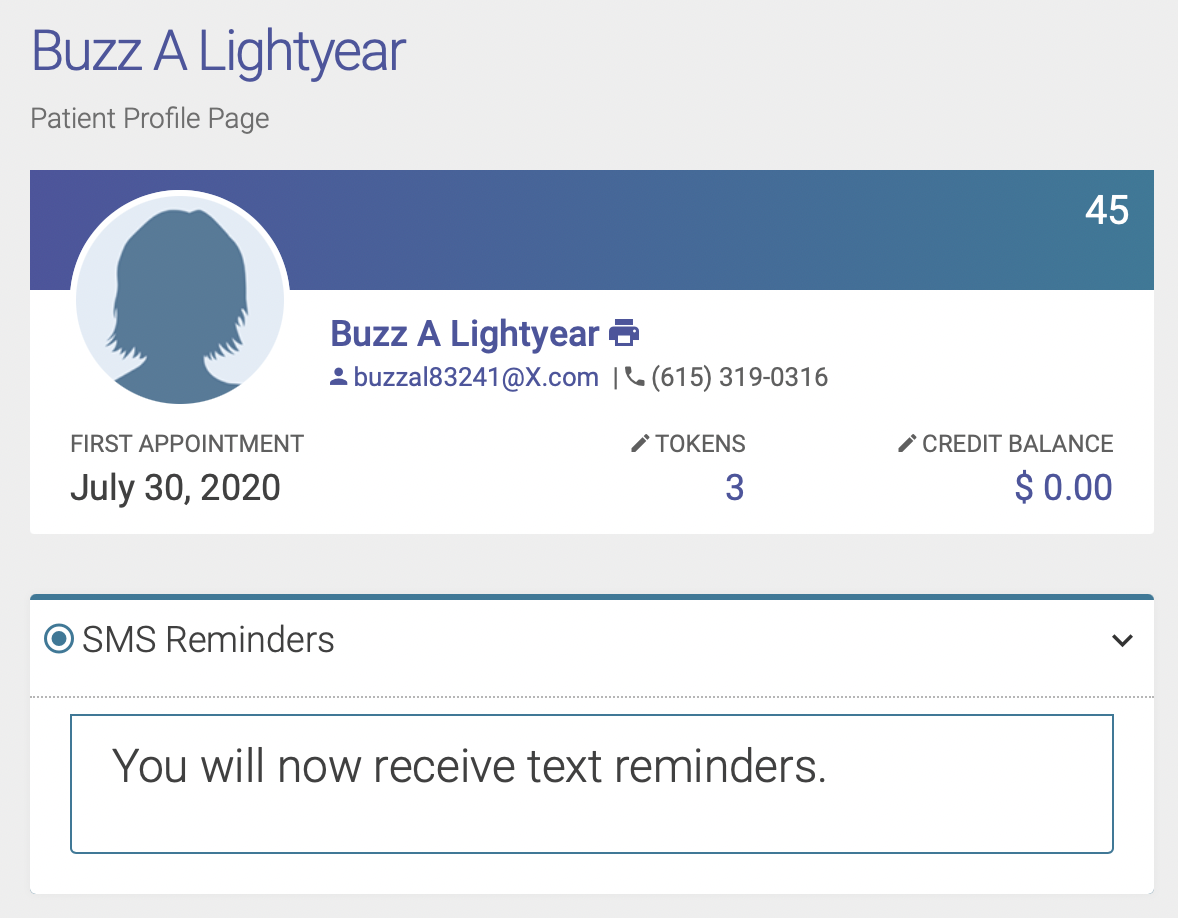
How to opt in via Admin Portal
You can opt in for the patient via the Admin Portal on their Patient Profile Page. Under their name you'll see a box for SMS reminders. Enter the phone number where they'd like to receive message:
Once they enter their number they'll get a confirmation code at that number via text message:
Enter the code to complete the process:

You'll see a confirmation message once you enter their code:
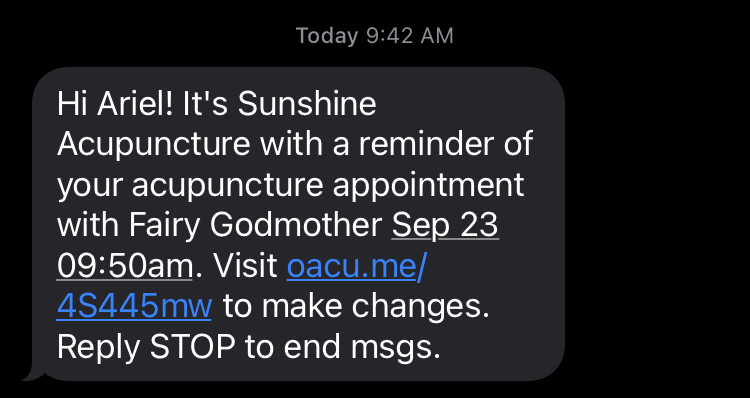
How your text messages will appear
Example of appointment reminder message (this will vary based on your saved verbiage):
If a patient tries to reply to a text, they'll receive this message listing your clinic's phone number:
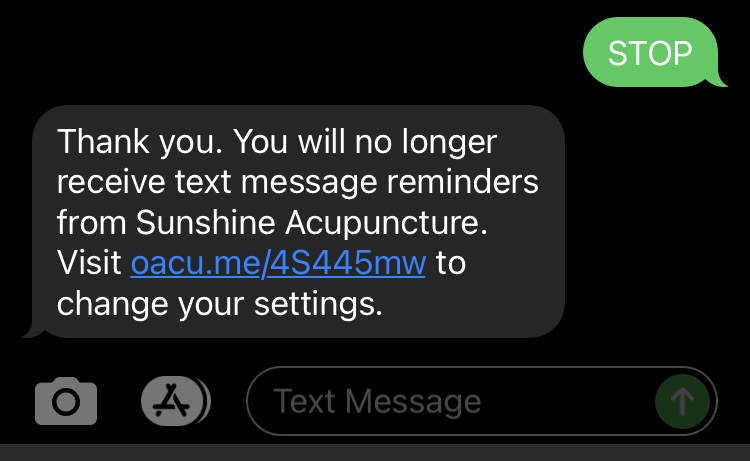
When a patient replies STOP to end messages, they'll receive this text:
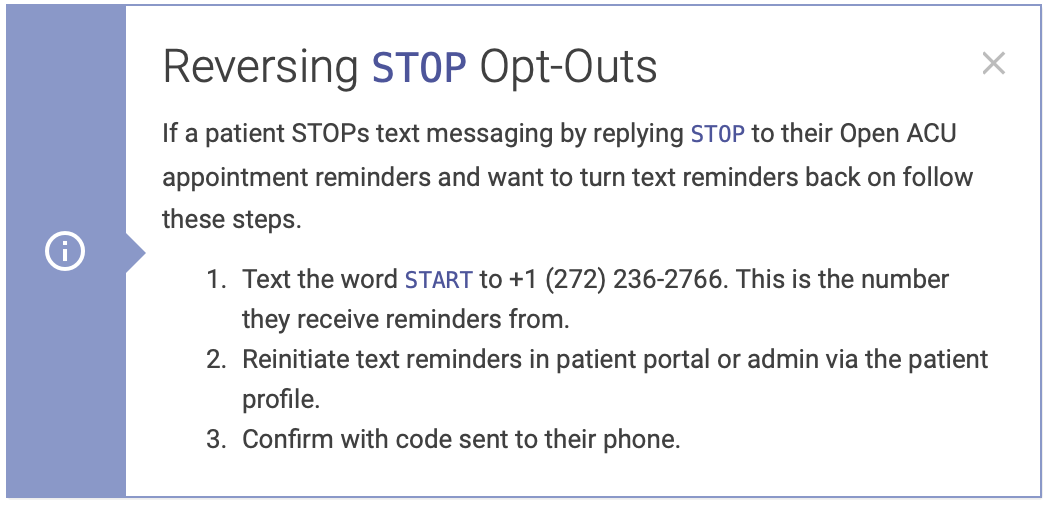
Opting back in after opting out
If a patient STOPs text messaging by replying STOP to their Open ACU appointment reminders and want to turn text reminders back on follow these steps:
Text Reminders: Codes Key
If you have text reminders with your Open ACU account you can edit the verbiage in the messages sent to your patients to your preferences. These messages can contain a combination of fixed text and variables that depend on the recipient and their appointment. Think of it like mail merge.
An Example of Text Reminder Verbiage:
Hi
[[NAME]]! It's[[CLINIC]]with a reminder of your[[BLNAME]]appointment with[[PRAC]][[APPTIME]]. Visit[[URL]]to make changes. Reply STOP to end msgs.
Use the codes with double brackets "[[]]" and all caps when inserting specific variables.
Text Reminder Codes Reference:
| Code | Description |
|---|---|
[[NAME]] |
Patient's first name |
[[APPTIME]] |
Appointment Date and Time |
[[URL]] |
Your Patient Portal URL |
[[CLINIC]] |
Your clinic's name |
[[PRAC]] |
The appointment's practioner's name |
[[BLNAME]] |
The Block Name |
[[LOC]] |
Location Name |
[[LOCADD]] |
Location Address |
[[LOCPHONE]] |
Location Phone Number |
Reverse A Checked-In & Paid-For Appointment
An Open ACU appointment is either checked-in or not checked-in. The payment for an appointment is typically done at the same time. So a reserved appointment is either not yet checked-in, checked-in without payment or checked-in with payment.
You can go to Account > Settings and turn on the ability to check-in patients without payment. You would then add the payment later.
Sometimes you may have mistakenly checked-in an appointment and you need to reverse that checkin status. Or you need to cancel an appointment that you accidentally checked-in.
Here's how to reverse a Checkin that has a payment
- Click the appointment pencil icon.
- This opens the appointment editor.
- Tick the checkbox at the top "Checkout this appointment"
- Click the button "Remove Checkin/Refund" near the bottom of the editor.

This will create a refund for the transaction for the appointment, so now there are two transactions. One for the original checkin and another for the refund. If you are using Stripe Payments this will also issue a refund to the patient on the payment method they used. Your patient will see both the original charge and the refund on their credit card statement.
If you end up checking the patient back in they will be charged a new transaction. If you are using Stripe there will be a new charge on their credit card.
If you choose to checkin only, without payment (you must change the setting for this feature) you can reverse that checkin as well. Since there is no transaction yet there is no refund.
Reverse a Checkin Only Appointment
- Click the red checkin icon to open the appointment editor
- Click "Reverse Checkin at the top.
- The appointment is now not checked in and can be checked in again.

Move an appointment with drag and drop
If you want to move an appointment to a different time within the same Block, you can do so through drag and drop.
Here's a video overview:
Step by step instructions:
- Highlight the preferred appointment time by clicking anywhere in the space next to the time on the schedule
- Click the arrow buttons next to the name of the patient whose appointment you want to move:
3. A popup box will appear, asking you to confirm the change:
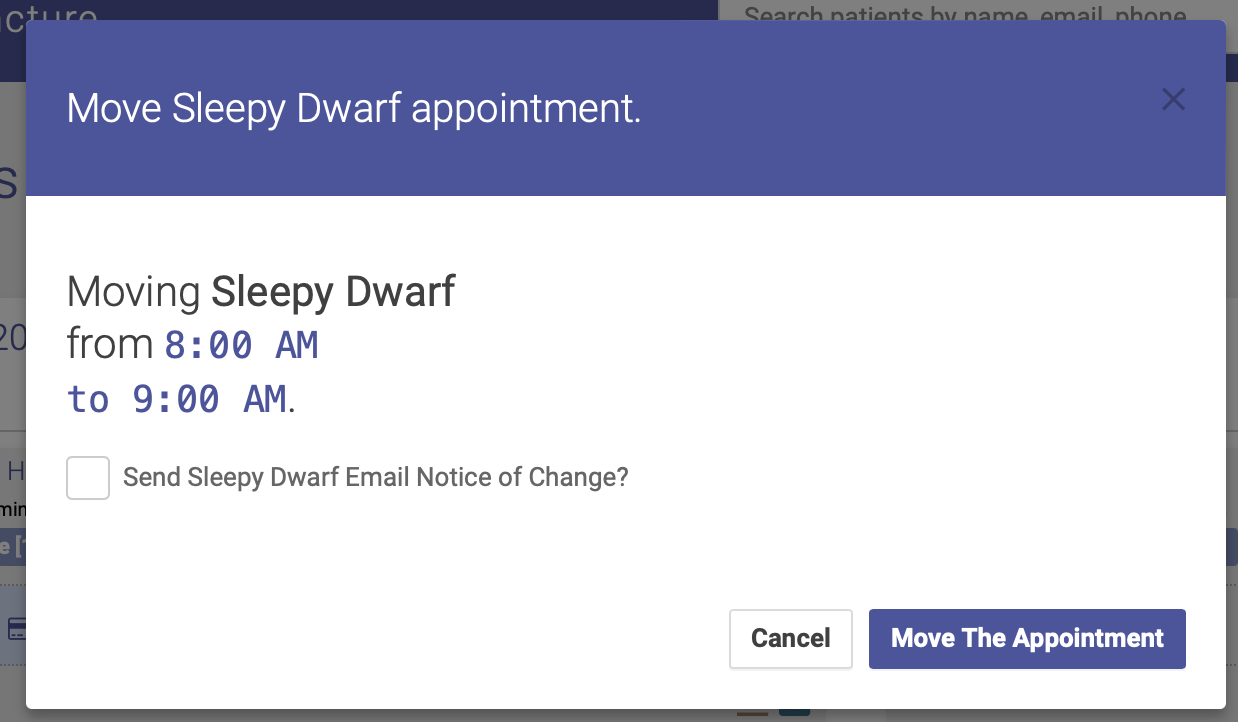
4. Click Move the Appointment, and voila! The appointment has now been moved to a new time. You also have the option of emailing the patient a notice of the change.
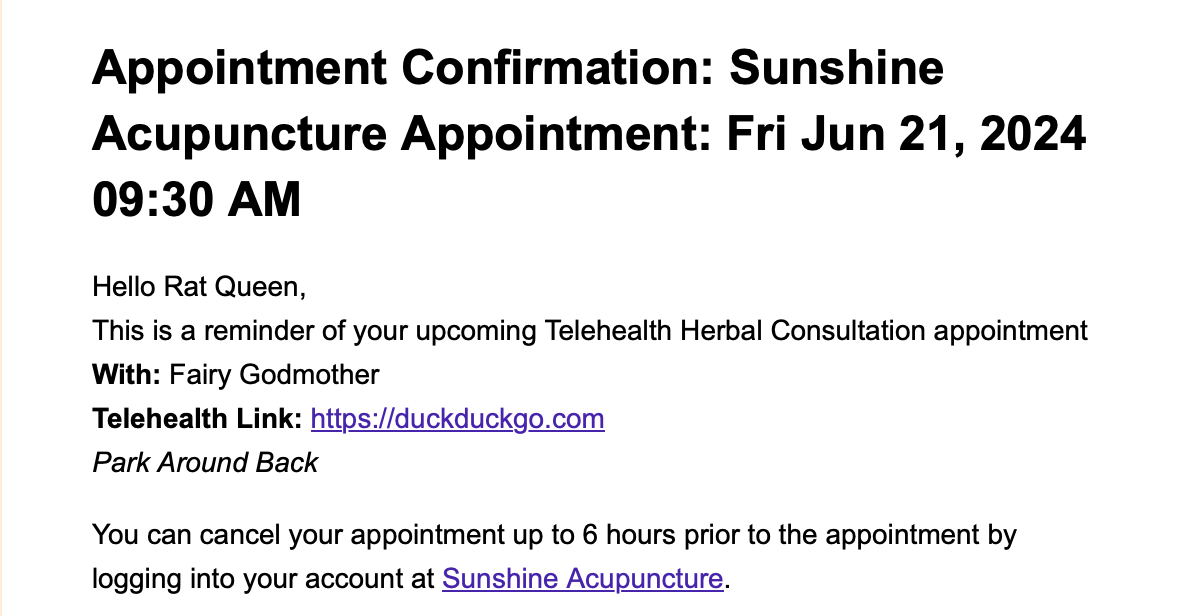
Telehealth
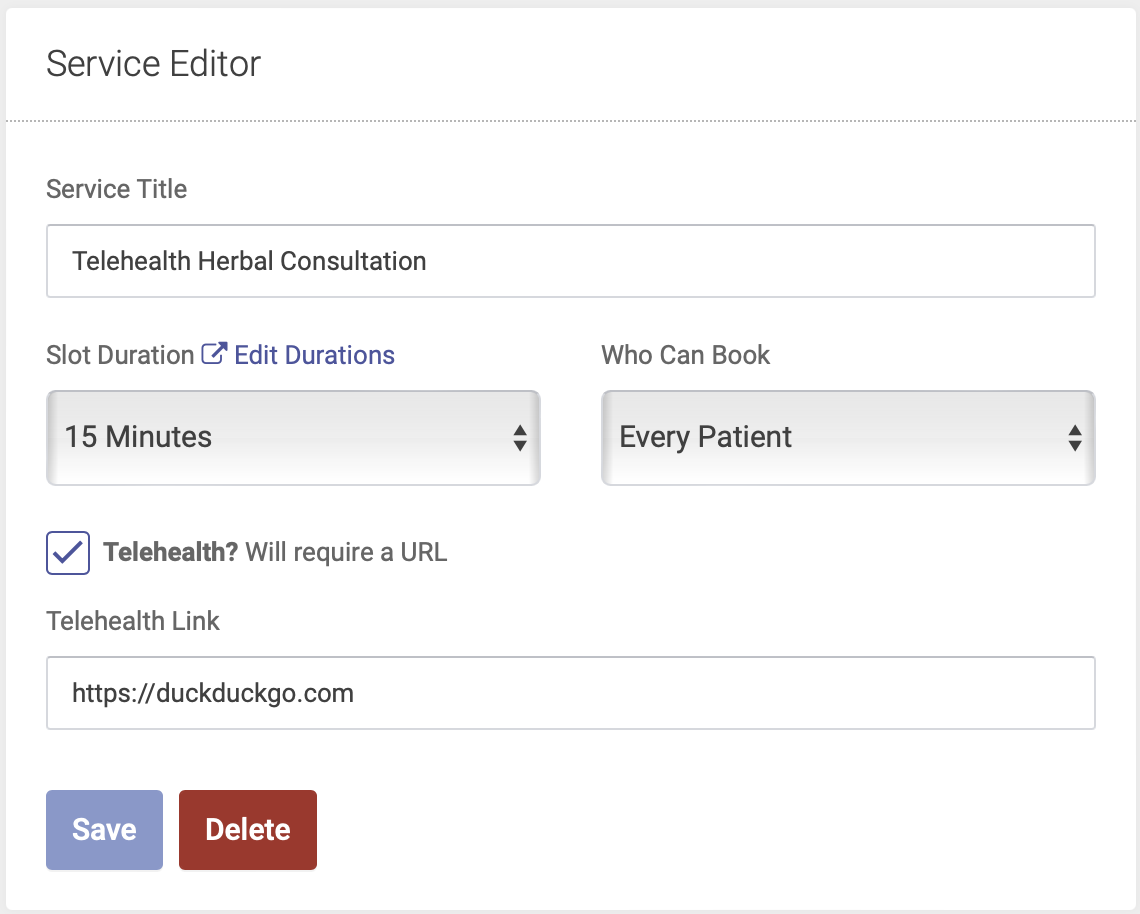
To create a Telehealth Service, you’ll add it on your Services page. Check the “Telehealth” checkbox, and then enter your telehealth URL in the Telehealth Link box. Open ACU does not provide a telehealth URL. You will need to provide your own from a service such as Zoom or Doxy.
When a patient is scheduled for a Telehealth service, the link where they will join the telehealth session will appear in their confirmation and reminder emails:
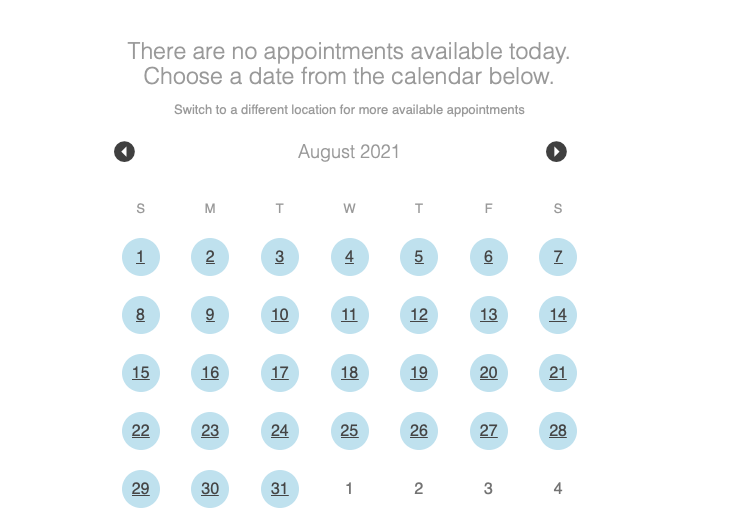
Patient Portal: No Available Indicator
There is a feature on the patient portal that indicates days that have no available appointments.
When a patient pulls down the dropdown menu the days with available blocks are still links. Days whose blocks are all full, therefore no appointments available, are red.
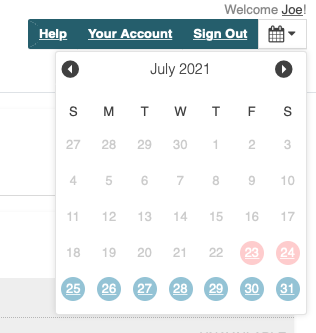
Page without any blocks
If a patient loads the portal on a day you are closed (no blocks) a calendar to choose a date replaces where the blocks normally show up.