Admin Scheduler Help
Open ACU is a schedule and health records online software for acupuncturists. The Open ACU admin is the main hub for all things Open ACU.
- Getting Started
- Getting Started Checklist
- Settings and Templates
- Users
- Locations
- Services
- Add Practitioner Bios to Patient Portal
- Scheduling
- Blocks
- Saving Block Styles and Using Them
- Scheduling an appointment
- Checking In
- The Checkin Transaction
- Check in without recording a transaction
- Canceling Appointments
- Waiting Lists
- Squeeze Appointments
- Day Notification
- Recording a note prior to checkin
- Text message appointment reminders
- Text Reminders: Codes Key
- Reverse A Checked-In & Paid-For Appointment
- Move an appointment with drag and drop
- Telehealth
- Patient Portal: No Available Indicator
- Patients
- The Open ACU Patient Portal
- Creating New Patients
- Importing Patients
- Patient Profile
- Patient Icons
- Include or Omit Insurance Fields on Patient Portal
- Duplicate Patients
- Inactive Patients
- Patient activity logs
- Printable Transaction Statement for a Patient
- Appointment Notes on Invoices
- Transactions
- Recording the check-in transaction
- Editing a transaction
- Recording a transaction without a check-in
- Reversing a Transaction
- Tokens and Credits
- Tokens and Credits Overview
- Using tokens and credits for payments and fees
- Manually changing credit/debit and token balances
- Purchasing Tokens and Credits
- Reports
- Appointment Report
- Transaction Report
- Cancelation Report
- Practitioner Reports
- Detail TRXN Report
- The Appointment Log
- Downloading Patient Email Addresses
- Service Report
- Taking Credit Cards
- Start Taking Credit Cards
- Adding a Patient's Credit Card
- Taking Payments with Stripe
- Charging Late Cancellation Fees with Stripe
- Issuing Refunds with Stripe
- Receipts
- Reader Unreachable?
- How Open ACU Referrals Works
- Events and Group Scheduling
- Create an Event in Open ACU
- Event Notifications
- Adding EHR Notes to an Event
- Creating a Multi-day Event
- Register Attendees for an Event
- All Events page
- Event Waiting List
- Event Report
- Registering for an Event: Patient Portal
- Collecting Payment for an Event
- Issuing a Refund for an Event
- Online Events
- Checking in Event Attendees
- Event URL
- Remove an Attendee from an Event
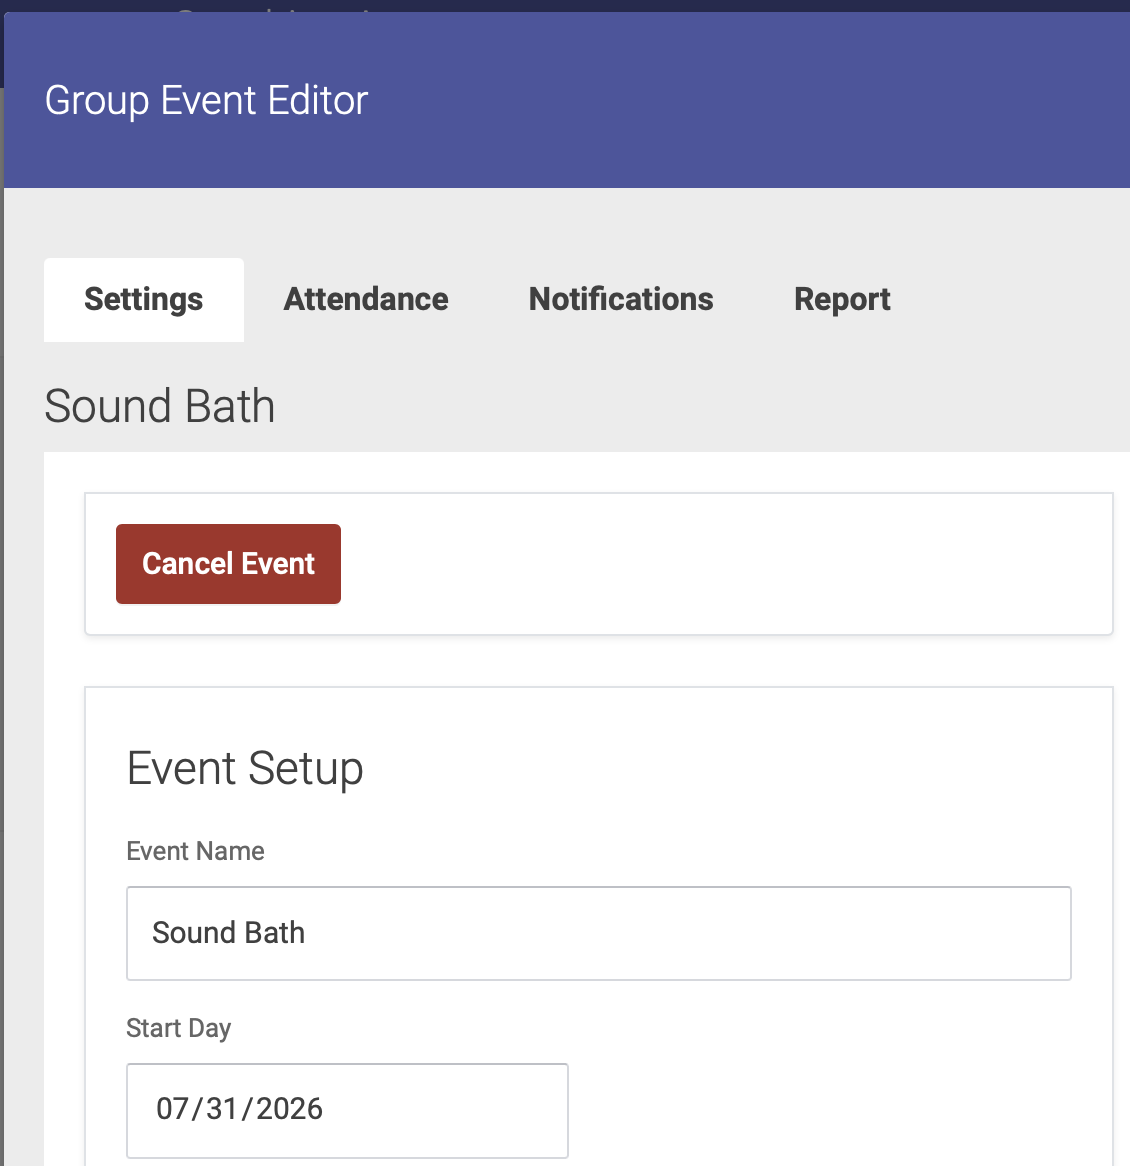
- Cancel an Event
Getting Started
All the setup and preparation for opening a new Open ACU account.
Getting Started Checklist
Your Open ACU account has a main portal for the administrative and practitioner staff to enter and maintain a clinic's locations, practitioners, patients, appointment schedule and health records. This article overviews the steps to get your clinic up and going with these steps. (Follow the links for more)
Checklist for getting started with your new Open ACU account:
Basics
- Users: Create User accounts for employees. Each clinic employee should have a separate User account. There are four levels of permissions for Users: Owner, Practitioner, Super Admin and Admin. Instructions here for creating User accounts.
- Locations: Add your clinic location details. You can have up to 2 locations with a basic account. Additional locations are $10 monthly per location. Instructions here for adding and editing Locations.
- Settings and Templates: Create your account's basic settings, plus your logo and color preferences for emails and the patient portal. Full list and description of Settings here.
- Services: Add the Services that your clinic offers. Instructions here for adding, editing and deleting Services.
- Patients: If you have a patient list, import your patients. Instructions here.
- SMS settings: If you have opted in to text message appointment reminders, activate your SMS settings using the verbiage codes.
- Take credit card payments: To take credit card payments within Open ACU you will need to add the feature to your account and then complete the Stripe onboarding process. Instructions here for adding the credit card payments feature and saving your payments settings.
Schedule
- Schedule blocks: Open your schedule by creating blocks. You can save blocks as templates in your Blocks Library to streamline the process of opening future blocks.
- Schedule appointments: Once your blocks are created, you can schedule appointments.
- Other schedule functions: Get familiar with other schedule features, such as canceling an appointment, squeezing an appointment, waiting lists, the Day Notification, checking in an appointment, and checkin transactions.
EHR
- Intake form settings: Set up your intake form settings, including verbiage for instructions and terms, and intake questions. Instructions here. You can also edit your intake questions.
- EHR preferences: Each individual practitioner should set their own note format preferences. Instructions here.
- Treatment codes: Treatment codes are shorthand for the points that a practitioner uses most frequently. Each practitioner should create their own list of treatment codes.
- Treatment groups: Treatment groups are shorthand for point combinations that a practitioner uses frequently. Each practitioner should create their own list of treatment groups.
- Other schedule functions: Get familiar with other EHR features, such as entering EHR notes, viewing treatment history, private EHR notes, and printing health records.
Patient Portal
Using Open ACU:
Open ACU has many features designed to integrate scheduling, health records and accounting into one seamless platform. You'll want to familiarize yourself with some of these basic features when you first start using Open ACU:
Schedule Management
- Schedule appointments: schedule appointments from your admin portal
- Cancel an appointment: cancel appointments, including how to assign a cancellation fee
- Waiting list: Add patients to the daily waiting list
- Squeeze appointments: Add extra appointments when your schedule is full
- Blocks: All about how to add, edit, save and delete schedule blocks
- Day Notification: Add an alert to the top of the schedule
Patient Managment
- Create a New Patient: add a new patient to your database
- Patient Profile: add and edit information on a patient's profile
- Patient Duplicate: manage and merge duplicate patient accounts
- Patient Icons: key to the patient icons you'll see on the schedule
- Inactive Patients: how to inactive or reactivate a patient
- Patient Portal: information about your patient portal
Transactions
- Checkin transaction: record payment when a patient checks in and pays for treatment
- Checkin without payment: check in a patient and record their transaction later
- Purchase transaction: record a payment that isn't connected with an appointment
- Reverse a transaction: what to do when you've entered a transaction incorrectly
Health Records
- Viewing intake forms: view patient responses to intake form questions
- Viewing EHR records: view a patient's past EHR notes
- Entering EHR notes: how to record EHR notes, via the Blocks page or Appointments page
- Private EHR note: record a note that can be viewed by all Practitioners but not Admins
- Printing health records: print records for legal or insurance requests
Tokens and Credits
- Tokens and credits overview: track individual patient balances with tokens and credits
- Using tokens and credits: use tokens and credits for payments and/or fees
- Purchasing tokens and credits: add tokens and credits at checkin, or with a purchase transaction
- Managing balances: manually change tokens and credit balances
Reports
- Appointment reports: view appointments for a given date range
- Transaction report: view transactions for a given date range
- Detail TRXN report: view transactions in more detail
- Cancellation report: view cancellations for a given date range
- Practitioner reports: view totals summary and patient rate of return for a given date range
- Appointment log: view all details of a specific appointment
- Service report: view appointments and revenue by service for a given date range
Settings and Templates
Your settings page is where you set your application preferences, templates and rules for your account, and your patient portal logo and colors. You can get to the Account Settings page but clicking Account —> Settings on the sidebar menu, or by clicking on your clinic’s name at the top of the page.
Logo and colors
Upload your clinic logo and edit colors buy clicking the Edit Logo, Colors button next to your clinic name:
![]()
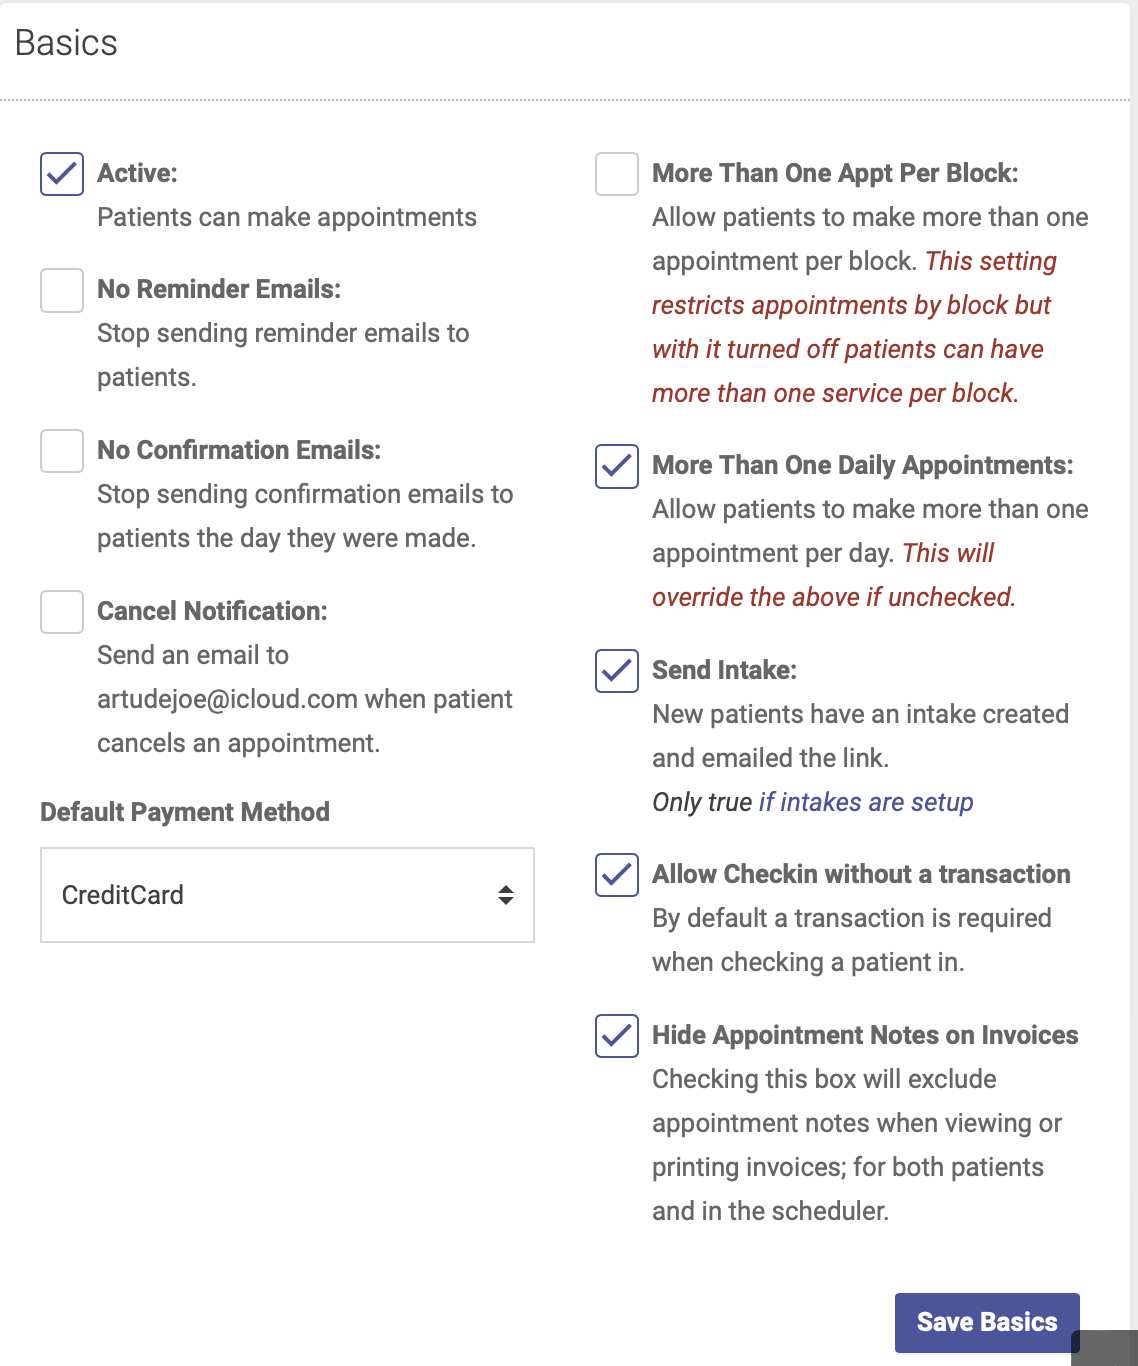
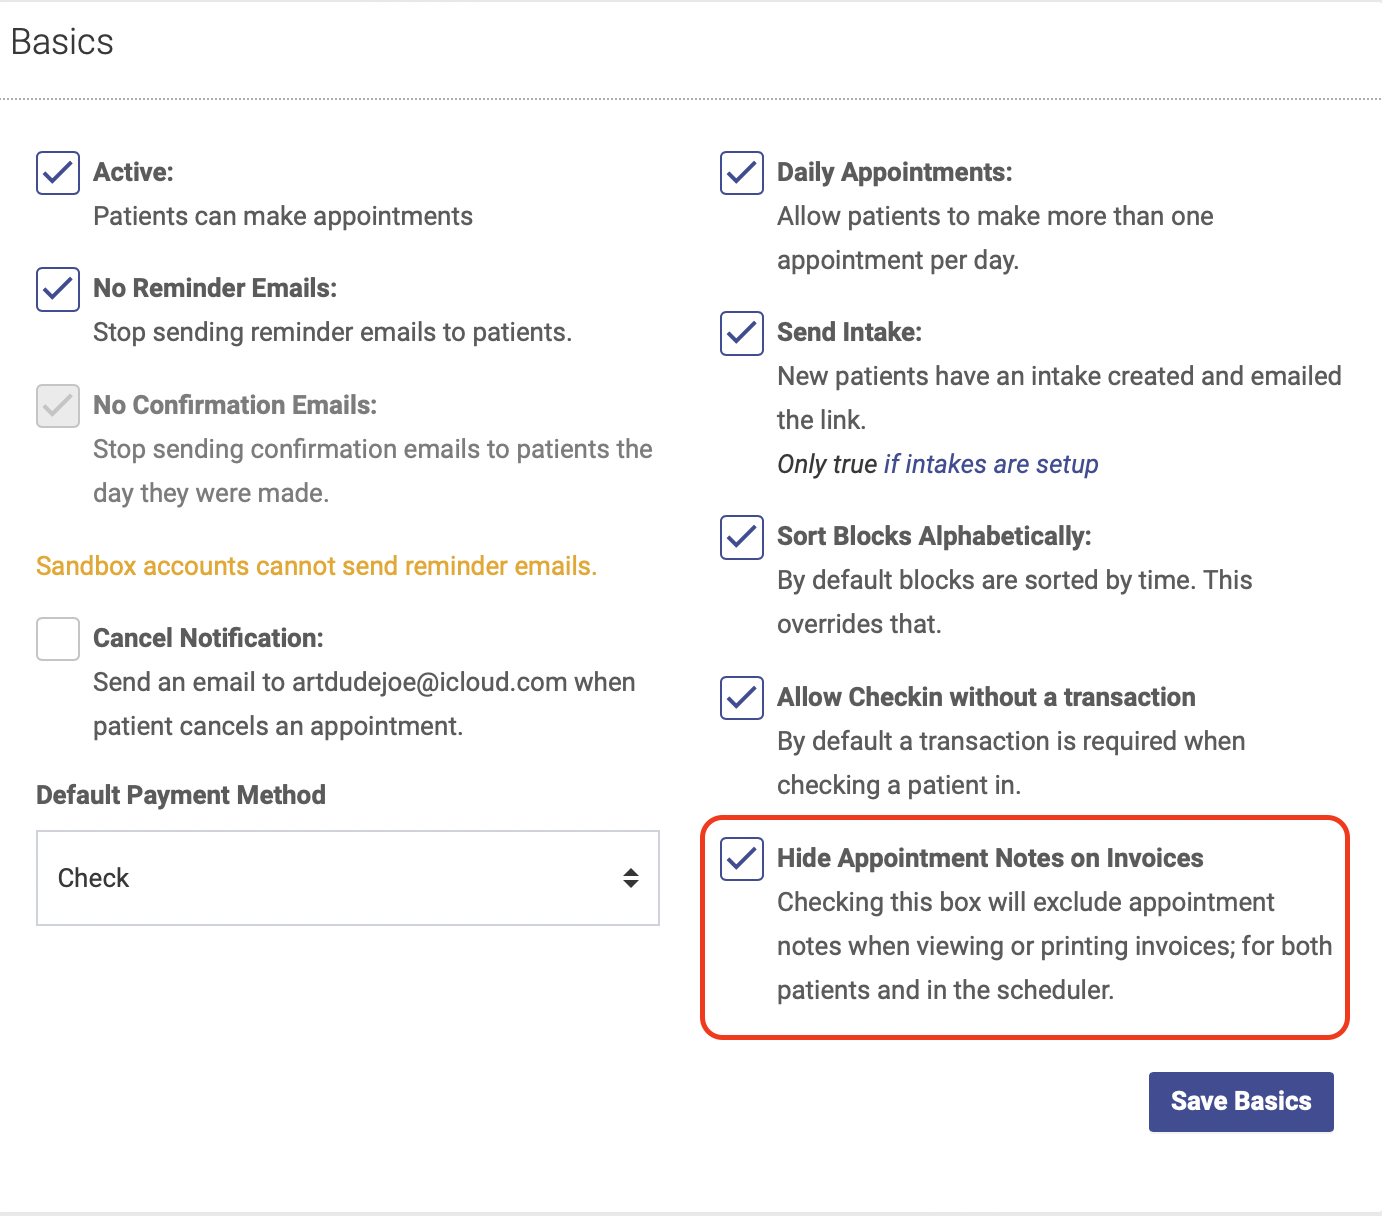
Basics
- Active: keep this box checked to allow patients to make appointments online
- No reminder emails: check this box if you DON’T want to send reminder emails. If you DO want patients to receive reminder emails, leave this box unchecked.
- No confirmation emails: check this box if you DON’T want to send confirmation emails. If you DO want patients to receive confirmation emails, leave this box unchecked.
- Cancel notifications: check this box to have notifications of canceled appointments sent to your contact email. Note: you can also see a list of canceled appointments buy running a cancelation report.
- Default payment method: select whichever payment method your patients use most often. This will be the default method when you record a payment.
- More than one appt per Block: By default, patients cannot schedule more than one appointment per block via the patient portal. Checking this box will override that rule and allow a patient to make more than one appointment per Block.
- More than one daily appointment: By default, patients cannot schedule more than one appointment per day via the patient portal. Checking this box will override that rule and allow a patient to make more than one appointment per day.
- Send intake: when this box is checked, a new patient will automatically receive a link to their intake form when they create their account. Note: this will only work if you’ve set up your intake forms.
- Allow checkin without transaction: checking this box will allow you to check in a patient without having to record their payment at time of checkin. You can record their payment at a later time by following the instructions to check in without a transaction.
- Hide appointments notes on invoices: checking this box will exclude appointment notes when viewing or printing invoices, both for patients and for admins.
Scheduler Site Settings
In this section you’ll store your contact information, website, and the text for your email templates.
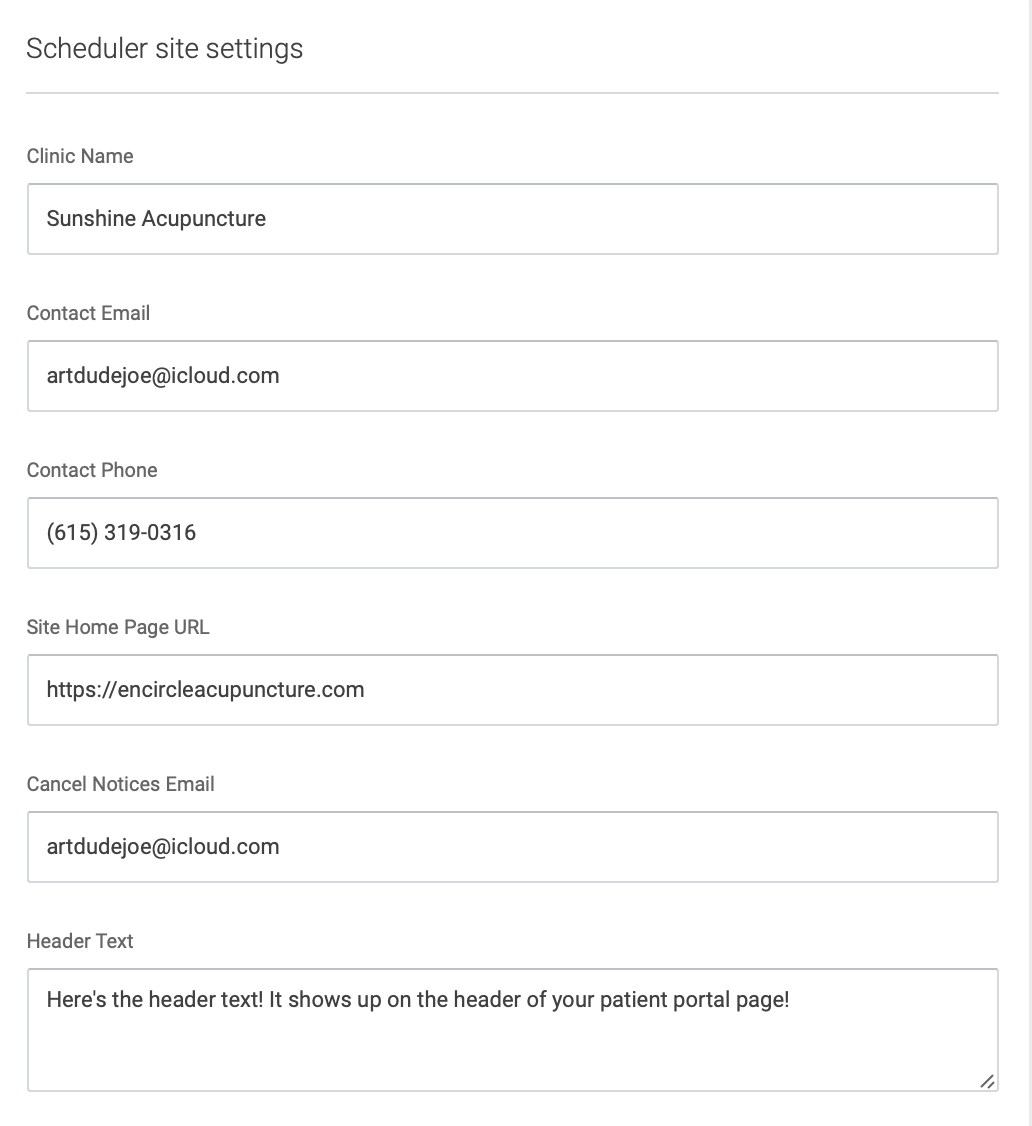
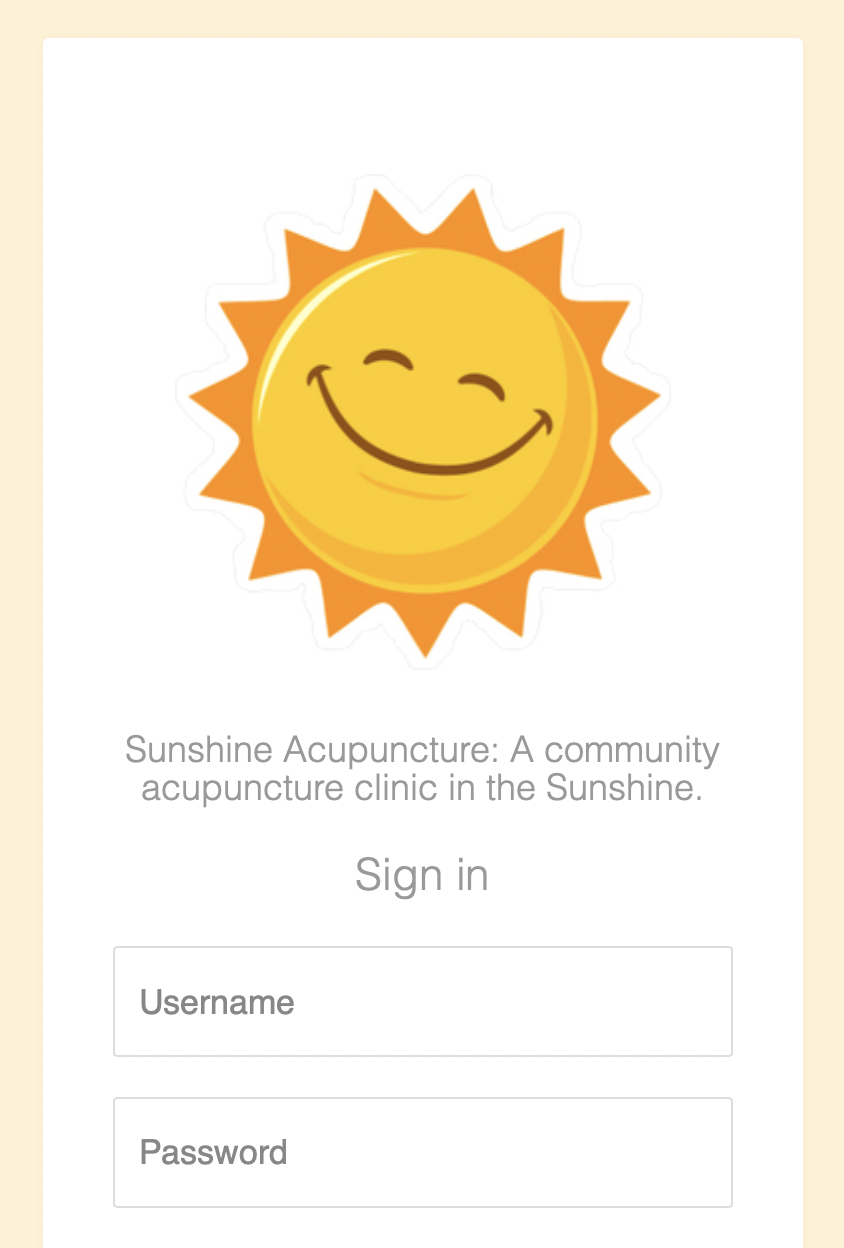
The text in the Slogan field will appear under your clinic's logo on the patient portal login page:
The New Account Instructions field is where you’ll save the instructions patients will see on your website for creating their account:

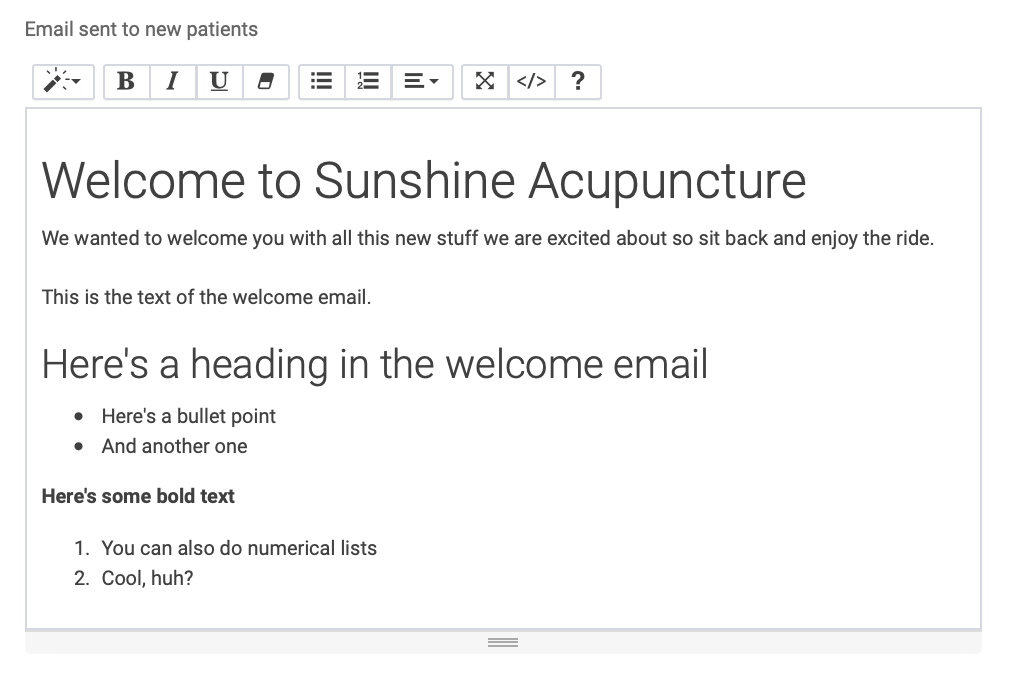
The Email sent to new patients will automatically be sent to a new patient once their account is created:
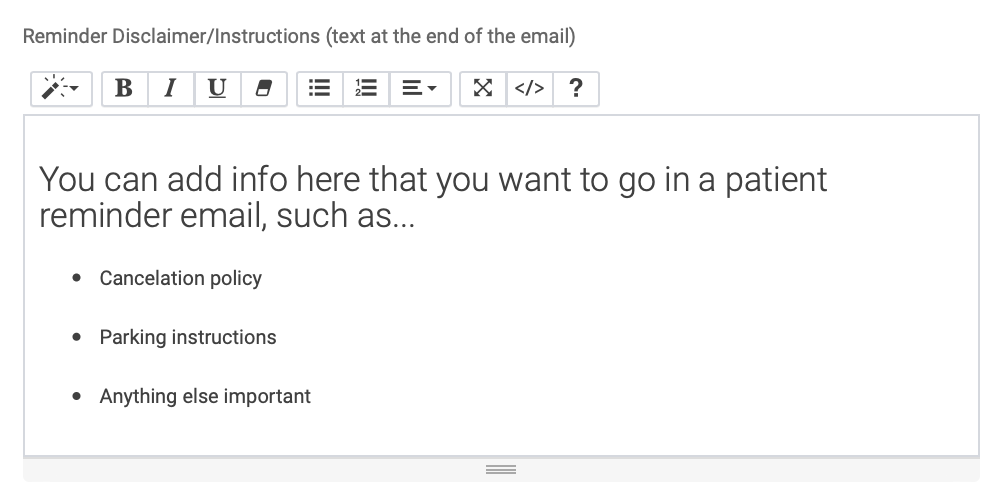
The Reminder/Disclaimer Instructions will go at the end of appointment reminder emails:
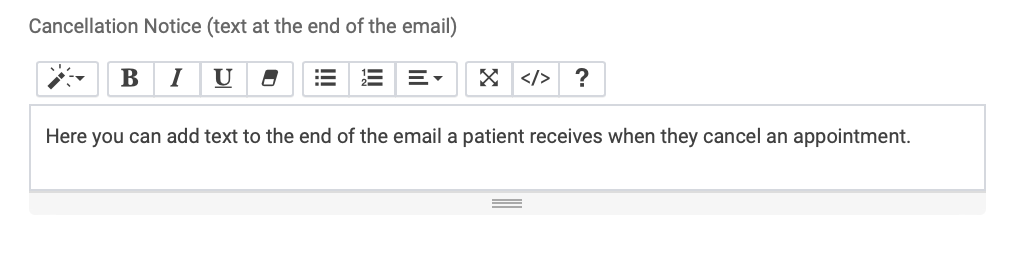
The Cancelation Notice is where you’ll add text for the email a patient can receive when an appointment is canceled.
Waiting List Settings
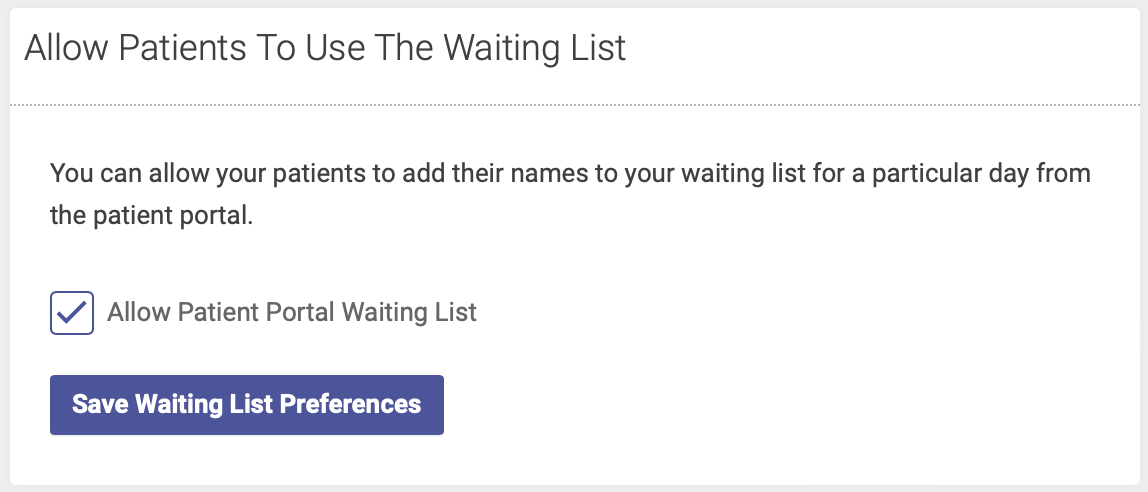
If you want to allow patients to add their names to the daily waiting list via the patient portal, check the Allow Patient Portal Waiting List box and click Save to save your preference.
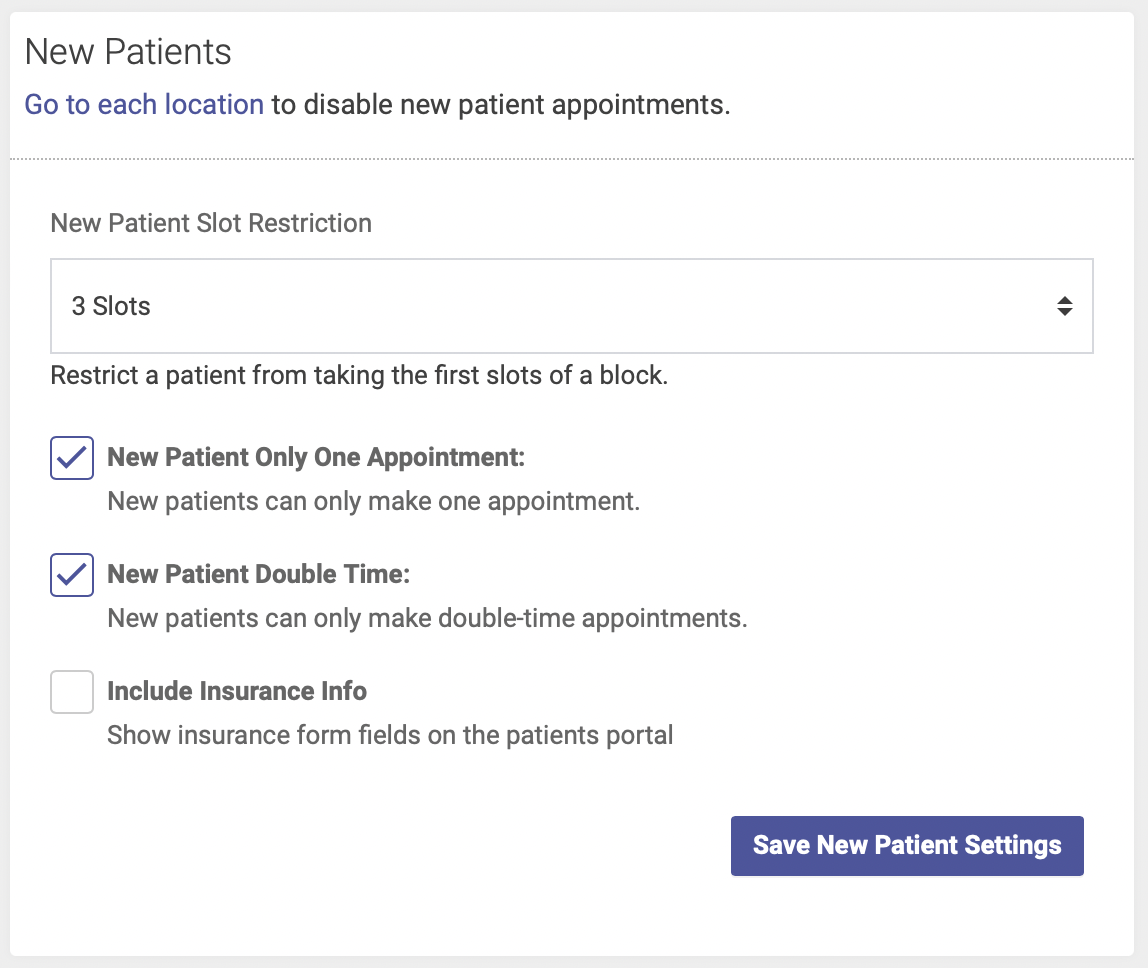
New Patient Settings
This is where you’ll save settings related to when new patients can schedule appointments. You can:
- Restrict new patients from taking the first slot(s) of a block, using the new patient slot restriction drop-down menu
- Restrict new patients from making more than one appointment by checking the Only One Appointment box
- Restrict new patients from making single-slot appointments by checking the New Patient Double Time box
- Include or omit insurance info on the patient portal.
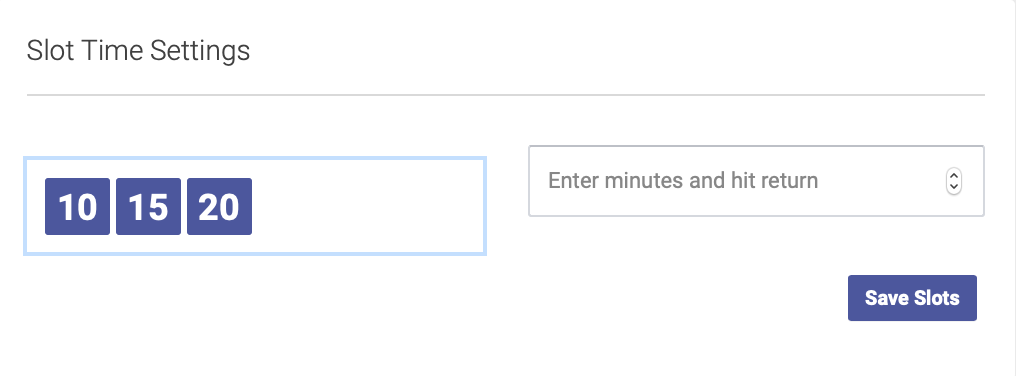
Slot Time Settings
In this section you can add and delete your options for slot duration. To add an option, enter the number of minutes and click return. To delete an option, simply click on the number in the box on the left.
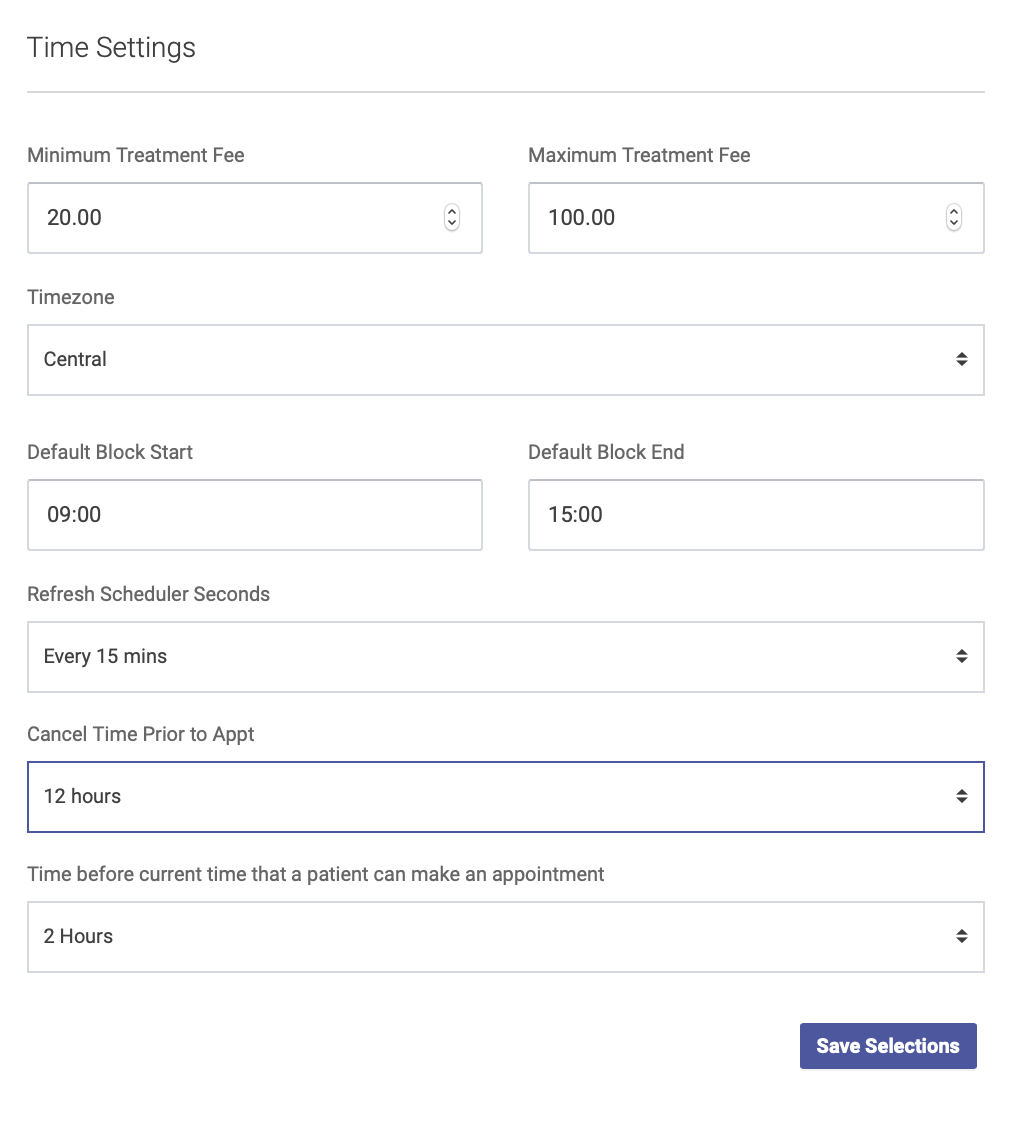
Time Settings
This is where you’ll save basic time and fee settings for your scheduler:
- Minimum and maximum treatment fees (these can be manually overridden during the checkin process)
- Time zone
- Default start and end times for blocks (these can be manually changed when creating blocks)
- Scheduler refresh: will automatically refresh your scheduler after a period of inactivity
- Cancel time prior to appointment: determine how long before an appointment you’ll allow a patient to cancel online
- Time before: determine how much lead time you’ll allow for a patient to make an appointment online
Text Reminder Settings
Note: Only available if you have opted in to the text message reminder feature for an additional $5 per month.
Complete the following steps to activate SMS reminders:
- Check the Send SMS Reminders box
- Select your preference for when text messages are sent - they can be sent either 24 or 48 hours before the appointment.
- Enter your verbiage for your text message - click the Key to Verbiage Codes button for options to customize your messages.
- Click Save Texting Preferences and you're done!
See this reference for the text code variables you can use or click the Key to Verbiage Codes button on your admin page.
Users
To add or manage a User, click on the Users page from the main menu.
Different user types have different permissions:
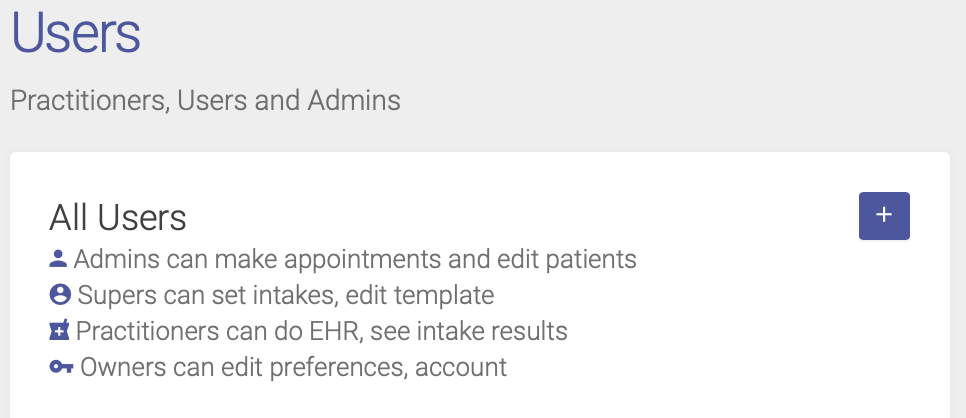
Admins can make appointments and edit patients. Admins cannot view EHR records or intake responses.
Super admins have the same permissions as admins, plus they can edit templates and intakes. Super admins cannot view EHR records or intake responses.
Practitioners have the same permissions as admins, plus they can view EHR records and intake responses, and create and edit EHR notes.
Owners have full access to all schedule and EHR features.
To add a user, click the plus sign, complete the information and click Add when you’re done.
To change user settings or to delete a user, click their name on the list of Users.
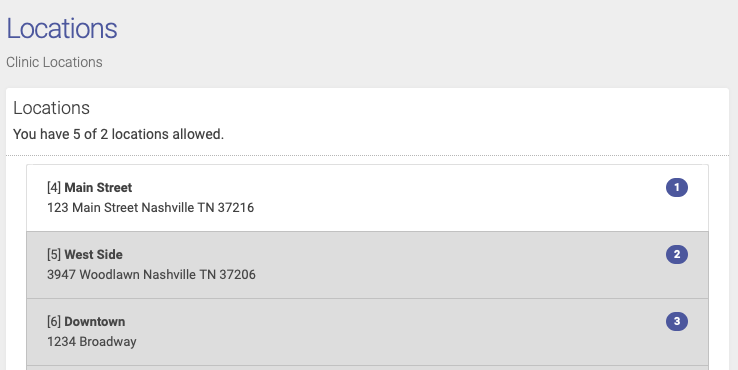
Locations
Open ACU gives all accounts 2 free active locations. You can add a location to your account for $10 a month. If you need more than 10 locations contact us for bulk location pricing.
Adding A New Location
If you don't need to purchase more locations you can add one at anytime. Just go to Locations and click the [+] Plus sign to the right. If you need to add locations to your account click "Add A Location".
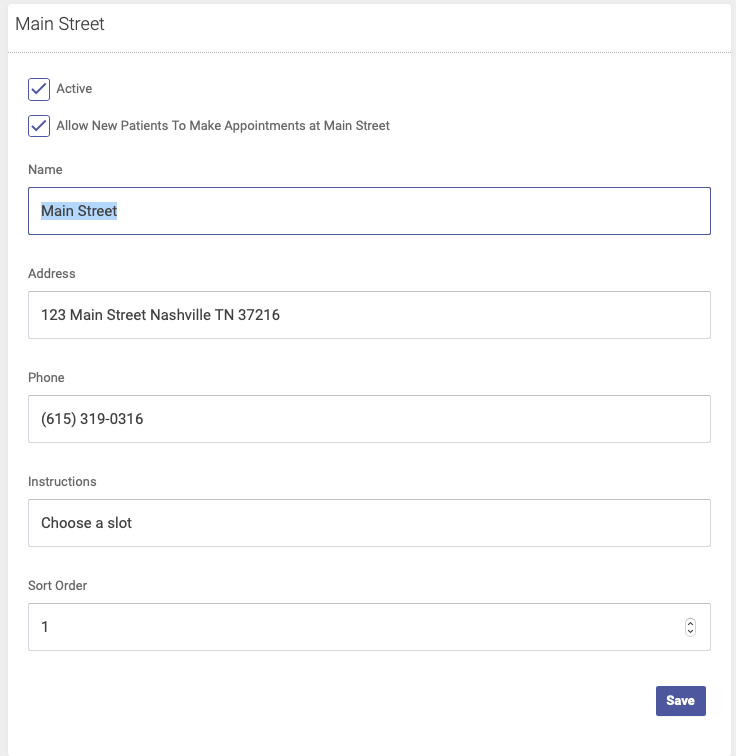
Each location has these options
- Active. This checkbox makes the location available online to patients and in the appointments grid of your admin. Unchecking it hides it from those options. Inactive locations still show up in reports and remain associated with appointments that occurred in those locations. You cannot delete a location. If you need to you make contact us to do so for you but that still may not guarantee a deletion.
- Allow New Patients To Make Appointments. Uncheck this to prevent new patients to make any appointments at this location.
- Name *required. This text shows up when the patient is choosing the location. Enter something descriptive and short.
- Address *required. Enter a well formed address as it will enhance the patient's ability to locate your clinic via GPS.
- Phone *required. Enter a location specific to the location.
- Instructions optional. Enter a short text with specific location instructions. This will appear on the location page of your schedule in the Patient Portal.
To edit your locations
- Go to Locations in the main menu on the left.
- Select one of your locations in the left column by clicking or tapping.
- Edit the location details and click save.
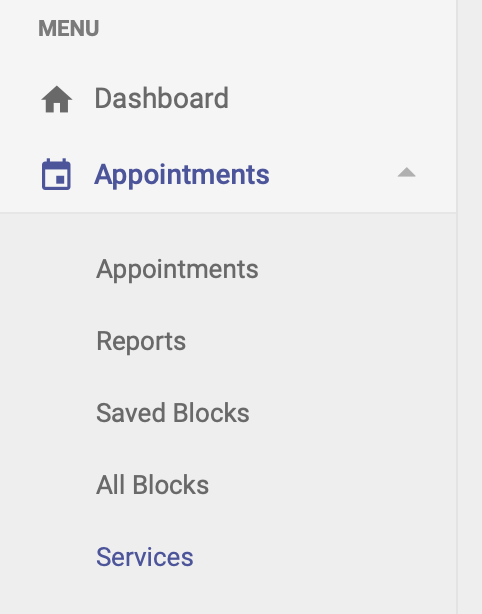
Services
Every schedule block is required to be assigned one or more Service choices; therefore you will need to create at least one Service choice in your Open ACU account.
To add a Service, you’ll go to the left-hand side menu and click Appointments —> Services:
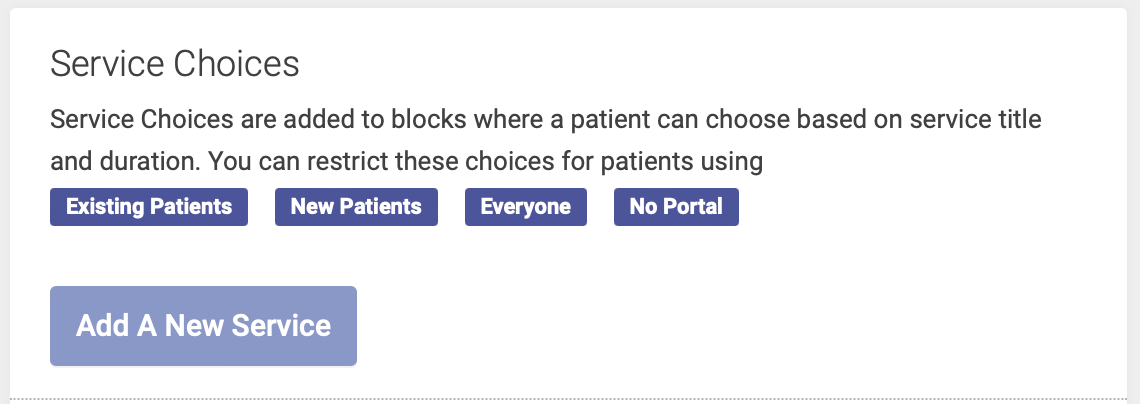
Service choices
Service choices will allow patients to select which service they'd like to schedule. You will choose patient restrictions for each service:
- New patient: only new patients can schedule this Service
- Existing patient: New patients cannot schedule this Service; it's only available to someone who's already been to the clinic
- Everyone: anyone can schedule, new or existing patients
- No portal: this Service does not appear as an option on the Patient Portal, but is visible on the admin portal
Adding a Service
To add a new Service, click the Add a New Service button:
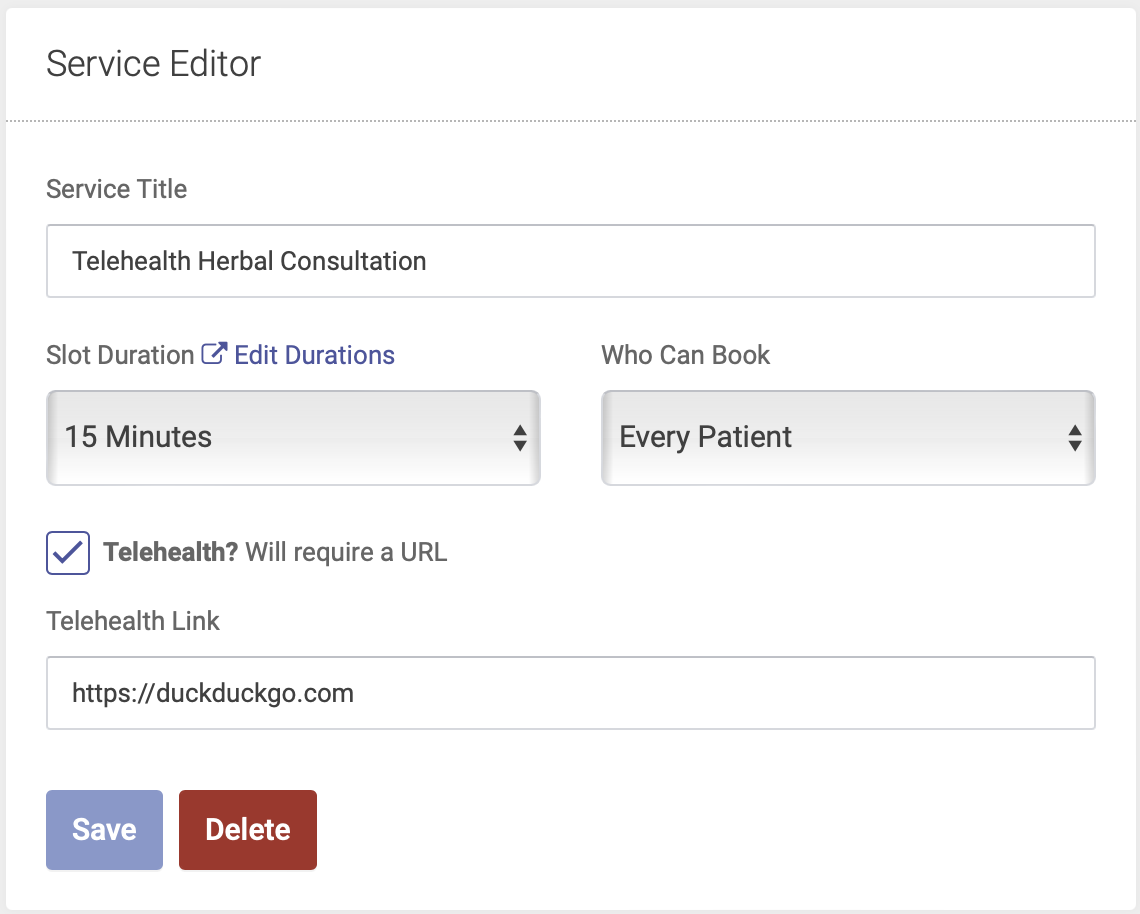
You will then create your Service in the Service Editor box. Add the following details for each service:
- Service Title: this will appear on the admin and patient portals, so make your title short and descriptive
- Slot duration: this will determine how much time a Service will take up on the schedule, and not necessarily the length of the entire appointment. For example, a "Community Acupuncture" Service might take up 10 minutes on the schedule, but the appointment length might be an hour. In this case, you'd choose 10 minutes for your Slot Duration. The Slot Duration options in the drop down menu are based on the Slot Time Settings that you saved on your Settings page.
- Who Can Book: select which patients you want to be able to book this Service: Existing Patients, New Patients, Everyone, or No Portal (hidden on the patient portal but still visible on the admin side)
- Click the Telehealth box to make this a virtual appointment (must include a URL where the patient will join the Telehealth appointment)
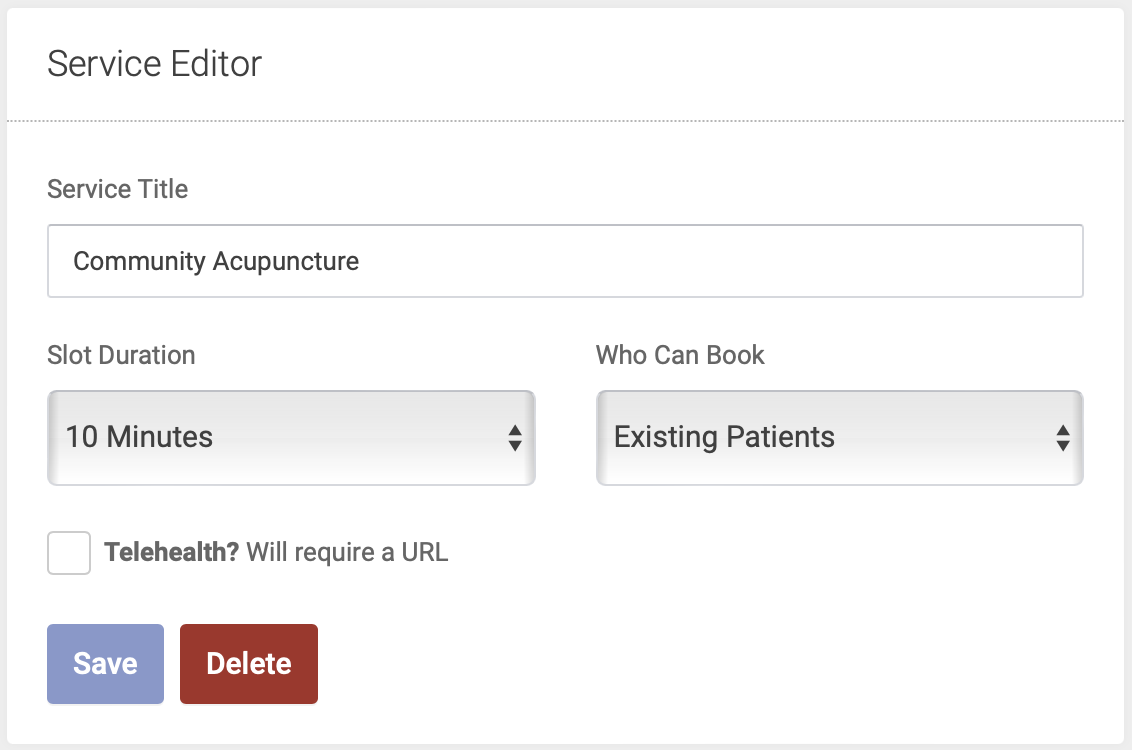
Click Save to save your new Service.
Key Tips on Service Titles
Giving your Service a proper title will give clarity to both you and your patients when scheduling appointments. So choose a Service title wisely! Here are some tips:
- On the patient portal, patients will see the Service Title but not the slot length. So choose a title that helps them easily identify which Service they are scheduling.
- Example: If you are offering 30- or 60-minute massages, include the length of time in your title. Don't just title both of them "Massage." One should be titled "30 minute massage" and the other should be "60 minute massage."
- The Service Title will also appear on the patient invoice, which they might submit for an insurance or legal reimbursement. So again, choose a descriptive title.
- Example: "Acupuncture" is a better title than "Acu"
- If a Service is only for new or existing patients, include that in your title. That way all admin users will easily know if there are any restrictions on who can be scheduled for a specific service.
- Example: If you are only offering reiki to existing patients, a good title is "Reiki - existing patients"
- You can offer combination services that will allow patients to book multiple services per block.
- Example: You could create a Service called "Acupuncture + Cupping" and designate an appropriate slot length to allow enough time for both services.
Editing a Service
To make changes to an existing Service, find your Service on the list on the Services page, and click Edit.
The Service Editor box will open on the right hand side of the page. In the Service Editor box, you can change the Service title, duration, who can book, and telehealth options:

Click Save to save the changes to your Service.
Deleting a Service
To make changes to an existing Service, find your Service on the list on the Services page, and click Edit.
The Service Editor box will open on the right hand side of the page. Click the red Delete button to delete your service. Once you delete a Service, it will not be available for any future schedule blocks. It will still appear on existing blocks that have already been scheduled.
Viewing Service choices
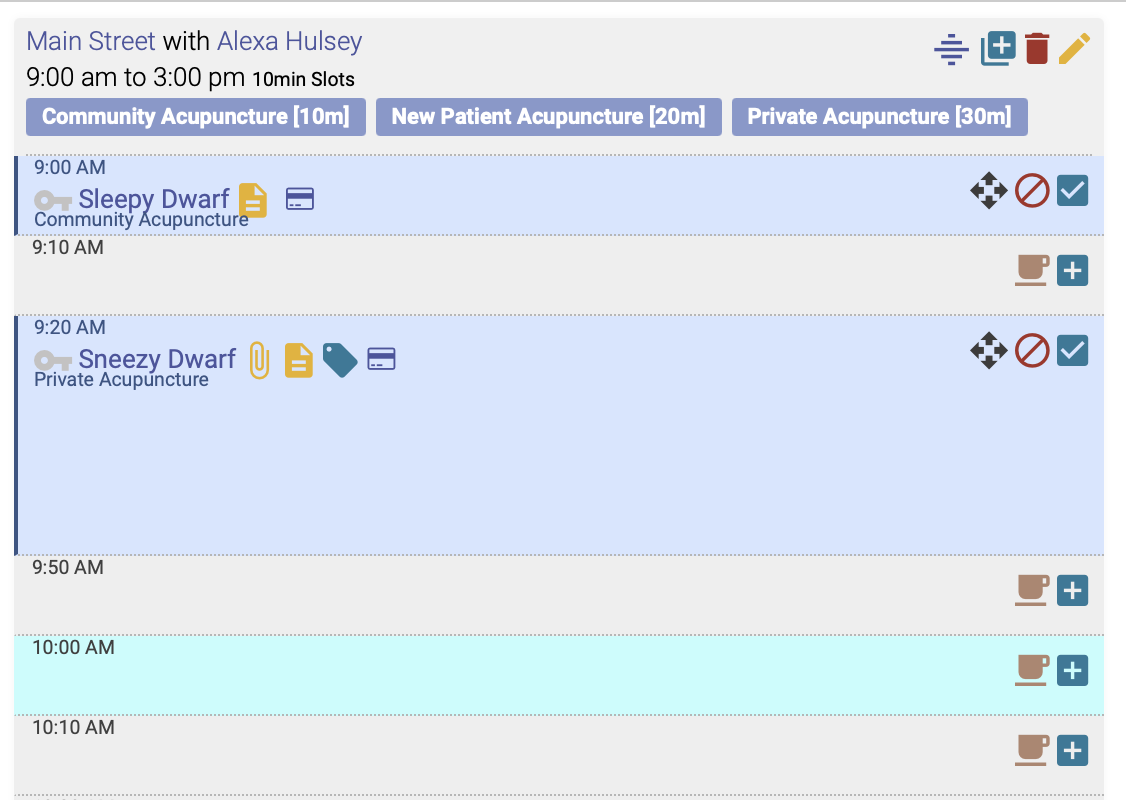
The Service choices will appear at the top of every schedule block, and the slot duration will appear next to every Service name. This will tell you which Services are available for a given block.
On the admin portal
The Service options will appear at the top of every block:

On the patient portal
On the patient portal, the Service options will appear in one of two ways:
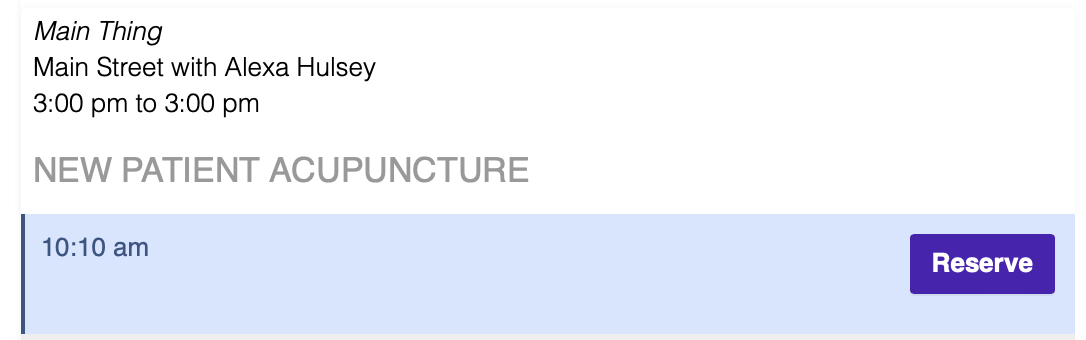
If only one Service is available
If there is only one service option for a given block, the Service name will appear at the top of the block:
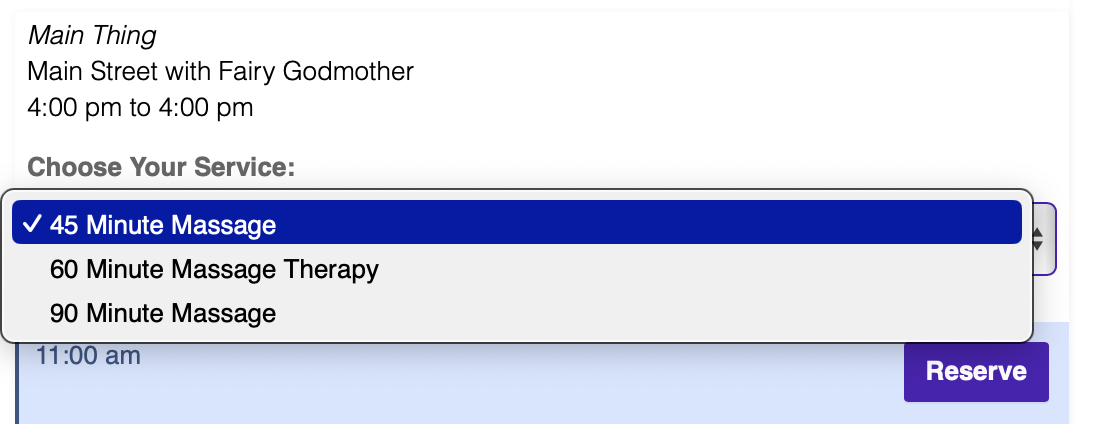
If multiple Services are available
If a block has multiple Service choices, they will appear as a drop down menu at the top of the block:
Add Practitioner Bios to Patient Portal
You can add your practitioners (and owners) biographies to your patient portal site.
To add Bios to your patient portal:
- Log into your Open ACU admin account as an owner.
- No other users have access to the other user profiles.
- Go to the > Users page.
- Select an owner or practitioner profile from the list of users on the left.
- Only owners and practitioners can have their bios added to the practitioner page.
- The user profile editor shows up on the right.
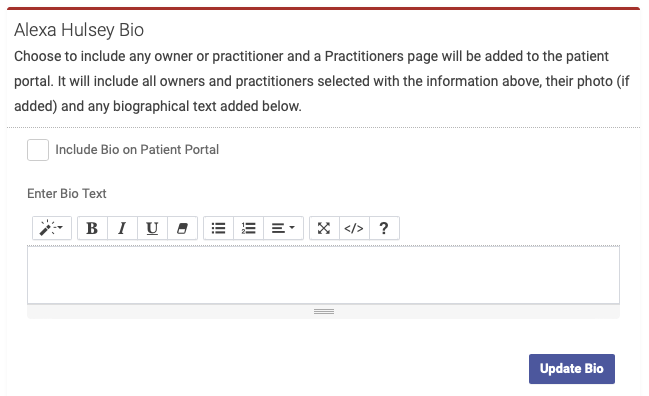
- Scroll to the Bio section for that user.
- Add text for the bio and check Include Bio on Patient Portal.
- Click Update Bio
Once any one owner or practitioner is included the patient portal will add a link to a page named "Our Practitioners". The link will appear in the header banner at the very top of the page and the footer.
Our Practitioners Page on the Patient Portal
The owners will be listed first in alphabetic order, the practitioners next and in alpha order. Depending on what's been entered for each listing they will include the profile image, the name, the license and designation, contact information and the text bio. It will look something like this:

Scheduling
Creating blocks and appointments on your schedule.
Blocks
Blocks are the shifts within your schedule. When you create Blocks, you'll assign a practitioner, location, services, and start and end times. You can also set up Blocks at repeating intervals. Here's a video overview:
Adding a block 

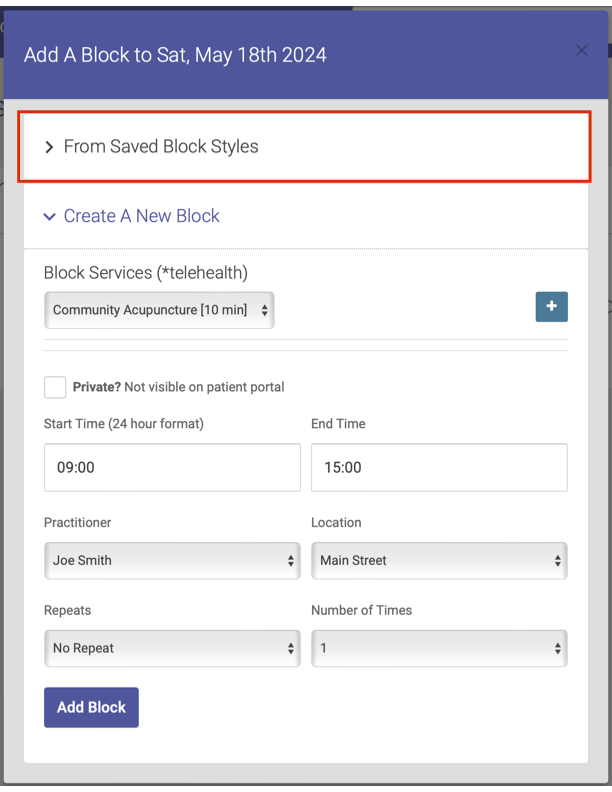
Go to the day and location where you want to create the Block, then click the plus sign [+] in the group of block icons to the top right of the page. A form will popup in a modal window. You can either use a Saved Block or Create A New Block:
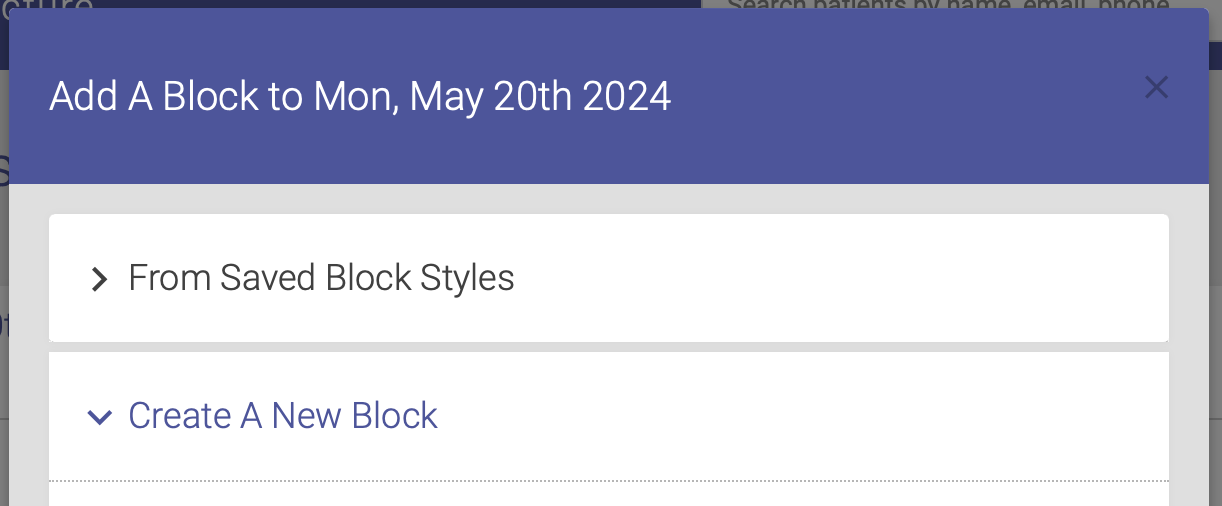
Using a Saved Block:
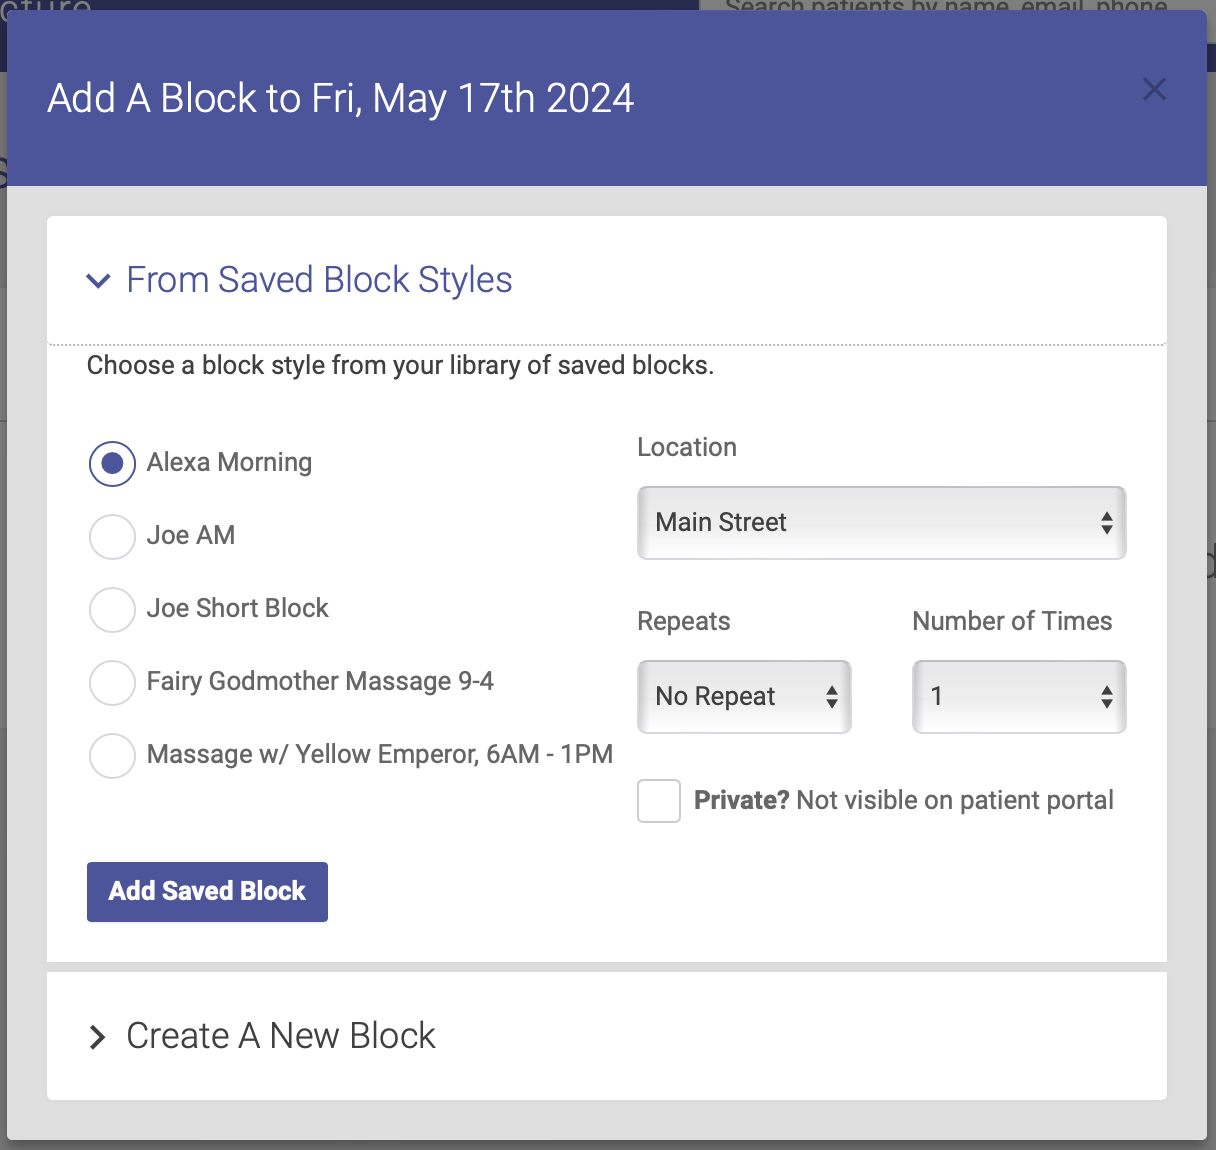
- Select "From Saved Block Styles" to open the selection form (Create New Block is opened by default).
- Choose the block style you want to insert. Click here for detailed instructions on how to save blocks for later use.
- Click the Add Saved Block button. Your Block is now added to the schedule!
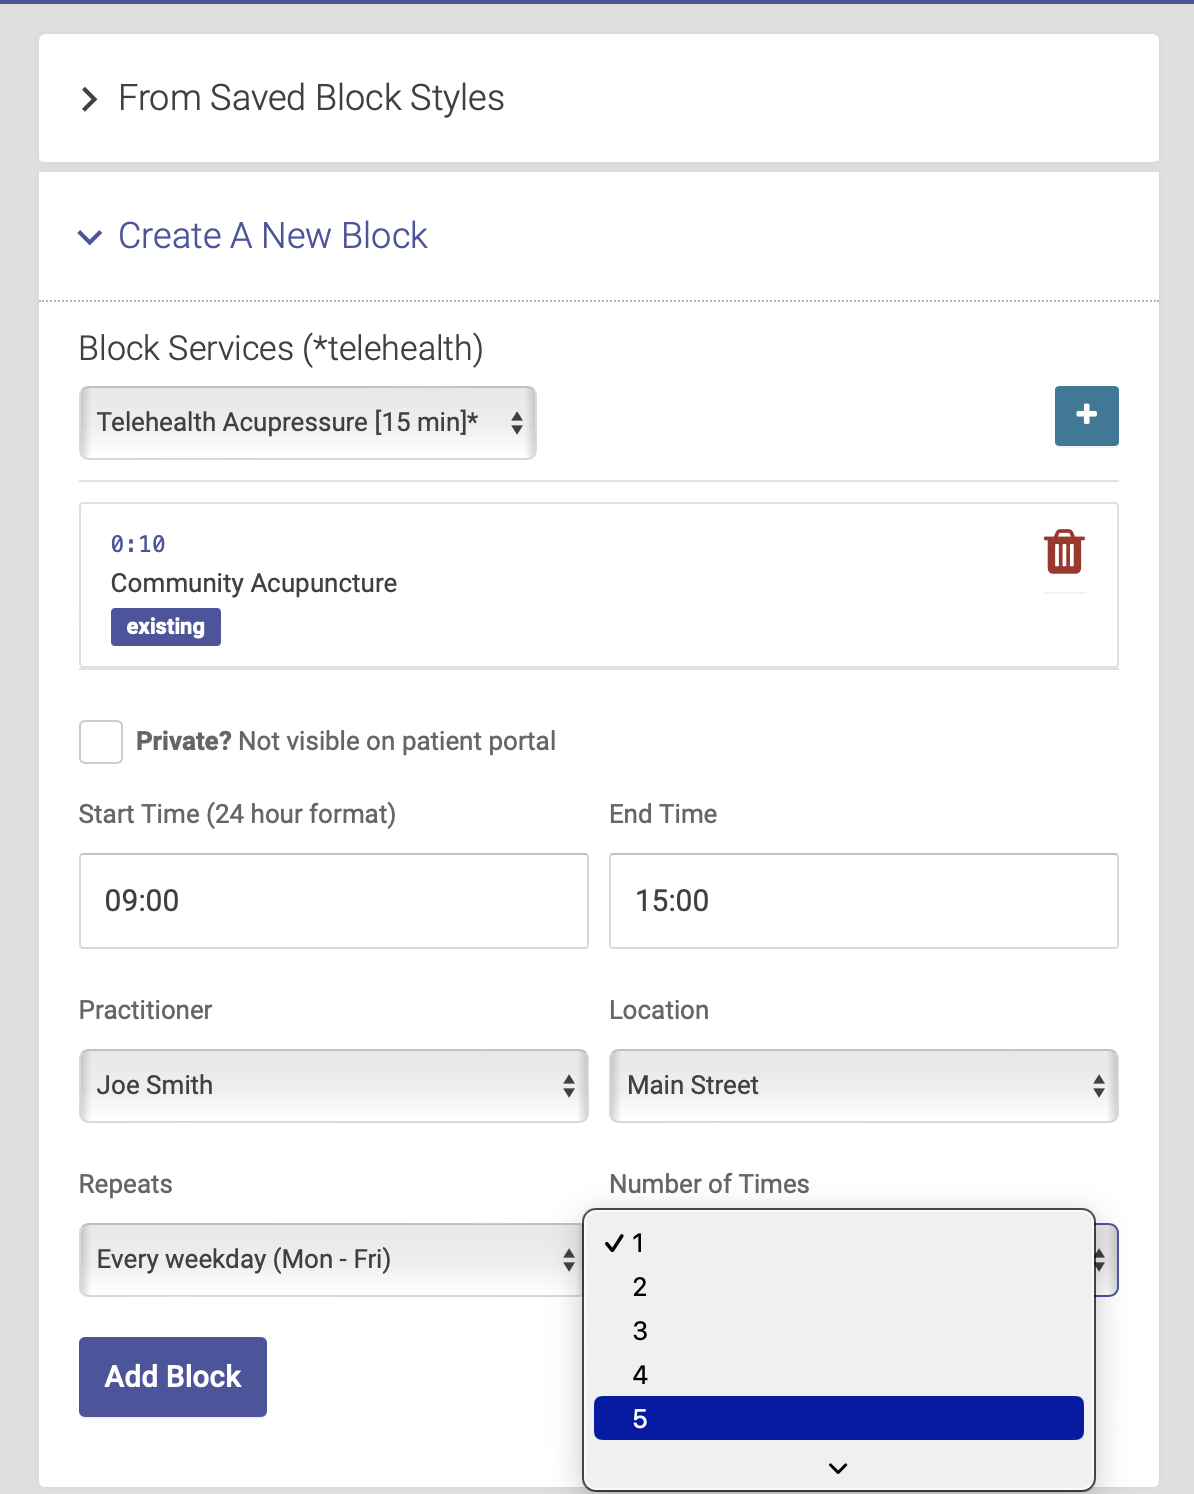
Create a New Block:
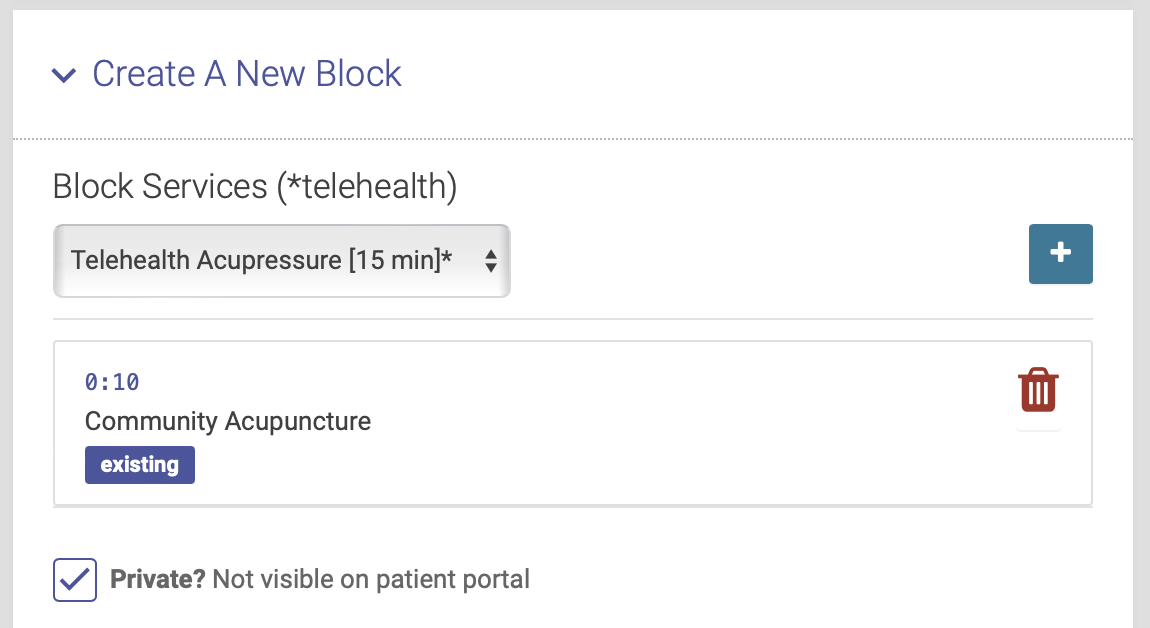
- Add the Service options you want to have available for this Block. Select the Service from the drop down menu, then click the plus icon [+] to add it. You can add multiple Services to any Block. When you add a Service, you'll see the Service title, slot length, and who can book. You can delete Services from a Block by clicking the red trash can icon.

- To make this block invisible on the patient portal, click the box next to Private. You will be able to view this block on the admin portal, but patients will not see it on the patient portal.
- Choose your start and end time.
- Select the Practitioner from the dropdown.
- Select your Location
- If you want to repeat this block, select the repeat increment and number of repeats (more on repeating blocks below)
- Click the Add Block button. Your block is now added to the schedule!

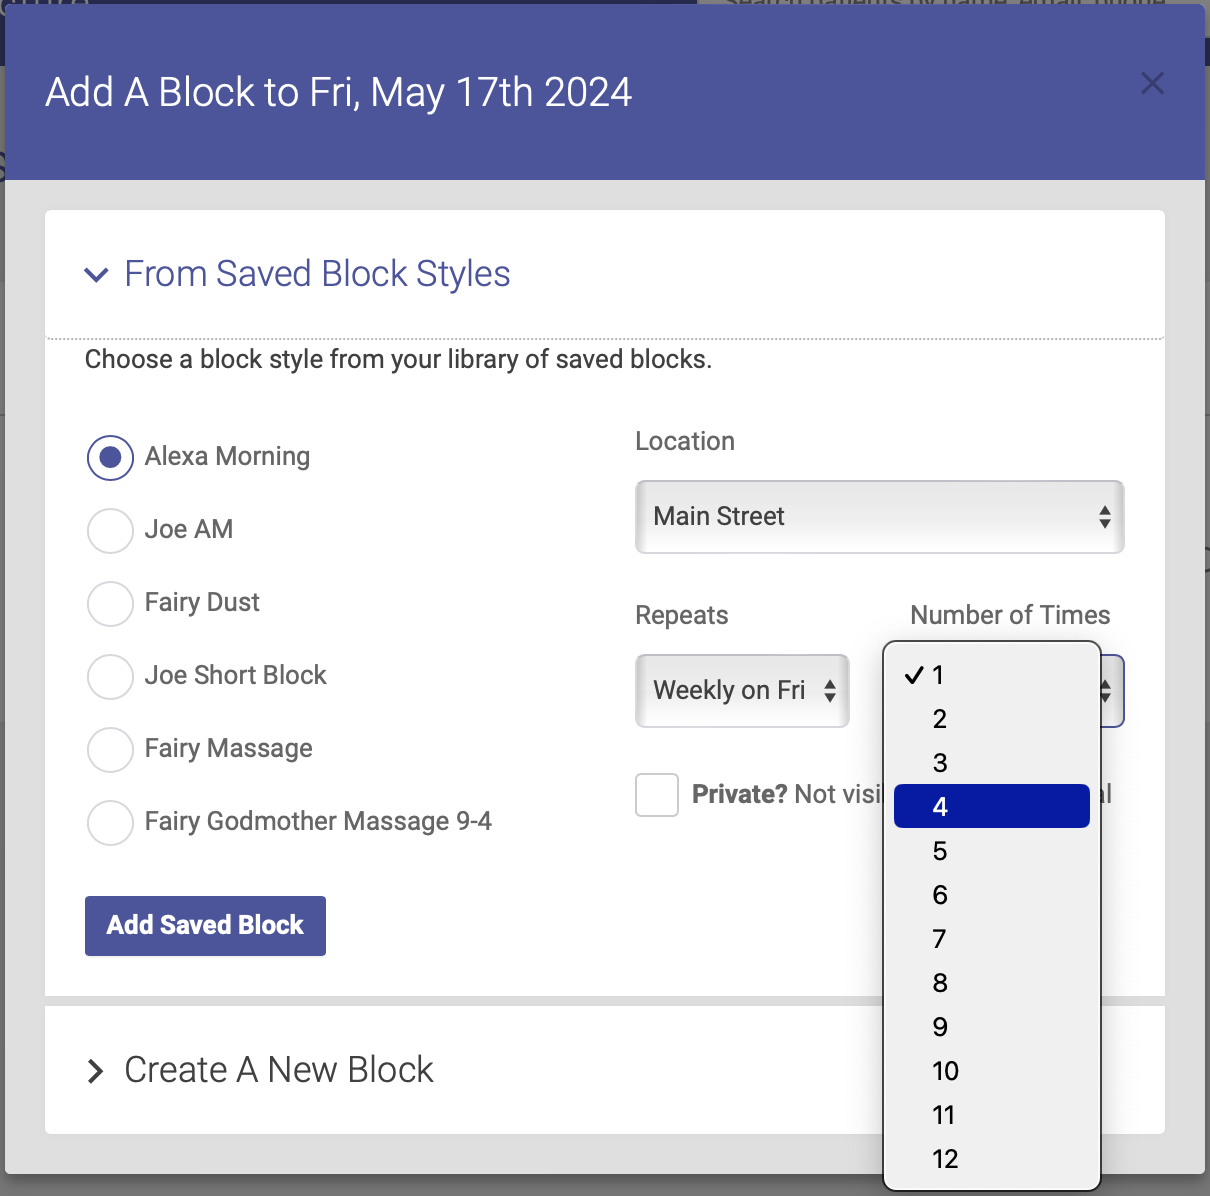
Repeating blocks
When adding a block to the schedule, you can repeat that block on future dates. To repeat a block, click on the Repeats dropdown menu to select your interval. You can repeat a block on a daily, weekly or monthly basis. Then select the number of times you want to repeat that block.
You can use the Repeat function when you are adding a new block or adding one from your saved blocks:
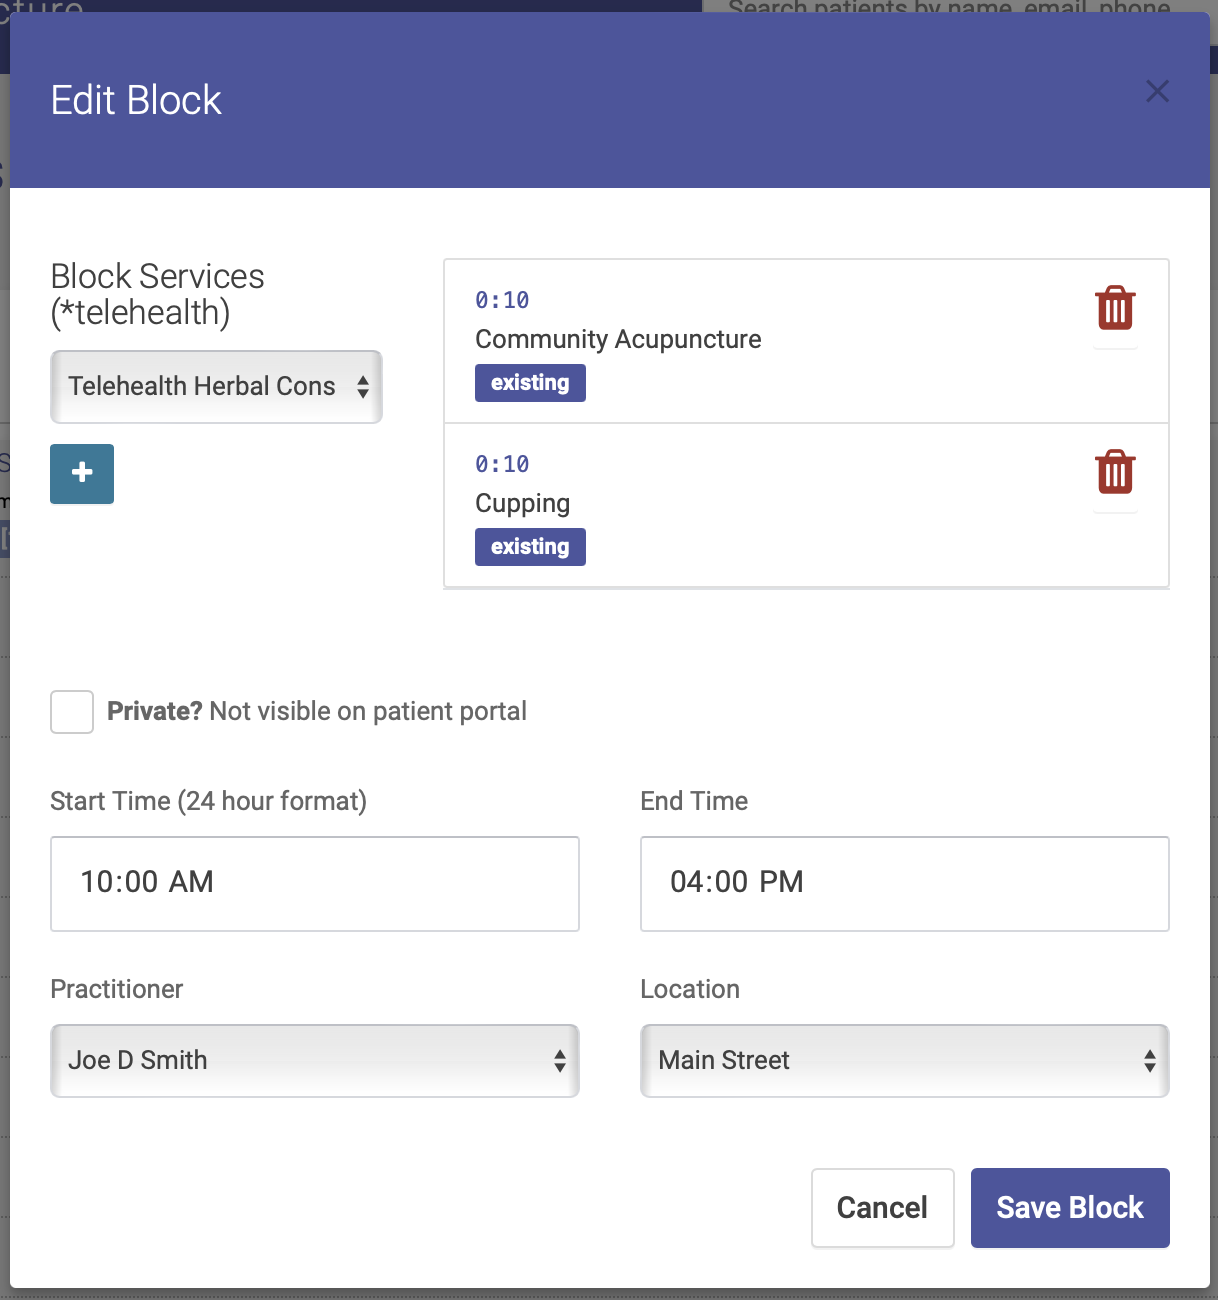
Edit a block 

- Click the pencil icon at the top right of the block.
- Change any of the parameters you used creating the block. This includes adding or deleting Services, or changing the start and end times, Practitioner and Location
- If you change the start or end time, and doing so cuts off any appointments:
- The appointments will be cancelled
- and they are added to the waiting list
Editing or Deleting saved blocks
Click on Saved Blocks under Appointments on the main menu:
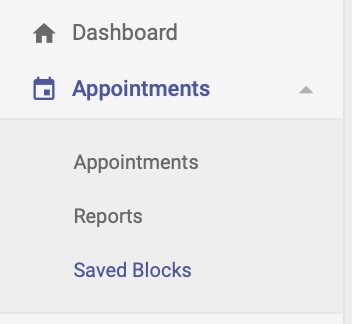
From here you'll select the saved block you want to edit or delete. Select your block to edit the title or delete the block:
Private Blocks
Private blocks are visible to schedule admins but do NOT appear on the patient portal, so patients are unable to schedule an appointment in a private block. Only admins can schedule an appointment in a private block.
If a patient has an appointment scheduled in a private block, the appointment WILL show up in their list of appointments on the patient portal.
To make a private block, click the "Private?" checkbox in the block options when creating a block:
The top of a private block will be highlighted in blue on the schedule:

Saving Block Styles and Using Them
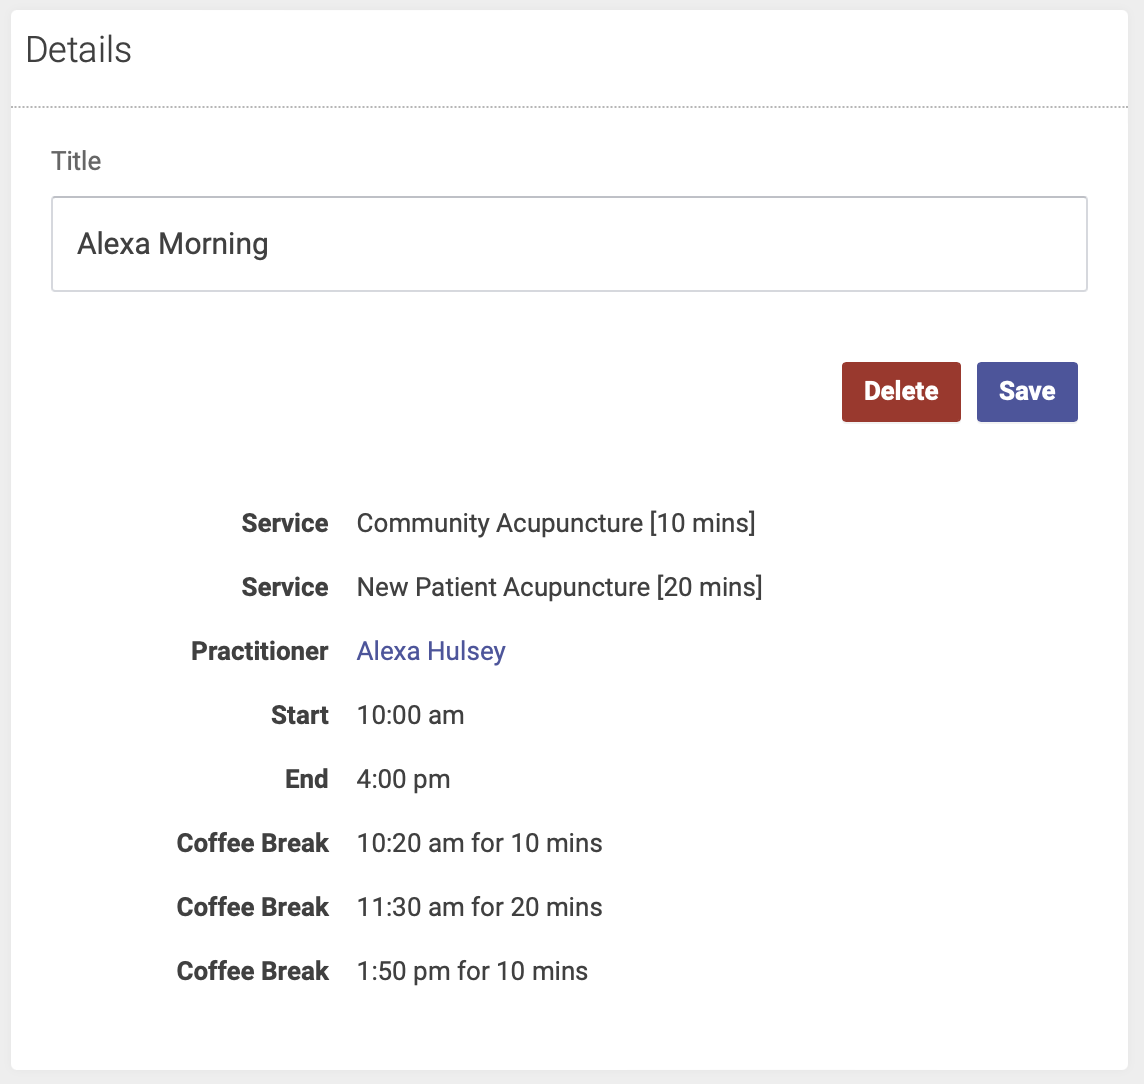
Any block can be used as a template of sorts, saving that block as a block style. Block styles include the practitioner, the service options, the start to finish times and any coffee breaks included. This is intended to make it easier to make blocks and to have fewer errors.
To create a block style
- Locate a block you want to save. It should have the start and finish times, Service choices, practitioner and coffee breaks you want.
- Click the stacked plus icon in that block's edit icons.
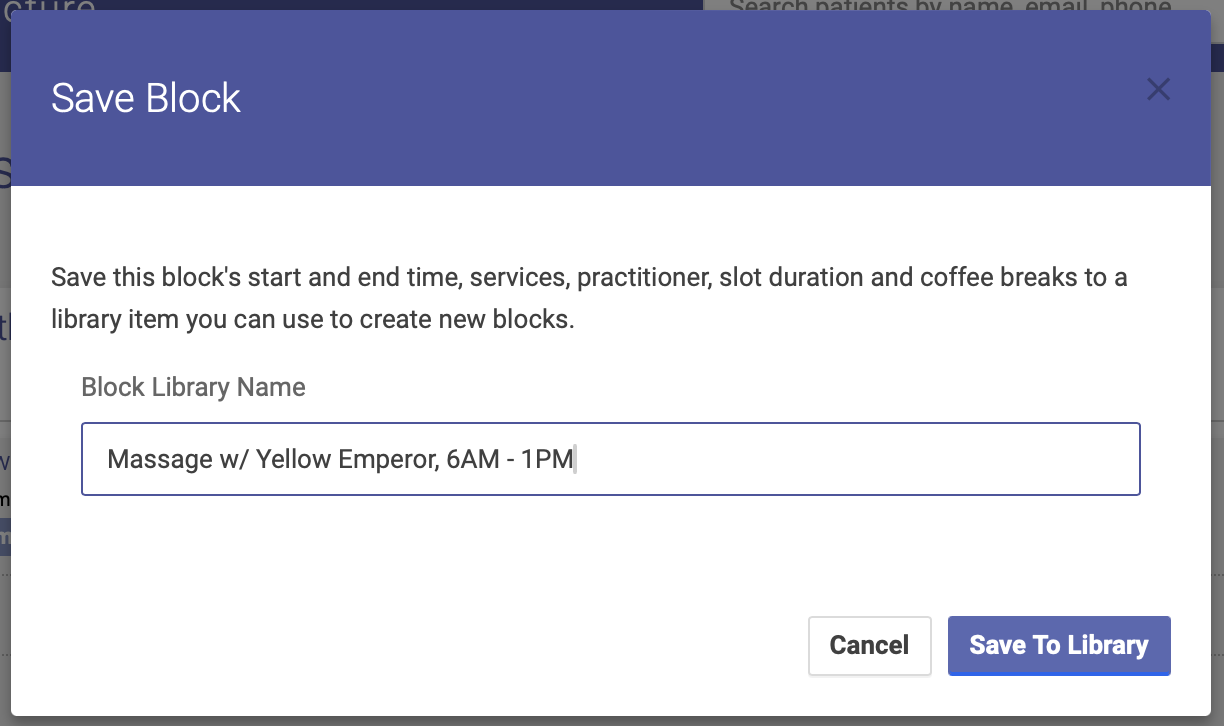
- In the popup form give it a unique and descriptive name and click save.
- Now, when you create a new block the option of using your saved block styles is available.
You can save any existing block to be used again on any other day or location. This includes the practitioner, Service options, start and end times and all coffee breaks.
To Save a Block for Later Use
- Find a block in your schedule
- Click the [+] sign in the block header on the right.
- Give your block a unique and descriptive name (max 80 characters)
- Click Save
To Use a Saved Block
- Go to the day and location where you want to create the block.
- Click the [+] at the top right of the day header

- Select "From Saved Block Styles" to open the selection form (Create New Block is opened by default).
- Choose the block style you want to insert
- Click "Add Saved Block"

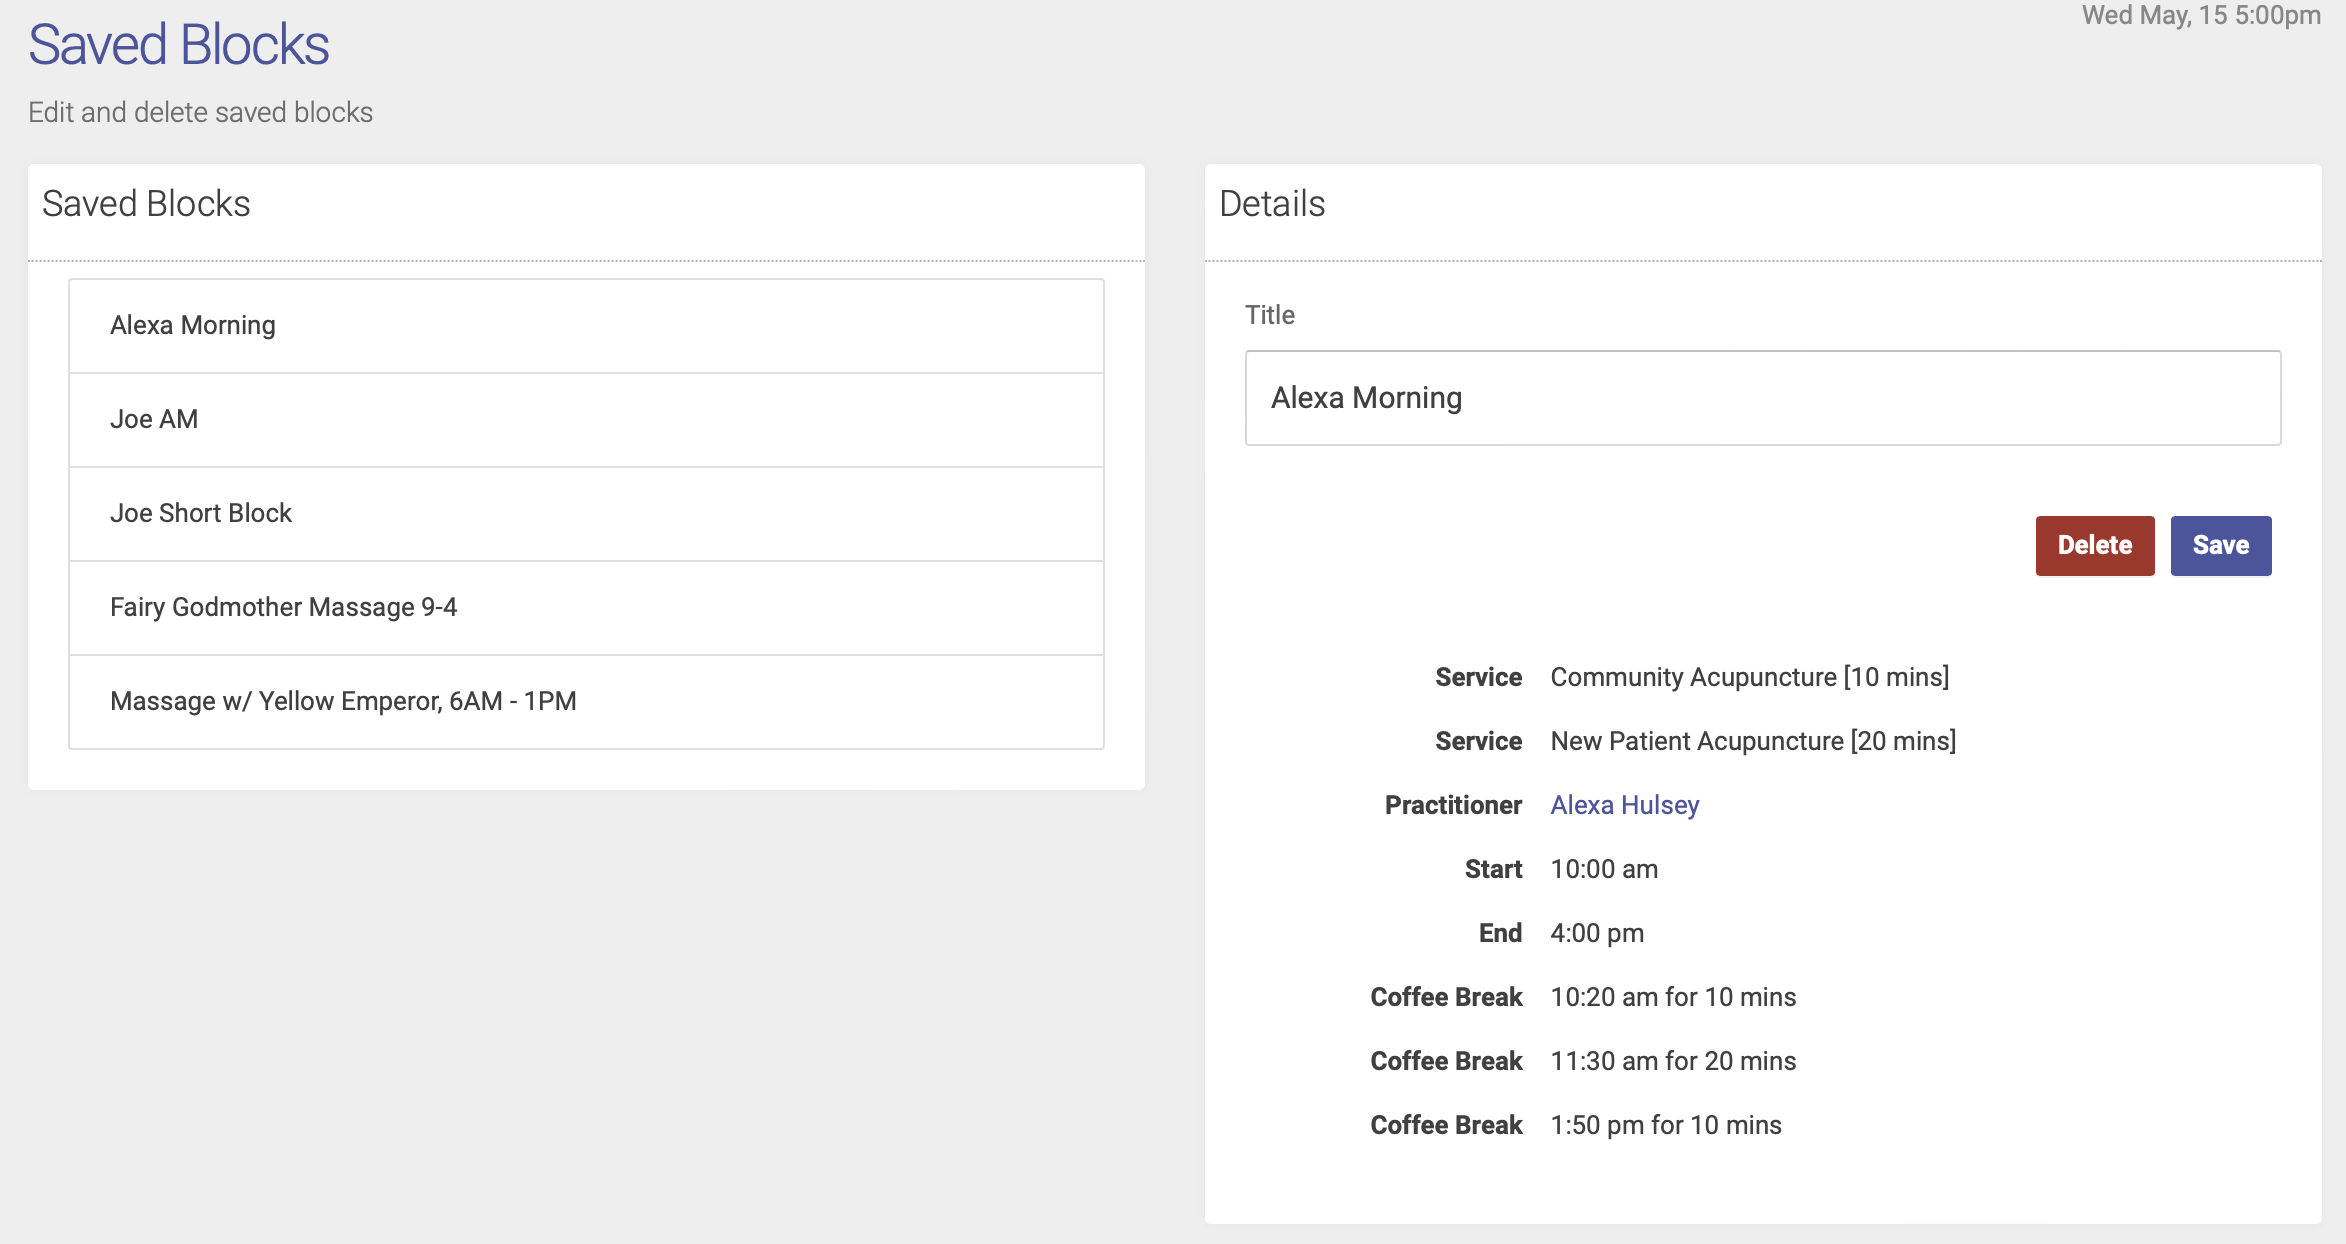
To View Your Saved Blocks
Under the Appointments tab on the left-hand side of the page, click Saved Blocks. This will bring up a list of your saved blocks. From here, you can change the title of a saved block or delete a saved block.
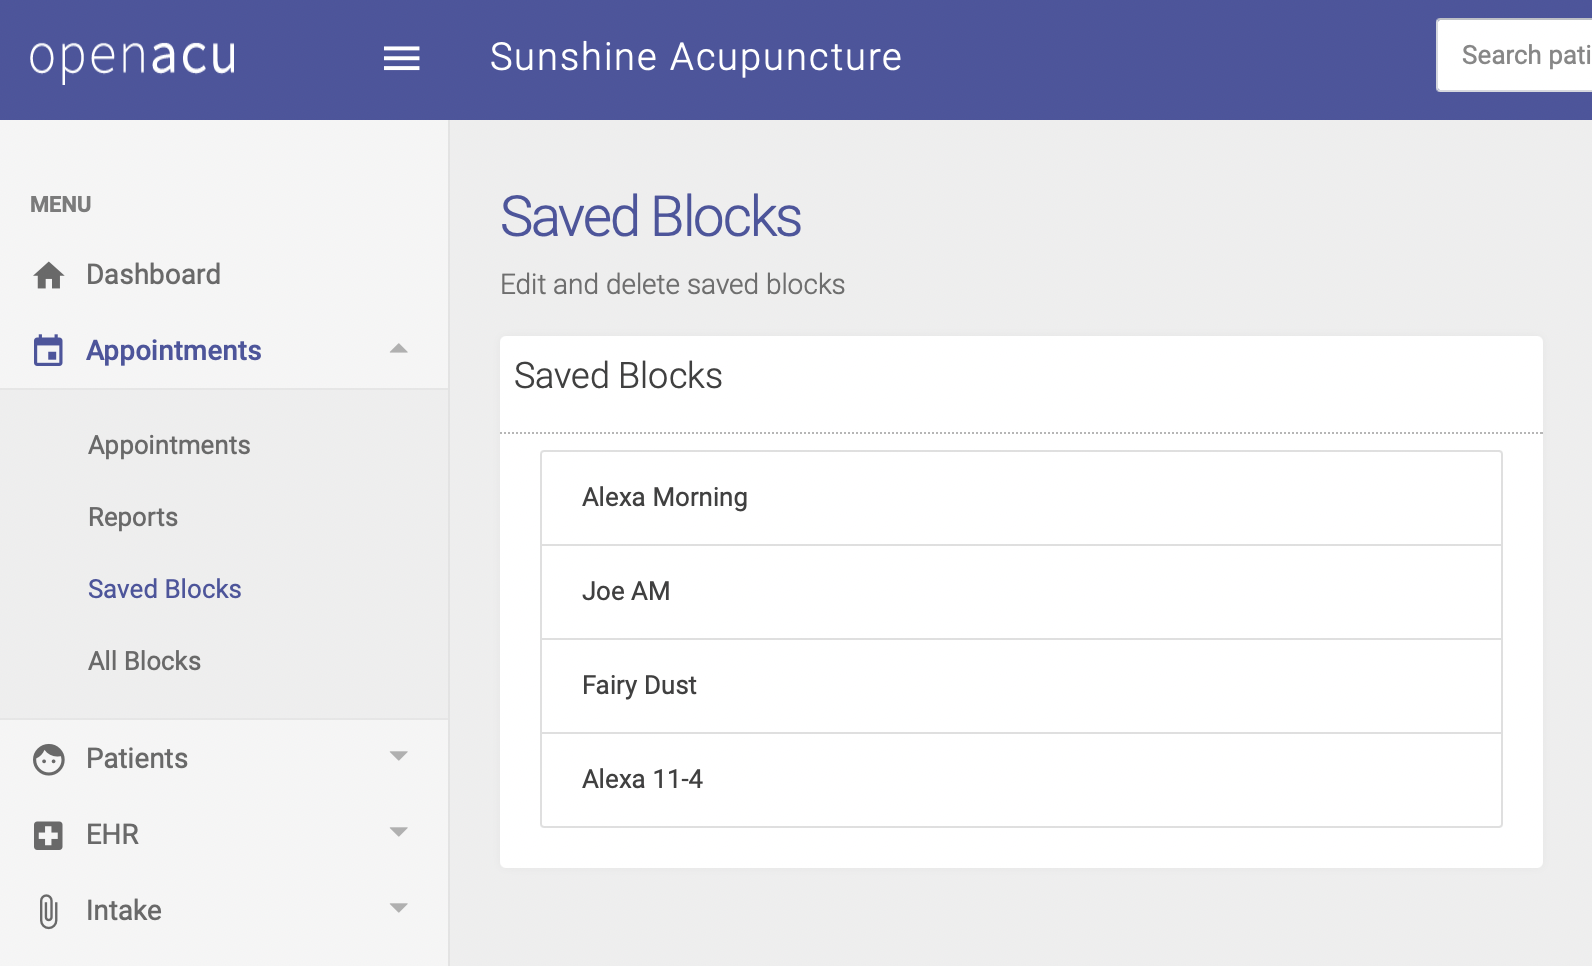
To Delete a Saved Block
From your Saved Blocks page, click on the name of the block you want to delete. The details of the saved block will appear to the right. Click Delete to delete the saved block.
To Edit a Saved Block
You can edit the title of a Saved Block but not any of the details. From your Saved Blocks page, click on the name of the block you want to edit. The details of the saved block will appear to the right. Enter your new title in the Title field and click Save.
Scheduling an appointment
If you have not created any blocks, please do so prior to scheduling any appointments. Open ACU lets you create appointments on a Block or shift based on the preset parameters of the block.
Here's a video overview of how to schedule an appointment:
Schedule an appointment on a block
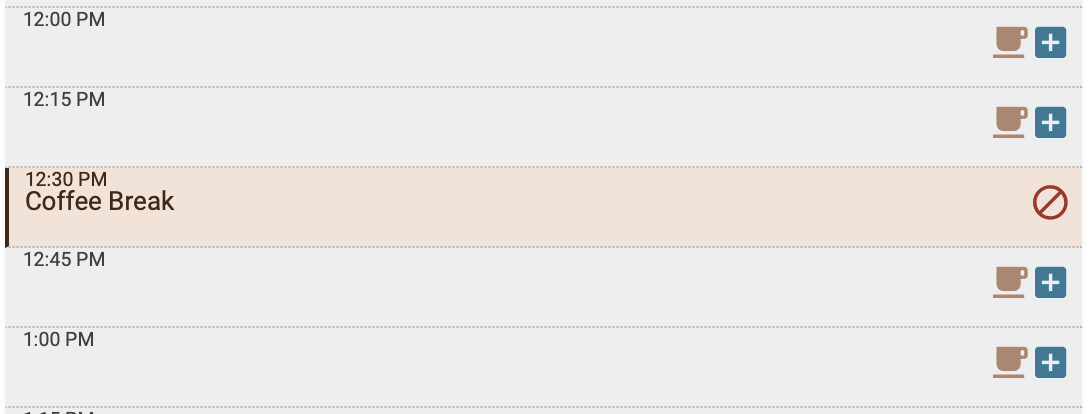
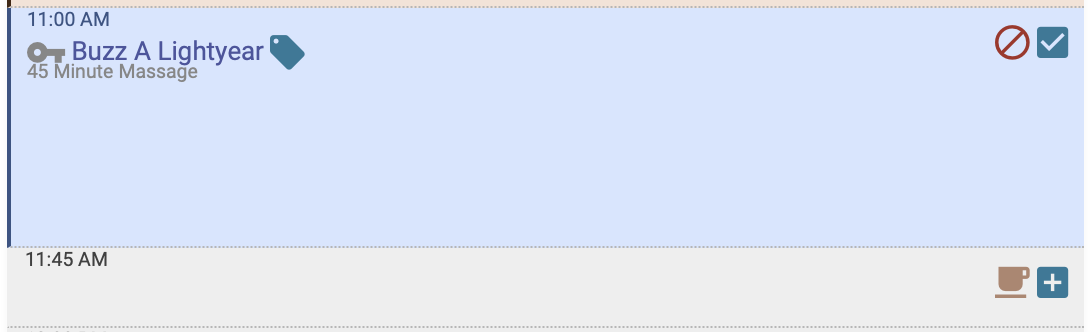
Find the slot you want to add the appointment to. It will have the time on the left and two icons on the right. The coffee cup icon is for adding a coffee break to the block. Click the [+] sign.
A popup form modal will appear. This is where you'll enter the appointment details:
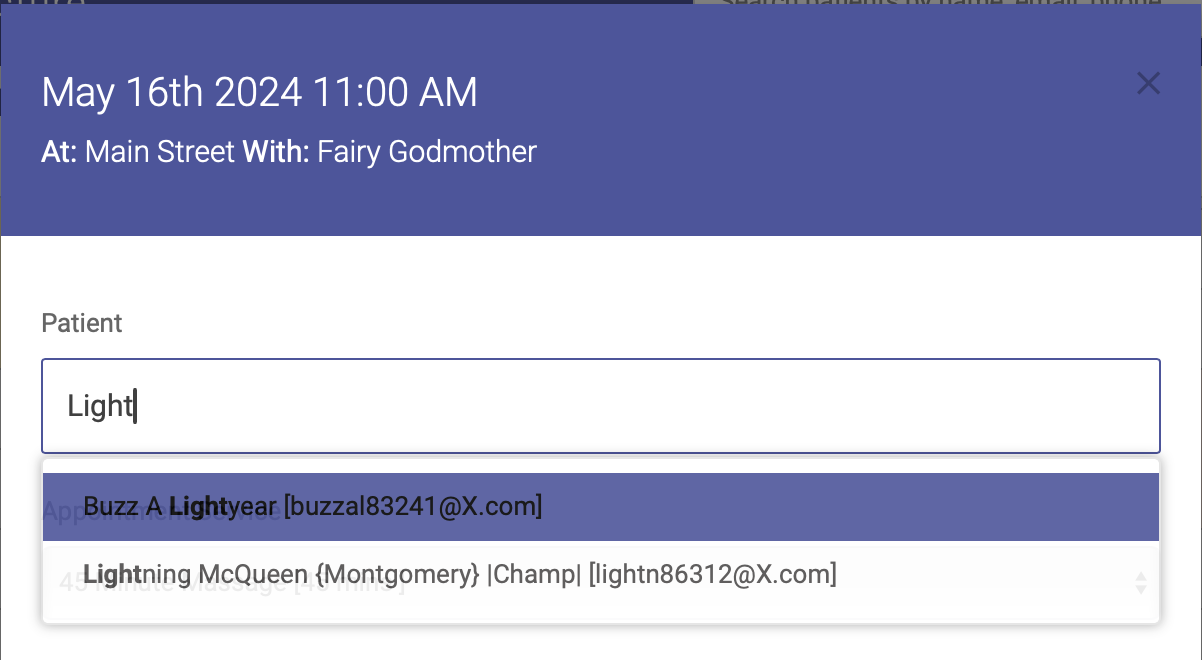
- Choose the patient by typing their name or their email address in the field. A dropdown will appear, select the patient by clicking their name or arrowing down to the name:
- You'll then select the Service from the drop down menu (if only one Service is available for a Block, there will only be one option in the drop down menu):
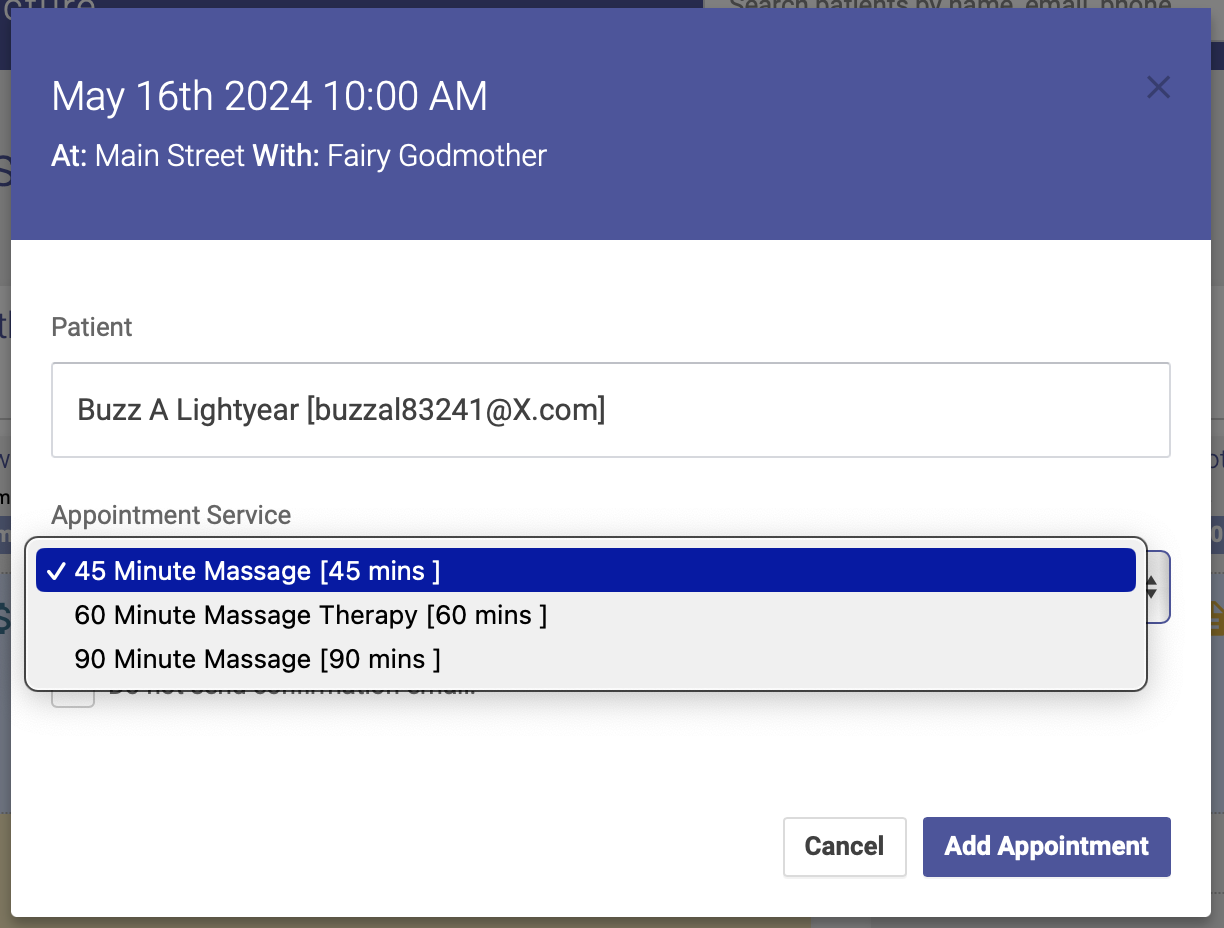
- Click the Add Appointment button. Your appointment is now scheduled! The Service name will appear under the patient's name on the schedule:
Checking In
Once an appointment is set by placing it on a block you are ready for patients to arrive. Upon arrival, in Open ACU you will check them in. This does two important things to your schedule and your patient's data. First it records a successful appointment, confirming the patient arrived. Second you can add transactional information to the appointment an therefore the patient.
Additionally, the practitioner will not be able to enter any treatment notes in the EHR until the patient has been checked in.
Checked In

Clicking the check icon at the far right of the appointment slot not only opens the transaction form modal, it records the fact that the patient showed up for their appointment. In your reports and in the patient record, plus on the schedule grid, it is clear which patients have shown up or not.
The check in also timestamps the checkin and the user who did so. All a part of the appointment log.
Check in Details
Once you click the check icon, a modal will appear where you will enter the patient's payment details:
Go to the next part of Checking In “The Checkin Transaction”.
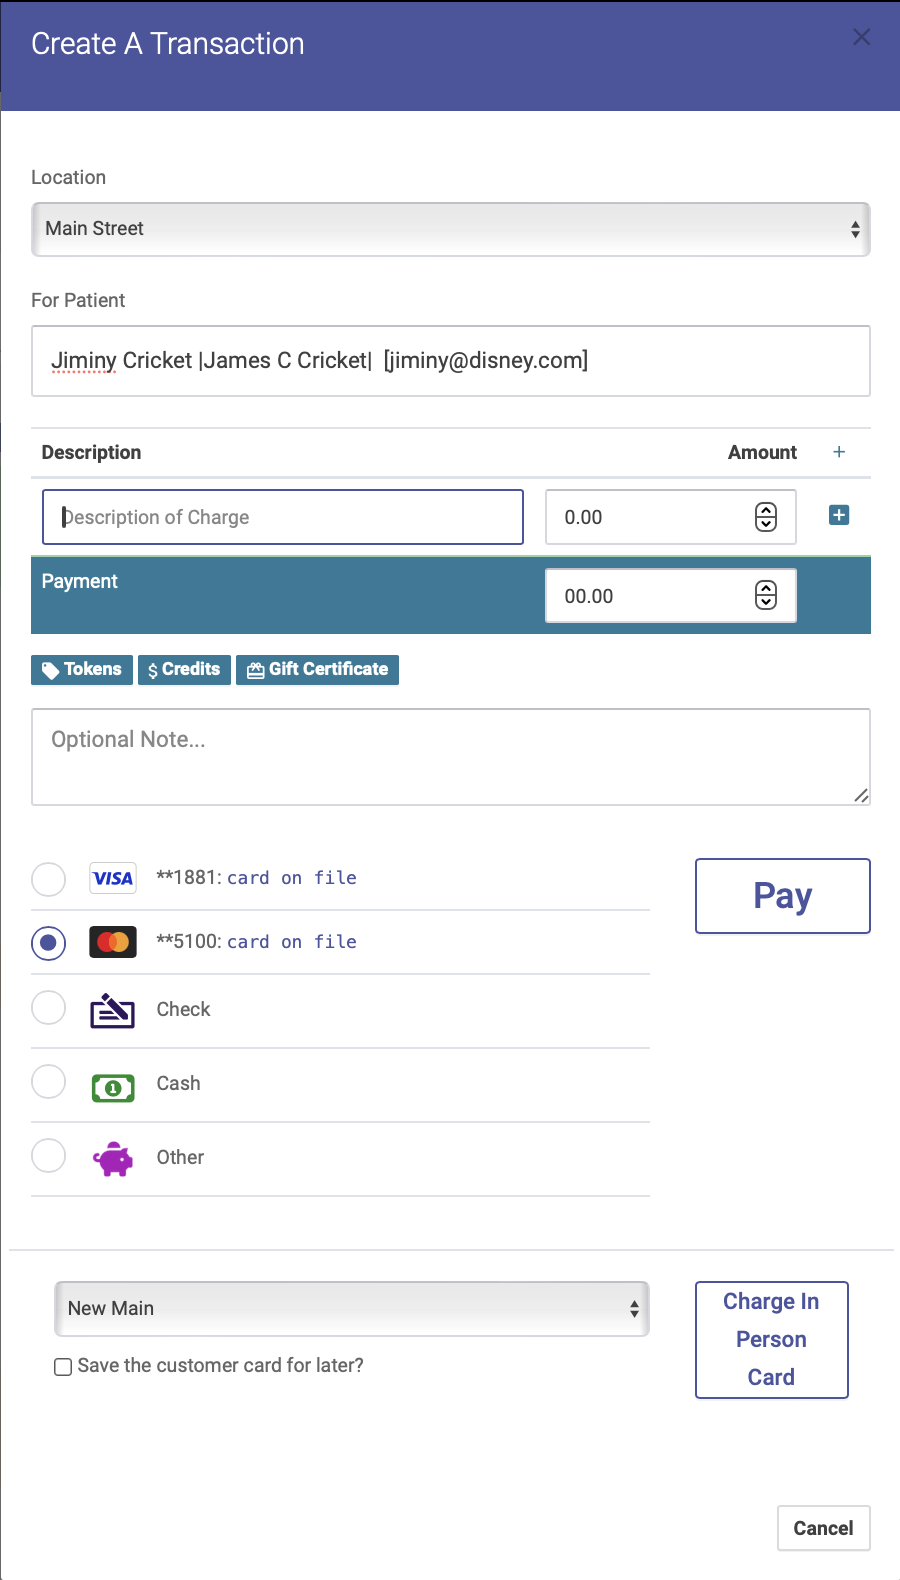
The Checkin Transaction
In Open ACU you cannot edit transactions, checkins or otherwise.
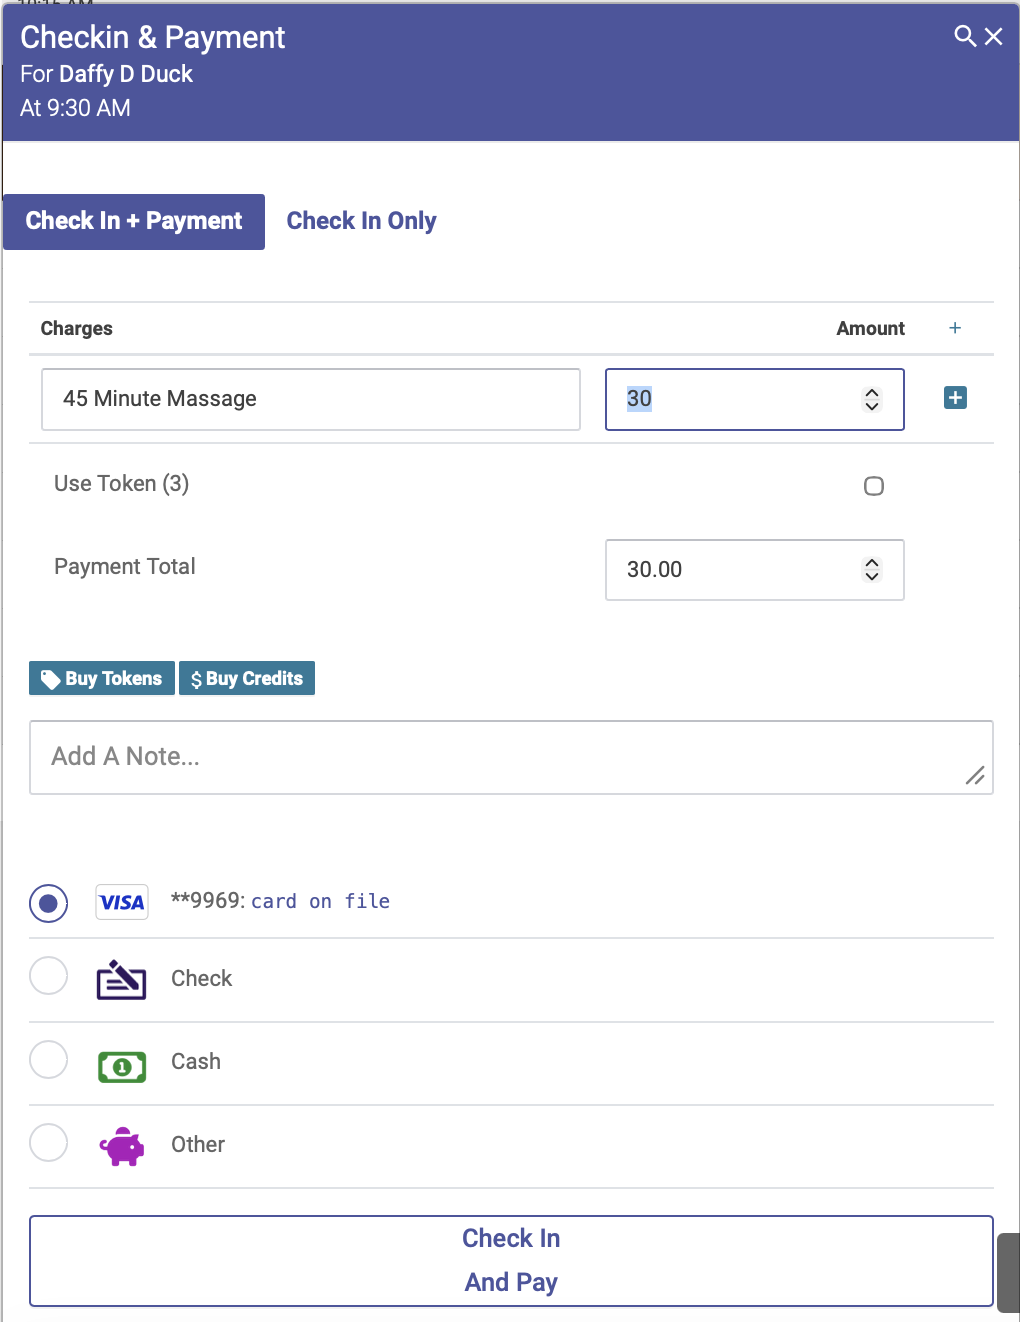
When you checkin a patient into the schedule you are confirming their arrival and creating a financial transaction for their visit. This transaction is a standard debit and credit system that is associated with a patient. Let's look at the basic checkin window. (Click on the image to enlarge)
Quick Checkin Tip 
- Enter the amount to charge for treatment (or leave it your default amount)
- Tab once to total field and hit return.
Checkin Transaction Fields
- Treatment Description. This first line is always the treatment line and it cannot be deleted.
- Treatment Amount. This is what you charge for a treatment. It is not advisable to enter 0.00 because you will want to adjust the fee for any treatment with patient tokens or credit.
- Payment Total. This amount will be calculated automatically and should typically not be changed. If you enter a number higher or lower than the real total it will add credit or debit to the patient's account.
- Add a Note. This is an optional field where you can add a note about a transaction. The note will appear on the receipt, and also on the transaction report.
- Payment Type. This is where you'll select your payment type: credit card, cash, check, or other. A few notes about payment types:
- You can select your default payment type on your Settings page, in the "Basics" section.
- If a patient pays with tokens or credits, the payment type will automatically default to "Other."
- If you are using our integrated payments via Stripe, and the patient has a card on file, you'll select the card on file and click "Check in and Pay."
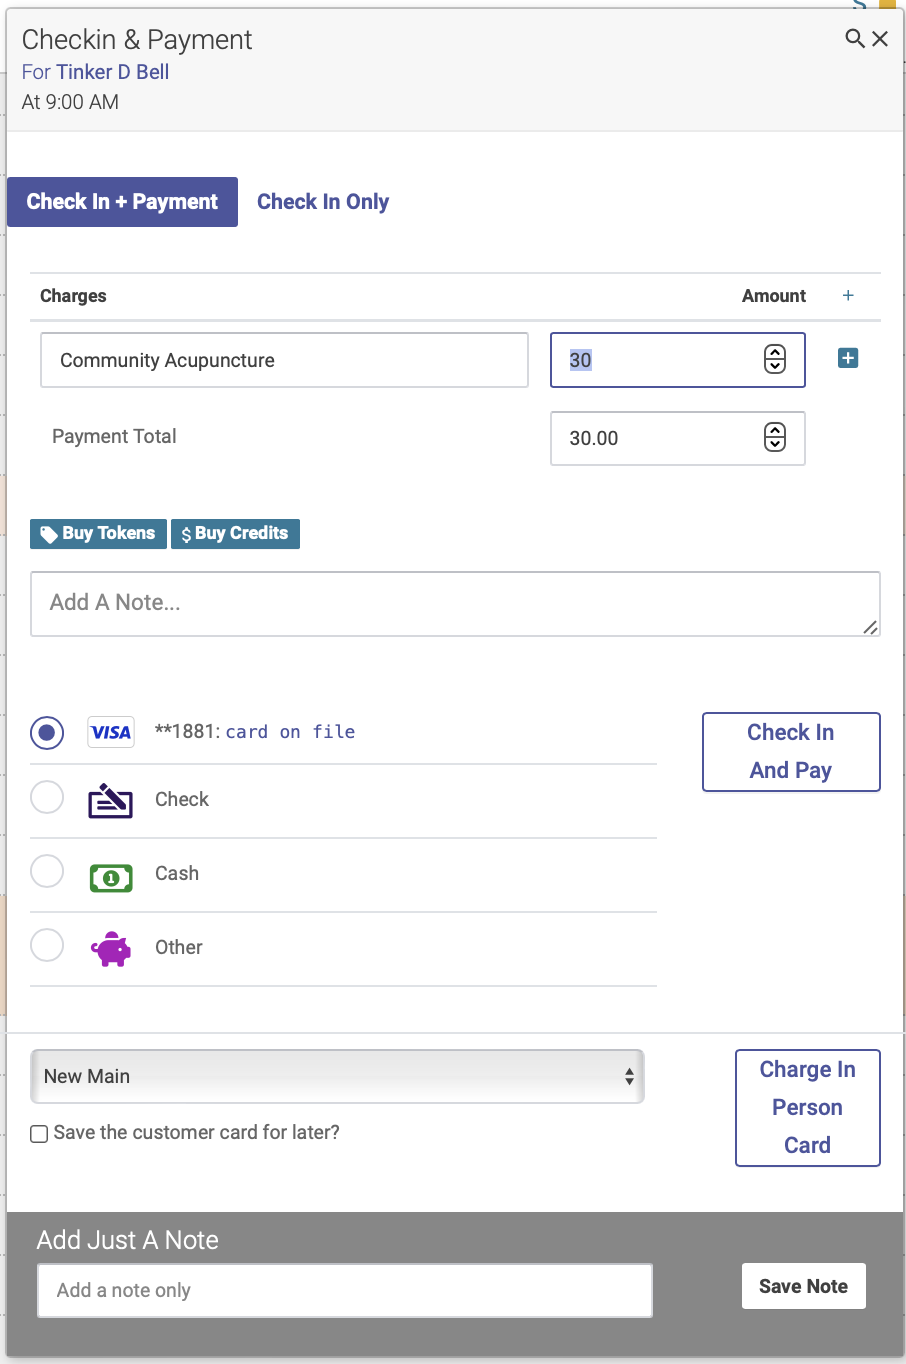
- If you are using our integrated payments via Stripe, and the patient does NOT have a card on file, you'll select "Charge In Person Card," and then follow the steps on the card reader.
- If you do not use our integrated payments via Stripe, you'll just select "Credit Card" for your payment type, then click "Check in and Pay."
Adding Items to a Transaction
Sometimes you sell something other than a treatment to a patient when they visit. Open ACU allows a non-treatment transaction for when patients arrive and want to purchase something without having a treatment appointment. See the non-treatment transaction help for more. The transaction popup form allows additional lines to the transaction.

Click the plus sign at the right of the treatment amount to add lines. This will add a new line. You can add a description and price. Click the red minus sign to delete the line from the transaction.

These lines add to the total due. Using a token for the transaction will only apply to the treatment amount.
Use Patient Token to Pay For Treatment

If a patient has at least one token they can use one to pay the treatment amount as entered in the transaction. This will adjust the balance of the transaction. Added line items total will remain and will need to be paid. Clicking Save will reduce the patient's tokens by one.
Use Patient Credit to Pay

If a patient has credit it will appear in the transaction. Credit can be used to pay for the entire transaction including extras and the treatment. If the credit is less than the total it will reduce the total transaction by the amount of credit and the rest will need to be paid.
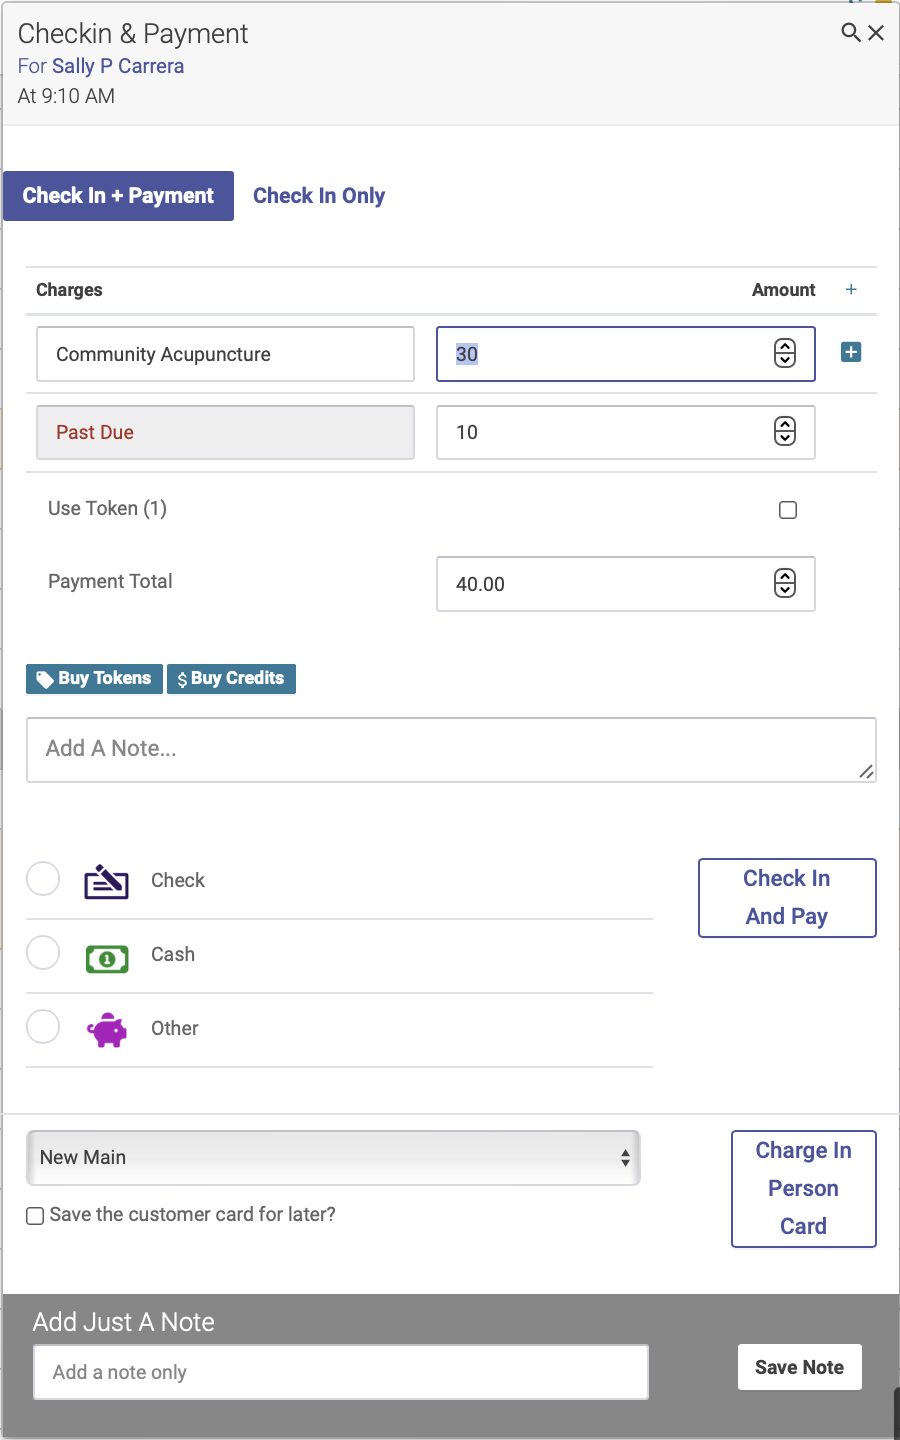
When a Patient Has a Debit
Patients may have accumulated debit on their account when they were either unable to pay (as noted above) or from a no-show cancellation. When this happens a debit amount appears in the transaction. The transaction amount is increased accordingly.
Check in without recording a transaction
You can check in a patient without recording a transaction by enabling the checkin without transaction feature.
Getting started
To turn on this feature, go to your Settings page. In the Basics section, click the Allow Checkin without a Transaction box:
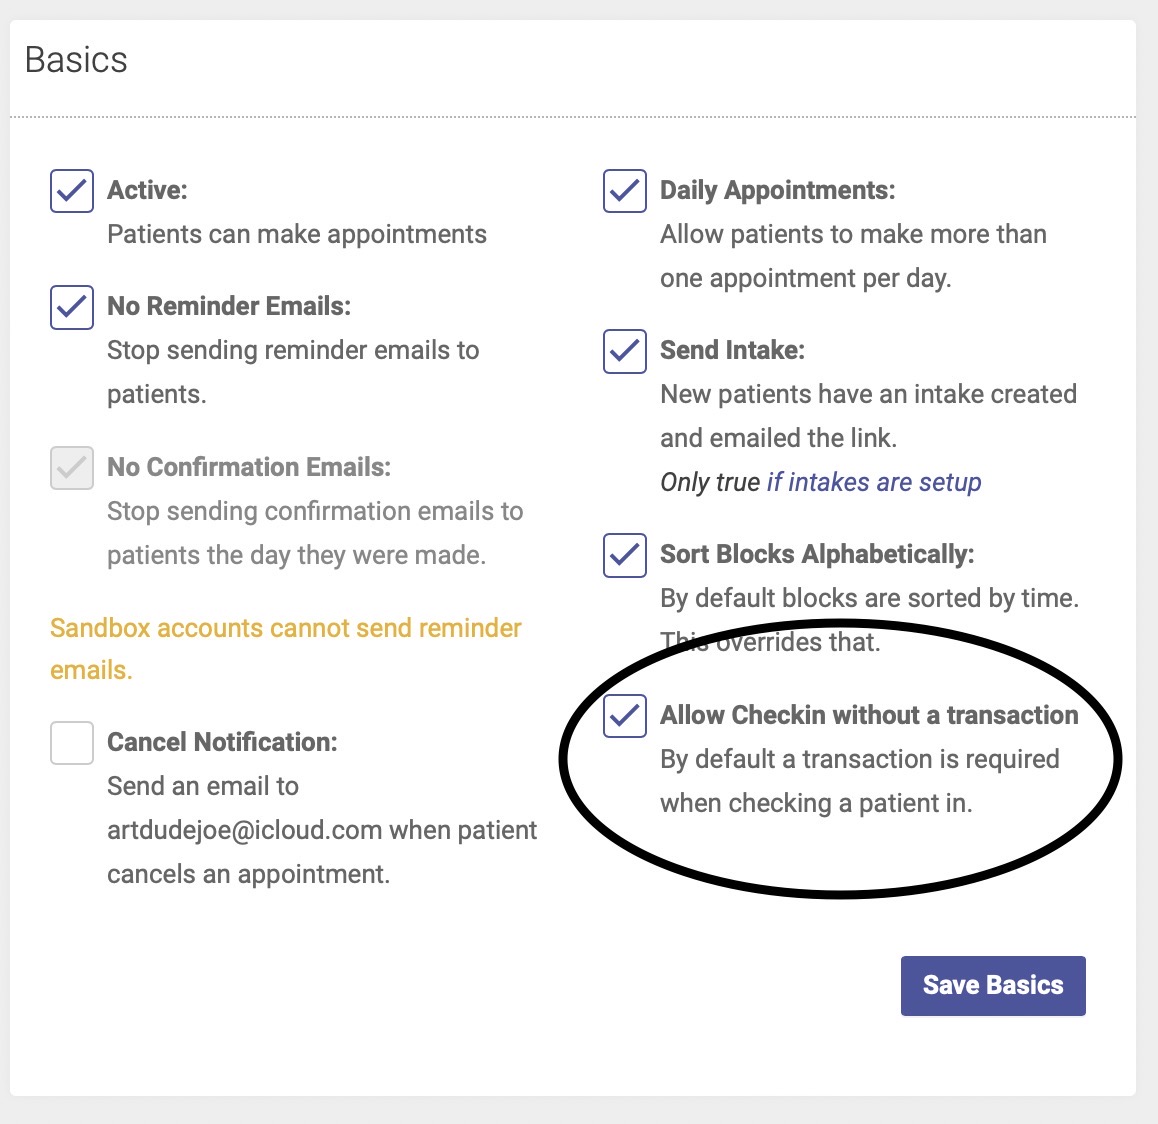
Note: the default setting is to require a transaction at the time of checkin. If you’d like to check in patients without a transaction, you’ll need to opt in to this feature.
Be sure to click Save Basics when you’re finished.
How to check-in without recording a payment
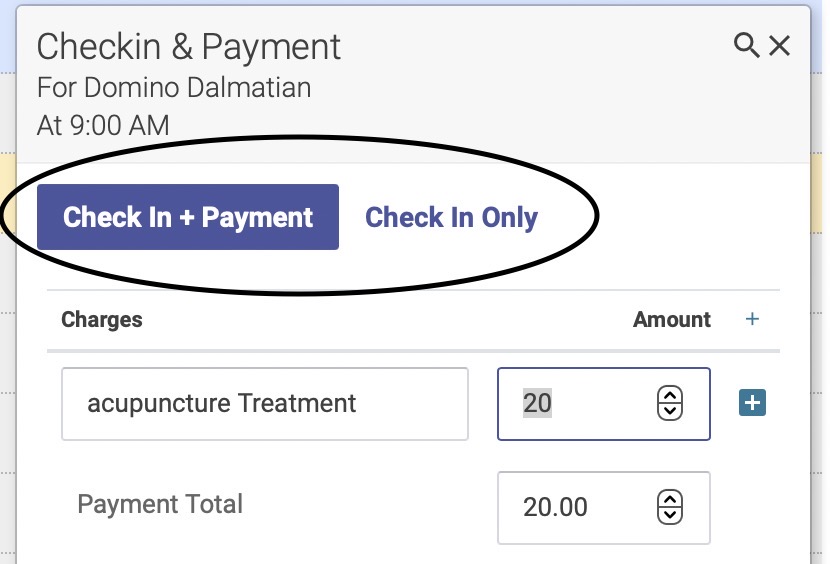
First, click the checkbox next to the patient’s name on the schedule. The popup that appears will show two options: Check In + Payment or Check In Only:
Click Check In Only—this will eliminate the payment and transaction boxes from the popup window. Then click the green Checkin Only button in the bottom right hand corner of the popup box:
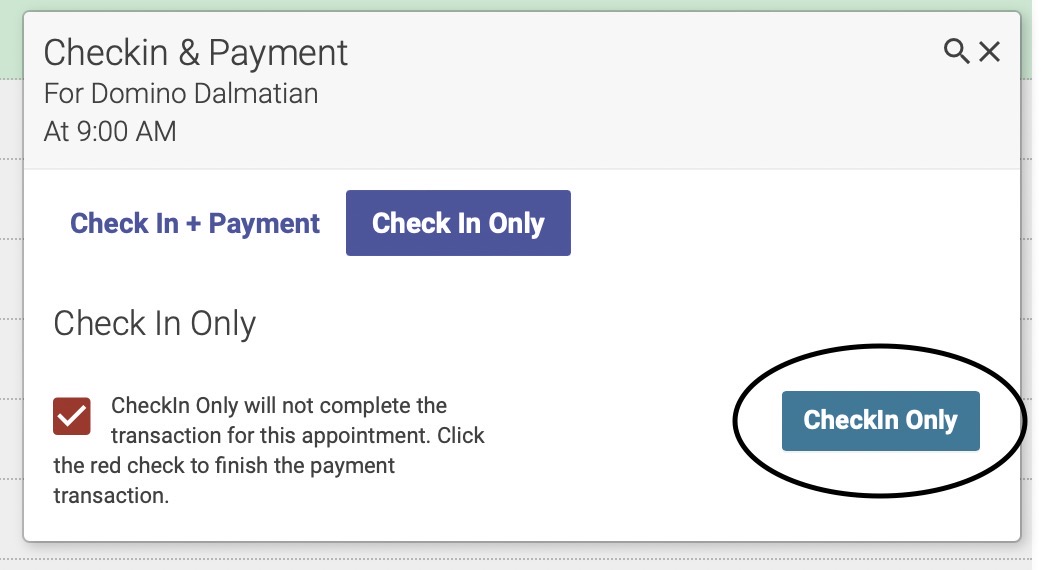
The checkin check box next to the patient’s name will now appear in RED—this is your reminder that you still need to collect and record the patient’s payment:

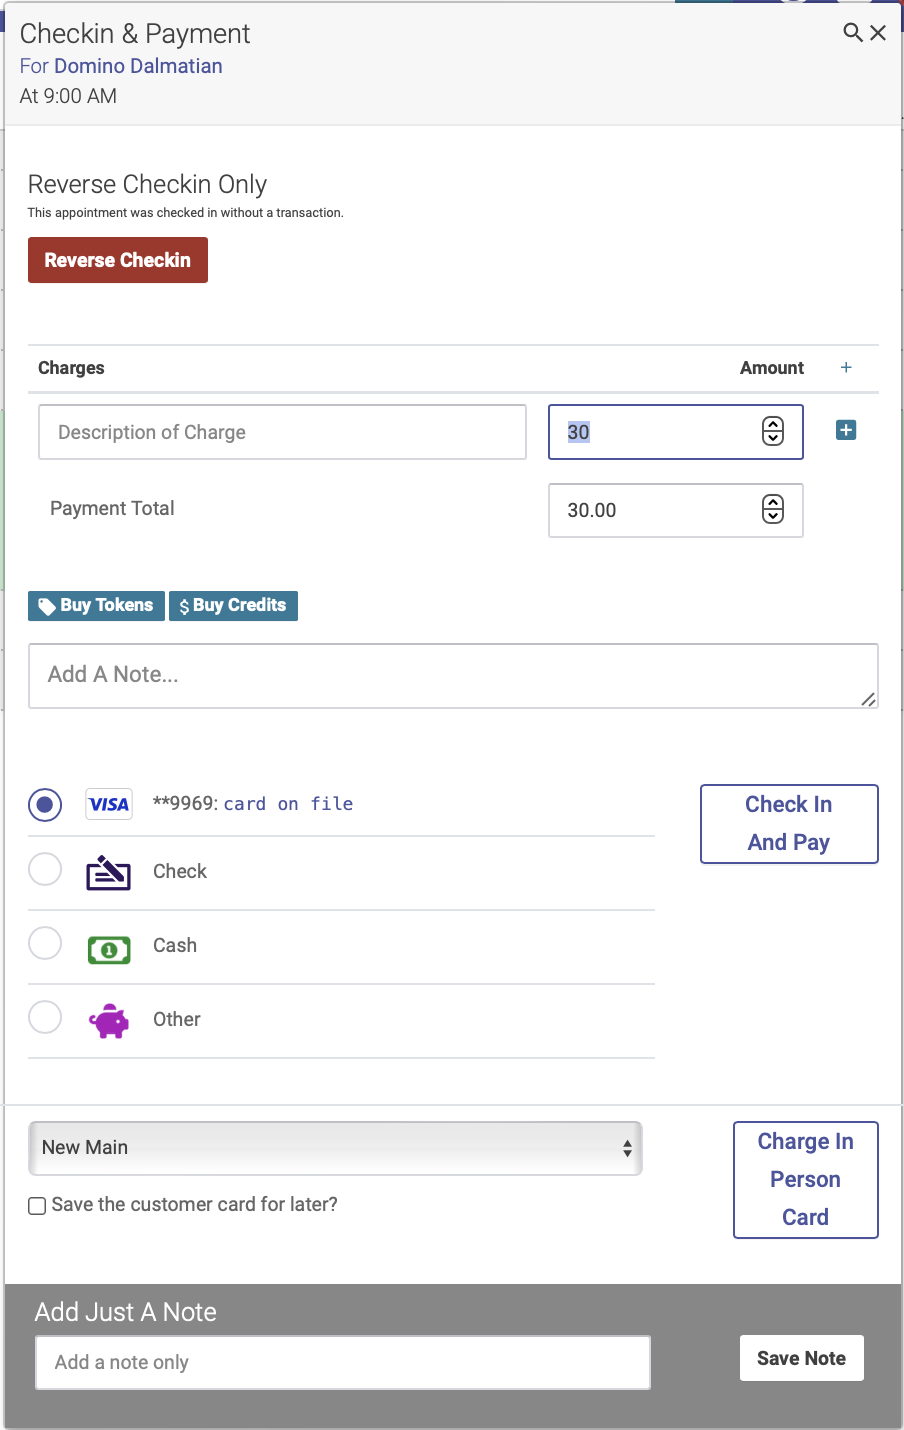
When you’re ready to collect and record payment, click the red check box. This will bring up the popup window, where you can record the transaction (you also have the option here to reverse the checkin, if you checked in this patient by mistake):
Once you’ve recorded and saved the payment, the patient will appear in yellow on the schedule:

Here's a quick screen recording showing how it works:
Canceling Appointments
Appointments can be cancelled by an admin under the following rules:
- If the appointment has not been checked in
- if it has you will need to reverse the appointment transaction.
- Appointments in the future or past can be cancelled, in effect removing it from the schedule
- There is a log kept for each cancelled appointment that you can see from the patient's page.
Patients can also cancel appointments via the patient portal
But, they are restricted by the number of hours the clinic has set in the preferences. This time is from 4 hours to 36 hours prior to the appointment.
How to cancel an appointment
Click the red cancel button next to the patient's name on the schedule:

When the admin cancels an appointment the cancel popup appears.
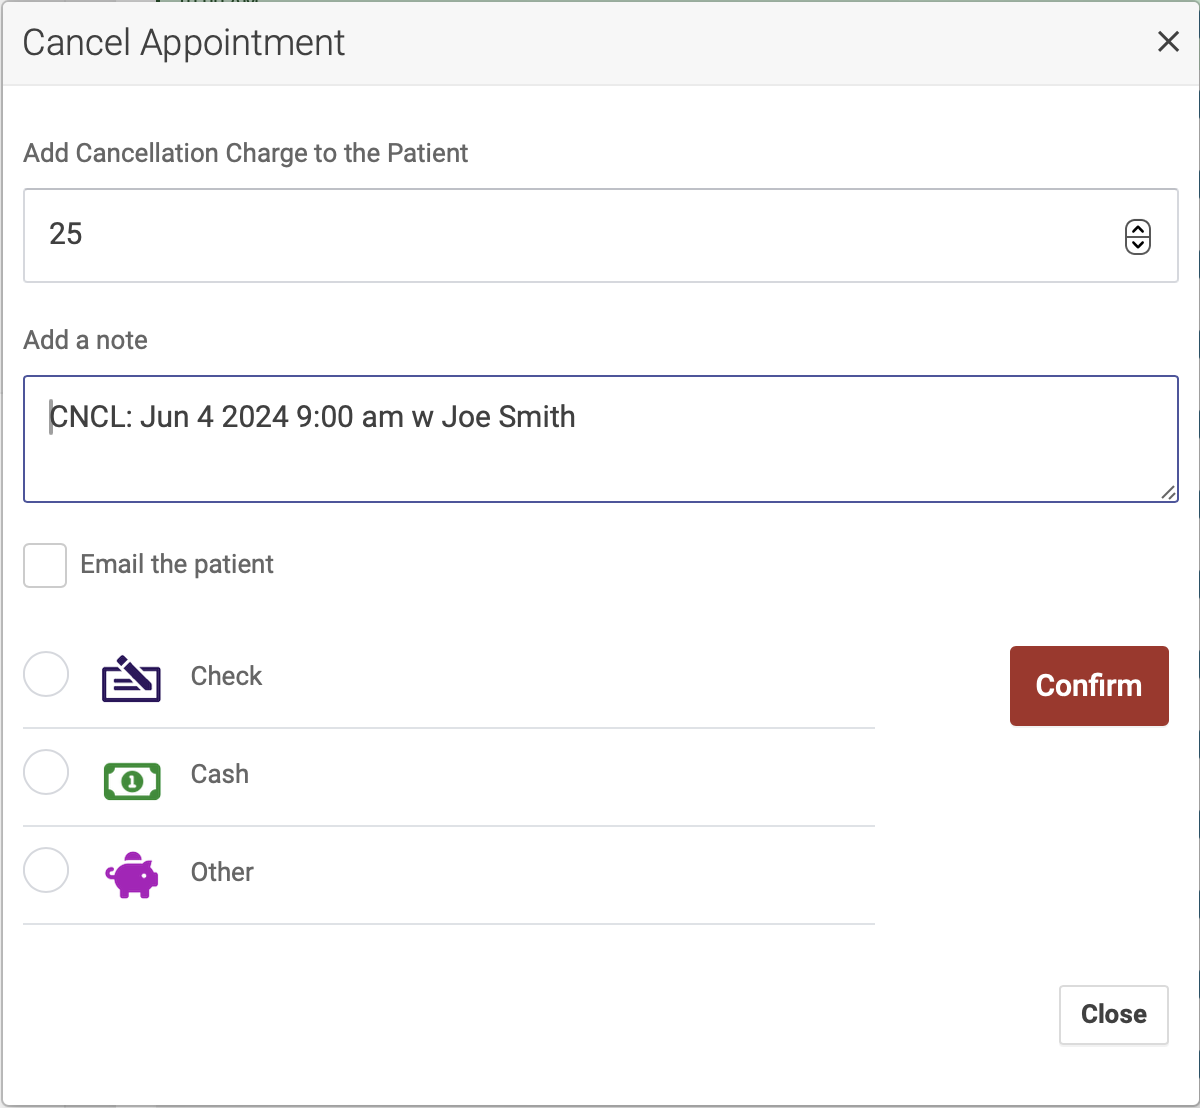
To charge the patient a no-show fee enter a dollar amount in the first field. A note is first for the appointment log and may also be used to send the patient an email. Checking the box sends that email with the details of their appointment cancellation. You may use the default values, no charge and the log note without sending an email.
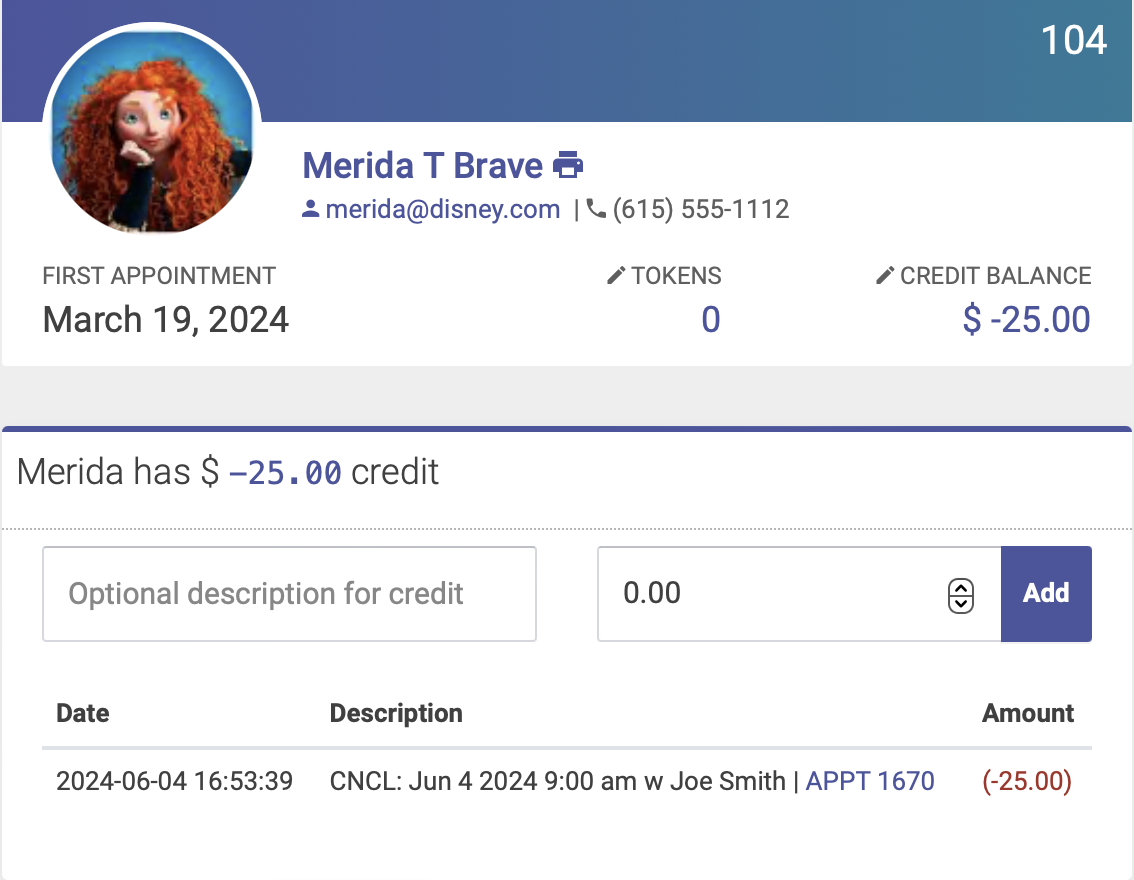
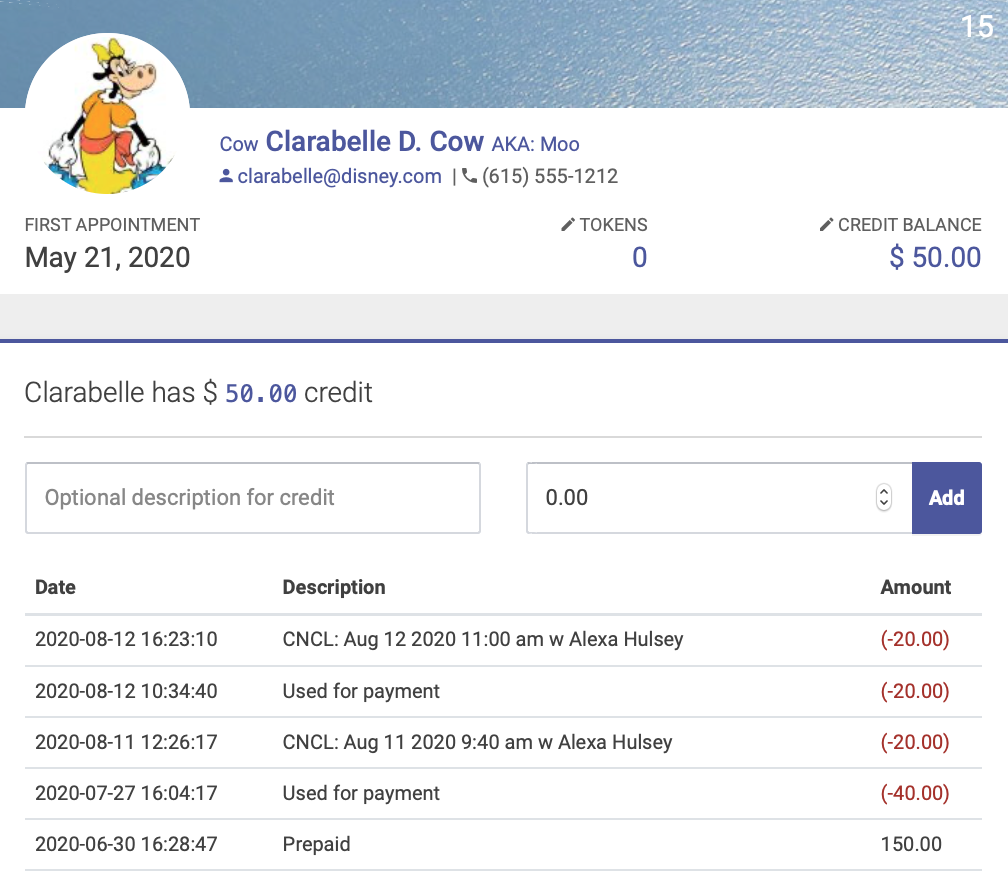
When you charge a patient a cancelation fee, it will appear as a negative credit on their account. You can view their credit balance and history from their Patient Profile page:
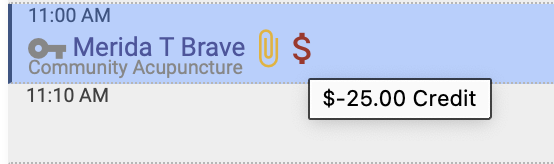
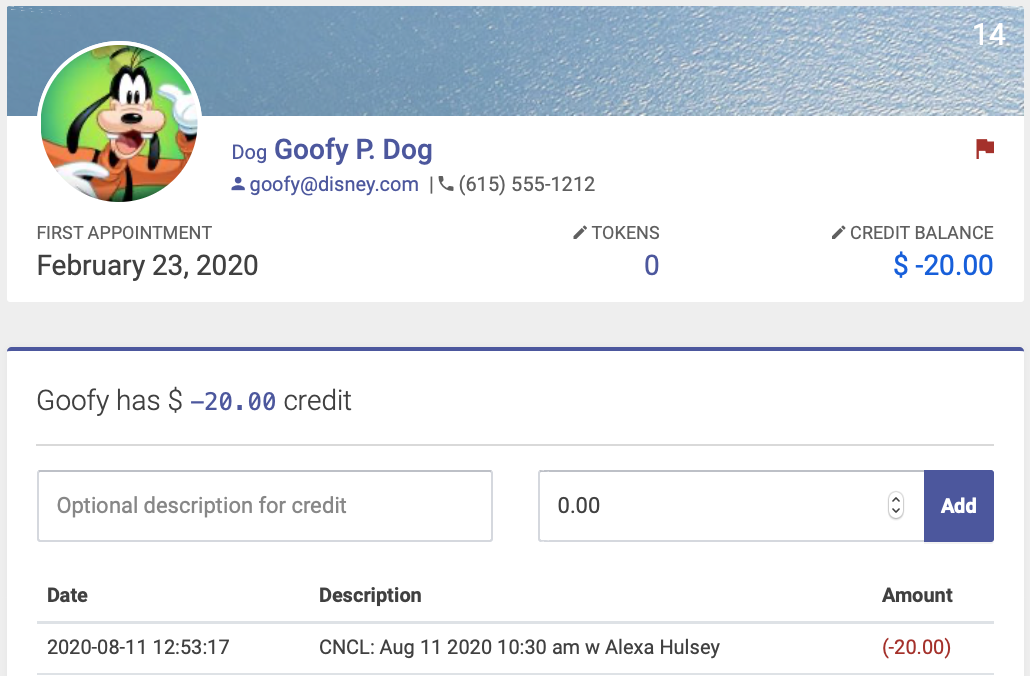
The negative credit balance will appear as a red dollar sign next to their name at future appointments, until the credit balance is paid:
How to charge the cancellation fee to a patient's credit card
If you're using our payments integration via Stripe, you can automatically charge the cancellation fee to a patient's credit card on file.
When you click the cancellation button and the cancel popup appears, you'll see an option to charge the card on file:
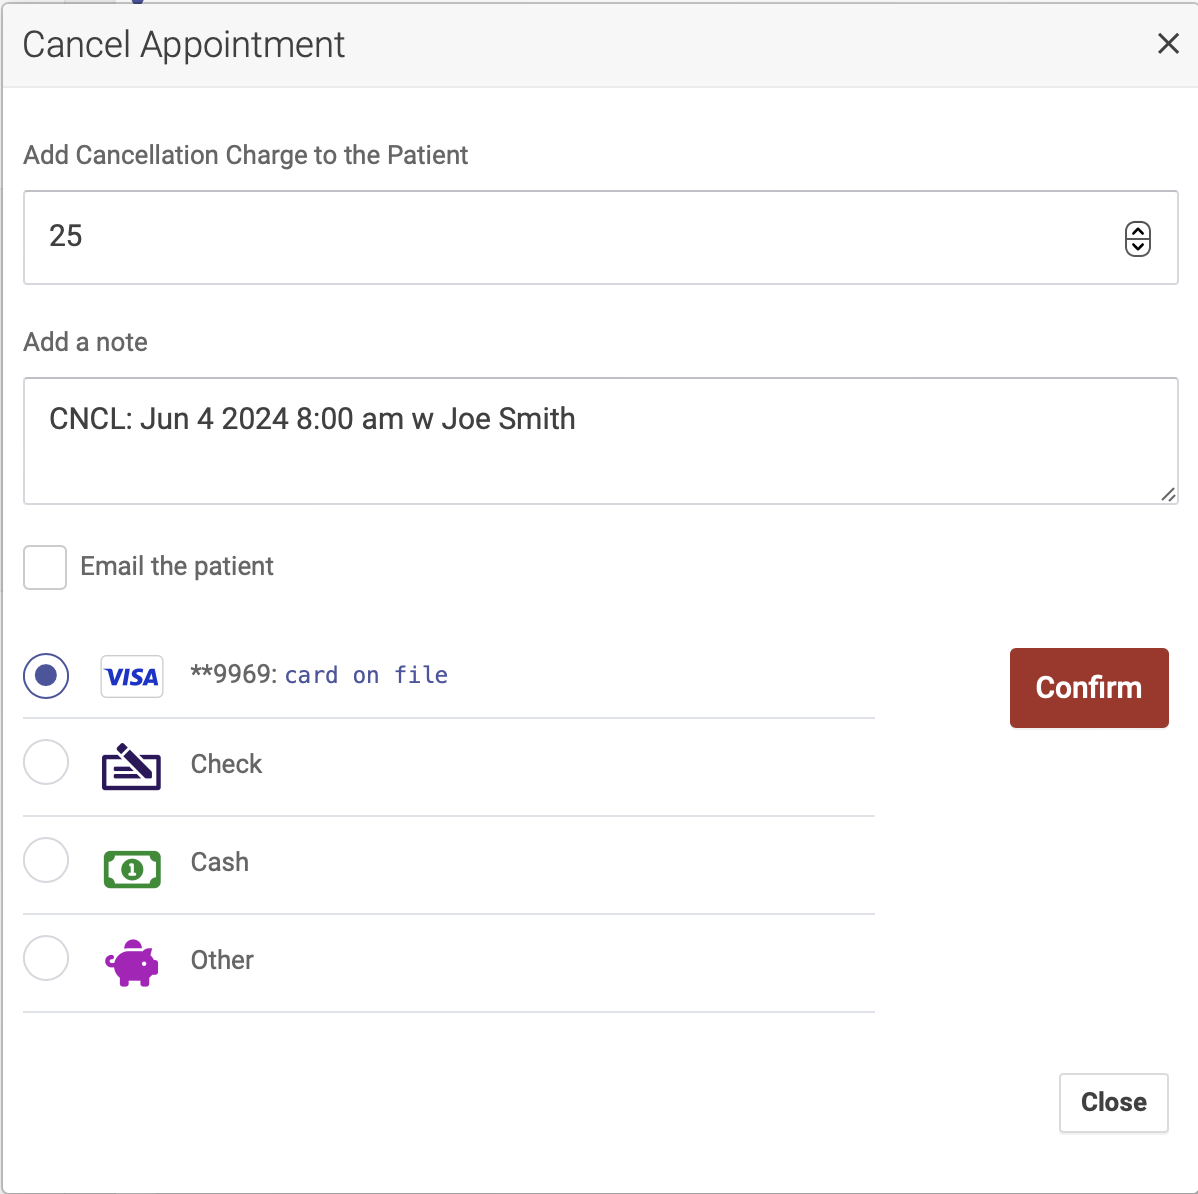
Select that option, then click Confirm. Their card has now been charged, and a negative credit balance will NOT show on their account.
Using tokens or credits to pay a cancellation fee
Tokens and credits can also be used to pay a cancelation fee.
Use Patient Token to Pay Cancelation Fee
Check the "take a token" box in the cancel popup - this will deduct one token from their account:

Note: You should only check this box if the patient has tokens in their account. Otherwise you'll give them a negative token balance.
Use Patient Credit to Pay Cancelation Fee
If a patient has a positive credit balance, the cancelation fee will automatically be deducted from their account when you confirm the cancelation and charge. The patient's credit history on their Patient Profile page will show when credit has been used to pay for treatments, cancelation fees, etc:

Waiting Lists
Each day / location combination can have a waiting list.
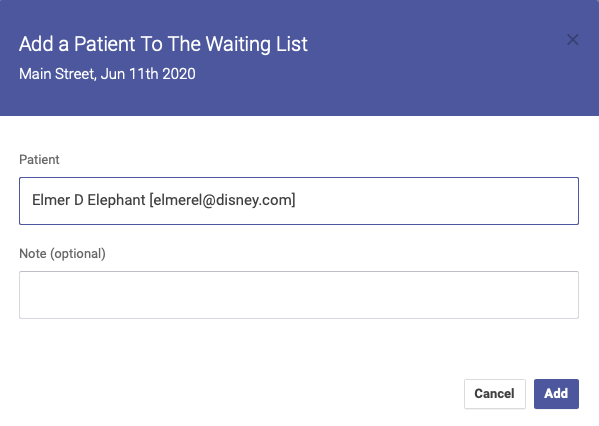
Adding a patient to the waiting list
First, click the plus sign next to Waiting List, located at the bottom of the left hand sidebar menu:

- In the modal window that opens start typing a patient's name and select (by clicking or arrowing down to) the patient you want to add the the waiting list.
- Add a note if you wish.
- Click Add
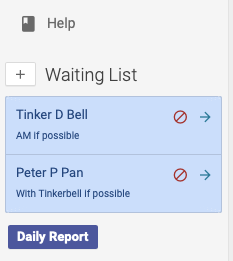
This will create a waiting list under the button, menu.
When deleting a block with appointments in it all those appointments will be cancelled but also added to the waiting list with a note stating who they were to see and what time.
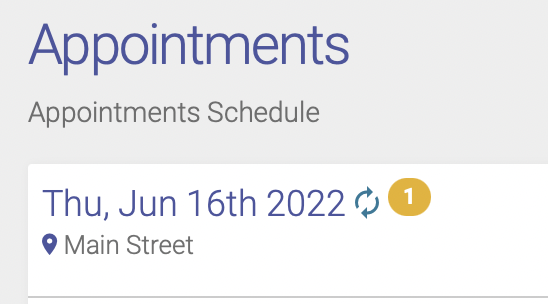
When one or more patients are on the waiting list for a given day, the number of patients on the waiting list will appear in gold at the top of the schedule, next to the date:
Adding appointments from the waiting list
Once there are patients in the waiting list you can easily add them to open slots on any block for that day / location.
If the slot is occupied with an appointment and you cannot select the slot to add from the waiting list as a squeeze, you will have to add that squeeze appointment conventionally.
- Click once on the appointment slot (not any of the icons) to select it. It will turn light green indicating that it has been chosen for a waiting list patient.

- Then click the right arrow next to the patient's name in the waiting list.

- A modal will popup.
- Confirm the slot information you are about to populate.
- Choose a slot time.
- Check the "Squeeze" checkbox if this is a squeeze appointment.
- Click "add"

Allowing patients to add themselves to the waiting list
You can enable the waiting list feature on the patient portal from your Settings page. If you want to allow patients to add their names to the daily waiting list via the patient portal, check the Allow Patient Portal Waiting List box and click Save to save your preference:

Patients will see a Wait List button at the top of the schedule:
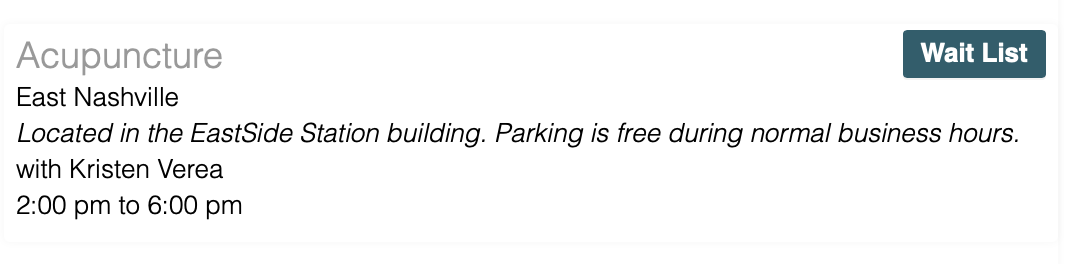
They can then add a note about their preferred appointment time. Their name will then show on the waiting list on the admin schedule.
Squeeze Appointments
Sometimes you have your schedule set, full of appointments and someone calls. What do you do? Squeeze them into your schedule. That's the idea behind Open ACU Squeezes. There are a number of scheduling strategies that utilize squeezing appointments which are outlined below. But first to how you create and manage squeeze appointments.
Adding A Squeeze Appointment
- Click the expanding icon in the block header to open the squeeze form modal.
- The expanding icon is the second icon. It is blue.

- The expanding icon is the second icon. It is blue.
- In the form start typing the name of a patient.
- Once you've entered 3 characters it will give you a list of names or email address that match.
- Arrow down or click on the patient you wish to squeeze into an appointment.
- Select a slot time.
- Squeezes cannot be double-time appointments
- The choices of slot times will not allow two squeezes on the same slot.
- The slot time can be occupied by a regular appointment, even if that appointment is double time.
- Click Add
- The squeeze appointment will appear on your schedule.


Squeeze Appointment Management
Squeeze appointments show up as a tab to the right. Clicking on the expand icon (not the checkin icon) expands the appointment slot view.

Clicking the "X" or hitting the escape key closes the slot view.
The expanded view works just like a regular appointment. You can cancel or checkin the patient.
Using squeezes in scheduling strategy
If your block slot times allow 6 appointments in an hour (10 min slots) you can expand that to more per hour using squeezes.
Since squeezes aren't available for patients to schedule through the patient portal you can add squeeze appointments for phone call ins or walk in patients. This leaves the regular slots available for the patient portal.
Day Notification
You can use the Day Notification to alert your patients and staff to any pertinent information that is specific to that day. For example, if the road in front of your clinic will be closed due to an event, use the Day Notification to communicate this.
The Day Notification does two things:
To add a Day Notification, click on the bell icon next to the date on the calendar:

Enter your subject and message:
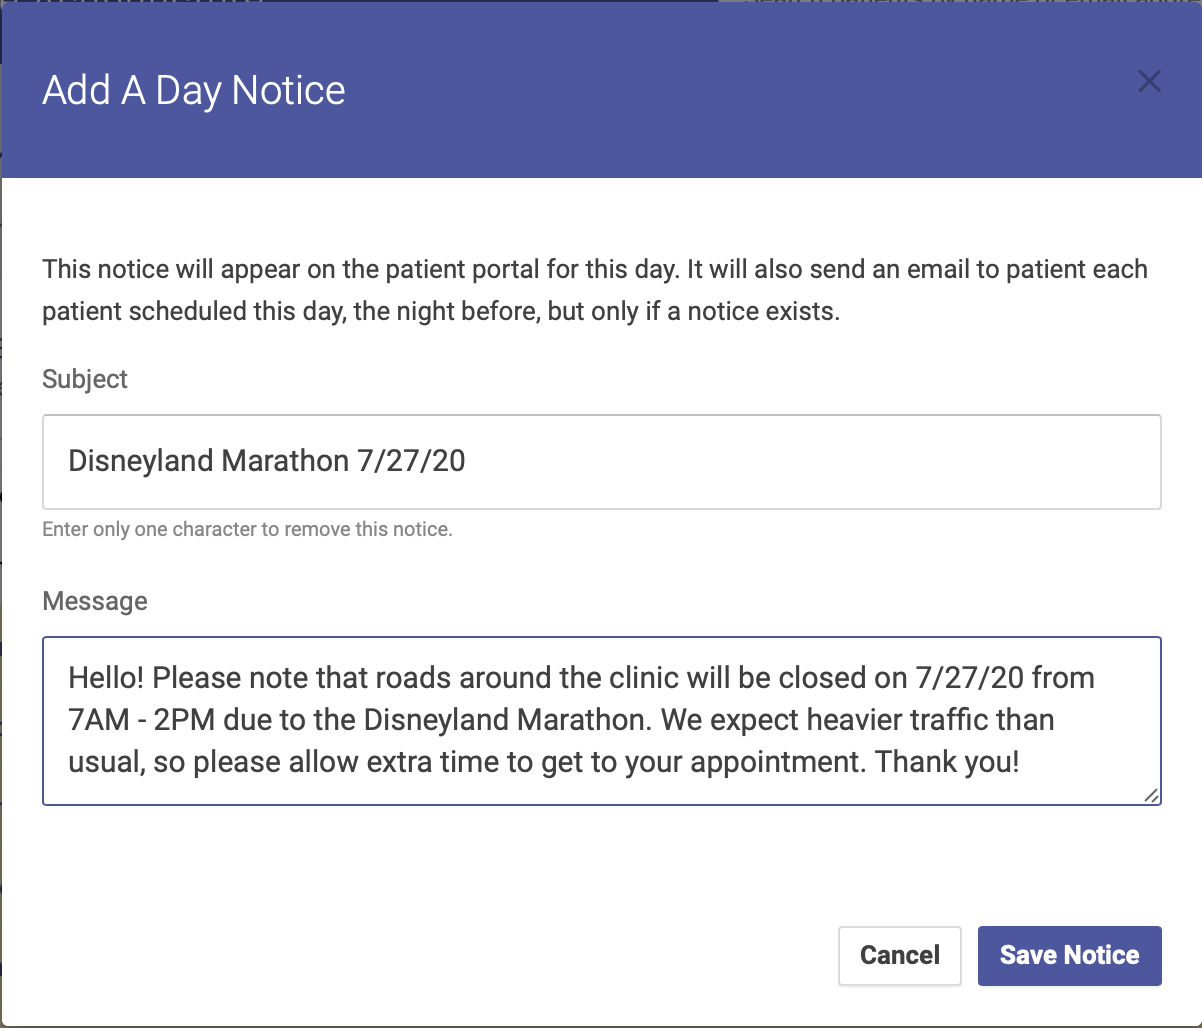
Click Save Notice to save your message.
Once you’ve saved your message, it will appear at the top of the day’s schedule:

Simply click the bell icon next to the notification subject to see the full message.
Recording a note prior to checkin
If you want to record a note on an appointment prior to the check-in, you'll click on the check-in icon next patient's name on the schedule as if you were going to check them in. However, don't enter any payment info. Instead, you'll add a note in the "Add note only" box at the bottom and click save:

Once you add the note and click Save, the checkin icon next to the patient's name on the schedule will turn yellow:
When you check in the patient, your recorded note will appear in the "Add a note only" box, and in the box above the payment method:

Here's a quick video showing how it works:
Text message appointment reminders
Your clinic has the option to send SMS/text message appointment reminders in addition to email reminders. Patients will need to opt in to receive text messages. They can opt in by logging in to the Patient Portal, or you can do it for them via the Patient Profile Page.
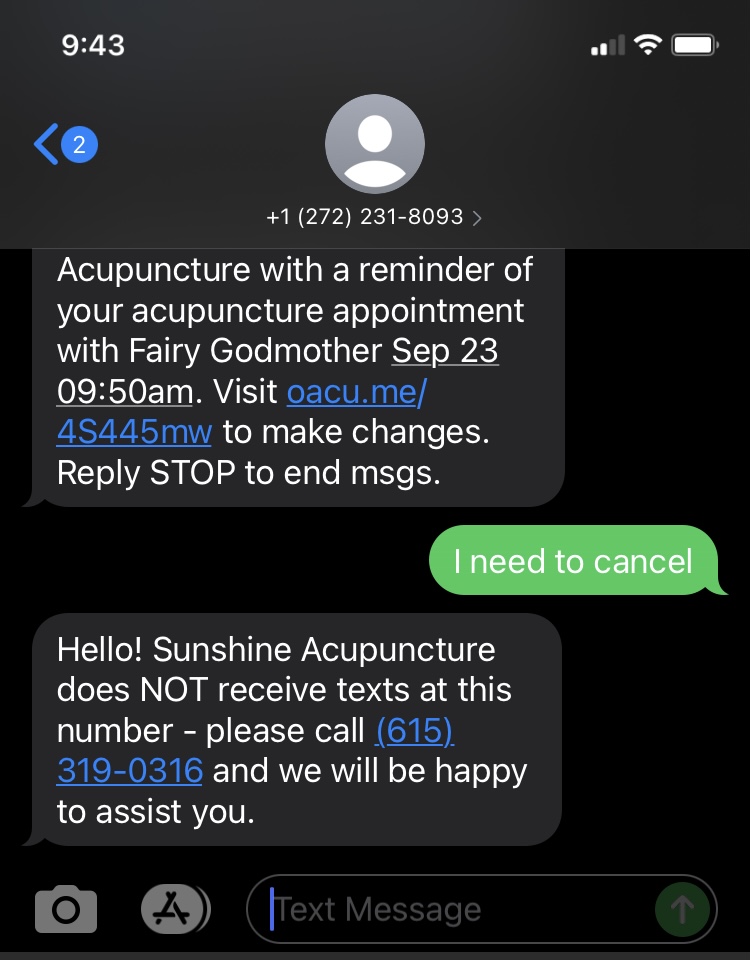
This feature does NOT include two way texting. If a patient replies to a reminder text with anything other than STOP, they'll receive a message directing them to call your clinic phone number for further assistance (see below for an example).
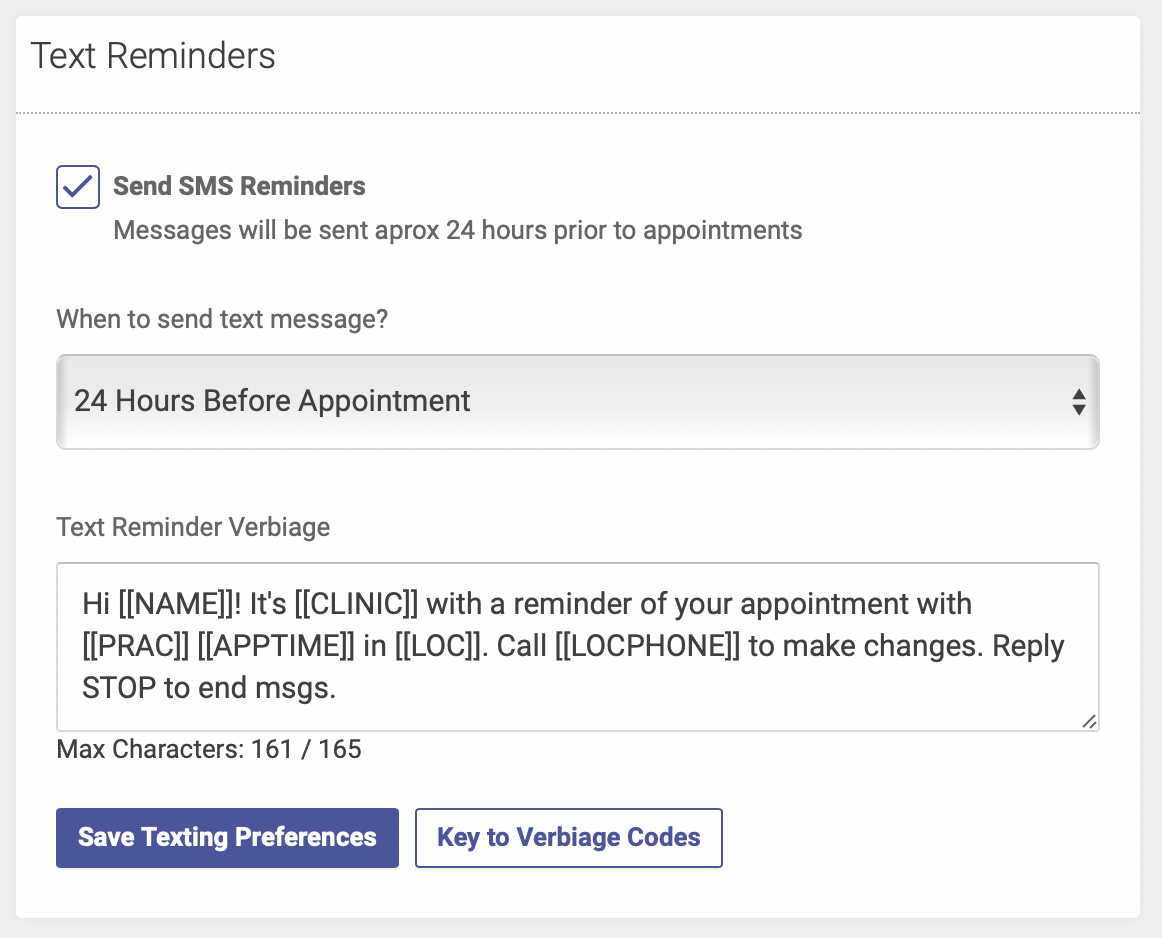
Setting up SMS reminders
To activate the SMS reminders feature and enter your settings, go to your Settings and Templates page. On the top right hand side you'll see a box for Text Reminders:
Complete the following steps to activate SMS reminders:
- Check the Send SMS Reminders box
- Select your preference for when text messages are sent - they can be sent either 24 or 48 hours before the appointment.
- Enter your verbiage for your text message - click the Key to Verbiage Codes button for options to customize your messages.
- Click Save Texting Preferences and you're done!
See this reference for the text code variables you can use or click the Key to Verbiage Codes button on your admin page.
Next, patients will need to opt in to receive text message reminders. They can opt in by logging in to the Patient Portal, or you can do it for them via the Patient Profile Page.
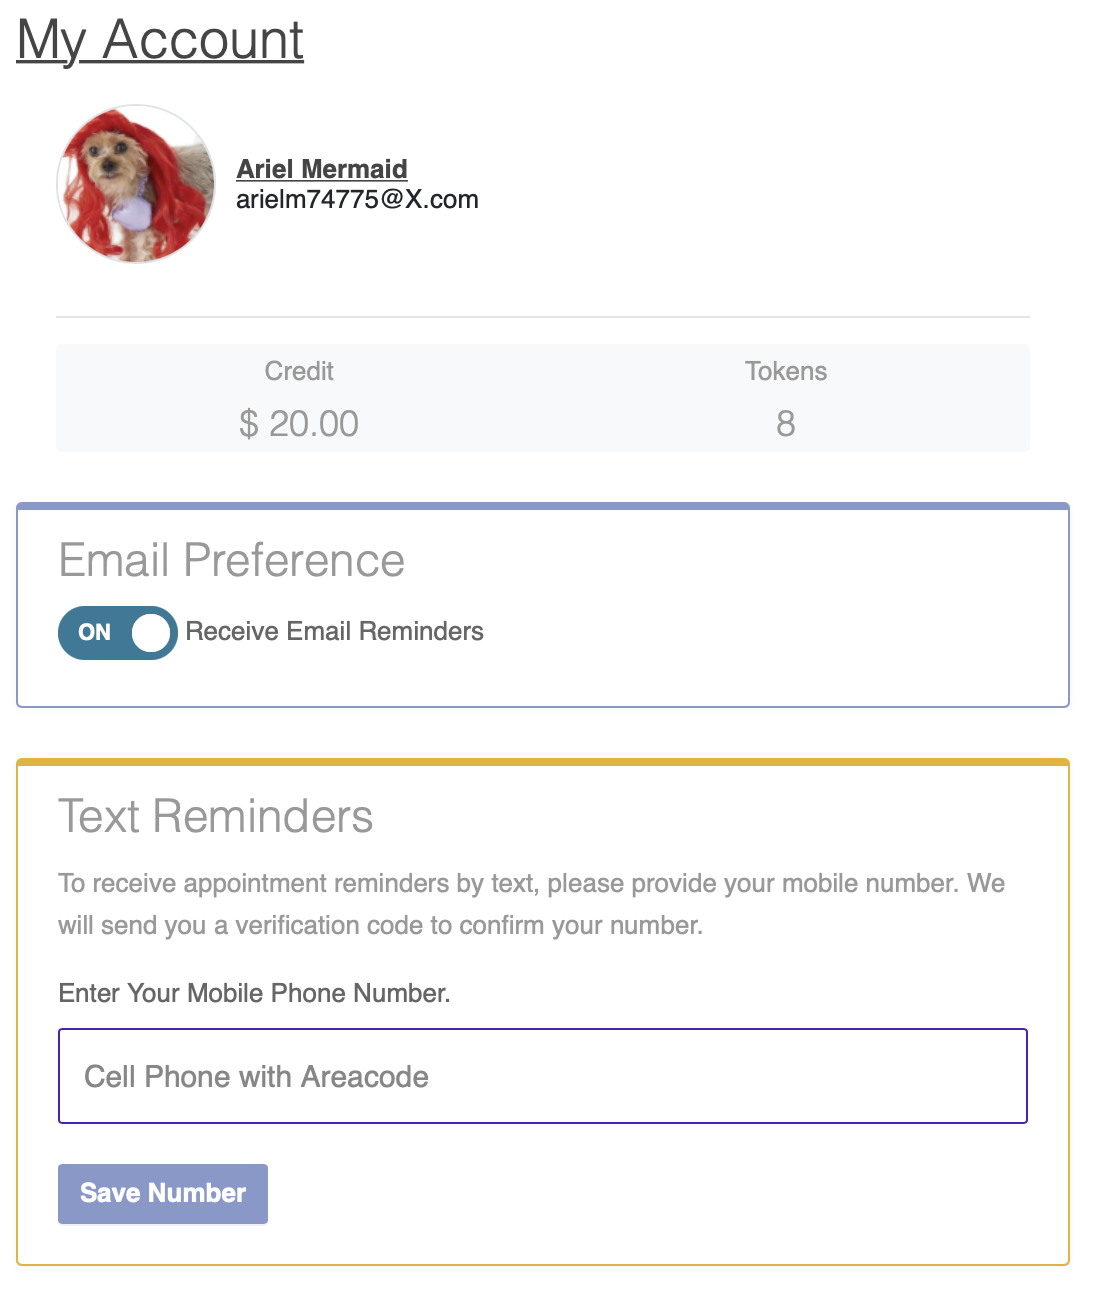
How to opt in via Patient Portal
The patient will need to log in to their account and click Your Account in the upper right hand corner:

On the Account page there is a box under their name where they can enter the phone number where they'd like to receive messages:
Once they enter their number they'll get a confirmation code via text message:
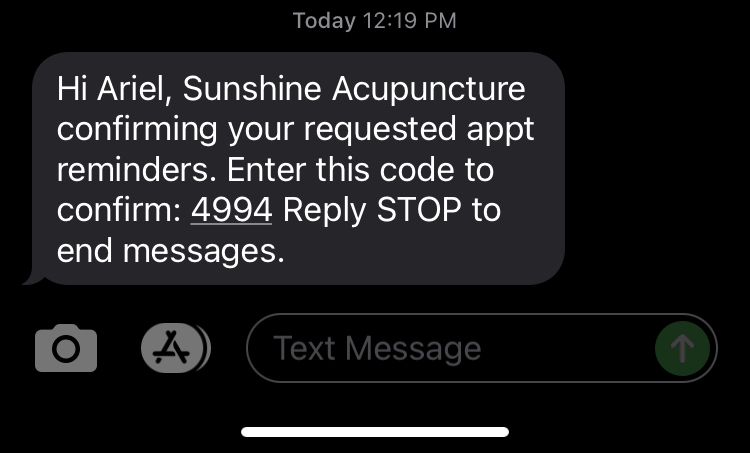
They'll need to enter the code to complete the process:
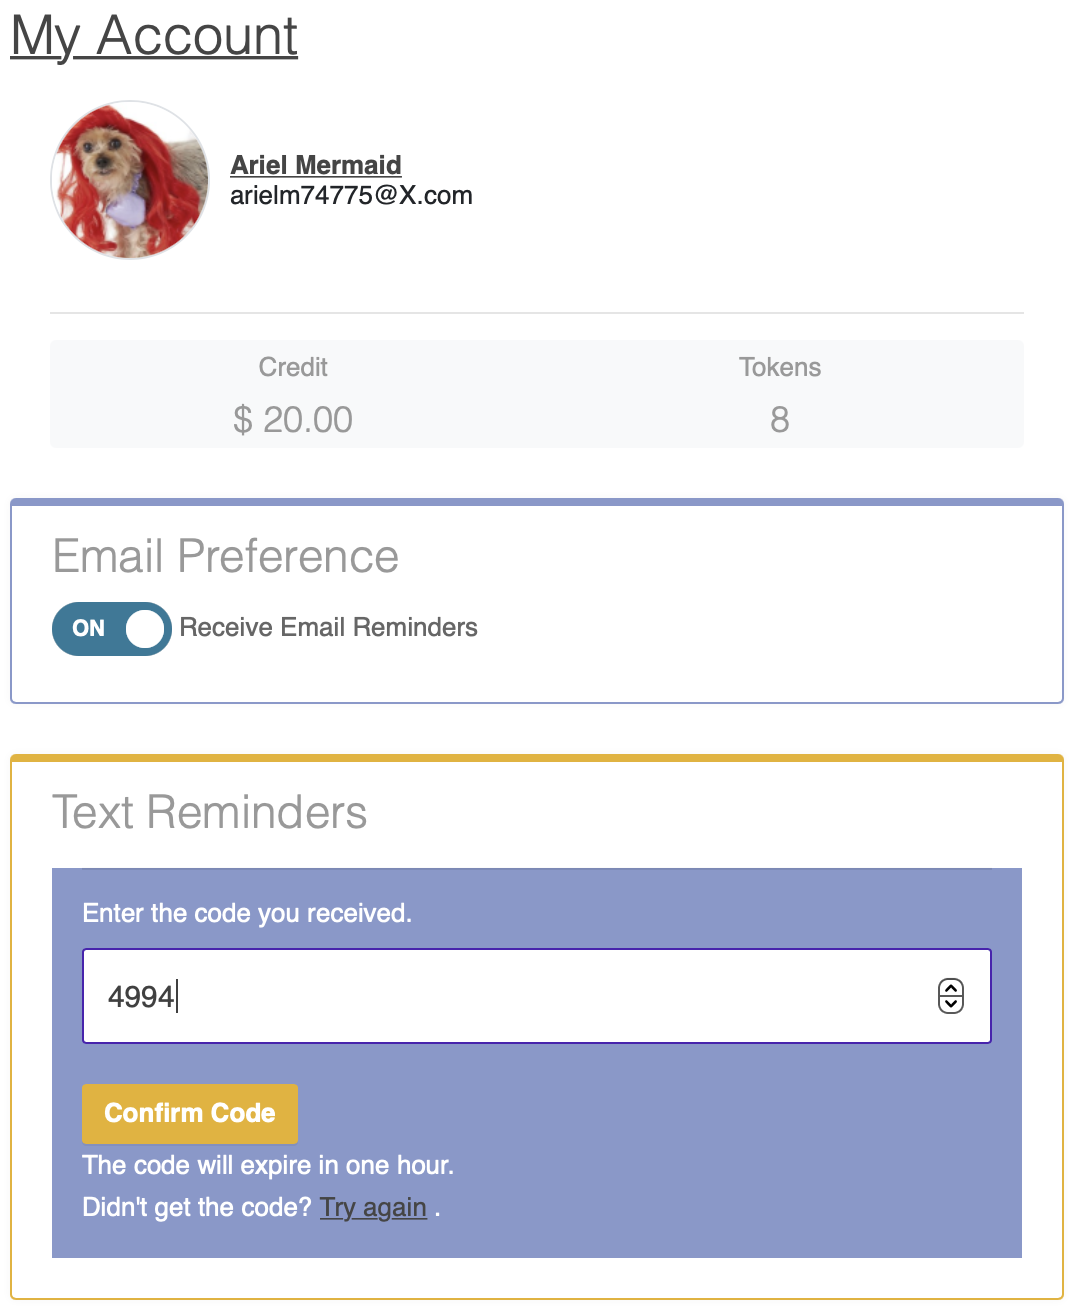
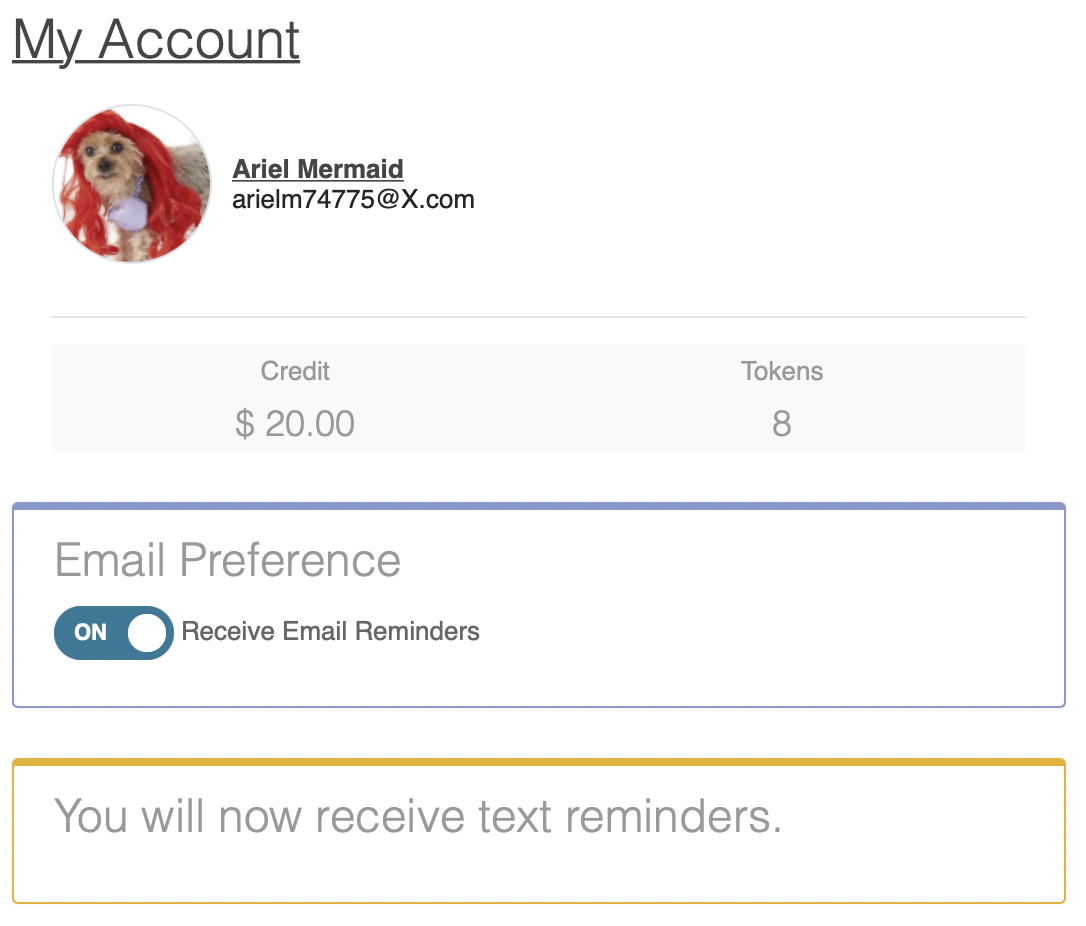
They'll see a confirmation message once they enter the code:
How to opt in via Admin Portal
You can opt in for the patient via the Admin Portal on their Patient Profile Page. Under their name you'll see a box for SMS reminders. Enter the phone number where they'd like to receive message:
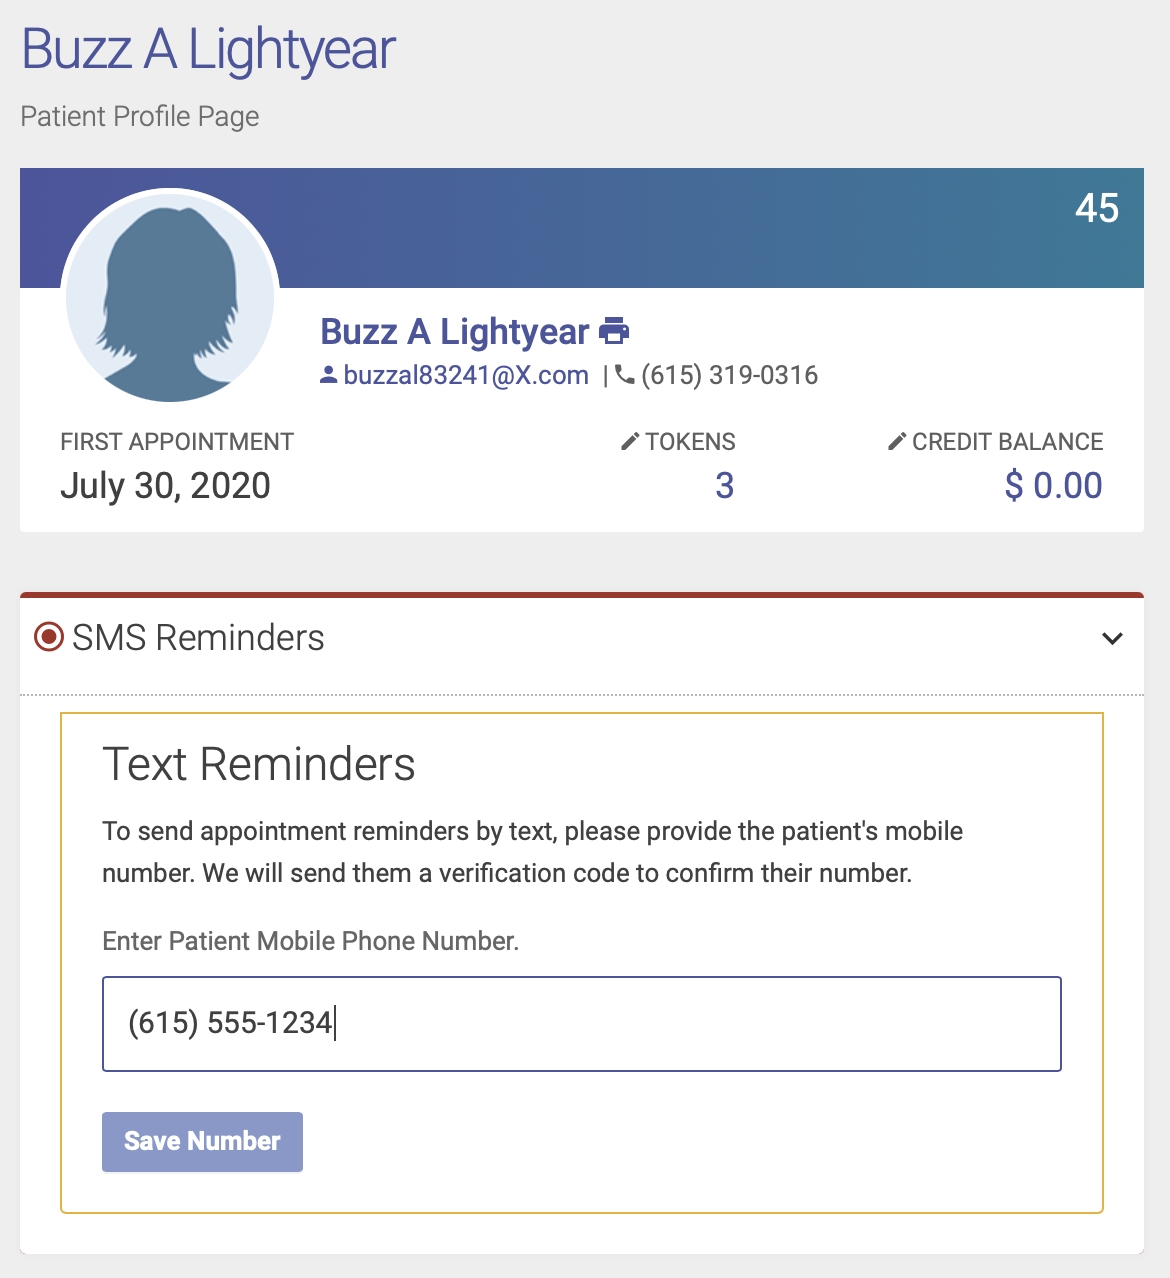
Once they enter their number they'll get a confirmation code at that number via text message:
Enter the code to complete the process:

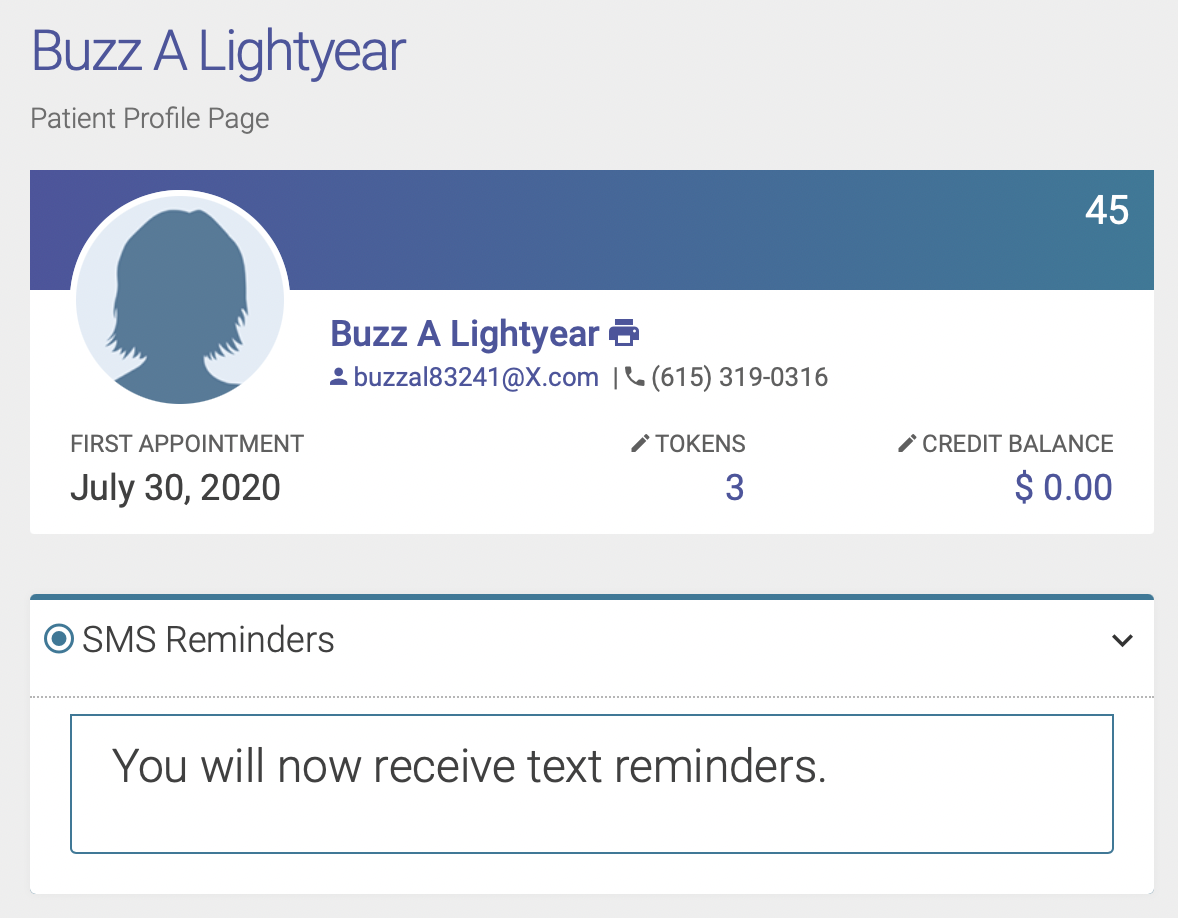
You'll see a confirmation message once you enter their code:
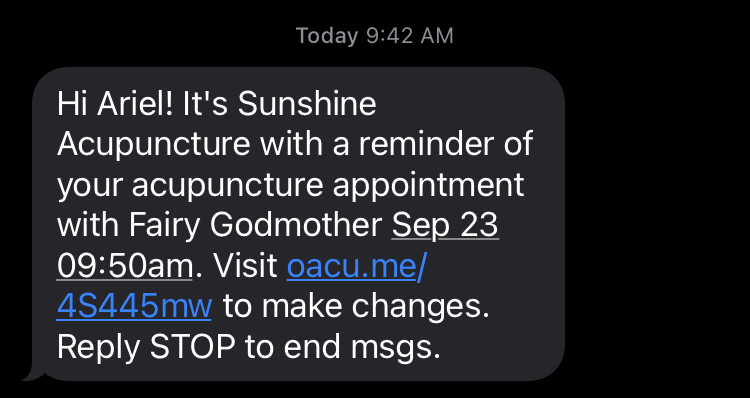
How your text messages will appear
Example of appointment reminder message (this will vary based on your saved verbiage):
If a patient tries to reply to a text, they'll receive this message listing your clinic's phone number:
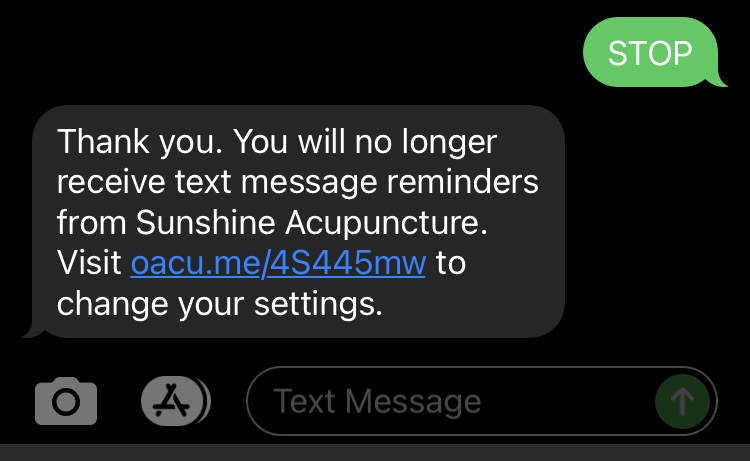
When a patient replies STOP to end messages, they'll receive this text:
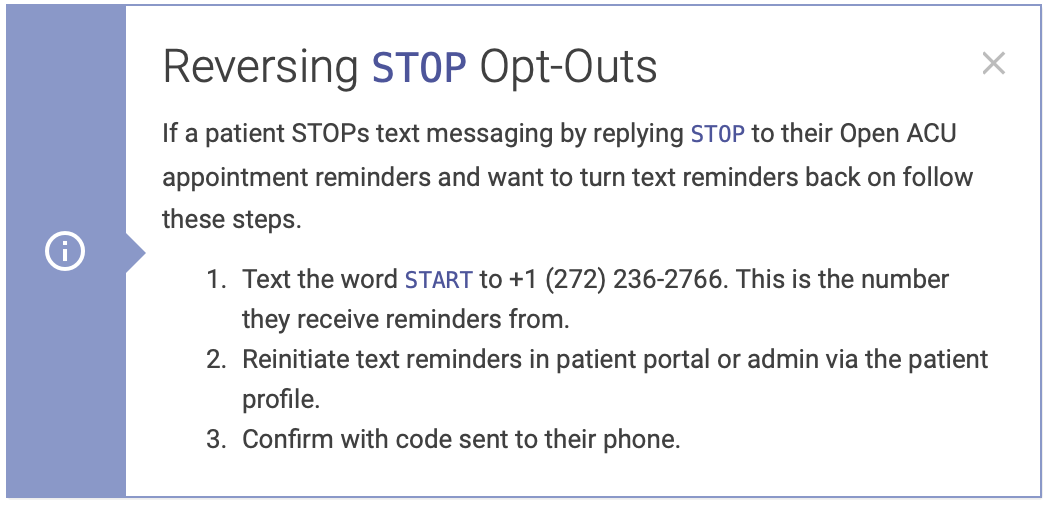
Opting back in after opting out
If a patient STOPs text messaging by replying STOP to their Open ACU appointment reminders and want to turn text reminders back on follow these steps:
Text Reminders: Codes Key
If you have text reminders with your Open ACU account you can edit the verbiage in the messages sent to your patients to your preferences. These messages can contain a combination of fixed text and variables that depend on the recipient and their appointment. Think of it like mail merge.
An Example of Text Reminder Verbiage:
Hi
[[NAME]]! It's[[CLINIC]]with a reminder of your[[BLNAME]]appointment with[[PRAC]][[APPTIME]]. Visit[[URL]]to make changes. Reply STOP to end msgs.
Use the codes with double brackets "[[]]" and all caps when inserting specific variables.
Text Reminder Codes Reference:
| Code | Description |
|---|---|
[[NAME]] |
Patient's first name |
[[APPTIME]] |
Appointment Date and Time |
[[URL]] |
Your Patient Portal URL |
[[CLINIC]] |
Your clinic's name |
[[PRAC]] |
The appointment's practioner's name |
[[BLNAME]] |
The Block Name |
[[LOC]] |
Location Name |
[[LOCADD]] |
Location Address |
[[LOCPHONE]] |
Location Phone Number |
Reverse A Checked-In & Paid-For Appointment
An Open ACU appointment is either checked-in or not checked-in. The payment for an appointment is typically done at the same time. So a reserved appointment is either not yet checked-in, checked-in without payment or checked-in with payment.
You can go to Account > Settings and turn on the ability to check-in patients without payment. You would then add the payment later.
Sometimes you may have mistakenly checked-in an appointment and you need to reverse that checkin status. Or you need to cancel an appointment that you accidentally checked-in.
Here's how to reverse a Checkin that has a payment
- Click the appointment pencil icon.
- This opens the appointment editor.
- Tick the checkbox at the top "Checkout this appointment"
- Click the button "Remove Checkin/Refund" near the bottom of the editor.

This will create a refund for the transaction for the appointment, so now there are two transactions. One for the original checkin and another for the refund. If you are using Stripe Payments this will also issue a refund to the patient on the payment method they used. Your patient will see both the original charge and the refund on their credit card statement.
If you end up checking the patient back in they will be charged a new transaction. If you are using Stripe there will be a new charge on their credit card.
If you choose to checkin only, without payment (you must change the setting for this feature) you can reverse that checkin as well. Since there is no transaction yet there is no refund.
Reverse a Checkin Only Appointment
- Click the red checkin icon to open the appointment editor
- Click "Reverse Checkin at the top.
- The appointment is now not checked in and can be checked in again.

Move an appointment with drag and drop
If you want to move an appointment to a different time within the same Block, you can do so through drag and drop.
Here's a video overview:
Step by step instructions:
- Highlight the preferred appointment time by clicking anywhere in the space next to the time on the schedule
- Click the arrow buttons next to the name of the patient whose appointment you want to move:
3. A popup box will appear, asking you to confirm the change:
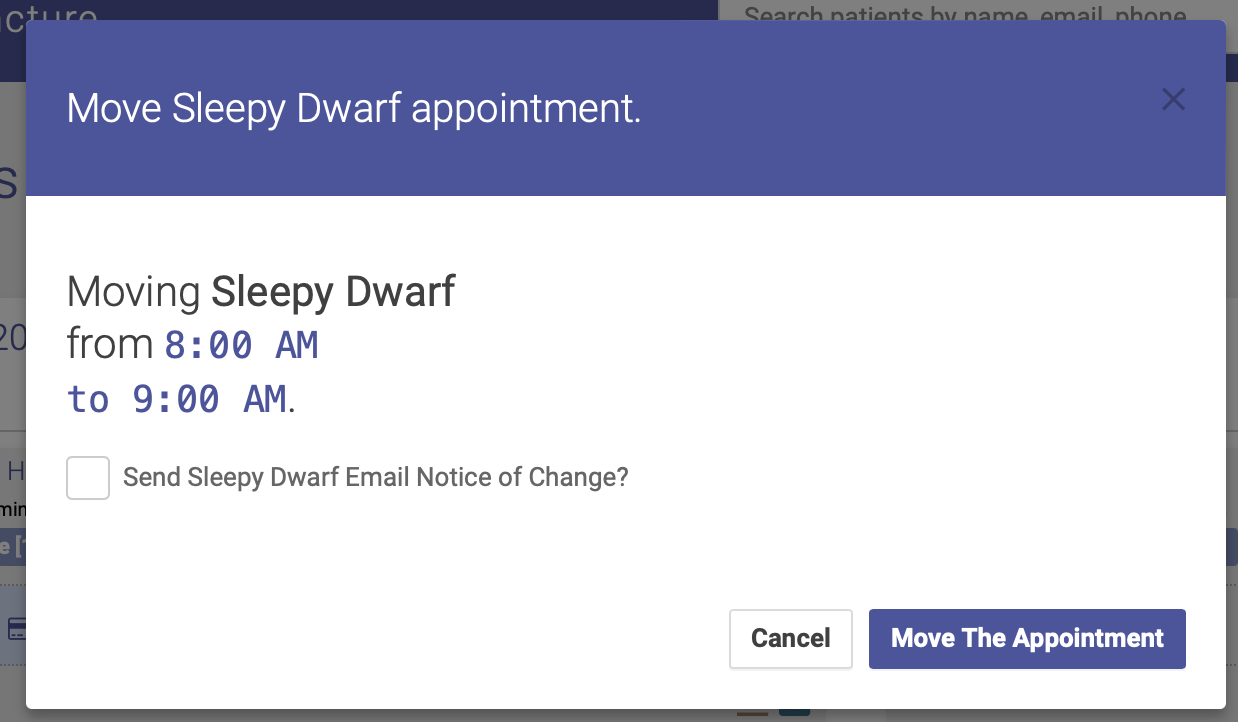
4. Click Move the Appointment, and voila! The appointment has now been moved to a new time. You also have the option of emailing the patient a notice of the change.
Telehealth
To create a Telehealth Service, you’ll add it on your Services page. Check the “Telehealth” checkbox, and then enter your telehealth URL in the Telehealth Link box. Open ACU does not provide a telehealth URL. You will need to provide your own from a service such as Zoom or Doxy.
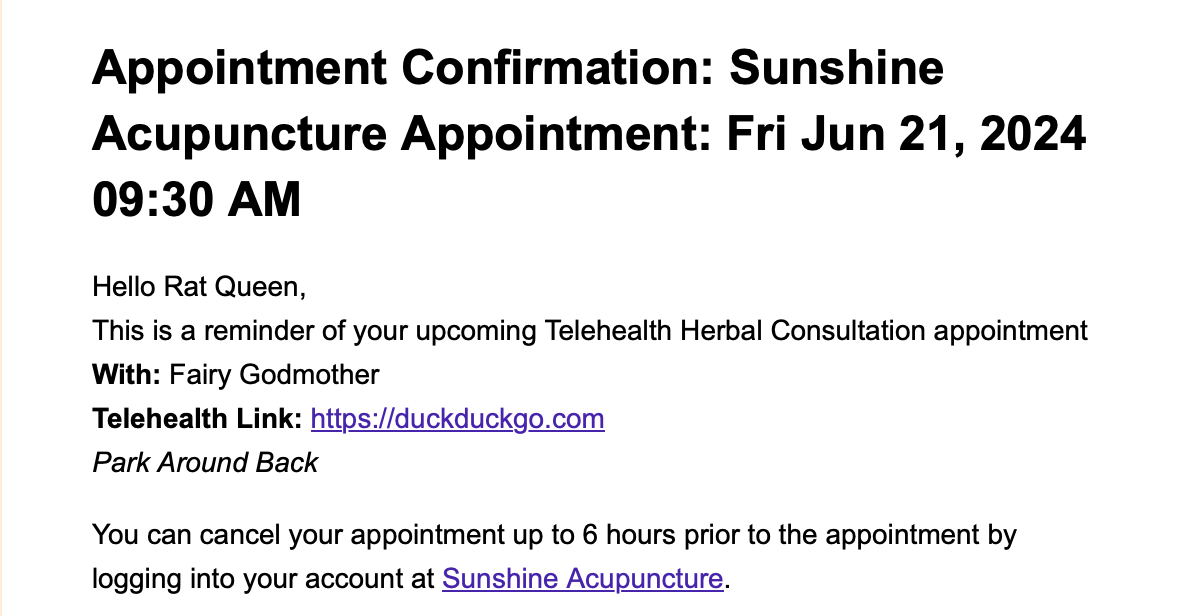
When a patient is scheduled for a Telehealth service, the link where they will join the telehealth session will appear in their confirmation and reminder emails:
Patient Portal: No Available Indicator
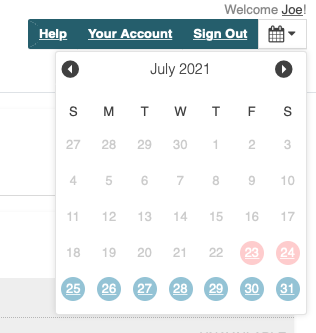
There is a feature on the patient portal that indicates days that have no available appointments.
When a patient pulls down the dropdown menu the days with available blocks are still links. Days whose blocks are all full, therefore no appointments available, are red.
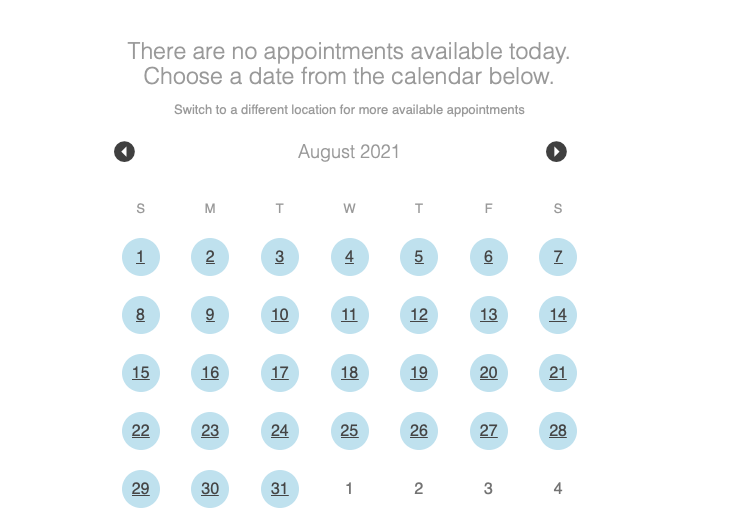
Page without any blocks
If a patient loads the portal on a day you are closed (no blocks) a calendar to choose a date replaces where the blocks normally show up.
Patients
Everything regarding the patient for editing and interacting with the information. You can download all patients from the patients page using the download icon in the top right of the table of patients.
The Open ACU Patient Portal
Your patients can interact with their account and your clinic through the Open ACU Patient Portal. This is a secure website specific to your clinic.
The Patient Portal URL
The specific URL for your patients is based upon your account name. You can derive your account name from the URL of your admin. If, for example, you login to your admin at https://ACCNAME.openacu.net "ACCNAME" is your account name.
The patient portal URL is https://ACCNAME.openacu.me , where ACCNAME is your account name.
Go to the Patient Portal directly from your admin
Once you've logged into your Open ACU admin, you can go directly to your Patient Portal from the user menu in the top right.

Creating New Patients
A patient remains "New" until they checkin to their first appointment. Or you uncheck the "new" in their profile. "New" patients can be restricted in various ways in their portal.
There are three places you can create new patients.
From any page go to Patients : New Patient. OR
From the Patients: All Patients page use the "New Patient" button at the top right. This will open a new modal window form for creating a new patient.
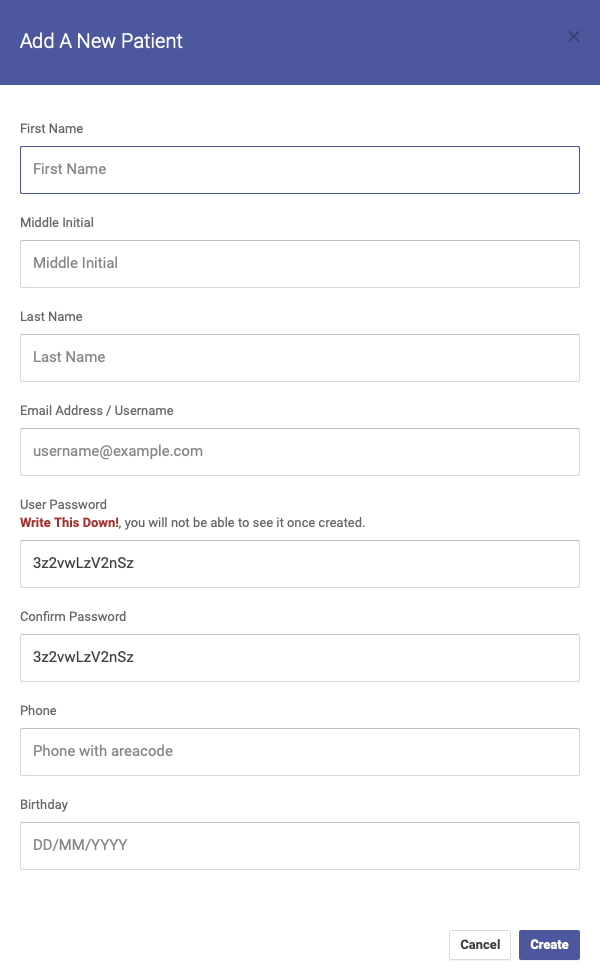
Also from the patients list page you can import a group of patients by uploading a CSV (comma delimited values) file. The popup modal window explains how to format the CSV.

Download all patients in your database from the Patients : All Patients page. Click the ![]() download icon to the top right of the patients listing table.
download icon to the top right of the patients listing table.
Importing Patients
You can import patients if you have a CSV file of the patients you wish to add.
To Import Patients From a CSV File
- Go to the Patients > All Patients page using the menu on the left.
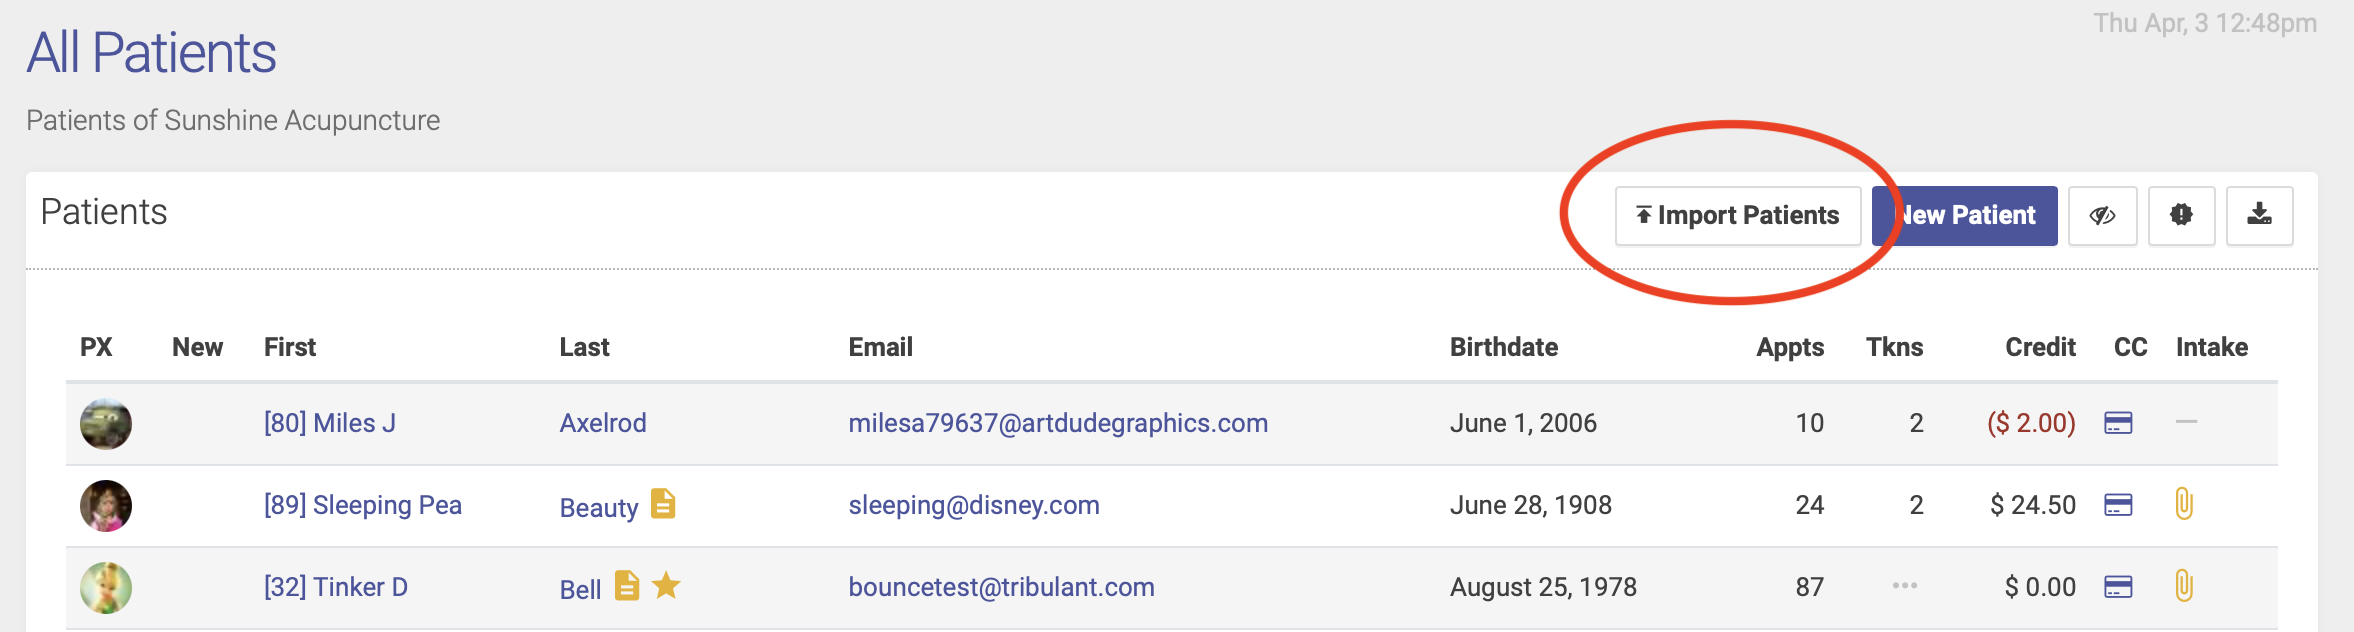
- Click the "Import Patients" button found in the top right of the list.
- Click "Browse Files" to and navigate to your CSV file.
- Click Import.
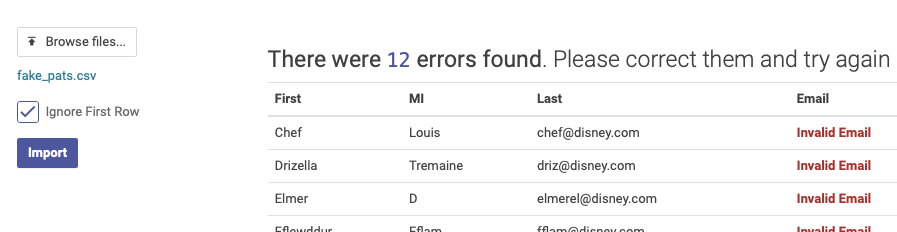
- The next screen will show you a summary of all the patients that will be imported.
- If there are any problems it will highlight them. You will need to correct these errors and try again.
- Click "Import" to finish.
Screenshots
Find the "Import Patients" button on the All Patients page.
The import modal with an example of the columns required. How to create a CSV from an Excel, Open Office or Google Sheet document. How to create a CSV file from an Apple Numbers document.
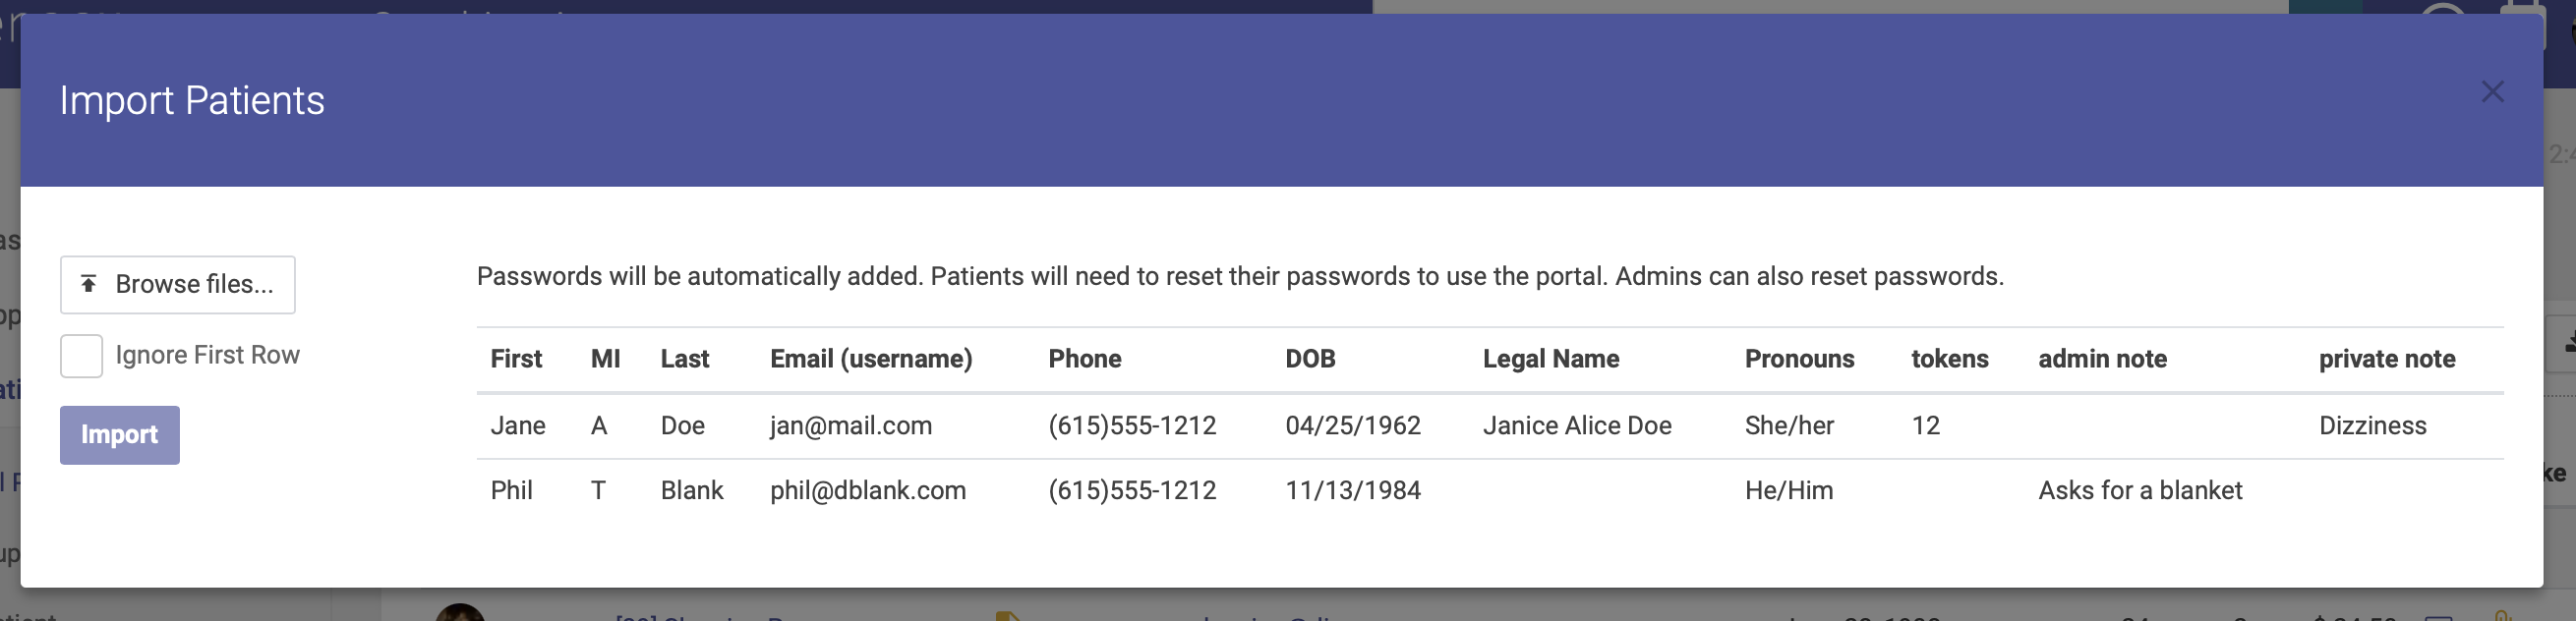
Once you've uploaded your CSV data Open ACU checks your file for any errors. You must correct these errors to complete the import.
Patient Profile
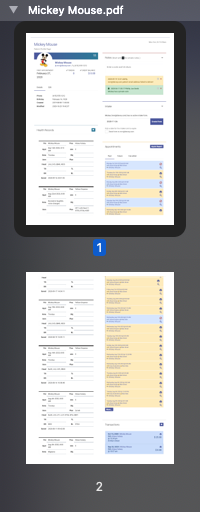
Each patient has an extensive profile page with a lot of interactive information available. The profile page has a several sections to edit, capture information or use to create entries. Click the image below to enlarge and for and overview of all the sections. The patient profile page is designed to be printed. Simply open and load all patient records (appointments, EHR records or Transactions) then print from the browser. In most modern browsers you can save the printable pages as a PDF. See the image at the bottom of this section for an example of printing.
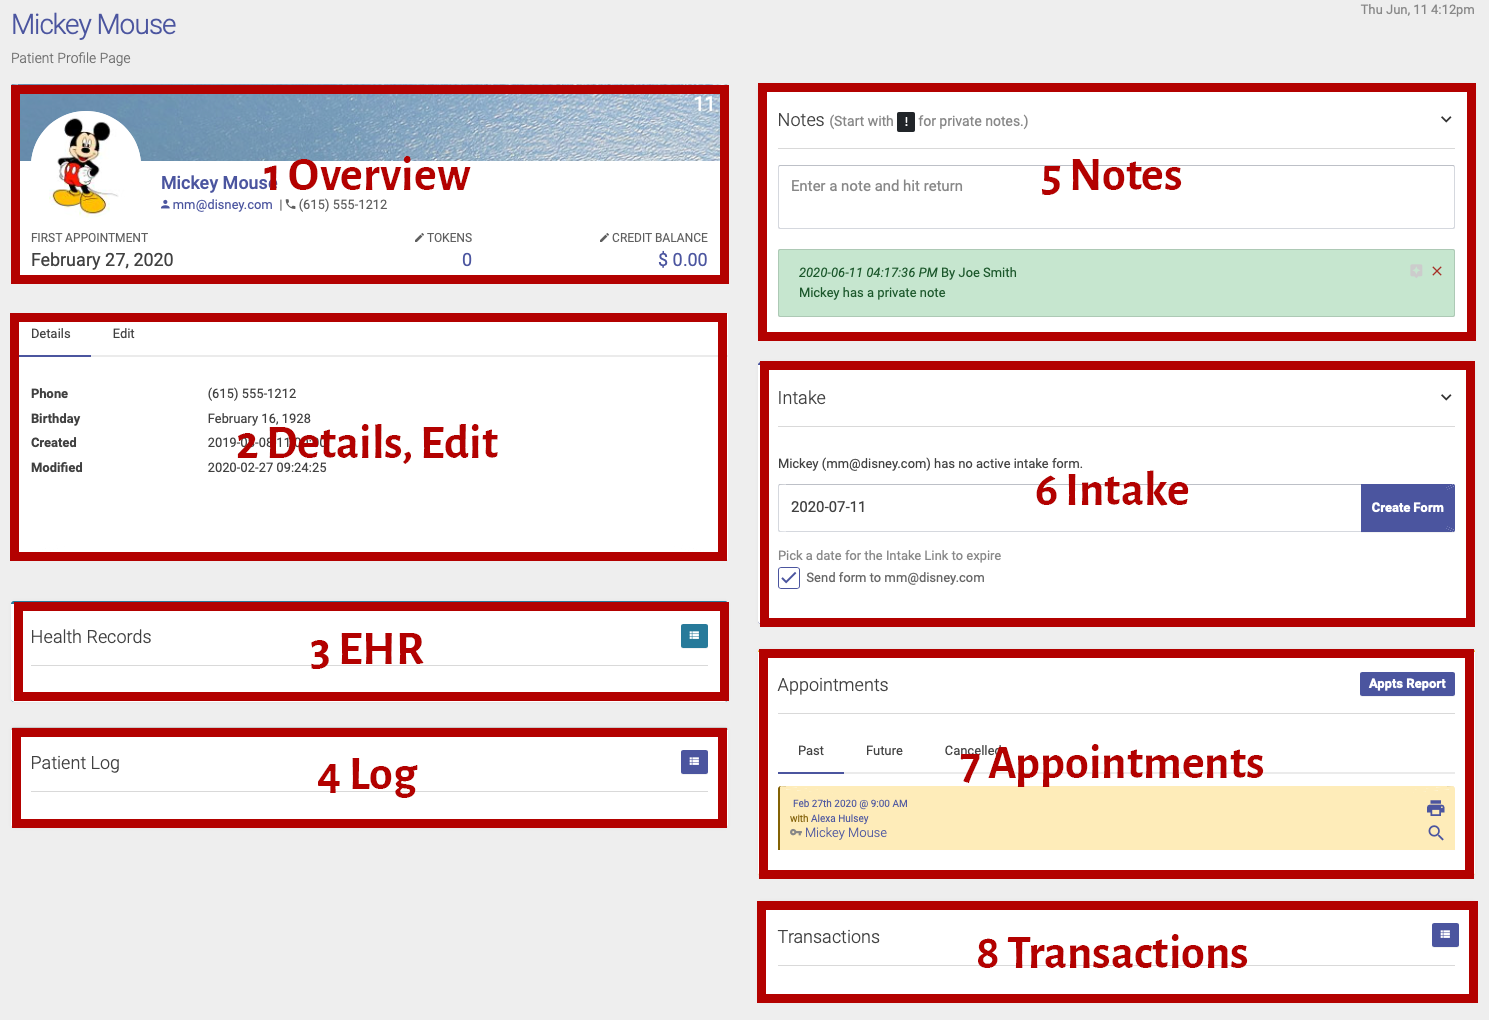
Going from the top left, down and then the top right and down the sections are as follows.
- The patient overview
This section is a quick overview of the patient.- Their ID is top right.
- The image can be changed, just click the image and use the upload form.
- To add or view tokens simply click.
- Same for credits or debits, click to see entries and make and entry
- Patient Details
This section is all the important information about the patient like their name and contact information.- Click the Edit tab at the top of the section to reveal the edit form.
- Make any changes you need and click saved details
Inactive patients cannot make an appointment. - For emergency contact information make changes and click Save Emergency/Insurance
- To change a patient's password enter the new password twice and click Save Password
Patient passwords can not be seen in Open ACU as they are double encrypted. You can only reset their password. Patients are able to change their own password.
- Electronic Health Records
- If you are logged in as a user with permission to view EHR records you can see the patient's records by expanding the list via the expand icon to the right.
- If you do not have permission you will not see this section on the patient profile page.
- Patient Log
- Click the expand icon to load the log.
- This log shows any changes made to the patient and by what user.
- This is a raw log so it shows every detail when something changes.
- Patient Notes
- Simply enter a note and hit return to save a new note.
- Start the note with a "!" to make that note private.
- Only users with EHR permission can add private notes
- Without permission users cannot see private notes
- All notes are encrypted.
- Any note can be deleted at anytime.
- Any note can be "pinned" to the top using the pin icon.
- Intake
- Here you can create an intake form for a patient and have it emailed to them.
- If you have EHR permissions you can see a patient's answers.
- Otherwise you only see if they've filled out a form or not.
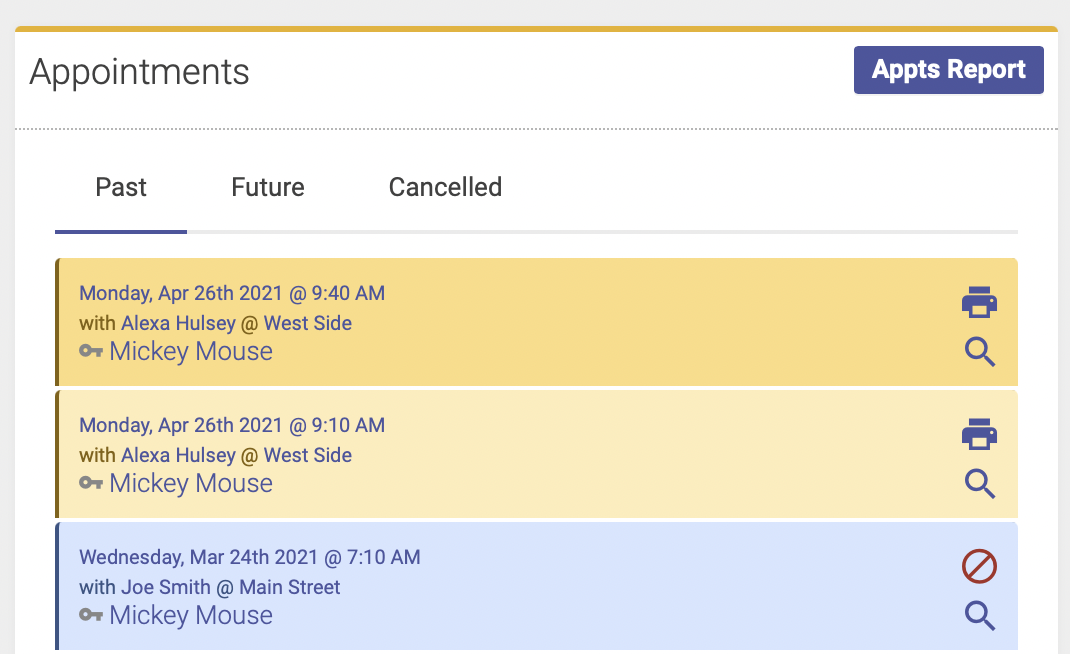
- Appointments
- As may be obvious, this section displays the patient's appointments. There are three tabs to choose from.
- By default it shows appointments in the past.
- Click "Future" to see upcoming appointments.
- "Cancelled" for a list of every appointment this patient has cancelled.
- Clicking the magnifying glass will show you a log of the appointment's activity, including:
- When and who made the appointment
- If it was cancelled, when and who cancelled.
- If a reminder email was sent
- If that email was delivered
- If that email failed
- If it failed a note will appear in the notes section stating their email bounced
- Email failure will also OPT-OUT the patient from any further emails.
- If they were checked in
- If a checkin was reversed
- If it was cancelled
- Clicking the printer icon (only if a transaction has occurred for the appointment) opens a new window for a printable receipt of the transaction. Patients have access to this in their account as well.
- As may be obvious, this section displays the patient's appointments. There are three tabs to choose from.
- Transactions, click the expand icon to load the patient's transactions
- Transactions are any financial transaction with your clinic.
- Appointments can have transactions.
- Open ACU also offers non-appointment transactions. They will show up here.
An example of a printed patient profile page.
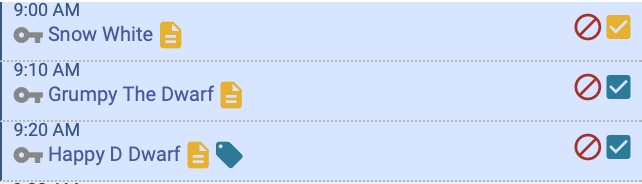
Patient Icons
On the schedule grid or the All Patients page each patient can have a number of icons displayed with their names that have significance. These are available as a way of seeing information at a glance for patients on your schedule. Here are all the possible icons (double sized here for clarity). These are shown in the context of an appointment.

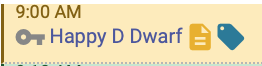
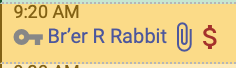
![]() Key to the left. Appointment made by an Admin. (Look into the appointment log to see which admin)
Key to the left. Appointment made by an Admin. (Look into the appointment log to see which admin)![]() Person to the left. Appointment made by the Patient.
Person to the left. Appointment made by the Patient.![]() Block 1. This is the patient's first appointment
Block 1. This is the patient's first appointment![]() Red flag. This patient has a red flag. (Use this feature however you wish)
Red flag. This patient has a red flag. (Use this feature however you wish)![]() Yellow Caution. This patient has a caution. (Use this feature however you wish)
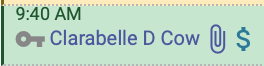
Yellow Caution. This patient has a caution. (Use this feature however you wish)![]() Paper clip. This patient has a completed intake form.
Paper clip. This patient has a completed intake form.![]() Sideways Paper clip. This patient has an intake that hasn't been completed. (Intakes expire so you may need to generate a new one.)
Sideways Paper clip. This patient has an intake that hasn't been completed. (Intakes expire so you may need to generate a new one.)![]() Token. This patient has at least one token. See the patient profile page or the checkin popup for the most accurate token total.
Token. This patient has at least one token. See the patient profile page or the checkin popup for the most accurate token total.![]() Green Dollar. This patient has at least $0.01 of credit.
Green Dollar. This patient has at least $0.01 of credit.![]() Red Dollar. This patient has at least -$0.01 of a debit.
Red Dollar. This patient has at least -$0.01 of a debit. ![]() Yellow Note. This patient has a note. When you mouse over this icon the most recent or pinned note will display.
Yellow Note. This patient has a note. When you mouse over this icon the most recent or pinned note will display.

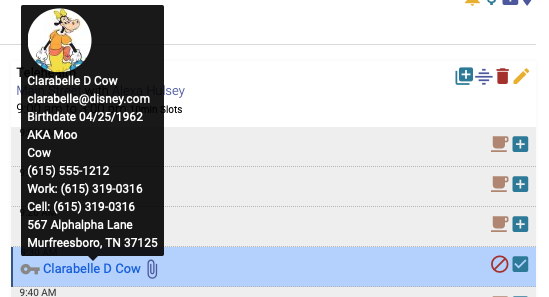
Patient Info Popup.
In the schedule and the patient list on All Patients mousing over the patient's name gives you an info window with useful information about the patient. Here is an example where much of what is available from the patient's profile pops up.
Include or Omit Insurance Fields on Patient Portal
When a patient logs into the patient portal they are given a profile to manage. This profile enables them to update contact information, their password, appointments and other things specific to their account. A group of items that patients can enter or change themselves in their insurance information. Your clinic may not take insurance as payment so you may wish to omit those fields in the patient portal.
To change the preference for including or omitting insurance fields do the following:
- Log into your Open ACU account if you haven't already.
- Go to the settings page
- Only ownership users can see the settings page. If you are not an owner ask the owner of your clinic to do this for you.
- You can also click your clinic's name in the header of any page to go to the settings page.
- Find the New Patient's settings on the left side of the settings page.
- Check or Uncheck "Include Insurance" checkbox and click save to change your setting.
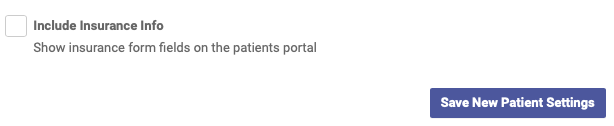
Patients will either see or not see the insurance information fields in the patient portal.
Duplicate Patients
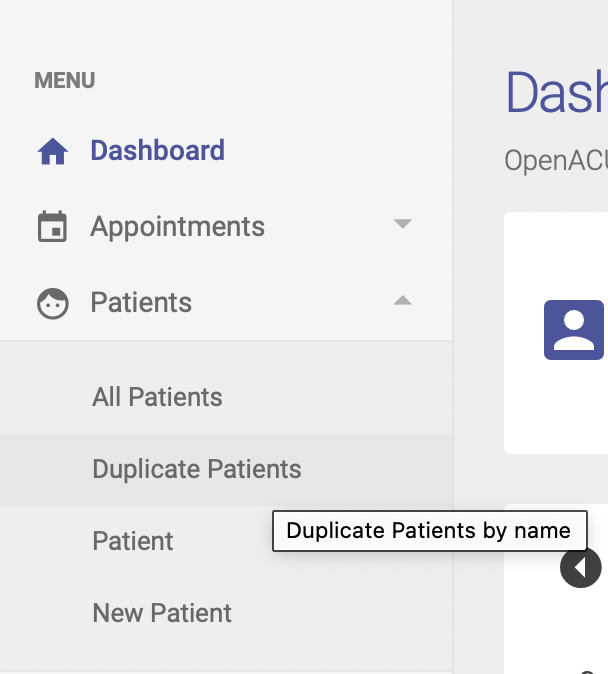
The Duplicate Patients page shows a list of patients with duplicate names. You can get to this page by clicking Duplicate Patients under Patients on the sidebar menu:
When two patients share the same name
When two or more patients share the same name, we recommend adding a middle name or initial to identify each patient. This can be done from the Patient Profile page.
When one patient has created multiple accounts with their name
Sometimes a patient will create multiple accounts with their name. When this happens, you'll need to merge the accounts. To do so, first navigate to the Duplicate Patients page.
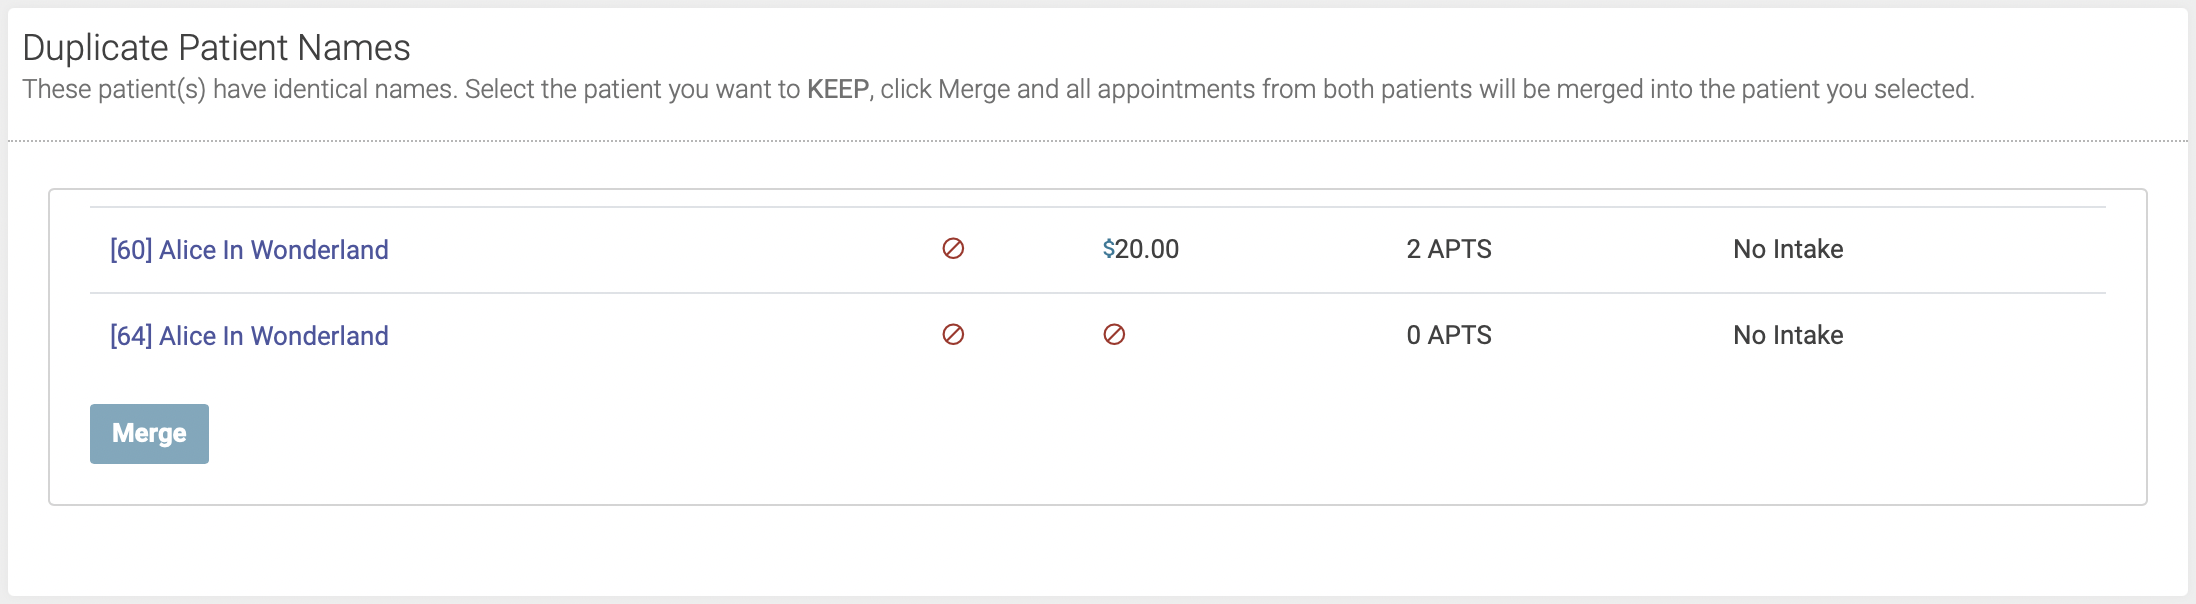
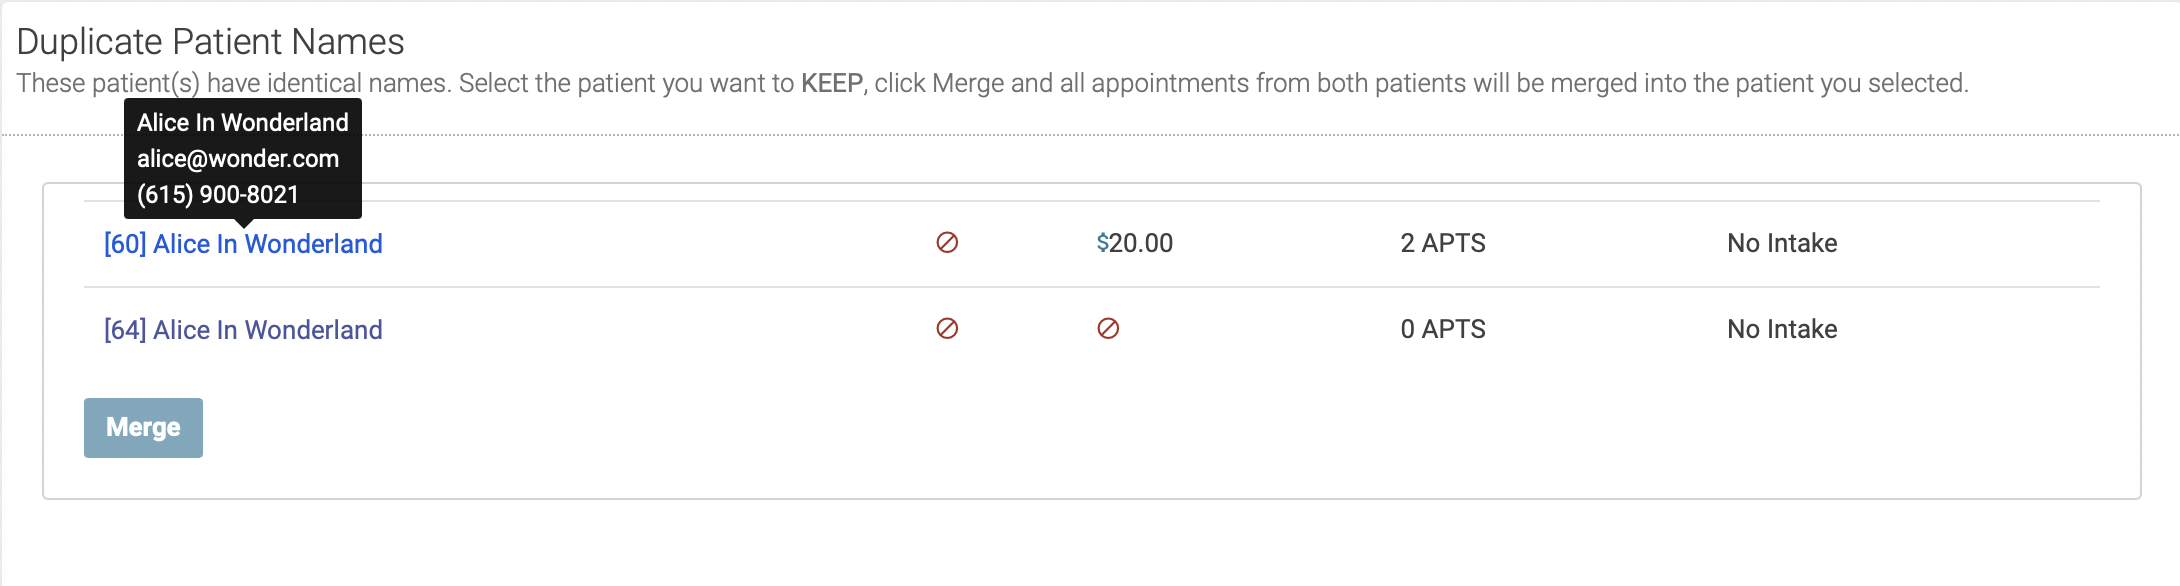
You'll see a list of duplicate patient names, including their number of past treatments, credit balance, and whether they've completed an intake form:
When you mouse over each patient's name, you'll see their email address, phone number, and other demographic info:
 Select the patient you want to KEEP by clicking anywhere on the line next to their name. This will highlight the patient you want to keep:
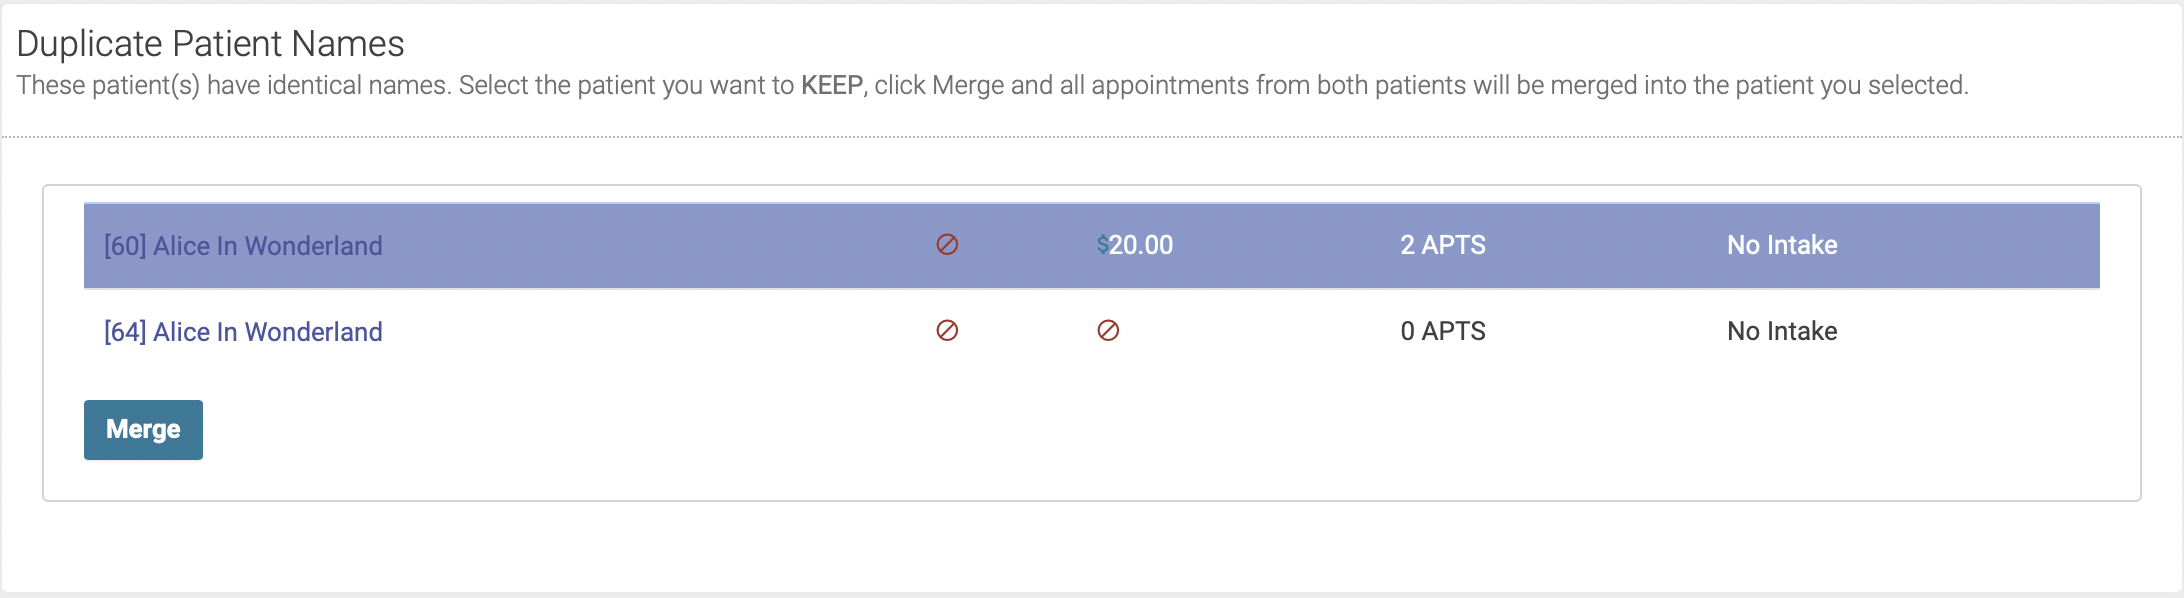
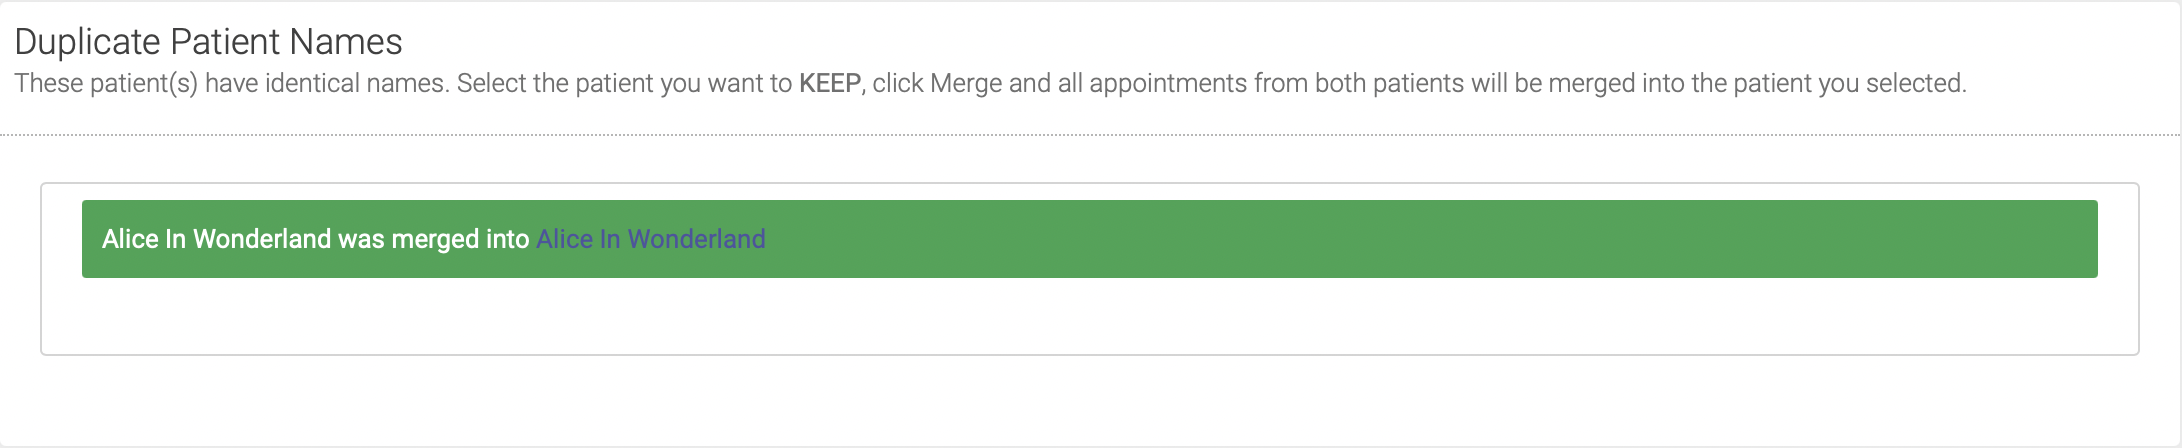
Click Merge. All appointments from both patients will be merged into the patient you selected, and you'll see this confirmation message:
Inactive Patients
Sometimes you need to prevent a patient from making appointments or for your receptionist from doing so. You can do this by making them "Inactive". Inactive patients cannot log in. Some patients will create a new account. They will not be able to use the same email address as an inactive (or active) patient.
To make a patient inactive
- Go to their profile page in the admin.
- Choose the Edit tab in the Details / Edit tabs
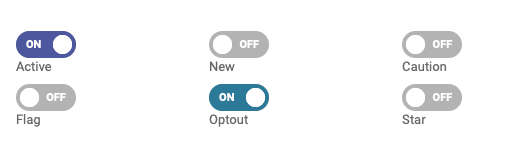
- Find the toggle switches under the name fields
- Click Active, making sure it is in the "Off" position
- Save the details

The button to see all inactive patients
 Showing the inactive patients.
Patient activity logs
All patient activity is logged on the Patient Profile page.
Patient Log
The Patient Log shows all activity related to a patient's account: account creation, changes to account information, creation of intake forms, and account password reset activity.

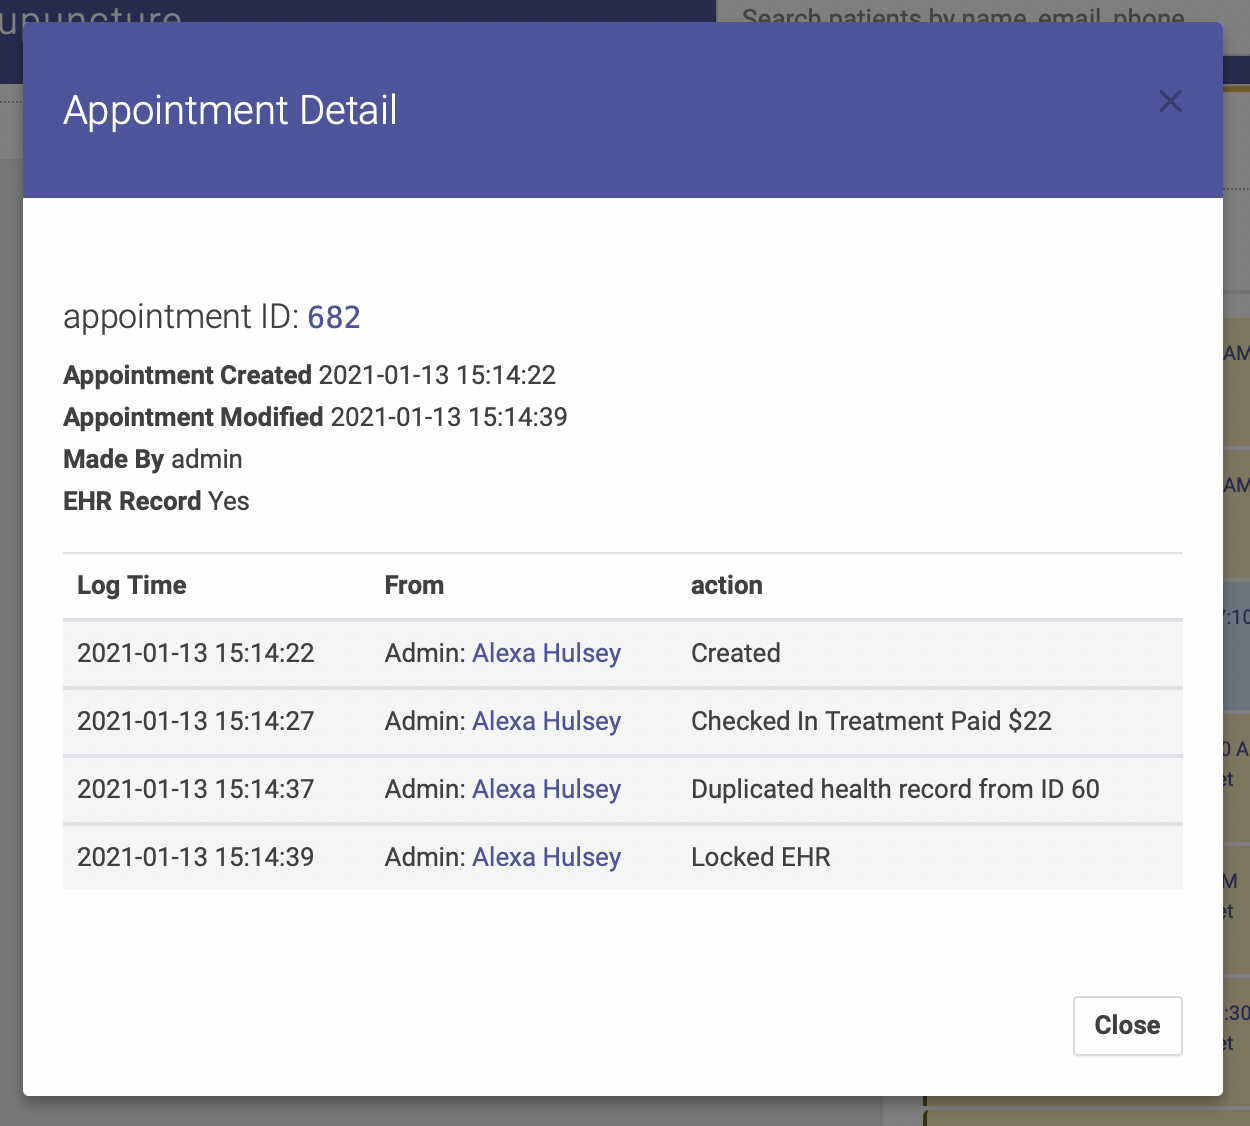
Appointment Detail Log
A popup window will appear showing all activity related to this specific appointment:
Intake Log
Before a patient's intake form is completed, all activity related to their intake is logged in the Intake section on their Patient Profile Page. This will show you when intakes were created and sent, and if the intake forms failed to deliver.
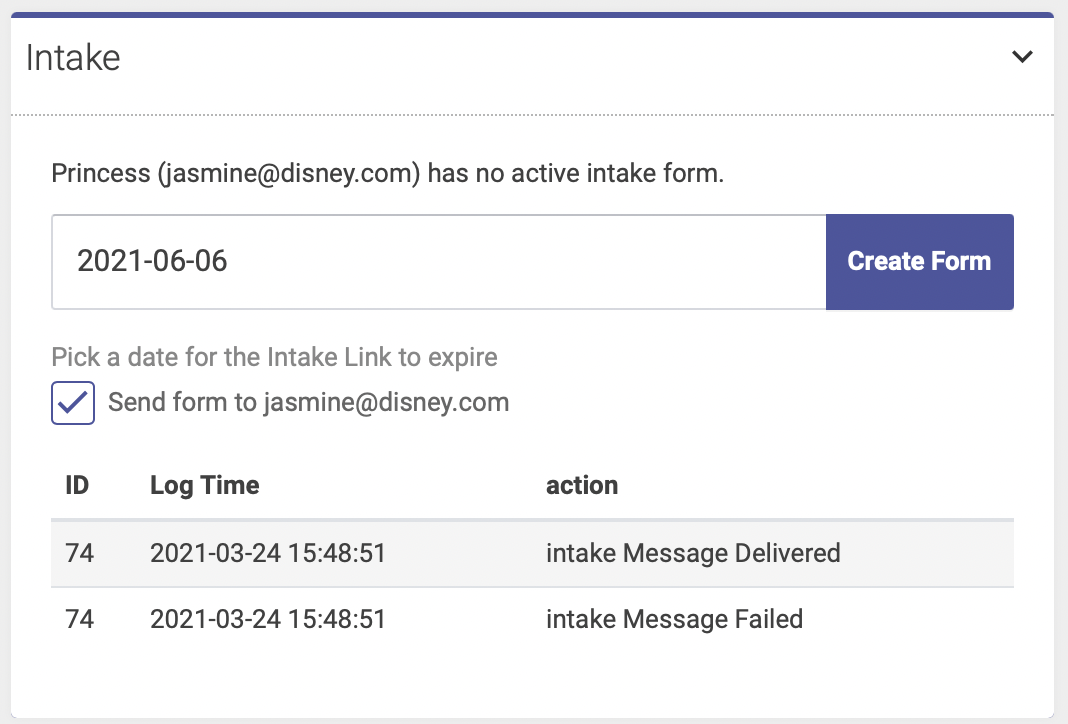
Once the intake form is complete, the log will be replaced by their intake form, which is visible only to users with Practitioner level access.
Printable Transaction Statement for a Patient
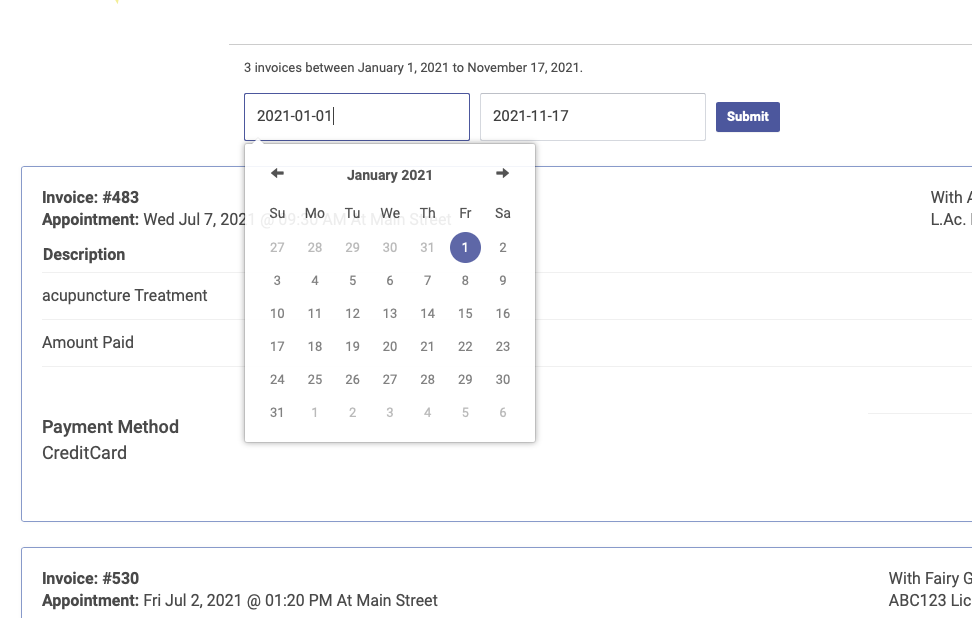
From the patient's profile page you can print a styled and branded transaction statement for patients that includes transaction details. Transactions can be narrowed down by date range and the page prints to a printer or PDF for emailing. Unlike the transaction report this report is designed to be printed and has your clinic brand in the header.
To Print Transactions for a Patient
- Log into your Open ACU Admin.
- Go to the patient's profile page for whom you'd like to report.
- Locate the "Transaction" section of the patient profile page.
- Click the printer icon in the section header.
This will open a new browser window or tab. By default all year to date transactions are loaded. You can change the date range and reload the page to your preferred dates.
Printing from a web page in most modern browsers allows you to save the file as a PDF. Please refer to your specific browser's instructions for creating PDFs from a web page.
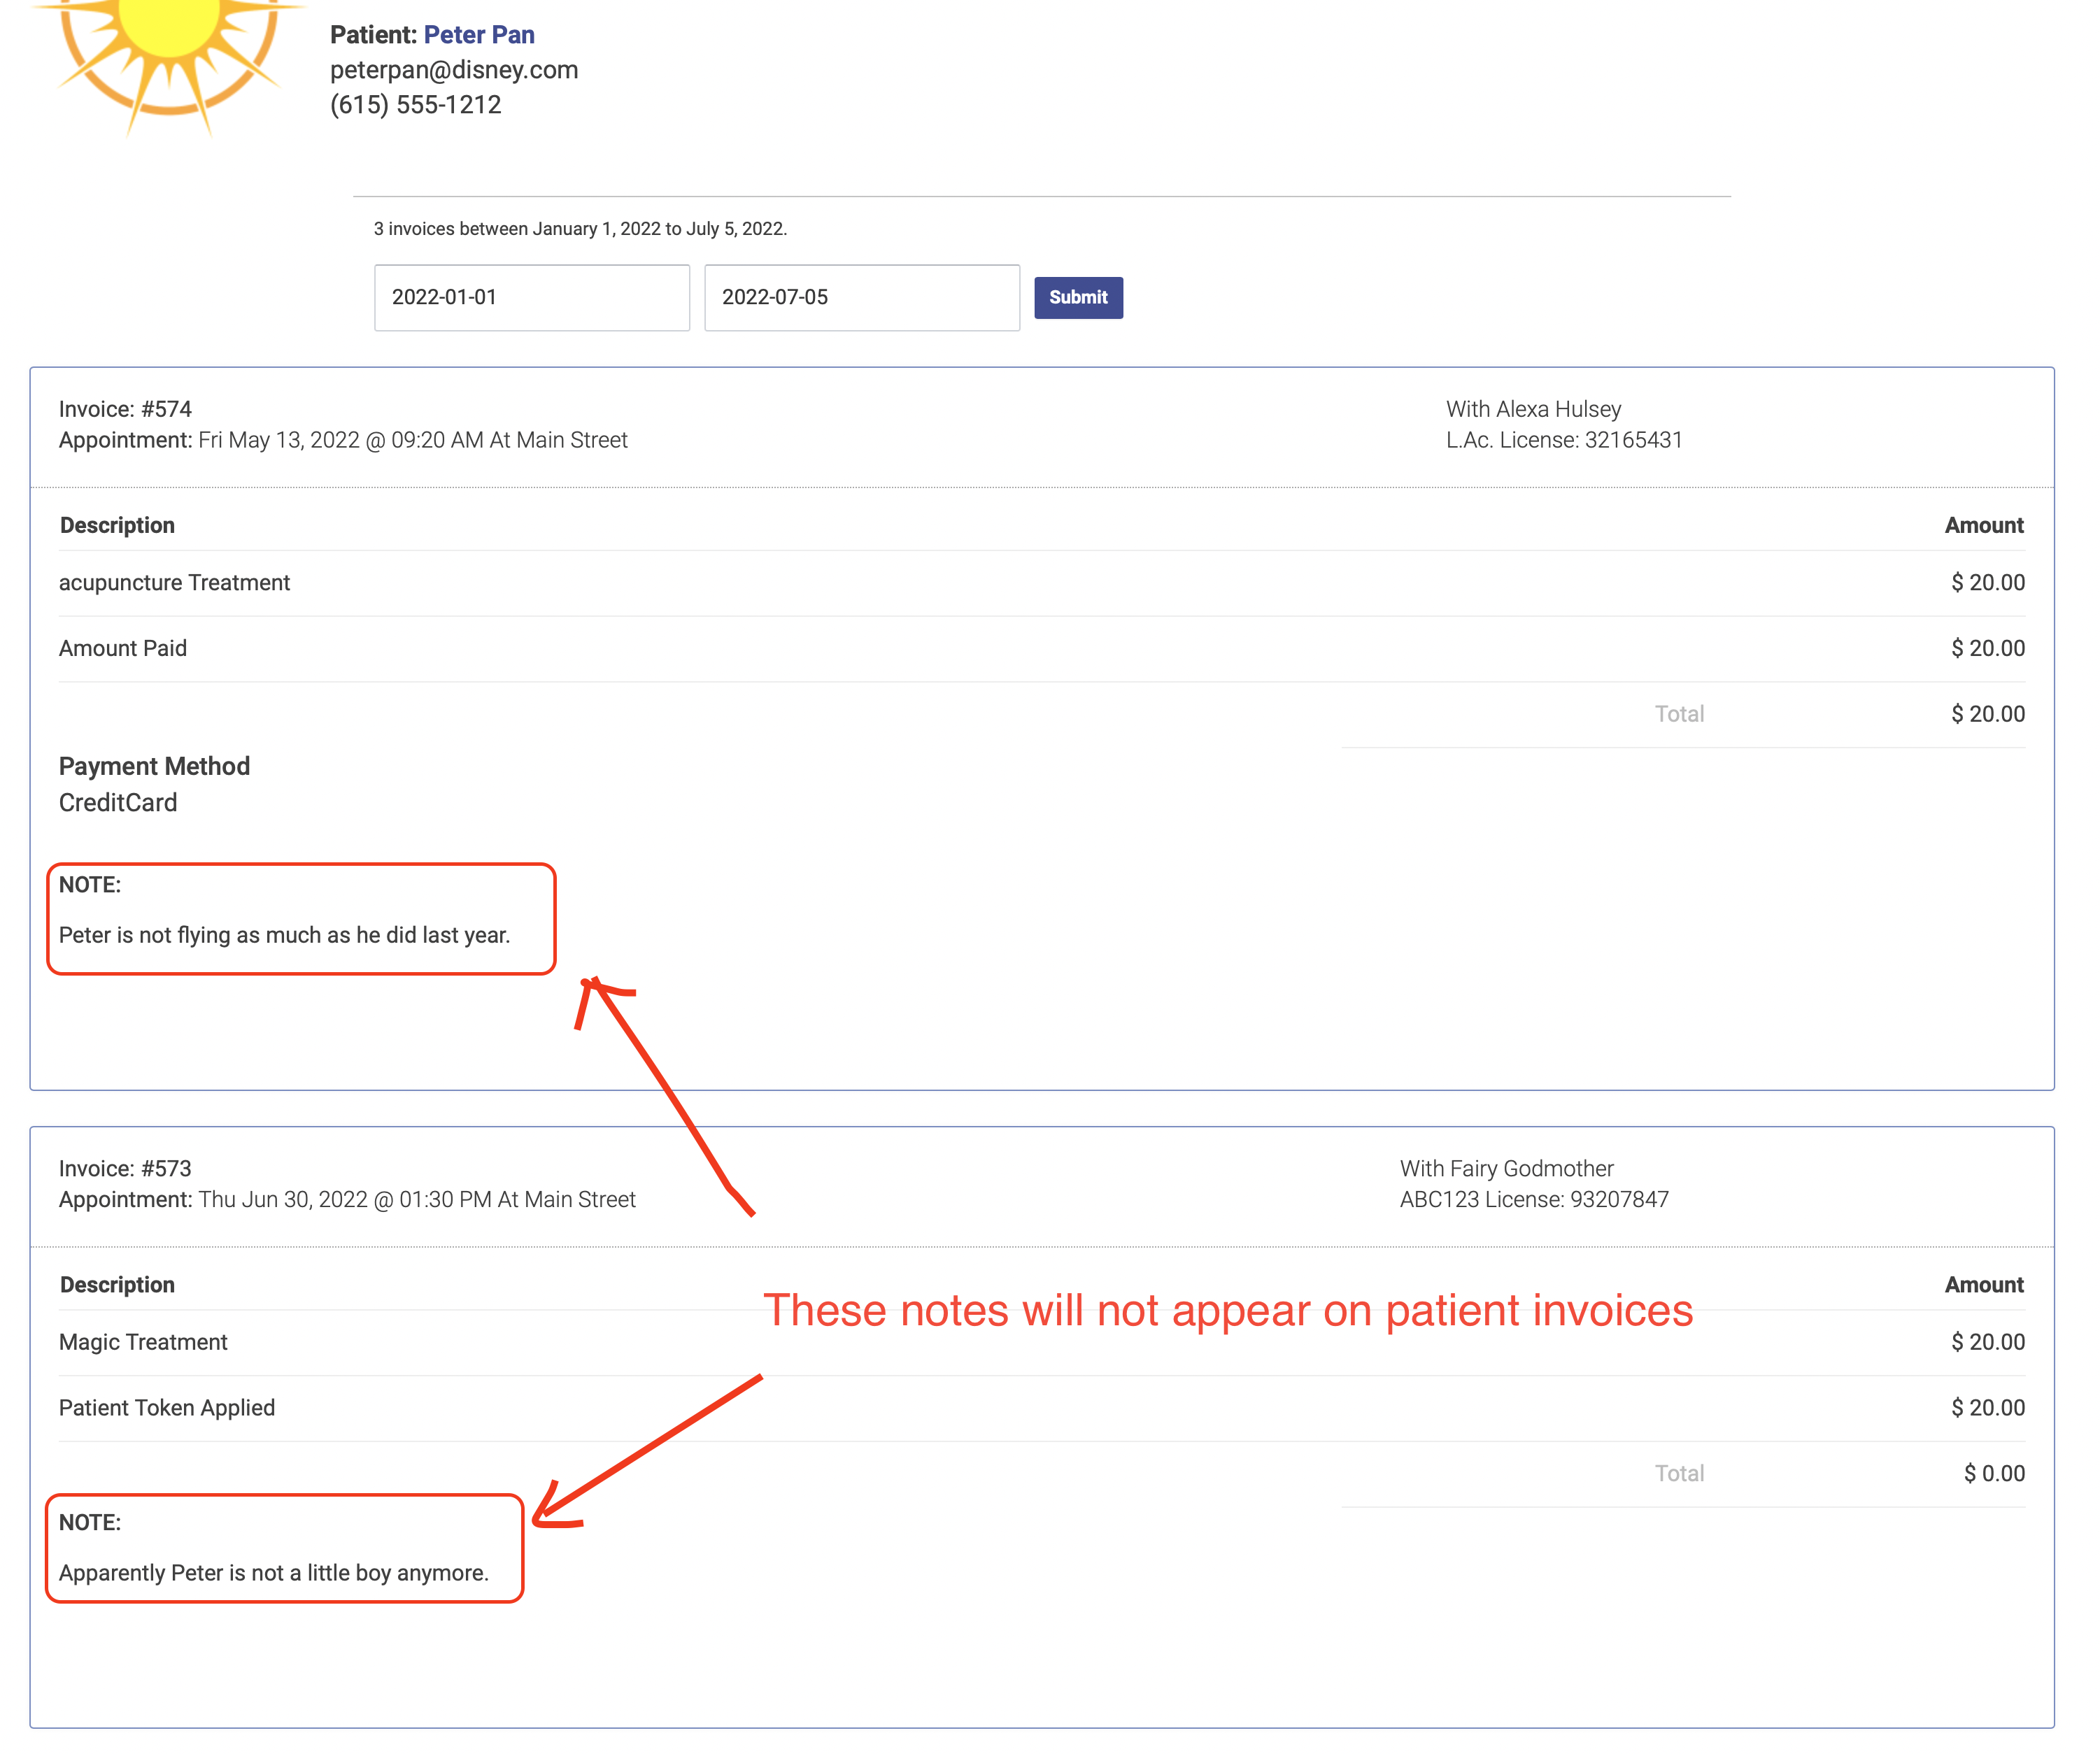
Appointment Notes on Invoices
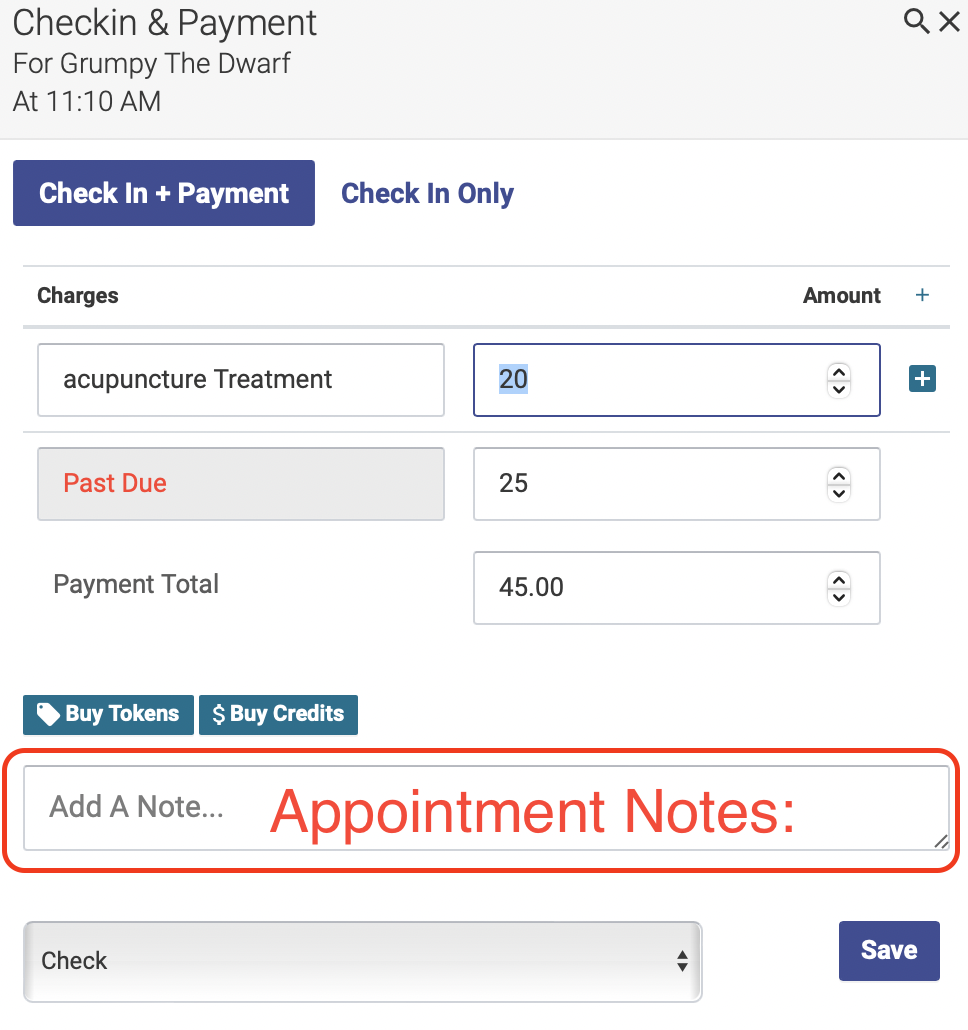
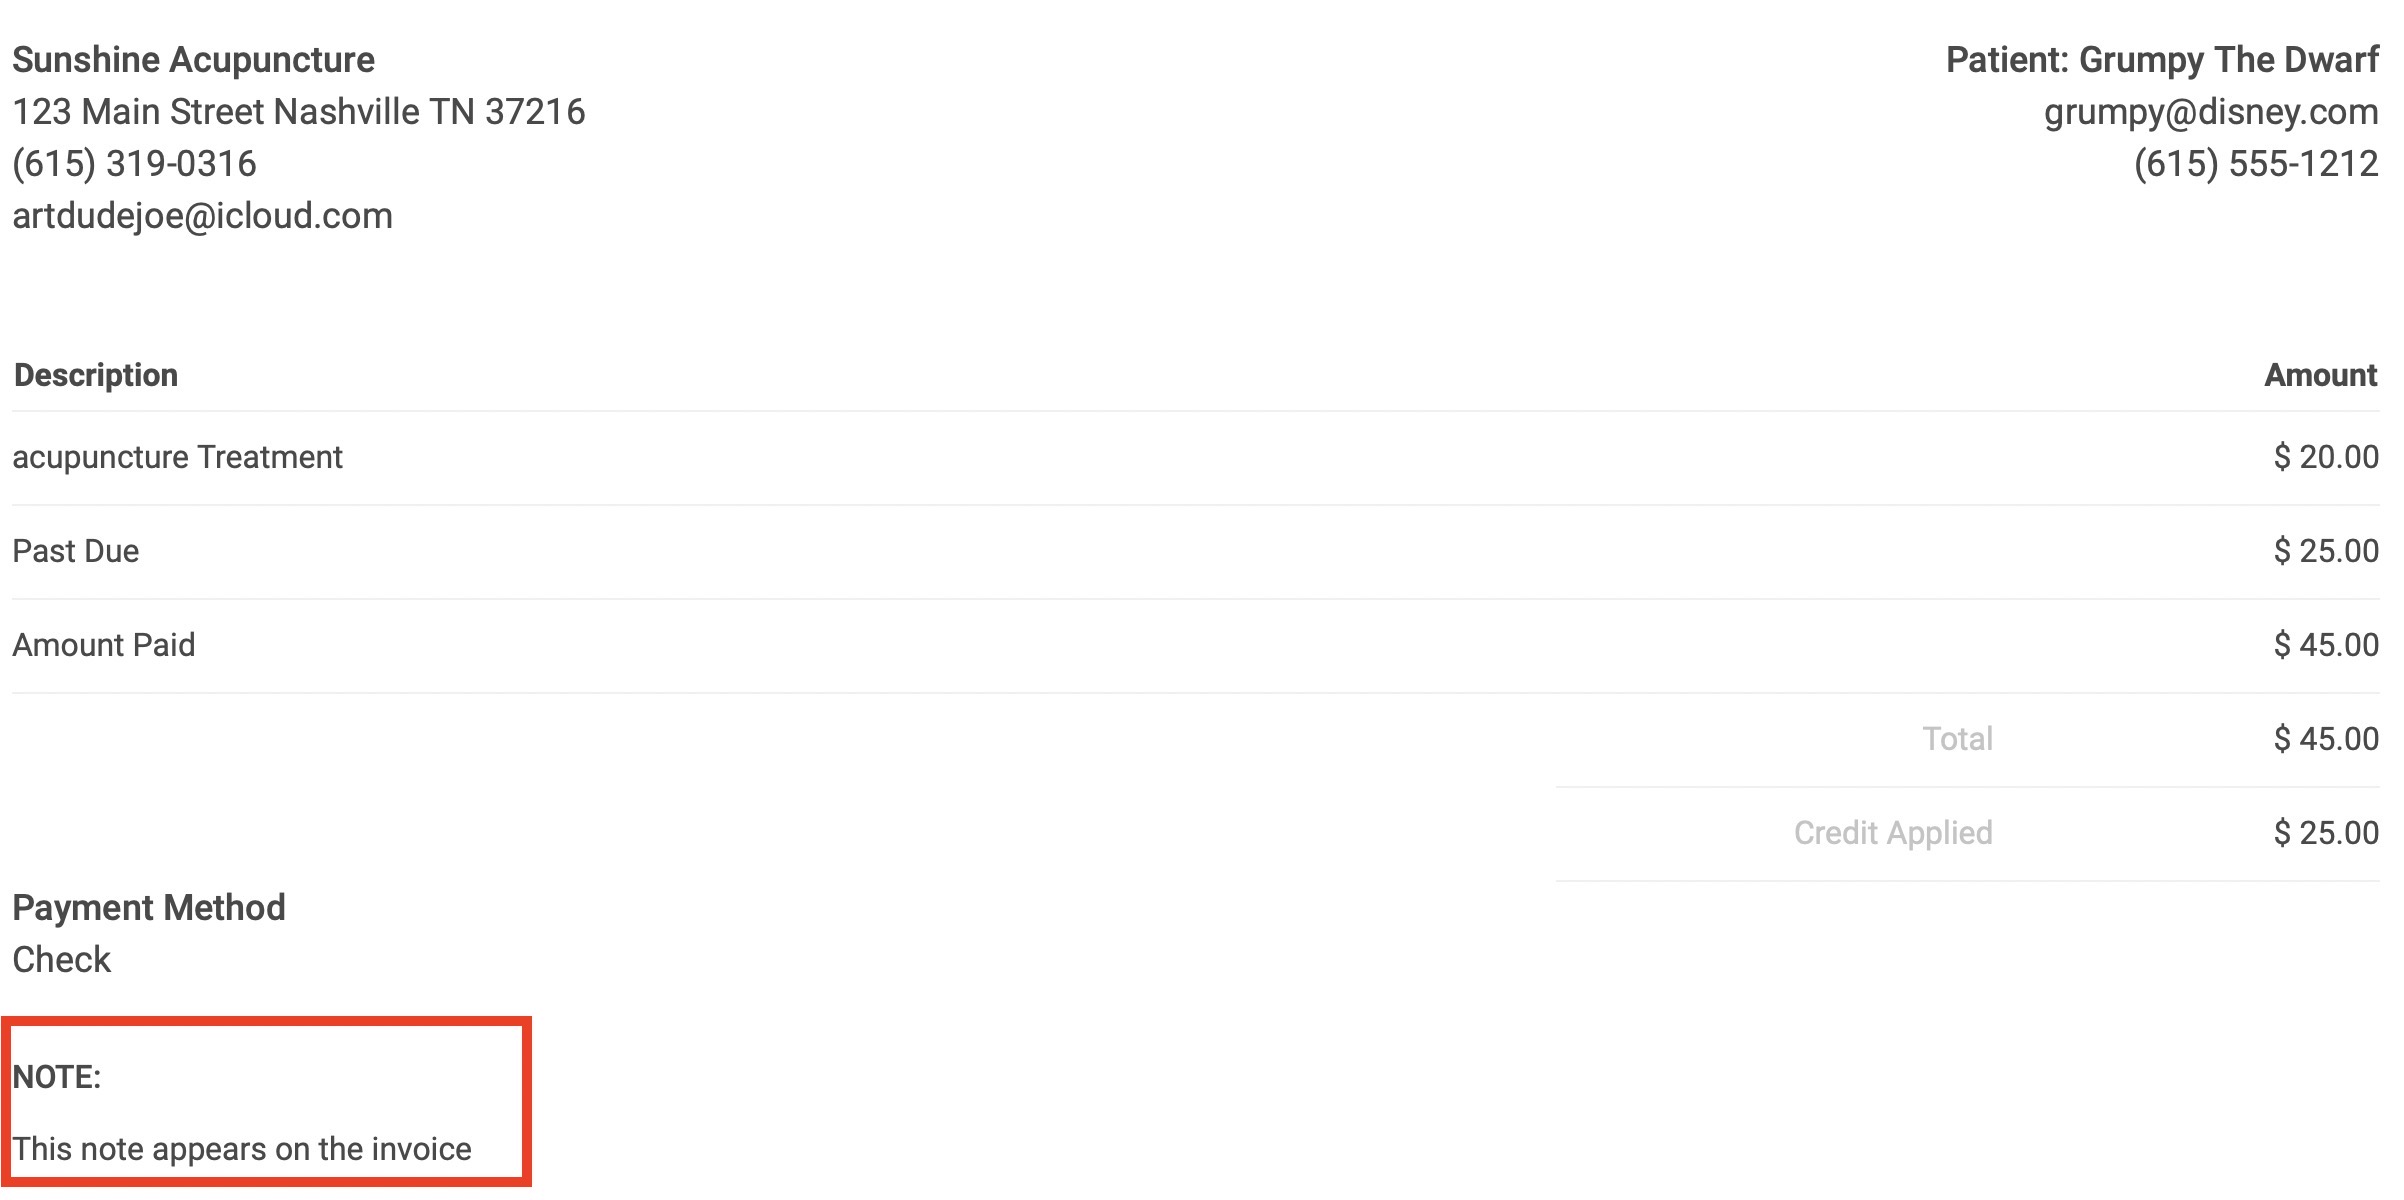
When you check in a patient and record their transaction, any notes you record in the Add a Note field will appear on the printable invoice, which can be viewed by patients:
Hiding appointment notes
If you do NOT want these notes to appear on invoices, you can change this setting on your Settings page, in the Basics section - just click the Hide Appointment Notes on Invoices box:
Transactions
How to record and edit transactional information.
Recording the check-in transaction
All transactional information related to an appointment can be recorded when you check in a patient. This is described in detail in the Checking In section.
Editing a transaction
In Open ACU you cannot edit transactions, checkins or otherwise.
To edit a transaction you’ve already saved, first you’ll need to reverse the check-in. Click the pencil icon next to the patient’s name. In the pop-up that appears, check the box next to “Check Out This Transaction?” then click Remove Transaction. This will remove the payment transaction.
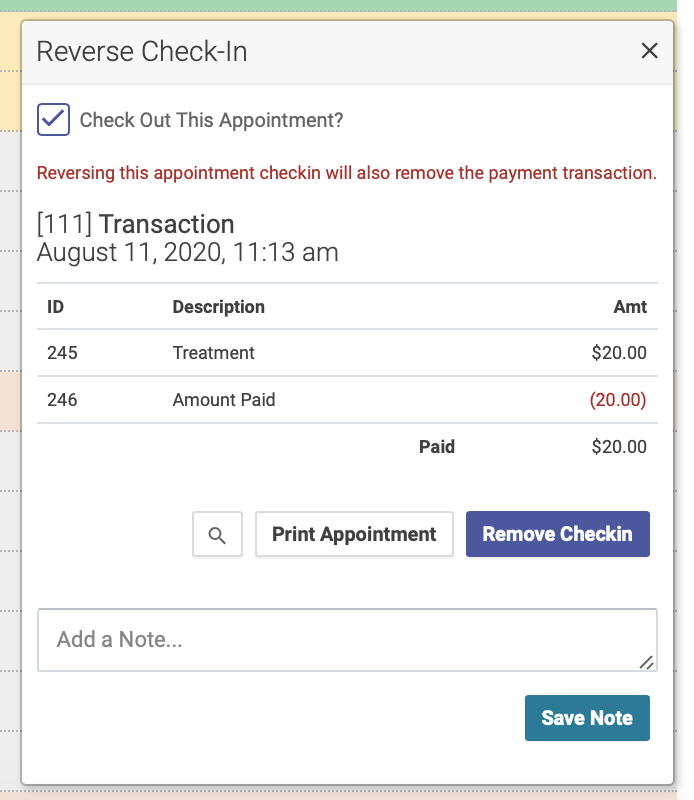
You can then check in the patient again and enter the correct transaction information.
Recording a transaction without a check-in
To record a transaction that isn’t connected with an appointment, you’ll use the Purchase Transaction option. At the top of the schedule, click the Day Tools dropdown menu, then click New Purchase Transaction:
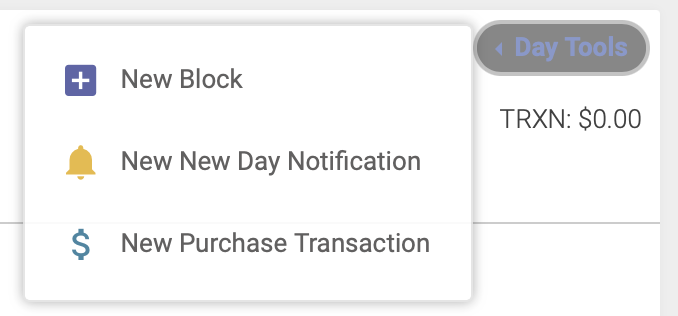
A popup modal will appear, where you will select the location, enter the patient’s name, a description of the charge, the amount paid and the form of payment.
If someone is purchasing tokens, credits, or a gift certificate, click on the corresponding button under the Description of Charge field. Tokens and/or credits purchased will automatically be added to the patient's account.
Purchase transactions will appear on the day’s Transaction Report but not on the Appointment Report.
Reversing a Transaction
Sometimes you create a transaction and there was an error or the credit card failed. In Open ACU you can reverse any transaction. Just be aware that this process may be connected to credit card processing and your account may charge a fee for reversals. This goes for reversing checkin transactions as well.
In Open ACU you cannot edit transactions, checkins or otherwise.
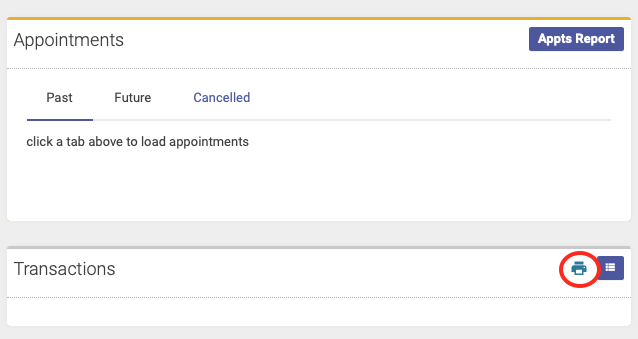
On the schedule page under the waiting list is a "Transactions" button. Click the button to the left to load a list of that day's transactions.

Blue items in the list are appointments. To reverse the transaction and un-check the appointment go to the appointment in the schedule to do so.
Gray items in the list are transactions. Click the pencil to see the transaction. It will show the details in a modal window.
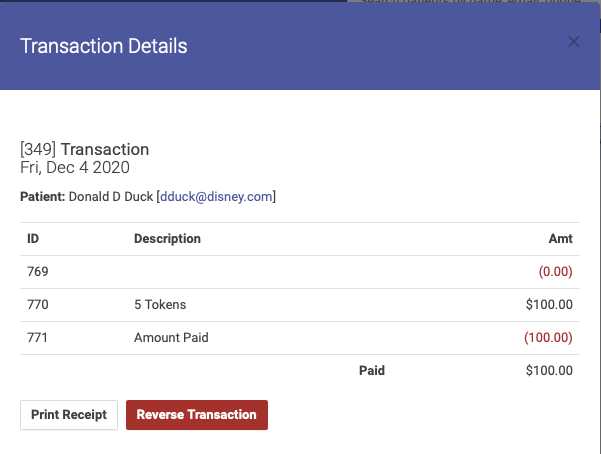
If you want to reverse the transaction, deleting it from the system, click "Reverse Transaction". This will remove the invoice and all its items from the records. It will also reverse any credit or token values for the patient.
Tokens and Credits
How to use the tokens and credits systems
Tokens and Credits Overview
Tokens and Credits are a way to track account balances for individual patients.
Tokens
Tokens represent individual treatments, so 1 token = 1 treatment. The token system can be used when selling package deals or doing promotions. Let’s say you’re running a special deal of 5 treatments for $50. You’ll assign a patient 5 tokens when they buy the package deal. They can then use those tokens to pay for future treatments. For information on how to use credits to pay for a treatment, see The Checkin Transaction.
When a patient has tokens, a blue ticket icon will appear next to their name on the schedule. You can mouse over the icon to see how many tokens they have.
Credits
The credits system tracks dollar amounts owed to or by a patient. Like tokens, a patient can use a specific dollar amount of credit to pay for treatment. For information on how to use credits to pay for a treatment, see The Checkin Transaction.
The credits tracking system will track money a patient owes to the clinic, by showing a negative balance. For example, if you charge a late cancellation fee, this will be tracked via patient credits and balances. For more information on how to use the credits system to track cancellation fees, see the Using Tokens and Credits for Payments and Fees.
When a patient has a positive credit balance, a blue dollar sign icon will appear next to their name on the schedule. You can mouse over the icon to see the amount.
When a patient has a negative credit balance, a red dollar sign icon will appear next to their name on the schedule. You can mouse over the icon to see the amount.
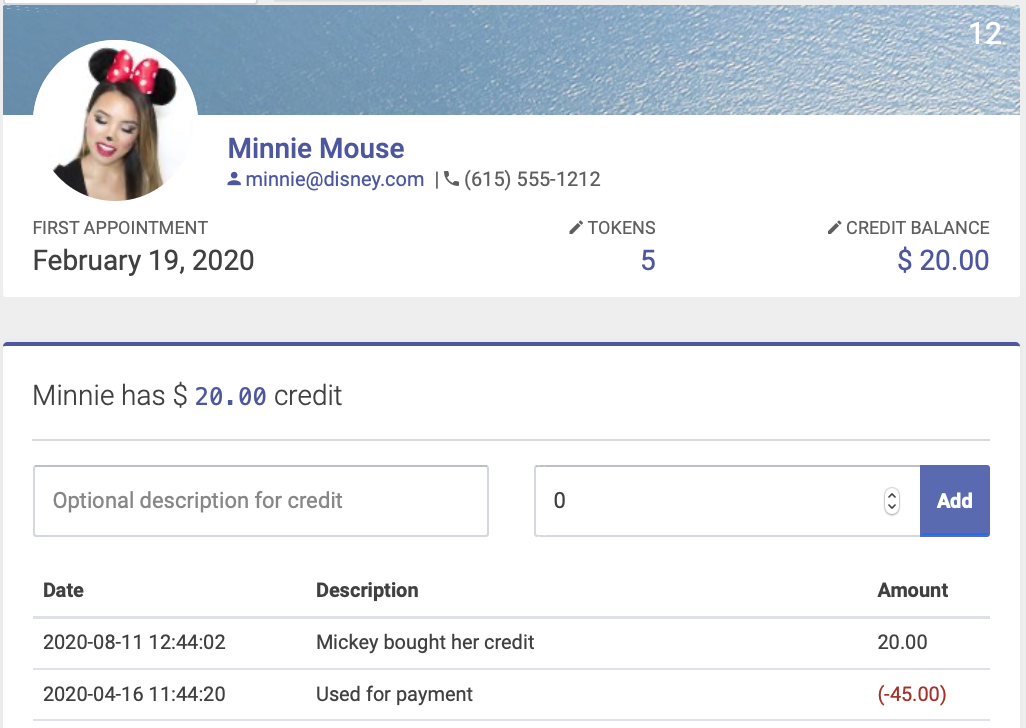
The patient's credit history on their Patient Profile page will show when credit has been used to pay for treatments, cancelation fees, etc:
Go to the next section: Using Tokens and credits for payments and fees.
Using tokens and credits for payments and fees
Using for payments
Patients have the option of using tokens and/or credits to pay for their treatments.
Use Patient Token to Pay For Treatment
If a patient has at least one token they can use one to pay the treatment amount as entered in the transaction. This will adjust the balance of the transaction. Added line items total will remain and will need to be paid. Clicking Save will reduce the patient's tokens by one.
Use Patient Credit to Pay
If a patient has credit it will appear in the transaction. Credit can be used to pay for the entire transaction including extras and the treatment. If the credit is less than the total it will reduce the total transaction by the amount of credit and the rest will need to be paid.
Using for Fees
Tokens and credits can also be used when a patient owes money to the clinic, for example for a cancelation fee.
Use Patient Token to Pay Cancelation Fee
Check the "take a token" box in the cancel popup - this will deduct one token from their account:
Note: You should only check this box if the patient has tokens in their account. Otherwise you'll give them a negative token balance.
Use Patient Credit to Pay Cancelation Fee
If a patient has a positive credit balance, the cancelation fee will automatically be deducted from their account when you confirm the cancelation and charge. The patient's credit history on their Patient Profile page will show when credit has been used to pay for treatments, cancelation fees, etc:
Go to the next section: Manually changing credit/debit and token balances
Manually changing credit/debit and token balances
Note: to see how to add tokens, credits or debits to a patient account during a checkin or purchase transaction, please see Purchasing Tokens and Credits.
You can manually add tokens, add credits and debits, and change account balances on a patient's account from the Patient Profile page.
Manually changing account balances
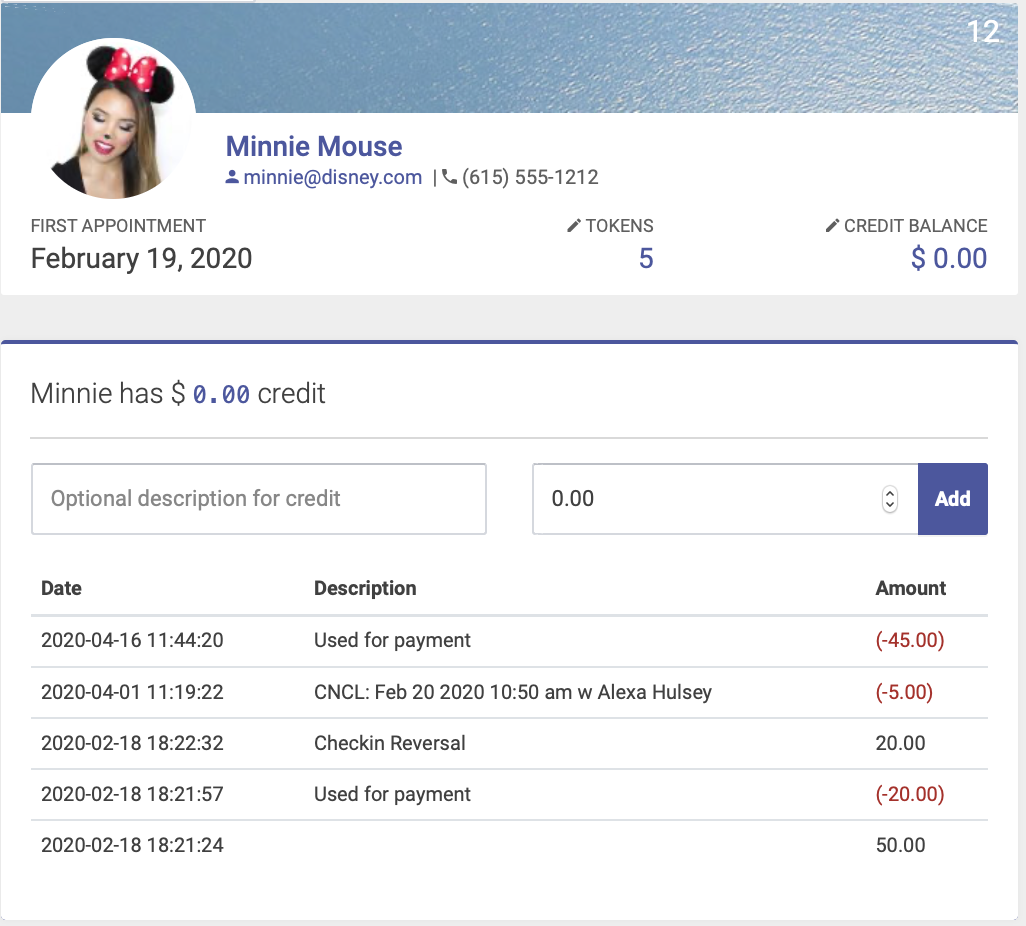
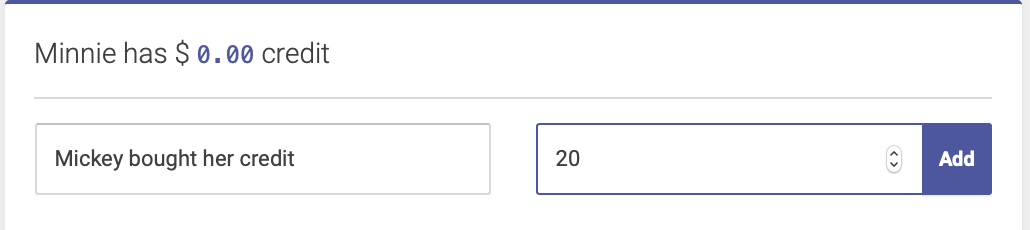
You can manually change an account balance - for example, waiving a cancellation fee - from the Patient Profile page. Under their name, you’ll see Credits - click that to expand the credits window, which includes their credit history:
Enter your optional description, the dollar amount, and click Add:
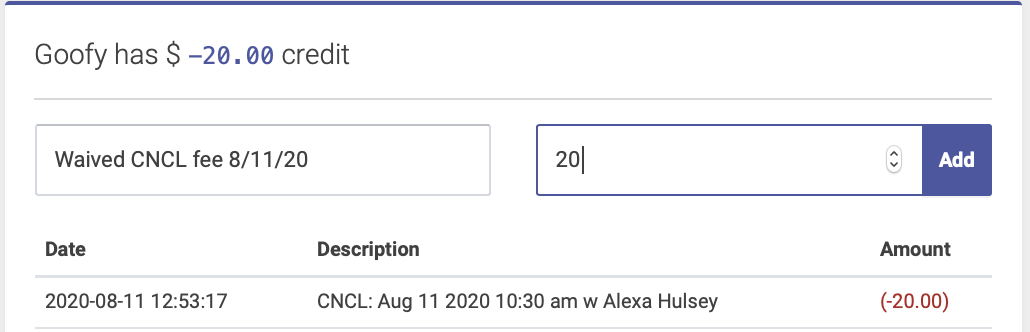
You’ll see the new credit balance under the patient’s name and the most recent entry for credits at the top of the history:

Adding tokens
Note: to see how to add tokens to a patient account during a checkin or purchase transaction, please see Purchasing Tokens and Credits.
Here's how to manually add tokens to a patient account, outside of a checkin or purchase transaction. Under the patient's name on their Patient Profile page, you’ll see Tokens - click that to expand the tokens window, which includes their token history:
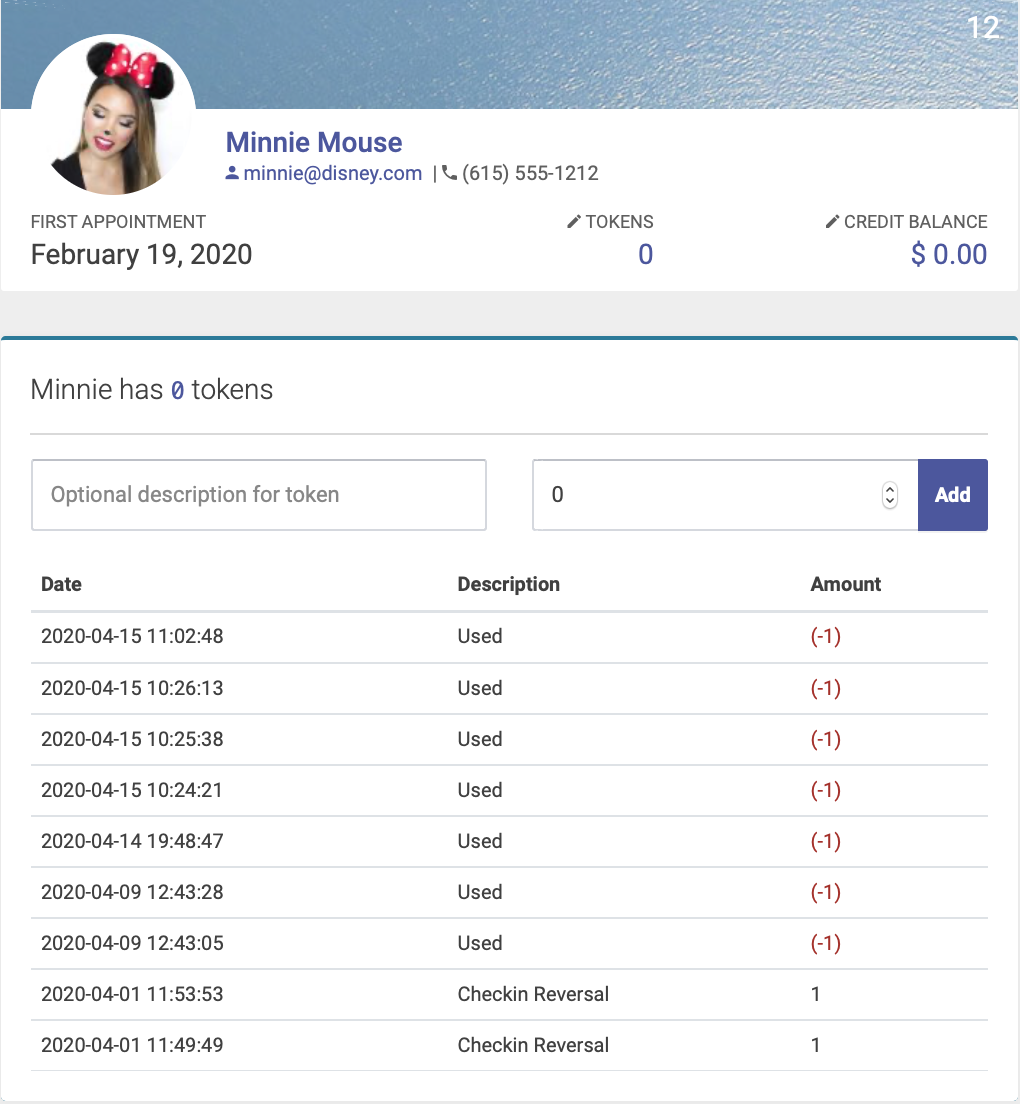
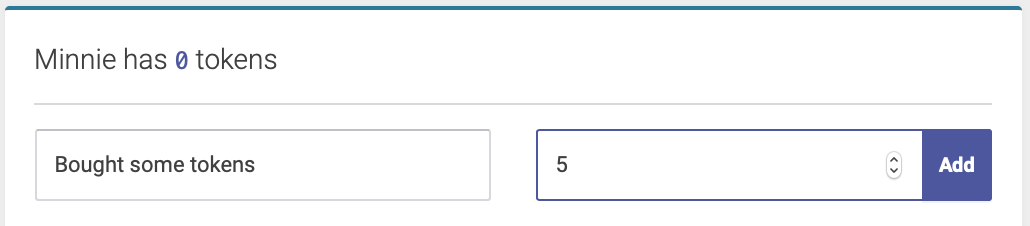
Enter your optional description for tokens, the number of tokens, and click Add:
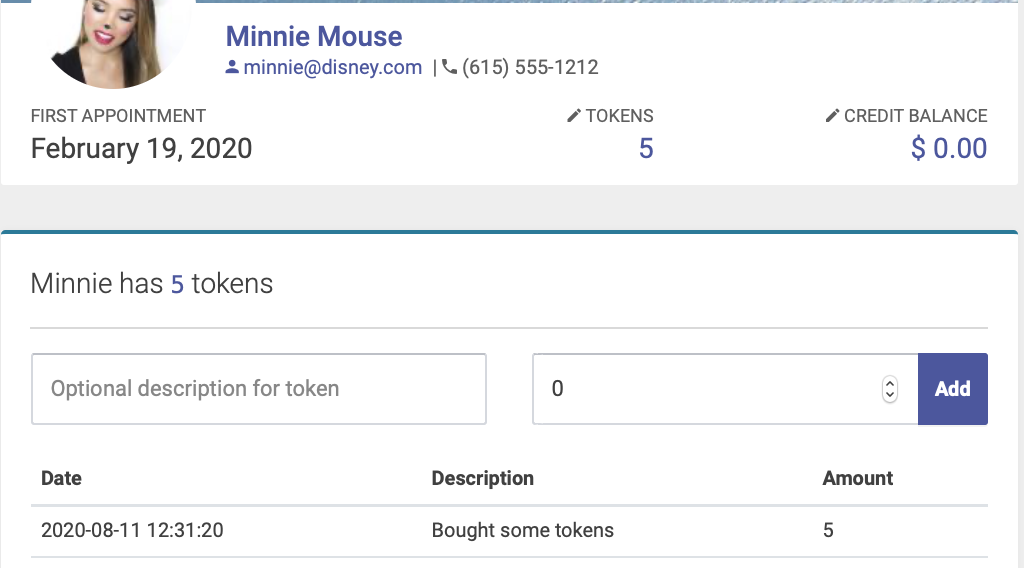
You’ll see the new balance of tokens under the patient’s name and the most recent entry for tokens at the top of the history:
Deleting tokens
Note: if a patient chooses to pay for treatment with a token, the token will automatically be deducted from their account during the checkin transaction. For more information, please see The Checkin Transaction.
To manually delete tokens from a patient's account, follow the instructions above for manually adding tokens. Instead of entering a positive number (i.e., 5), you'll enter a negative number for the amount of tokens you want to delete (i.e., -5). Once you click Add, their account balance will be updated.
Adding credits
Note: to see how to add credits to a patient account during a checkin or purchase transaction, please see Purchasing Tokens and Credits.
You can manually add dollar amount credits to a patient’s account from their Patient Profile page. Under their name, you’ll see Credits - click that to expand the credits window, which includes their credit history:
Enter your optional description for credits, the dollar amount, and click Add:
You’ll see the new credit balance under the patient’s name and the most recent entry for credits at the top of the history:
Adding debits/money owed
Note: to see how to add debits/money owed to a patient account during a checkin or purchase transaction, please see Purchasing Tokens and Credits.
You can manually add dollar amount that a patient owes from their Patient Profile page. Under their name, you’ll see Credits - click that to expand the credits window, which includes their credit history:
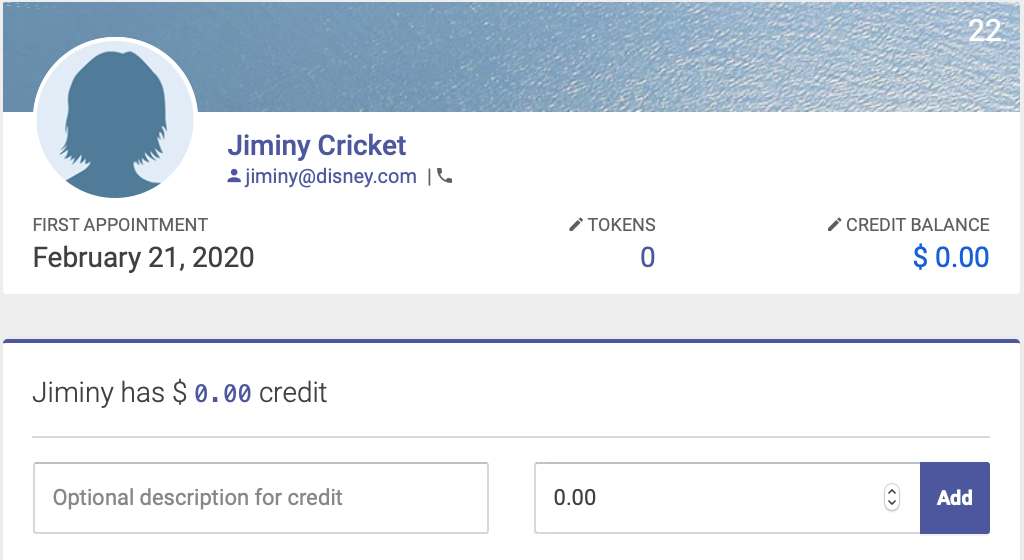
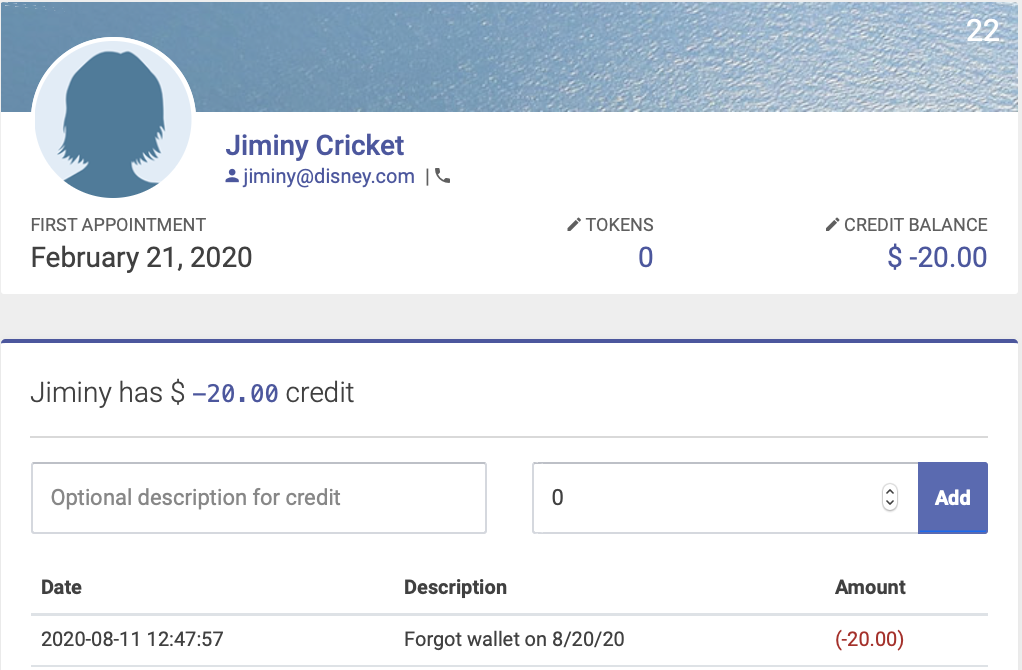
Enter your optional description for debit and the dollar amount. Be sure to enter a negative dollar amount, since this is an amount owed. Click Add:

You’ll see the new credit balance under the patient’s name and the most recent entry for credits at the top of the history:
Go to the next section: Purchasing Tokens and Credits
Purchasing Tokens and Credits
Tokens, credits and debits can all be added to a patient's account during the Checkin Transaction or using a Purchase Transaction. This is the most efficient way to add tokens, credits and debits to a patient account.
If necessary you can also manually change credit/debit and token balances.
Adding tokens at checkin
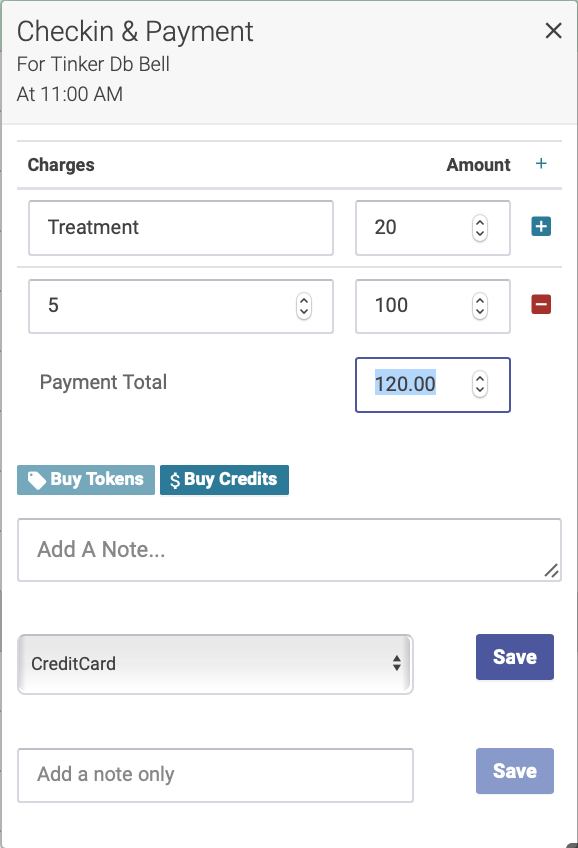
Let's say a patient wants to pay for today's treatment plus 5 tokens for future treatments, all at $20 each. When you checkin the patient, you'll enter $20 in the Treatment field, then click the Buy Tokens button. You'll then enter 5 for the number of tokens and $100 for the amount. This will bring your payment total to $120. Once you save the transaction, the 5 tokens will automatically be added to the patient's account.
Adding credits at checkin
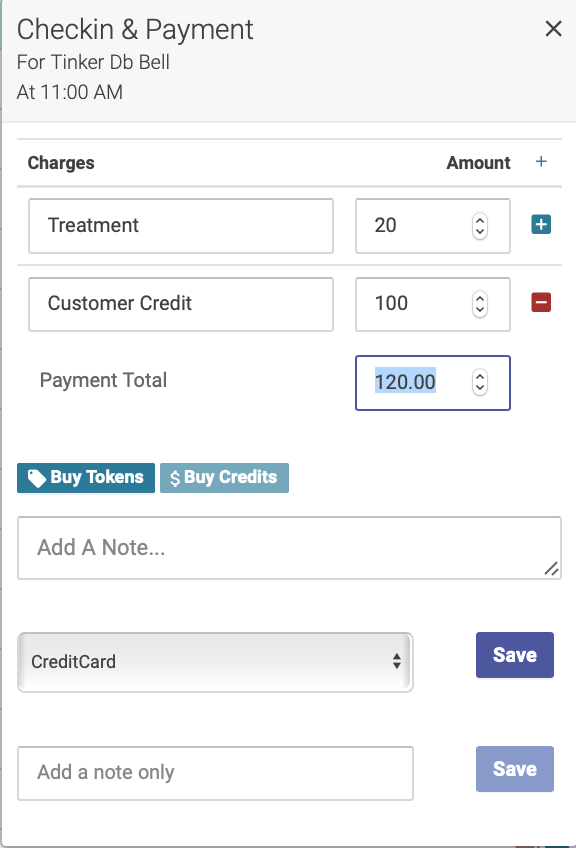
Let's say a patient wants to pay for today's treatment plus add $100 to their account for future treatments or retail item purchases. When you checkin the patient, you'll enter $20 in the Treatment field, then click the Buy Credits button. You'll then enter $100 for the amount. This will bring your payment total to $120. Once you save the transaction, the $100 credit will automatically be added to the patient's account.
Adding debits at checkin
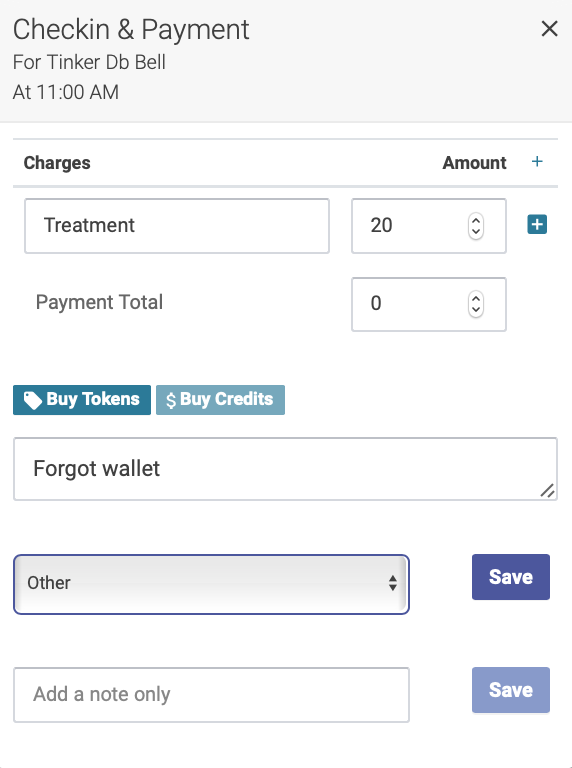
Let's say a patient comes in for treatment but forgot their wallet. You can add a debit to their account to prompt you to collect payment next time they come in. When you check in the patient, you'll enter the amount they should have paid in the Treatment field, then enter "0" for the payment total. You can also enter an explanation in the Note field. Once you save the transaction, a the negative balance will be added to their account.
Adding tokens or credits with a purchase transaction
Click on the Purchase Transaction icon - the $ in the upper right corner of the day's schedule. Once the popup modal appears, follow the steps for entering a token or credit purchase just like you would during a checking transaction.
Reports
Making sense of all your data in Open Acu.
Appointment Report
The Appointment Report shows all appointments for a given range. When running an appointment report, you can select for date, location and practitioner.
So let's say you want to see how many treatments a practitioner did last month - select your date range, location, the practitioner name, and Appointments from the menu at the top, then click Search:
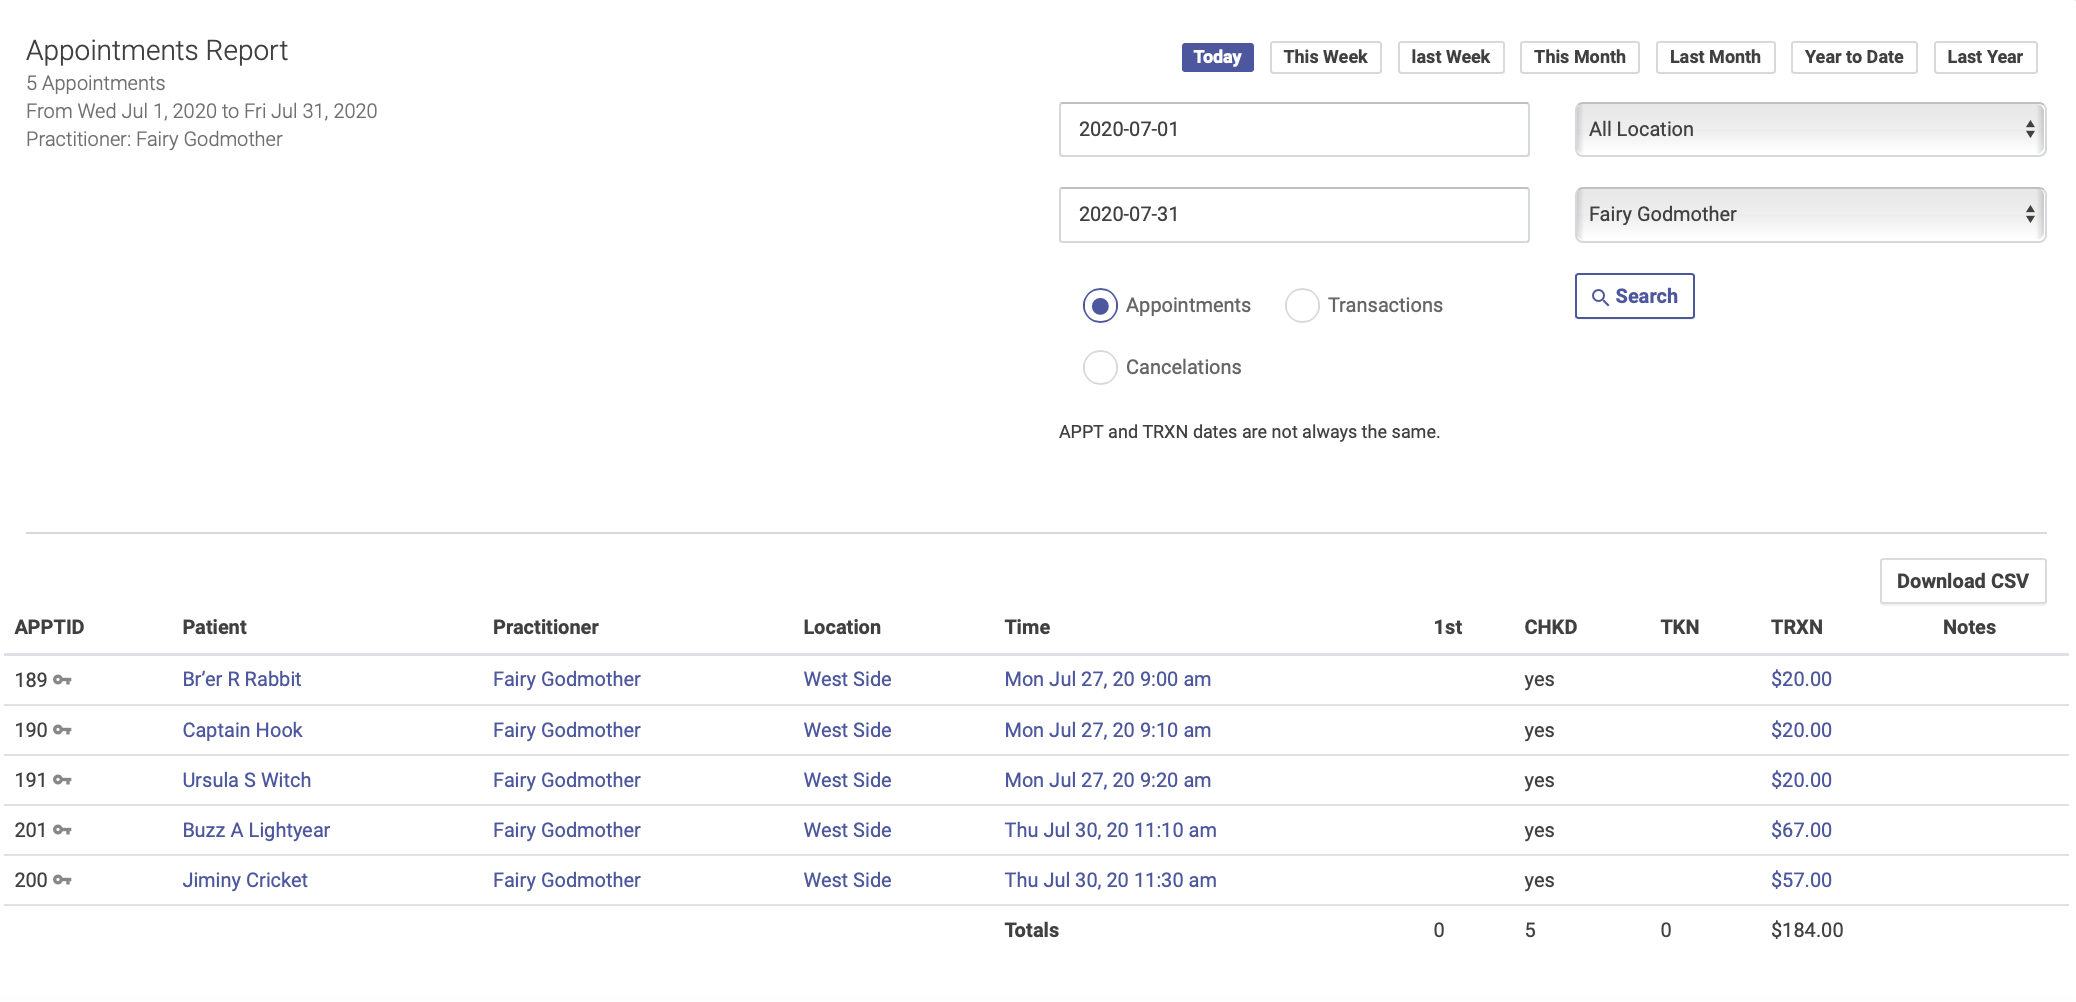
The appointment report does NOT show detailed transaction information - for that you'll need to run a Transaction Report.
Transaction Report
The Transaction Report shows all transactions for a given range. When running a transaction report, you can select for date, location and practitioner.
This is the report you'll want to run anytime you want to look at financial transactions, whether for the day, week, month, etc. It differs from the Appointment Report in a few ways:
- It includes transactions that aren't tied to an appointment, for example if someone comes in to purchase a retail item but doesn't get a treatment
- It includes debit/credit and token balances
- It separates out payments for treatments vs items
- It shows method of payment for each transaction (cash, check, credit card, or other)
When running a transaction report, you'll select your date range, location(s), practitioner(s), and Transactions from the menu at the top, then click Search:
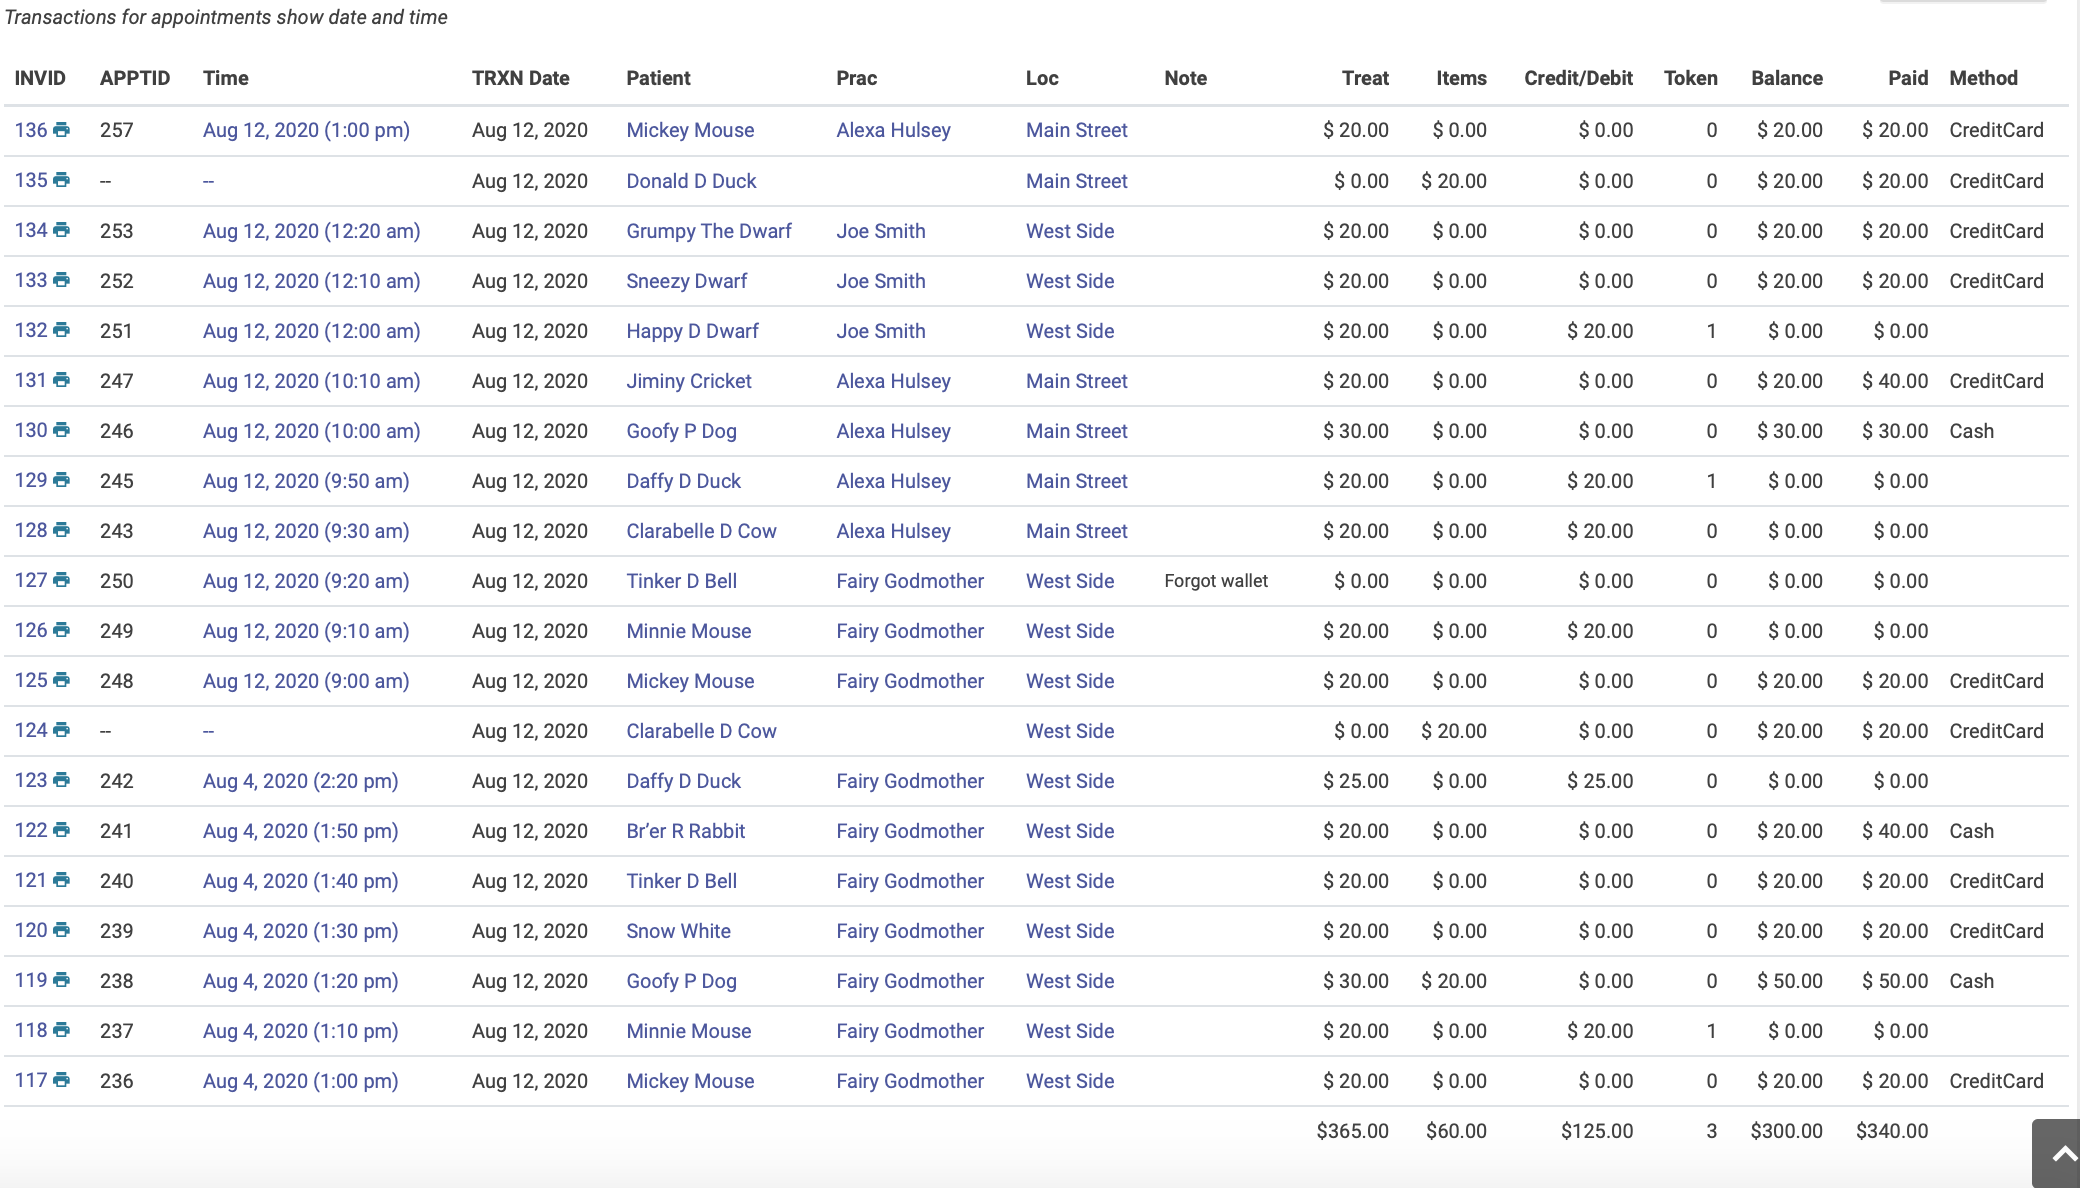
The report will show detailed information for each transaction. Note that the total at the bottom of the Paid column may be different from the total at the bottom of the Balance column. This occurs when patients use credits or tokens as payment. The Paid total will always show the actual amount collected for the given date range.
The transaction report does NOT show check-ins for the date range. For that you'll need to run an Appointment Report.
Detailed Transactions
There is a choice in the type of transaction reports that show all the details or line items for every transaction. Choose the "Detail TRXN" option for more details in your transactions. Note the gray lines separate transactions.
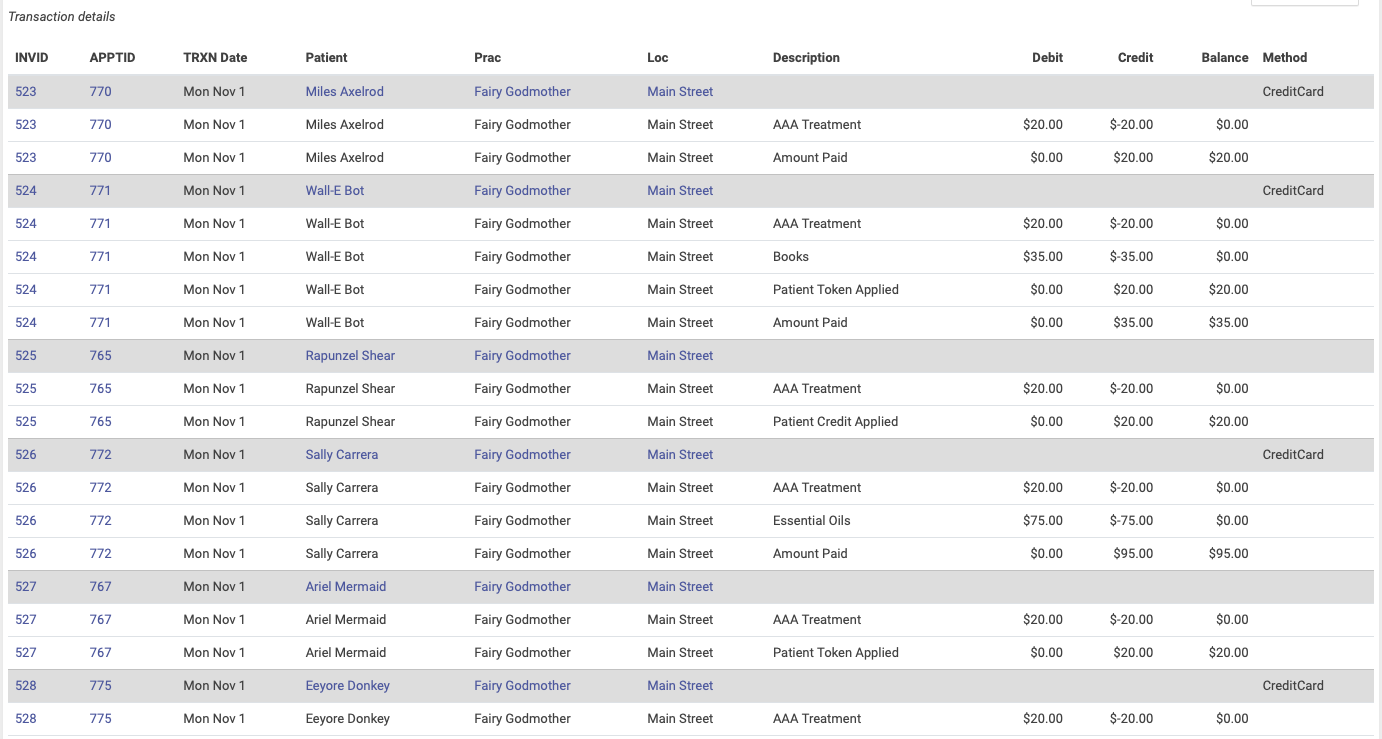
Cancelation Report
The Cancelation Report shows all canceled appointments for a given range. To run a cancelation report, select your date range, location, the practitioner name, and Cancelation from the menu at the top, then click Search:

Practitioner Reports
There are two practitioner reports that can be accessed from the Dashboard: the Totals Summary and Patient Return Rate.
Practitioners may view their own reports, but not the reports of other practitioners. Clinic Owners may view reports for all practitioners.
Totals Summary Report
This report shows a summary of a practitioner’s appointments for a given date range, including number of appointments, hours, busy rate and revenue. Click the pencil icon to select a preset or custom date range:
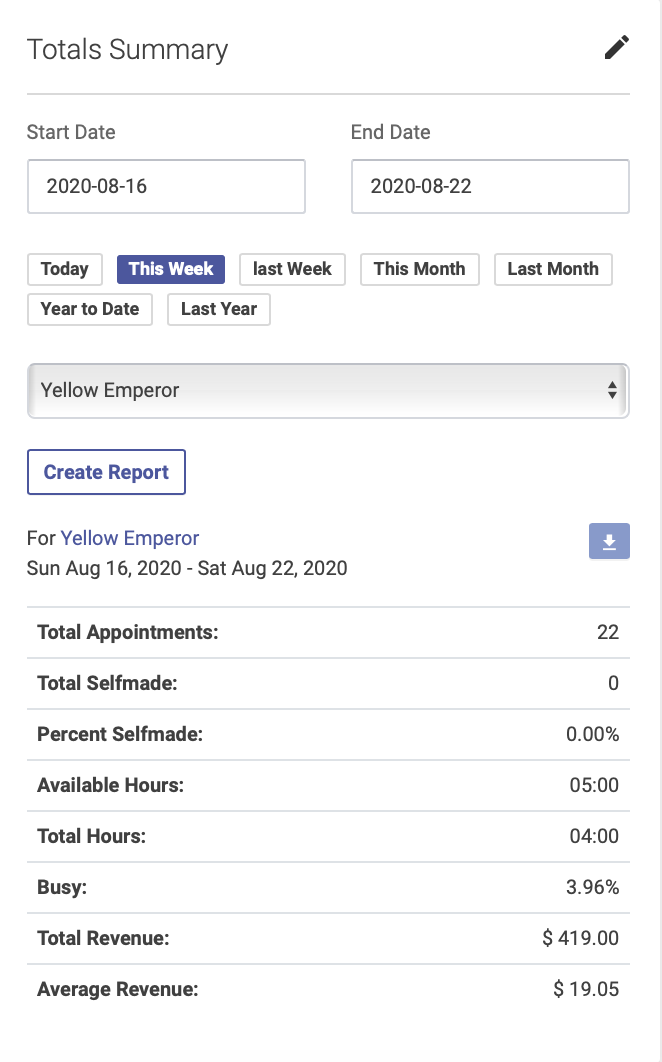
Patient Return Rate Report
This report shows the number new and returning patients for each practitioner. To run this report, click the pencil icon to select a preset or custom date range:
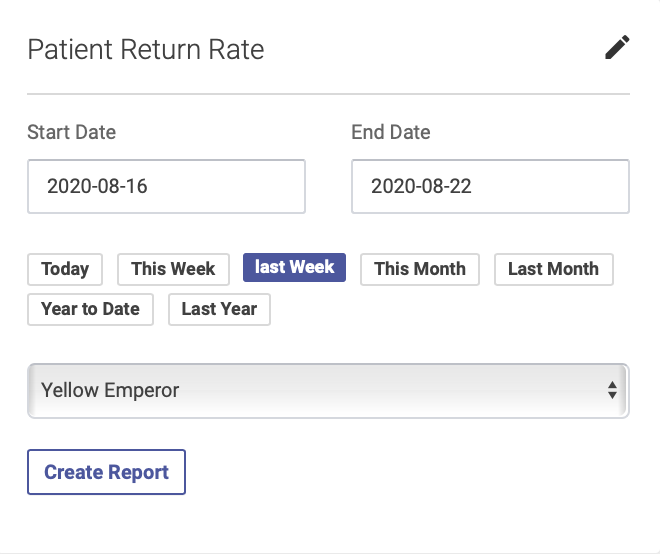
The columns will show numbers of new and returning patients, and the number of past and future appointments for each patient:
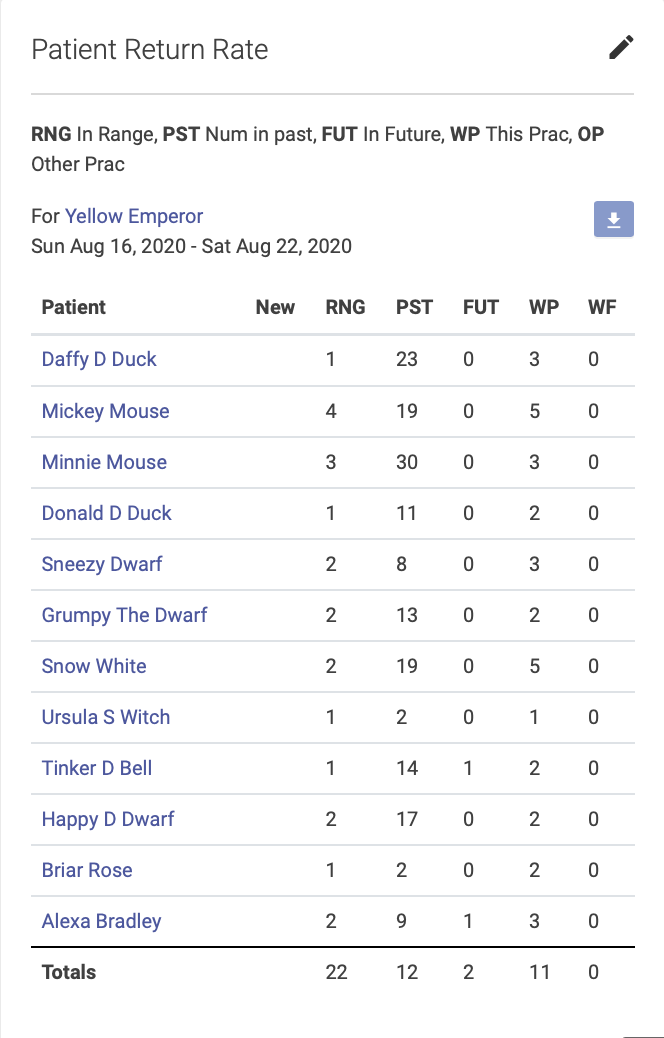
If you want to sort your data, you can use the arrow button at the top of the report to download your results to a spreadsheet.
To calculate your new patient return rate:
- Find your total number of new patients for the date range—this will appear at the bottom of the New column on the report.
- The next column, RNG, will show how many times a patient came in during that date range. The next column, PST, will show the total number of past appointments for that patient. f a patient has a 1 in the RNG column and a 1 in the PST column, that tells you they’ve only been in once. Add up your total number of patients who have only been in once.
- Subtract the number who have only been in once from the total number of new patients for the date range. This gives you your number of returns, which you can then use to calculate your return rate. For example, if you have 100 new patients in a date range, and 25 only came in once, that leaves you with 75 who came in more than once and therefore a 75% rate of return.
Detail TRXN Report
The Detail TRXN Report is similar to the Transaction Report in that it shows all transactions for a given range. The difference is that the Detail TRXN report shows anything that was entered in the Description box on a transaction.
When running a Detail TRXN report, you'll select your date range, location(s), practitioner(s), and Transactions from the menu at the top, then click Search:
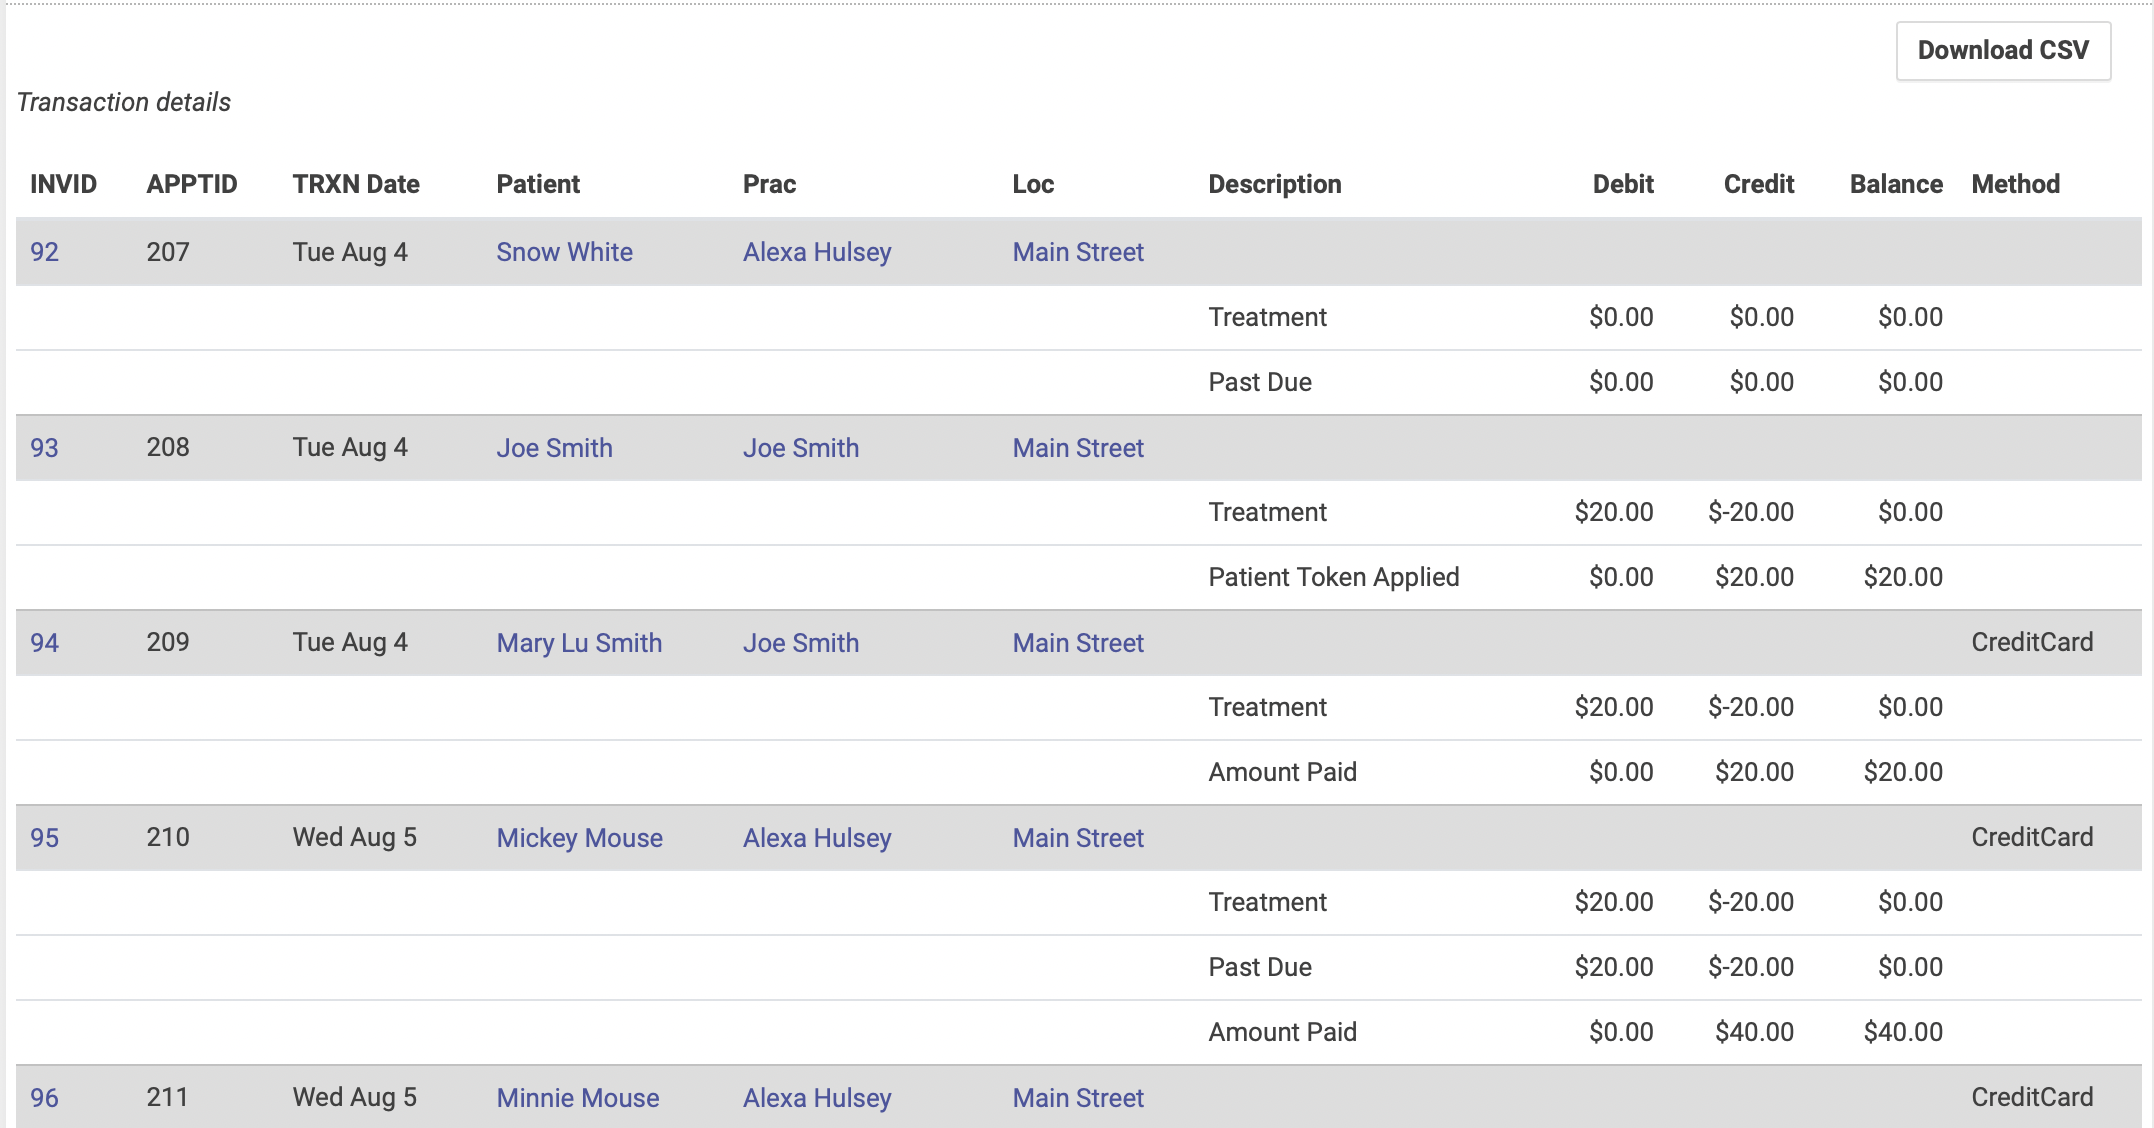
The report can be downloaded to a CSV if you'd like to sort your data.
The Detail TRXN report does NOT show check-ins for the date range. For that you'll need to run an Appointment Report.
The Appointment Log
Getting to the appointment log.
The appointment log opens as a modal window from the context of the appointment.
Here are the appointment popup boxes from the schedule. The first is when clicking the checkin icon. The second is the pencil icon on appointments already checked in. Click the magnifying glass icon to see the appointment log.
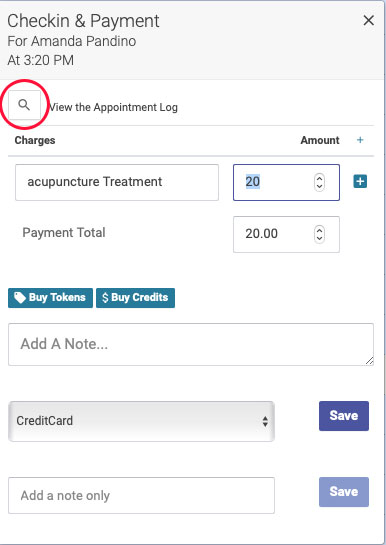
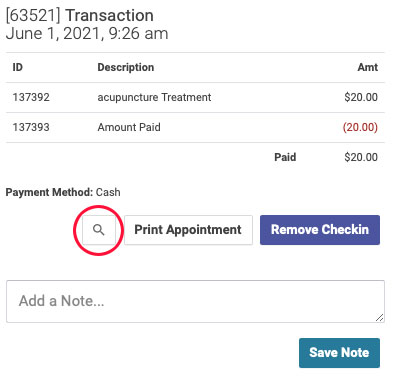
From the patient's profile page you can load the patient's appointments in the bottom right section of the page. Load past or future or cancellation appointments and look for the magnifying glass icon.
![]()
Open ACU logs everything as it pertains to appointments.
- When the appointment was created and by whom.
- Appointment confirmation email activity (Mail timestamps are Pacific time because the server is in California)
- Sent: meaning it got initiated from the email service.
- Delivered: meaning it arrived at the patient's email server.
- Bounced: means the message was sent to a mailbox that doesn't exist.
- Opened: the message actually was opened by the patient.
- Delayed: the patient's email account could not deliver the message and will try again.
- This status can happen when the receiving server has a log jam of messages and can't process the request. Yahoo, Verizon and AOL servers had this problem in early June 2021.
- Checkin is logged
- This will include the admin user who checked them in
- It will also summarize the transaction.
- If an EHR record is duplicated and which appointment ID.
- EHR record created.
- EHR record locked.
Here is an example of a log with a Delay message.

Delayed Messages are not the same as bounces, there is just a problem with the receiving or patient's email server. The sending part worked but the receiving server could not make the final push. The message will likely go through eventually. Our service does try 6 more times in a 72 hour period.
Here is a FAQ on understanding delays and bounces from SparkPost our mail delivery service.
Bounced messages will make Open ACU opt-out the patient's email preference because the mailbox address is broken and we don't want to try that again. You will also see a note on the patient's account saying this.
Downloading Patient Email Addresses
You can easily download a list of patient email addresses from the Patient Return Rate report, located on the Dashboard:
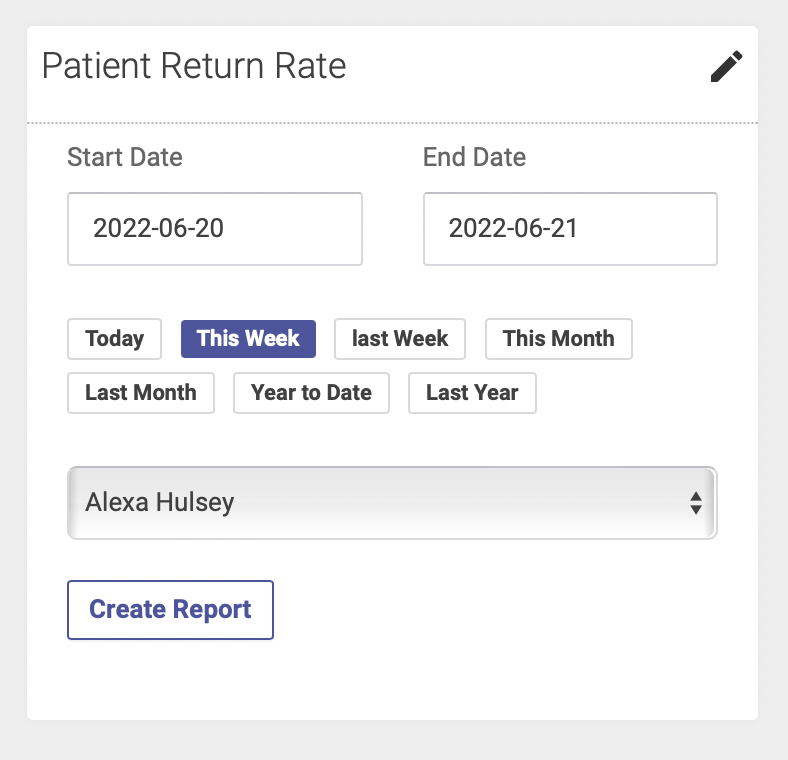
Select your date range and Practitioner (or All Practitioners), and click Create Report. To download your results to a spreadsheet click the download button at the top of the report:

Your patient names and email addresses will then export to a downloaded spreadsheet, where you can sort and arrange your data:
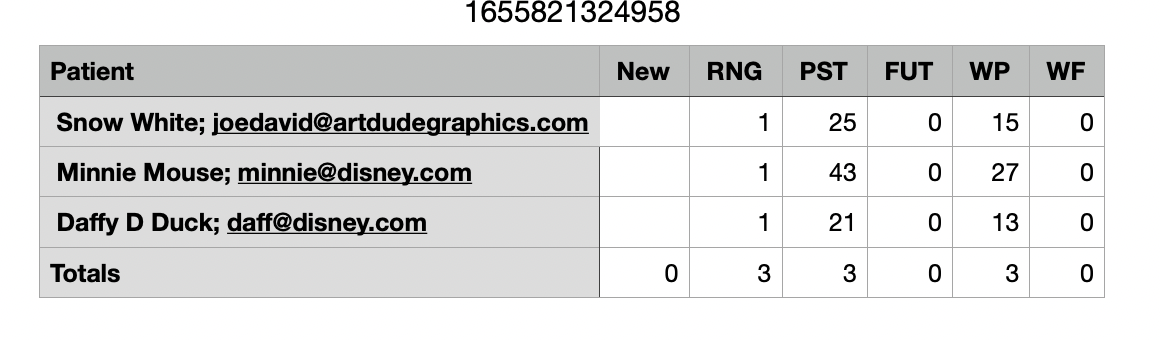
Service Report
The Service Report shows all appointments for a specific Service in given range.
Here's a video overview:
Follow these steps to run a Services report:
- From the left hand side menu, go to Appointments --> Reports
- Click Services Report at the top of the page
- Enter your date range and select your Service from the drop down menu, then click Apply
- Your report will list every appointment for that Service in your date range. The top of the report will show totals, including number of appointments, number of checked-in appointments, and revenue.
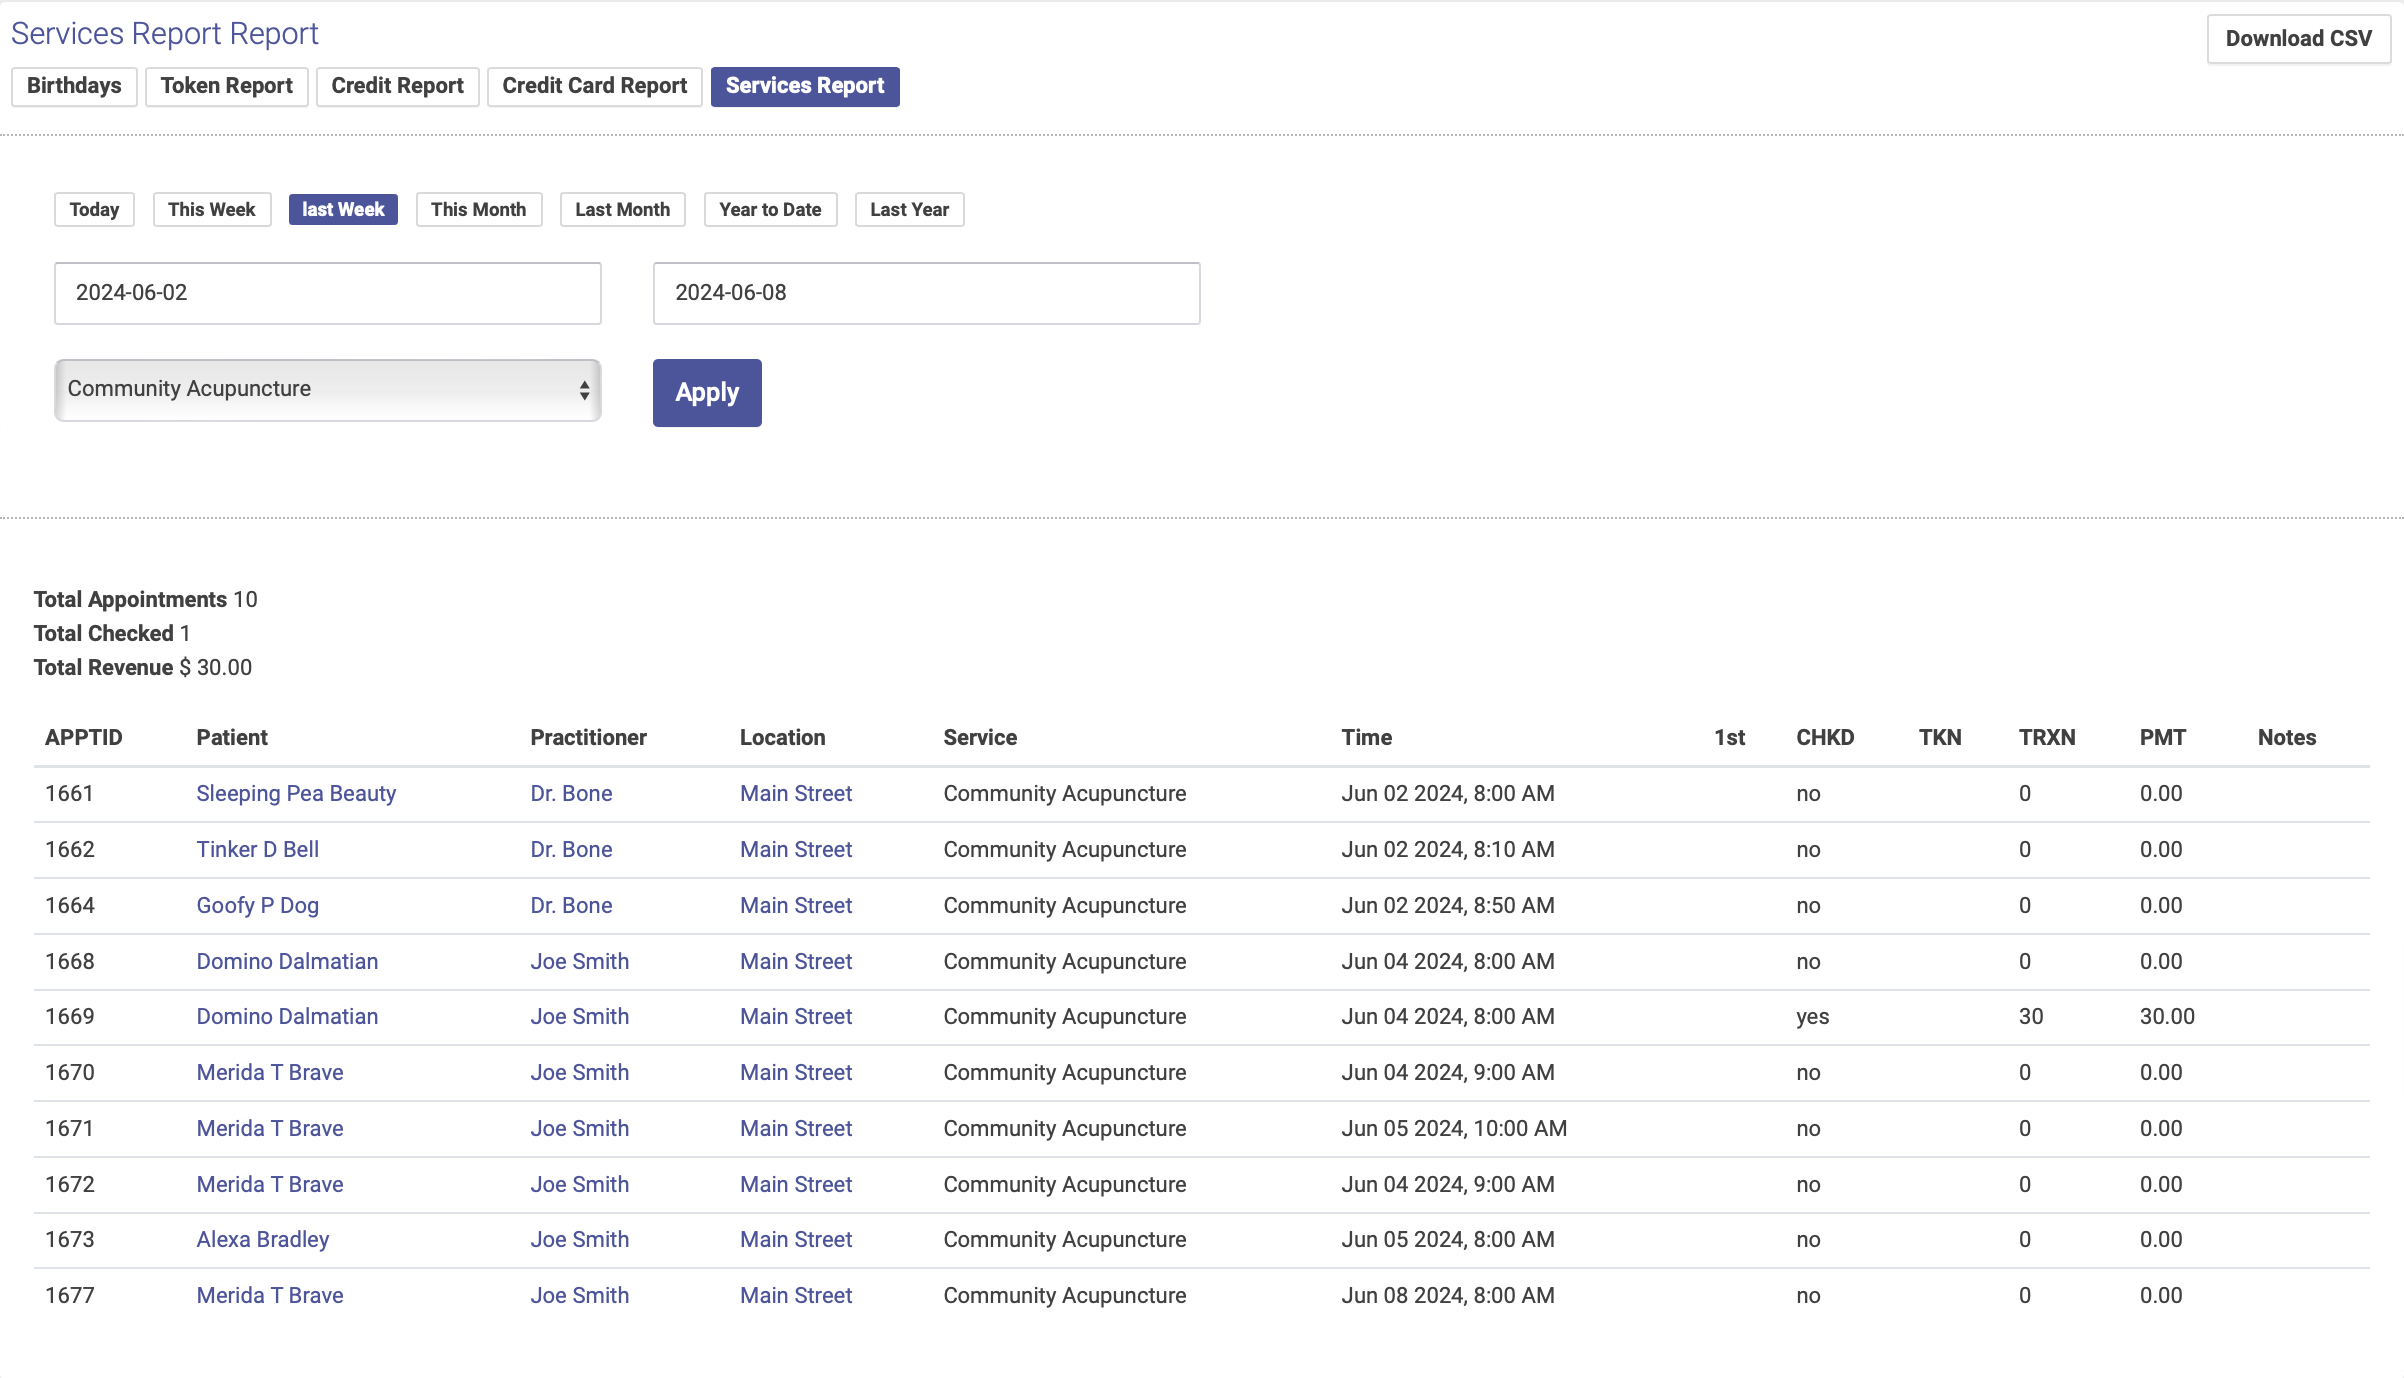
Taking Credit Cards
Start Taking Credit Cards
To take credit card payments within Open ACU you will need to add the feature to your account and then complete the Stripe onboarding process. These steps can all be completed from the Take Payments section of your account, which you can reach from the navigation menu on the left hand side of your screen:

How to start taking credit card payments
- Go to Account > Take Payments
only users with Owner status can see this page. - Click "Getting Started" to create a Stripe Onboarding link specific to your Open ACU Account
After a few moments you will see the link below.

This is a link to your account onboarding process. The link makes sure your account will work with Open ACU. If you aren't ready to start the onboarding process don't worry you can always come back to the Take Payments page and generate a new link.
Stripe Onboarding must be completed by the business owner or someone with significant management responsibility of that business. What you will need
- You will enter business details (legal business name, address and IEN or Social Security number)
- Set your preferences and branding details (logo, name and web address)
- Connect a bank account for charges and payouts.
- Documents to confirm your identity:
business license, passport or other identifying document based on the type of business and other factors.
Check your Stripe account status
Follow the steps on the Take Payments page to create and connect your Stripe account.
You may need to go back for final authorization steps before your account is ready for payments.
Look for three green checkmarks for each of the steps to go live. If the account needs further information you can click the "Log into your Stripe Dashboard" to finish the necessary steps.

Optional: Set up your Stripe Reader
If you want to take in-person credit card payments, you will need to order a WisePOS Countertop Reader from Stripe. You can do this from the Take Payments page:
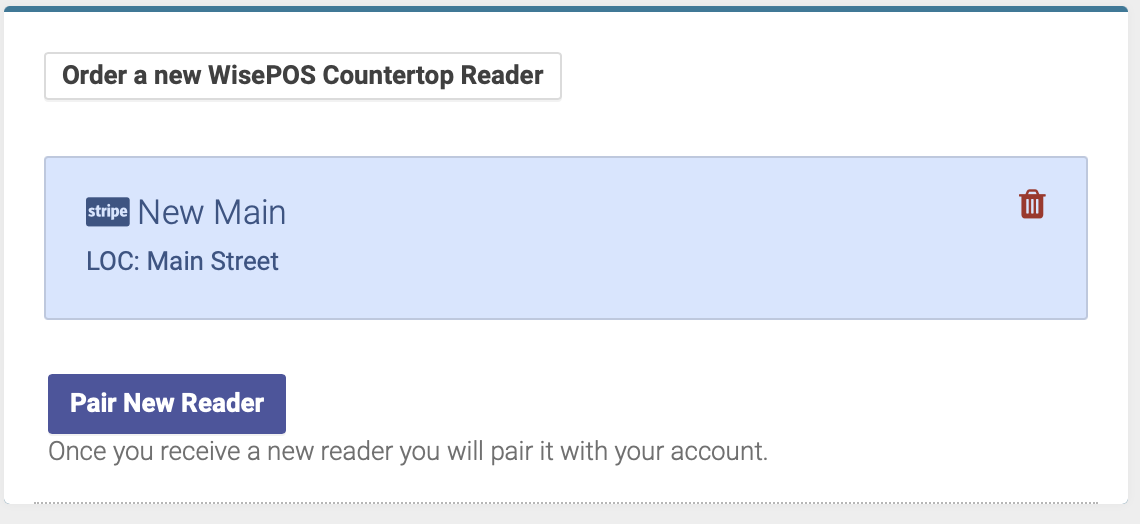
Once you receive your reader, you will need to complete the steps to set up and connect your reader:
- Follow the steps on the Take Payments page to set up your Wise POS reader
- Once the setup is complete, you will need to pair your reader with your account. You will also do this from the Take Payments page.
Note: only the WisePOS Countertop Reader works with Open ACU's Stripe integration
Credit Card Settings
Switch the Require a Credit Card button to ON if you want to require patients to save a credit card payment method prior to booking an appointment:
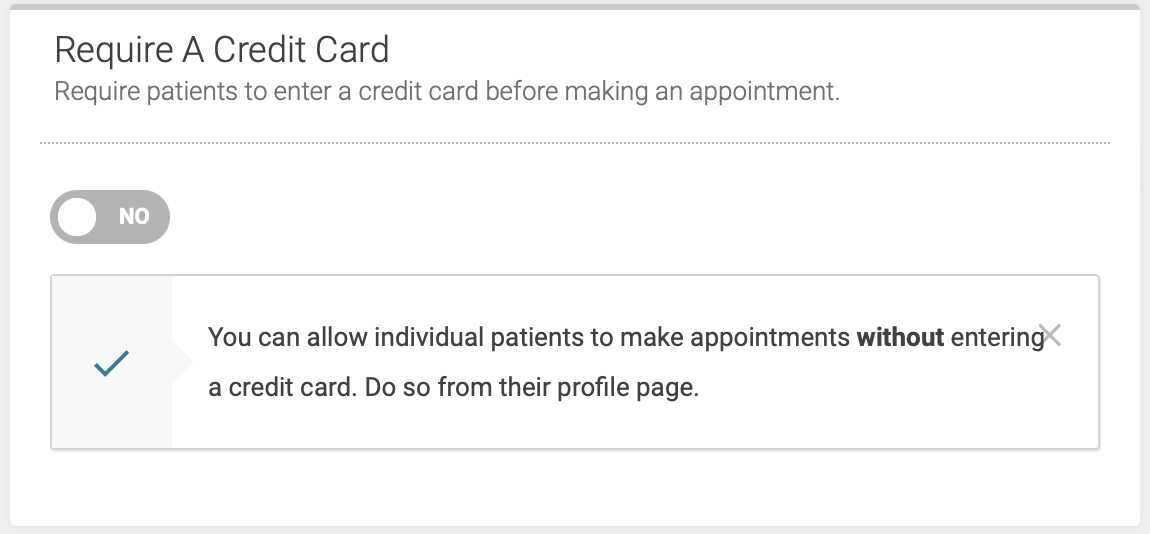
If you switch the Require a Credit Card option to ON, this will require that ALL patients save their credit card information online before scheduling an appointment. This will apply to both new and existing patients. If you choose to enable this option, we recommend notifying your existing patients of the change ahead of time.
You also have the option to allow individual patients to make an appointment without requiring a credit card. You can do this from their patient profile page.
Financial Policy
Enter and save your Financial Policy. Patients will agree to your financial policy when saving their credit card information online via the patient portal:
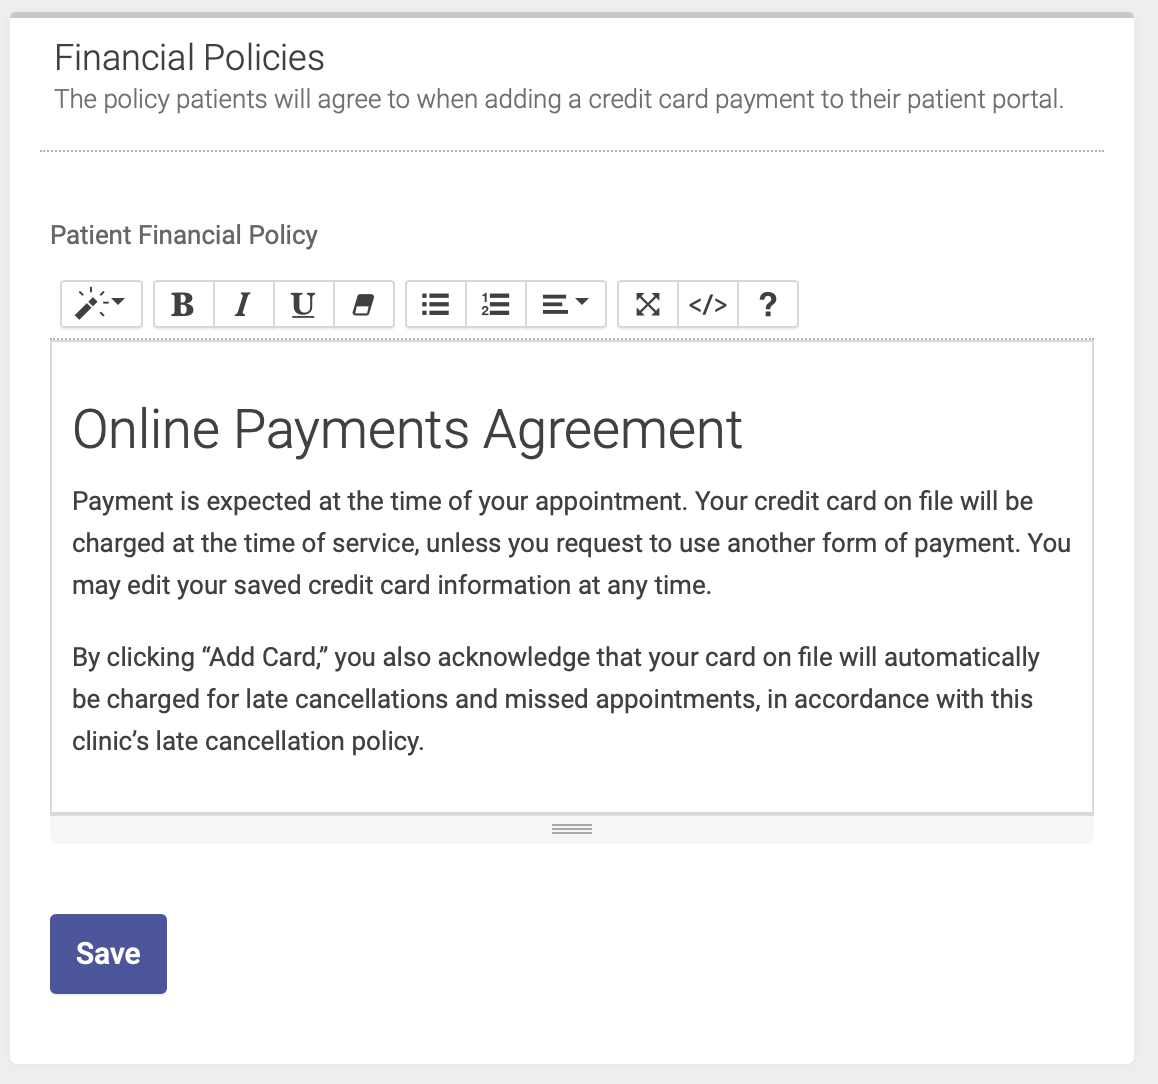
Accepting HSA and FSA cards
In order to accept HSA and FSA card payments, you need a certain Merchant Category Code (MCC). Your Stripe account is set up with an MCC code for Miscellaneous Personal Services, which is not an approved MCC for all HSA and FSA cards. Therefore, we recommend changing your MCC to one that is widely accepted for HSA and FSA cards.
To change your MCC, you will need to contact Stripe support through your Stripe dashboard. Tell them you need to change your MCC to 8099: Mental health, sports medicine, miscellaneous medical, so that you can accept HSA and FSA payments. They will probably ask you a few questions about your business to verify that this is the correct category, and they might not be able to do it immediately since this is not a typical request from merchants. But they do have the ability to change it for you, and it shouldn't take more than a few hours for the process to be complete.
Adding a Patient's Credit Card
You can save multiple credit card payment method for each patient for applying payments for appointments, non-appointment transactions and No-Show fees. There are a couple places that allow you to add payment methods.
Note: Stripe currently does not allow you to save a payment method for Apple Pay, Samsung, or Google Pay.
Add a Credit Card Payment Method to a Patient's Profile
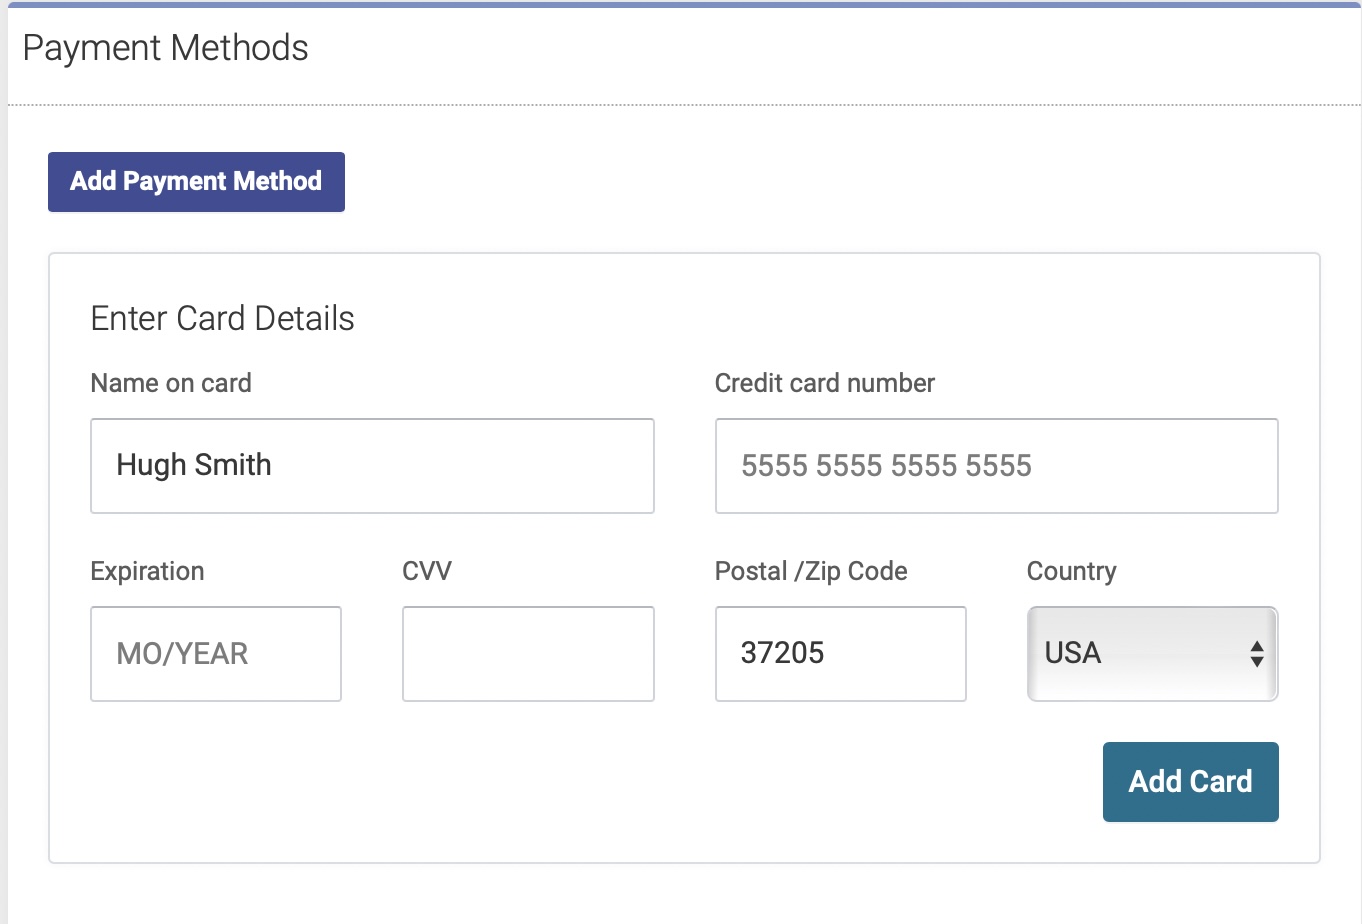
- Go to the patient's profile upon which you want to add the method
- Go to the Payment Method section of their profile on the left side
- Payment methods only show up on patient profile pages when your clinic has signed up for credit card payments and has completed the onboarding process.
- Click on "Add Payment Method"
- Enter card information.
- Click Add Card
- This will take a few seconds.
- If the card does not show as available immediately after you add it refresh the patient's page by clicking their name in the title area at the top of the page to refresh the payment methods. This is due to the approval process taking up to an hour to complete
- Now the payment method will show up as a choice when checking in a patient.
How to Delete Payment Methods or Make them the Default Method
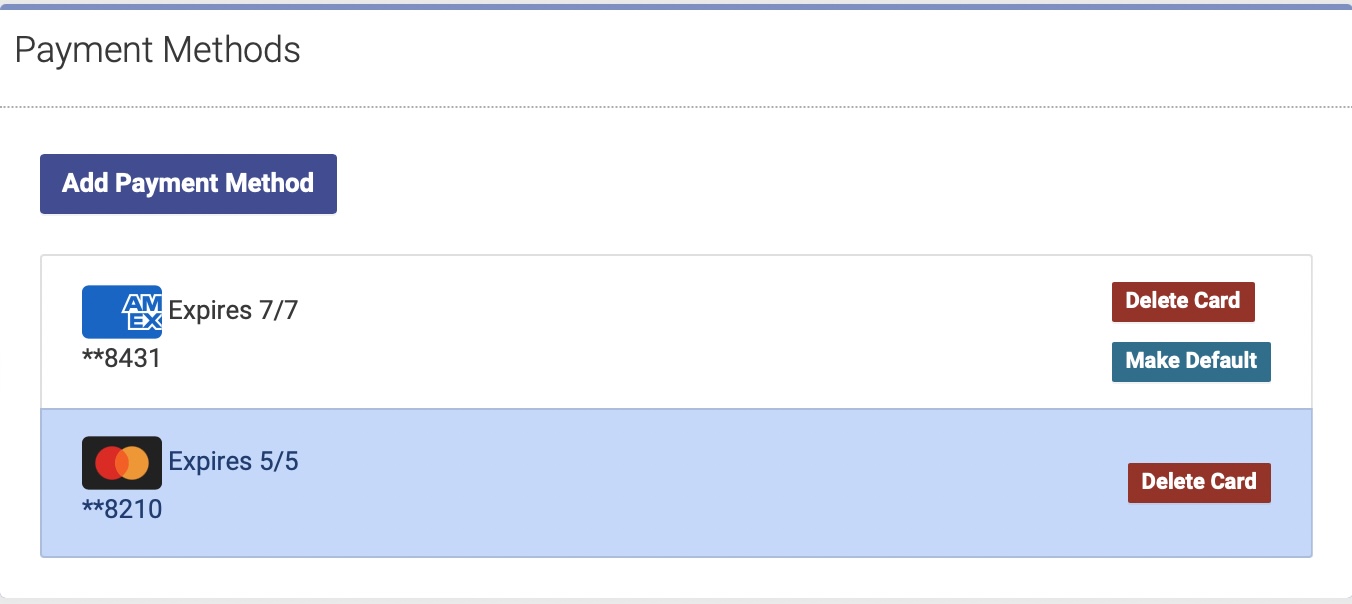
From the patient profile page the default payment method is highlighted with a blue background. If there is more than one payment method you can choose the default method by clicking on Make Default.
To delete any payment method from the Patient's profile click Delete Card. This will permanently delete this payment method from the patient's profile. Any transactions or appointments paid using that card will remain and reference that card number.
Add a Credit Card Method at Checkin or Transaction Pay
When checking in a patient the usual choices for payment method are available: Cash, Check, and Other. CreditCard is no longer available if you have payments added to your account. This is replace by "Add A Credit Card".
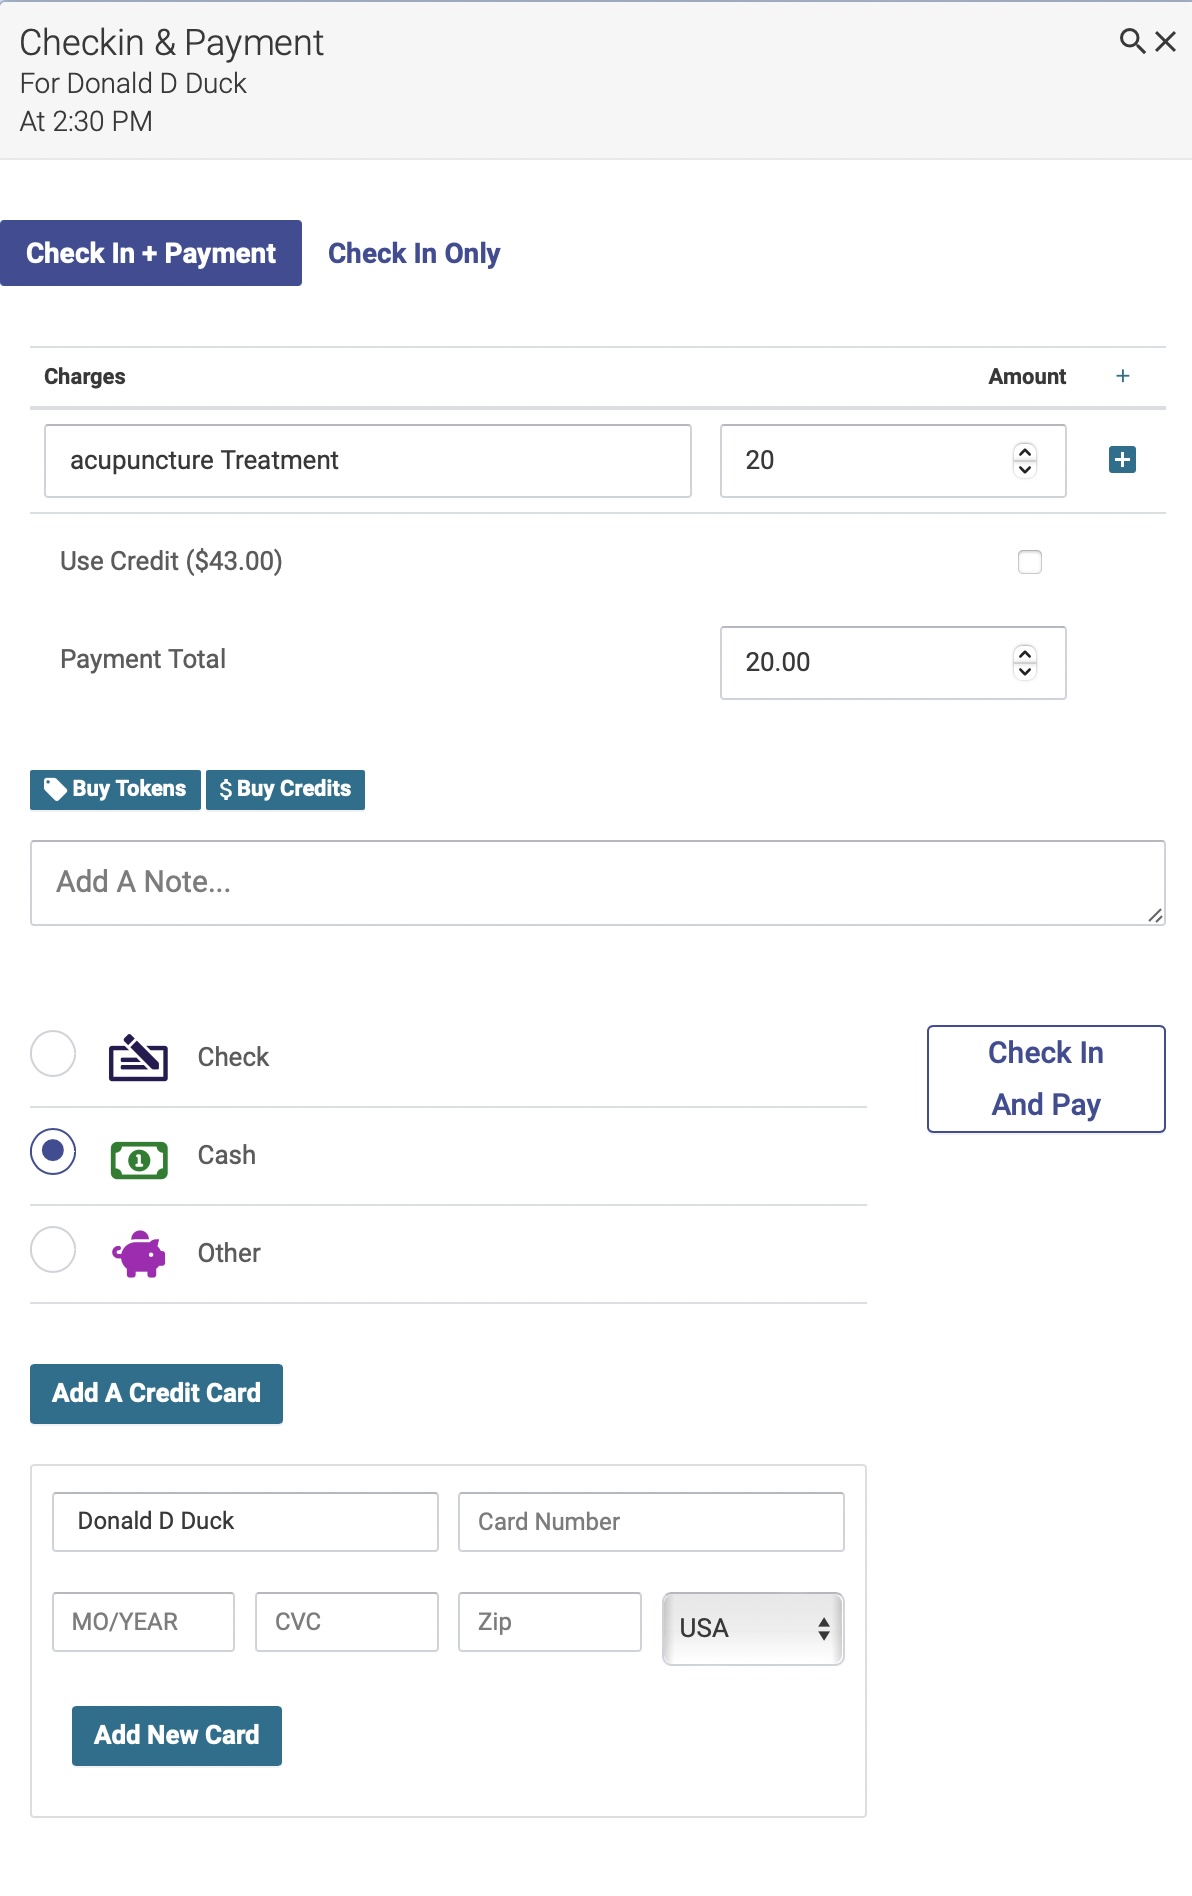
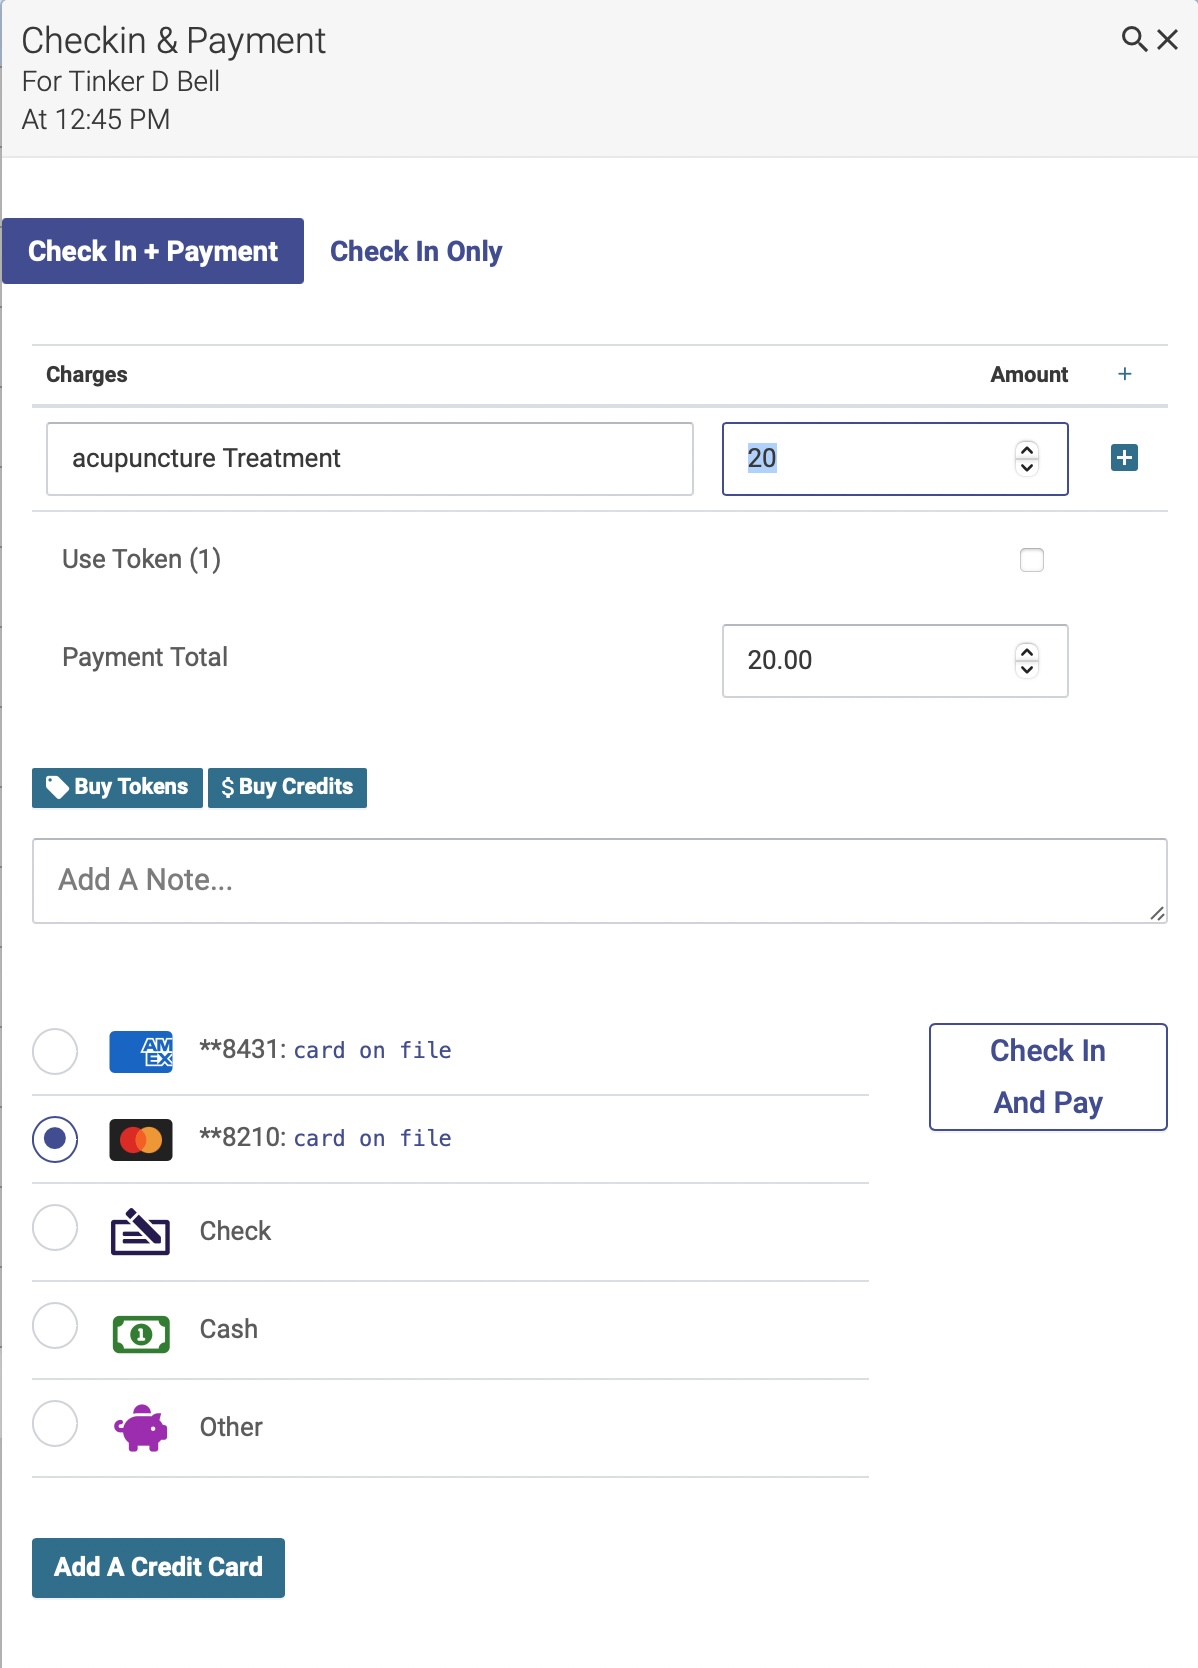
Clicking on "Add A Credit Card" opens a credit card form just like the one on their profile page. Enter the card and billing information and click "Add New Card". If successful, after a few seconds the payment methods will refresh with the new card as a choice. Clicking "Check In and Pay" will charge the card the Payment Total if it is more than zero.
Add a Credit Card Payment Method via Patient Portal
Patients can also add a credit card payment method to their own account via the patient portal. Instructions are in the Patient Portal Help section.
Taking Payments with Stripe
Using a stored card
A patient with a stored credit card will have a credit card icon next to their name on the schedule:
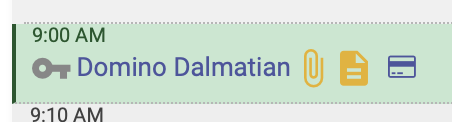
When you check them in, you’ll see the last 4 digits of their stored card in the list of payment options (if they have more than one card stored, you’ll see multiple options). Click the Check In And Pay button to charge their stored card:

You’ll follow the same process for a Purchase Transaction:

You also have the option to use the Stripe reader to charge their card in person, even if they have a stored credit card.
Using an in-person card
If the patient does not have a stored card, you’ll see an option for Charge In Person Card.
If you have multiple locations, you’ll first select the card reader you want to use. If the patient wants to store this card for later use, you can save their card info by checking the box. Then click Charge In Person Card:

The patient will then follow the instruction on the Stripe reader to complete the sale.
While the Stripe reader is waiting for the patient to complete the sale, you’ll see this message on your screen:
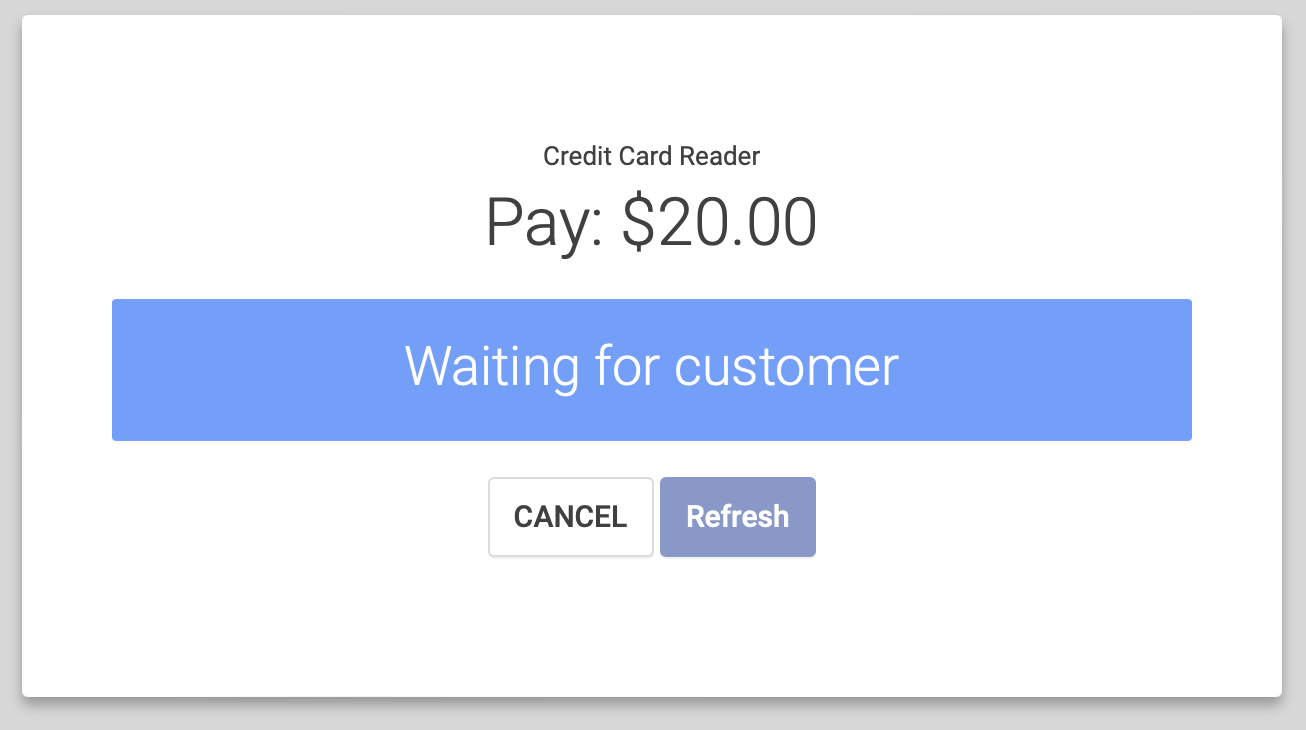
Once the sale is complete, the payment window will close.
Charging Late Cancellation Fees with Stripe
If a patient has a stored card, you’ll see the option to charge a cancellation fee their stored card. Enter the fee amount and click Confirm:
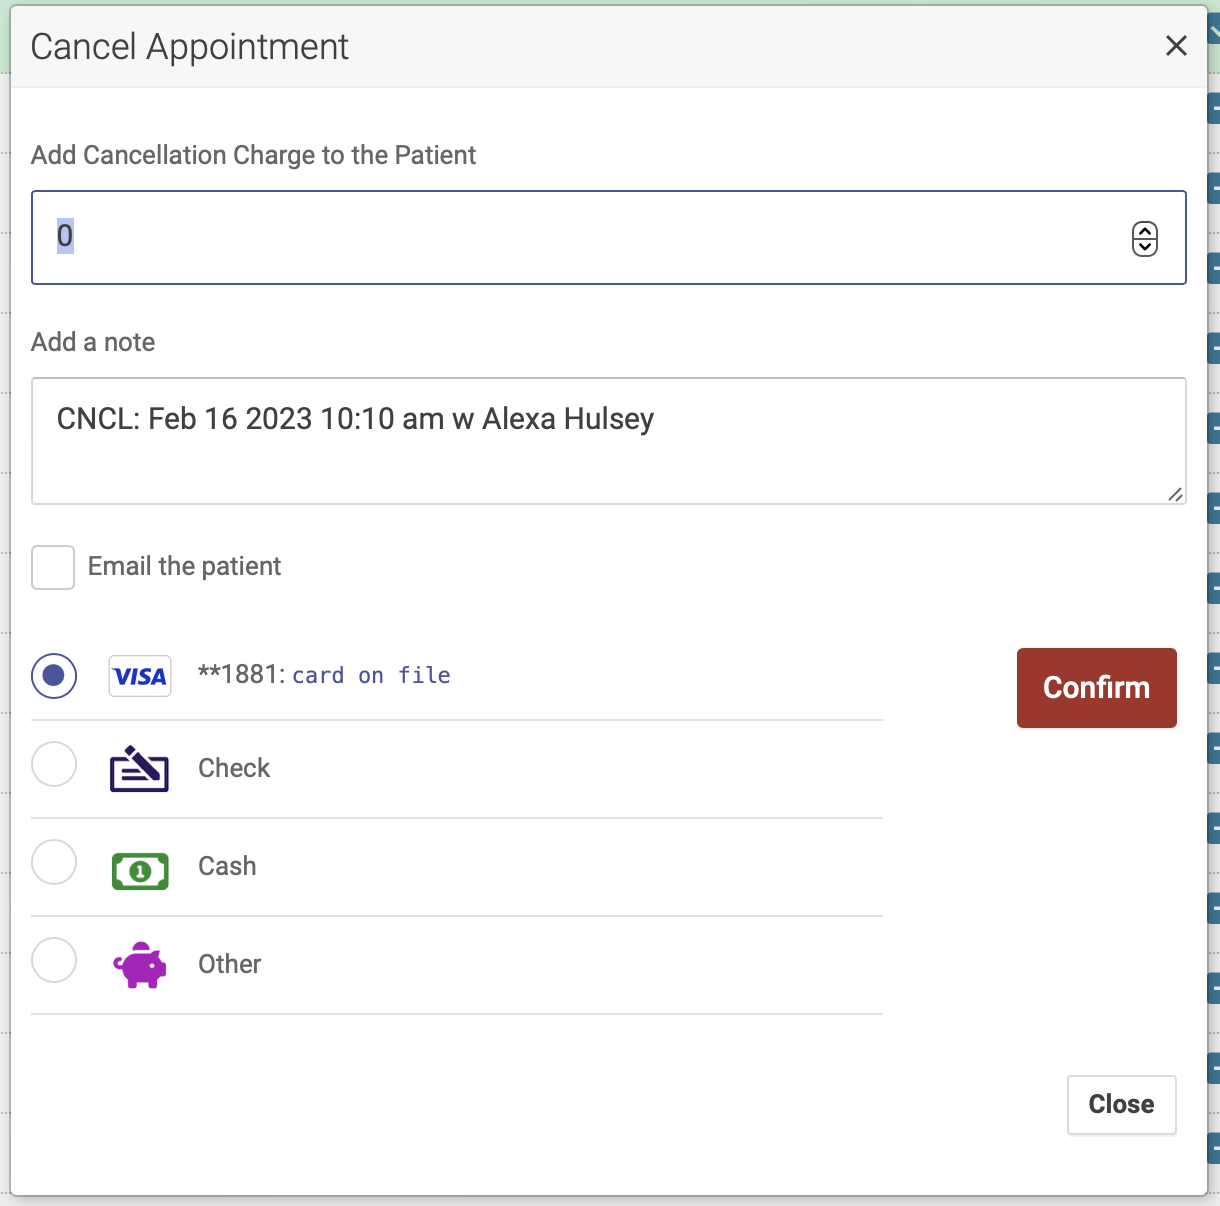
Issuing Refunds with Stripe
Any refunds and checkin reversals are recorded as a new transaction that has a negative value. You will see references to the opposing transactions in reports and logs.
If you issue a refund on a date after the original purchase, the refund amount will show on the daily report for the date the refund was issued. For example is a patient buys herbs on a Monday, and returns them for a refund on a Tuesday, the refund will show on Tuesday’s Transaction report.
Issuing a checkin refund:
To issue a refund of a checkin, simply reverse the checkin. This will automatically refund the credit card used at checkin.
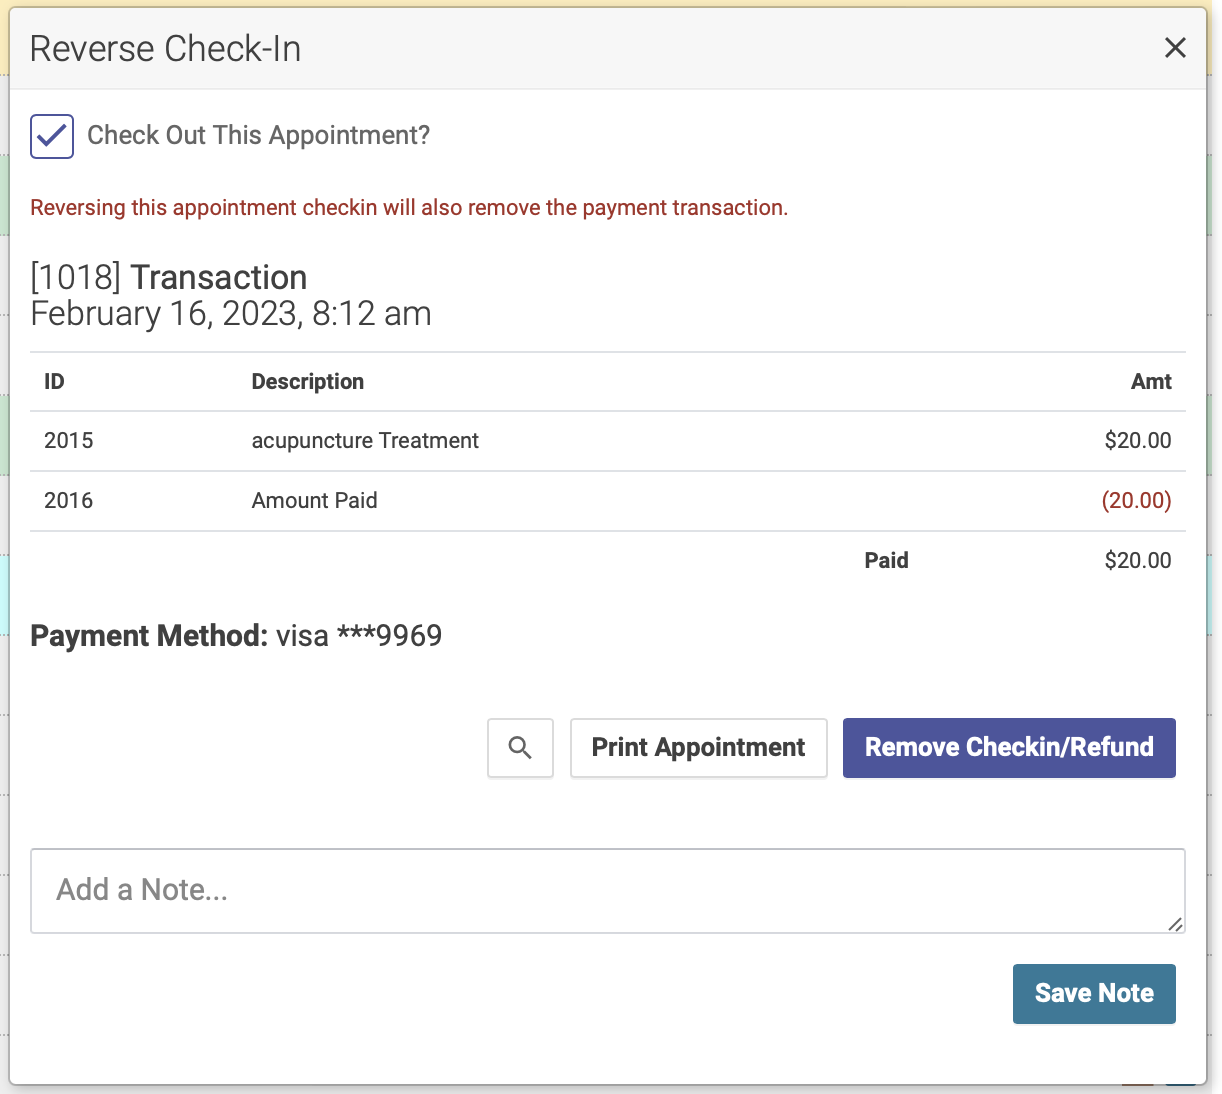
Issuing a purchase transaction refund:
You can issue a refund of a Purchase Transaction in two ways: via the Transactions list on the schedule or via the Transactions report.
Via Transactions list on the schedule:
Click the Transactions list at the bottom of the navigation menu on the left hand side of the schedule page. Purchase Transactions will be in yellow. Simply click the refund button to issue a refund back to the patient’s credit card:
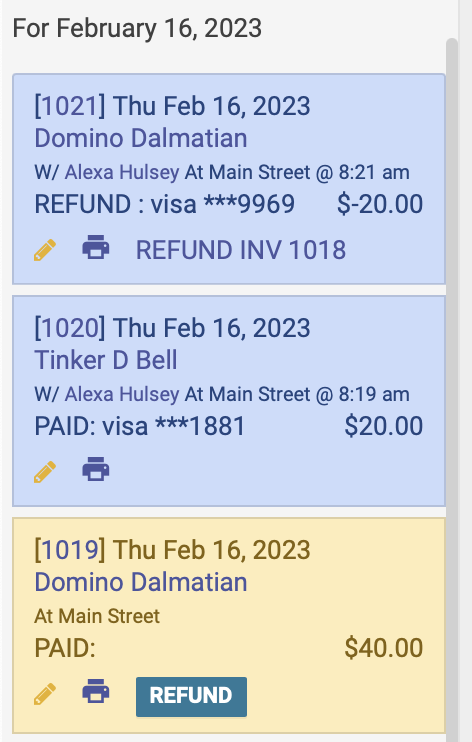
Via the Transactions report:
When you run a Transactions report, you’ll see a Refund button option for any Purchase Transactions. Simply click the refund button to issue a refund back to the patient’s credit card:

Receipts
Send a receipt via email
You can send a credit card receipt via email directly from the schedule, or from the patient profile page.
Send a receipt from the schedule
After you've completed a checkin, click the pencil icon. This will bring up the Reverse Checkin popup modal. Click the Print Appointment button:
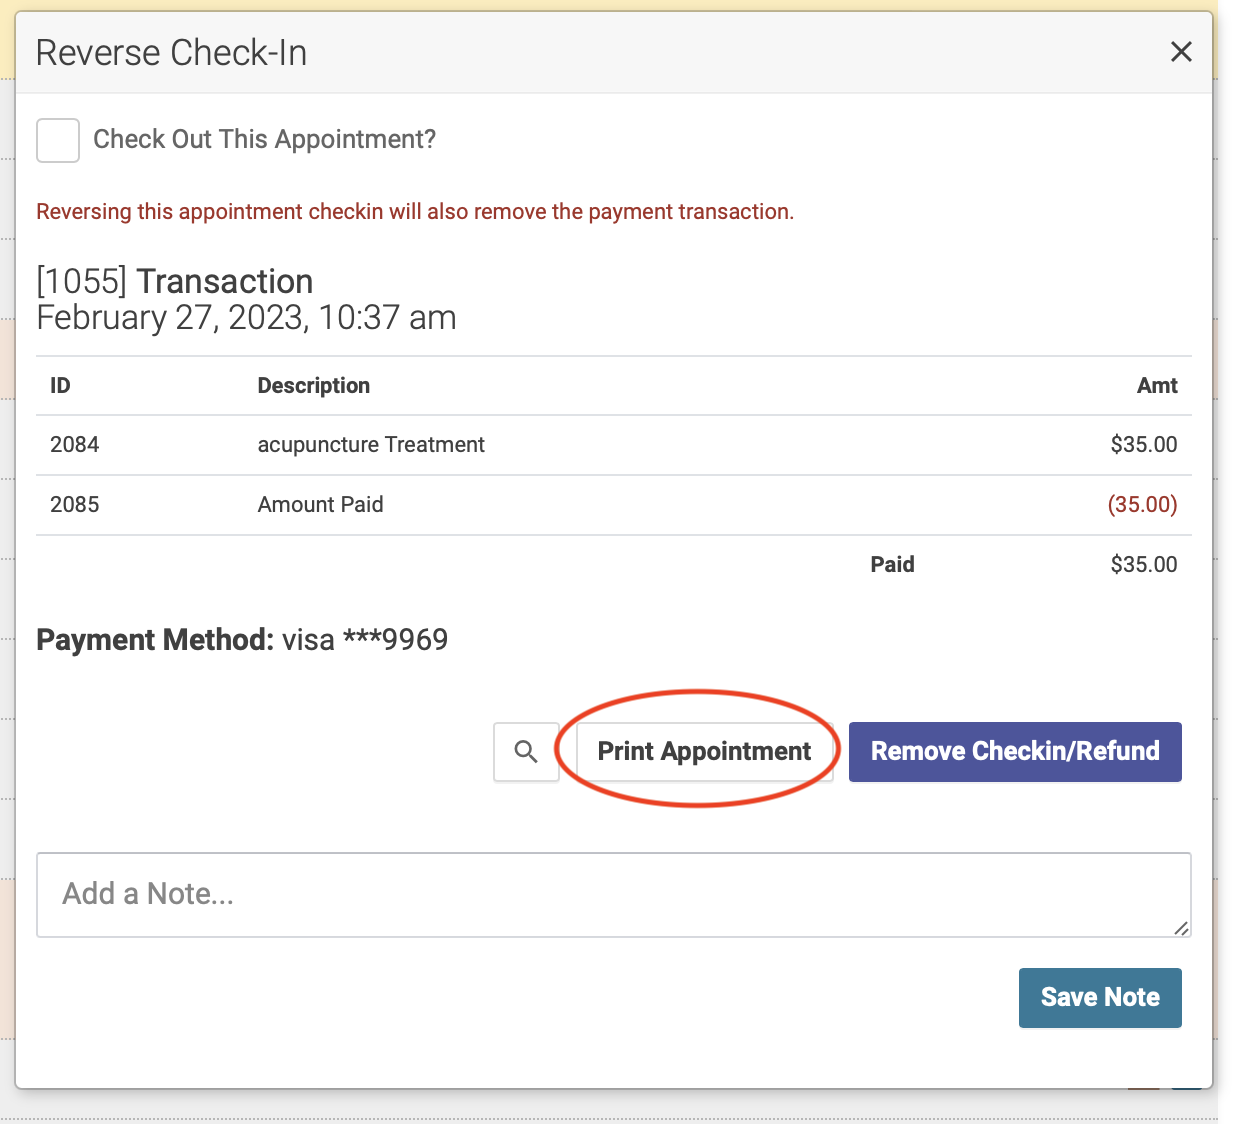
The invoice will open in a separate window. Click the Send Via Email button to email the receipt directly to the patient:
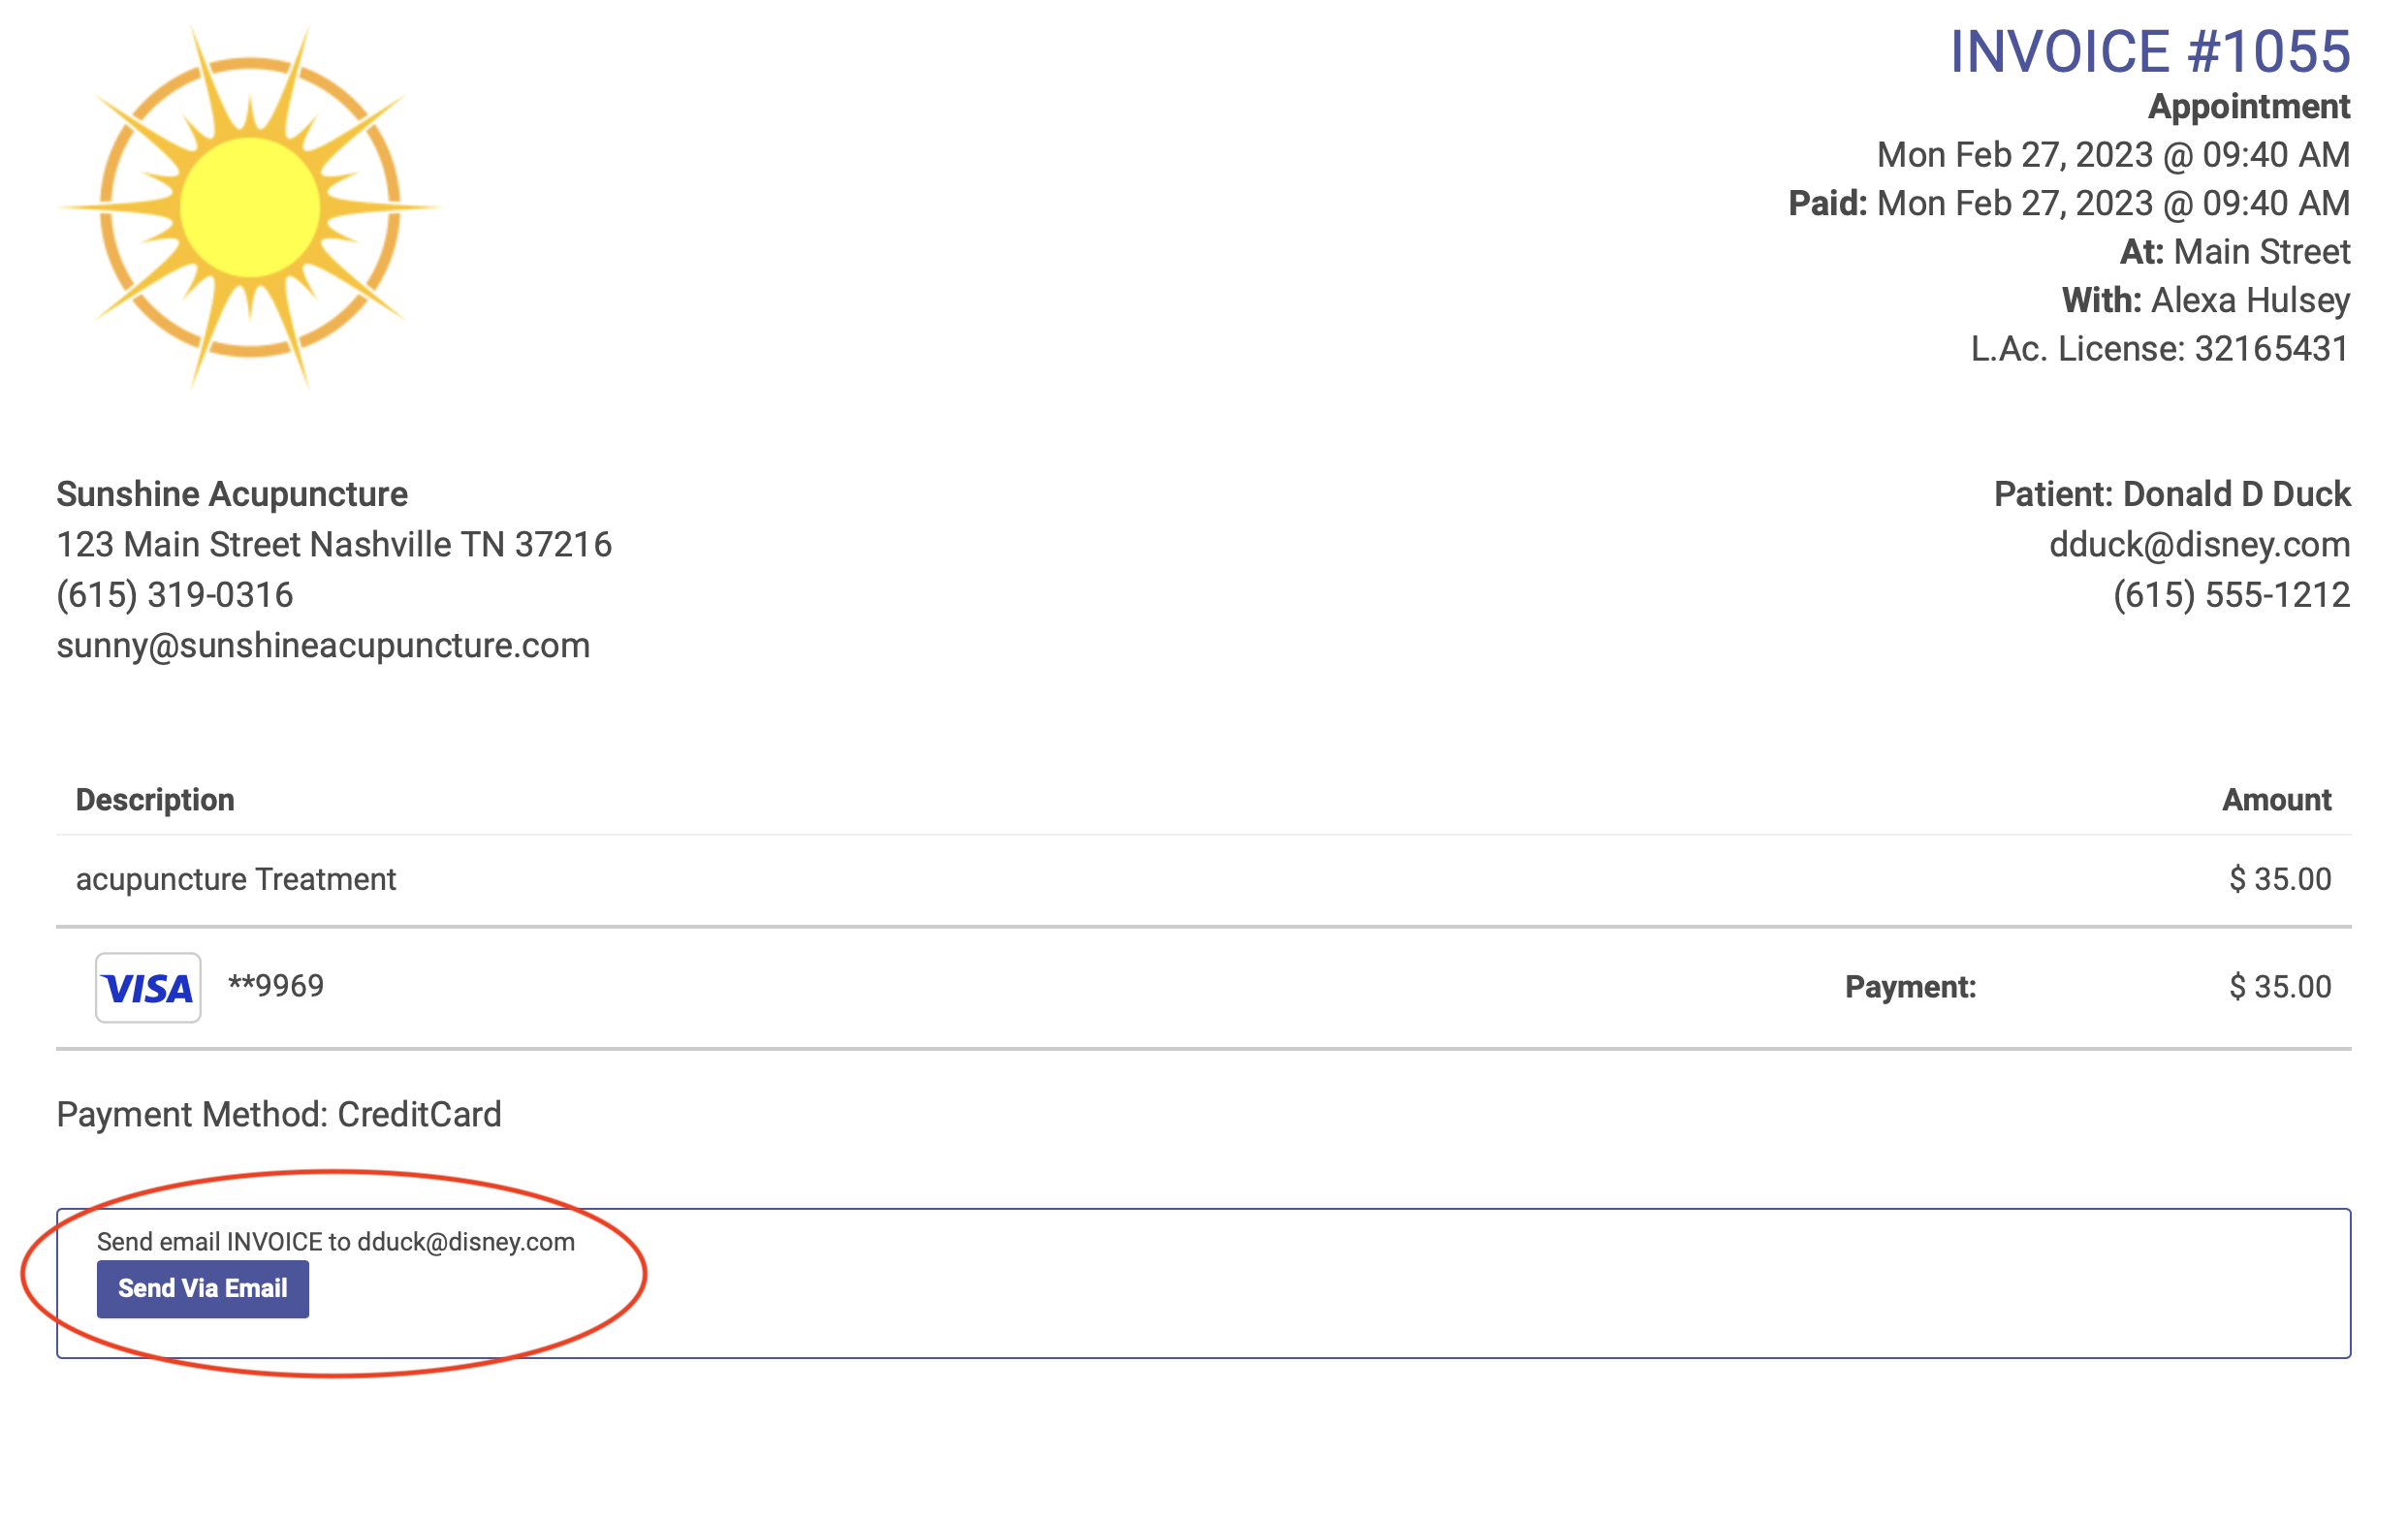
Send a receipt from the Patient Profile page
Find the transaction list on the Patient Profile page, find the transaction you want to email. Click the printer icon:

The invoice will open in a separate window. Click the Send Via Email button to email the receipt directly to the patient:
Reader Unreachable?
If your Stripe Reader fails to take a payment and gives you this error.

First check that the reader is on. Then open the settings by swiping right from the left corner of the screen. When asked the Admin PIN is 07139. Go to Network to make sure it is connected to your Wifi.
If both are true it may be an issue with Stripe. This is a rare occurrence that their server connecting to terminals is down. Wait 10 minutes and try again. These issues are typically resolved quickly.
How Open ACU Referrals Works
How to get a free month of Open ACU
Refer a friend to Open ACU using your clinic's unique referral code which you will find on Account > Referrals. This will take $55 off their cost at signup, meaning their first month is free! Once they've completed two months with Open ACU, you'll get a $55 credit to your account.
Here are the steps to copying your code and sharing as found on the Open ACU admin portal.
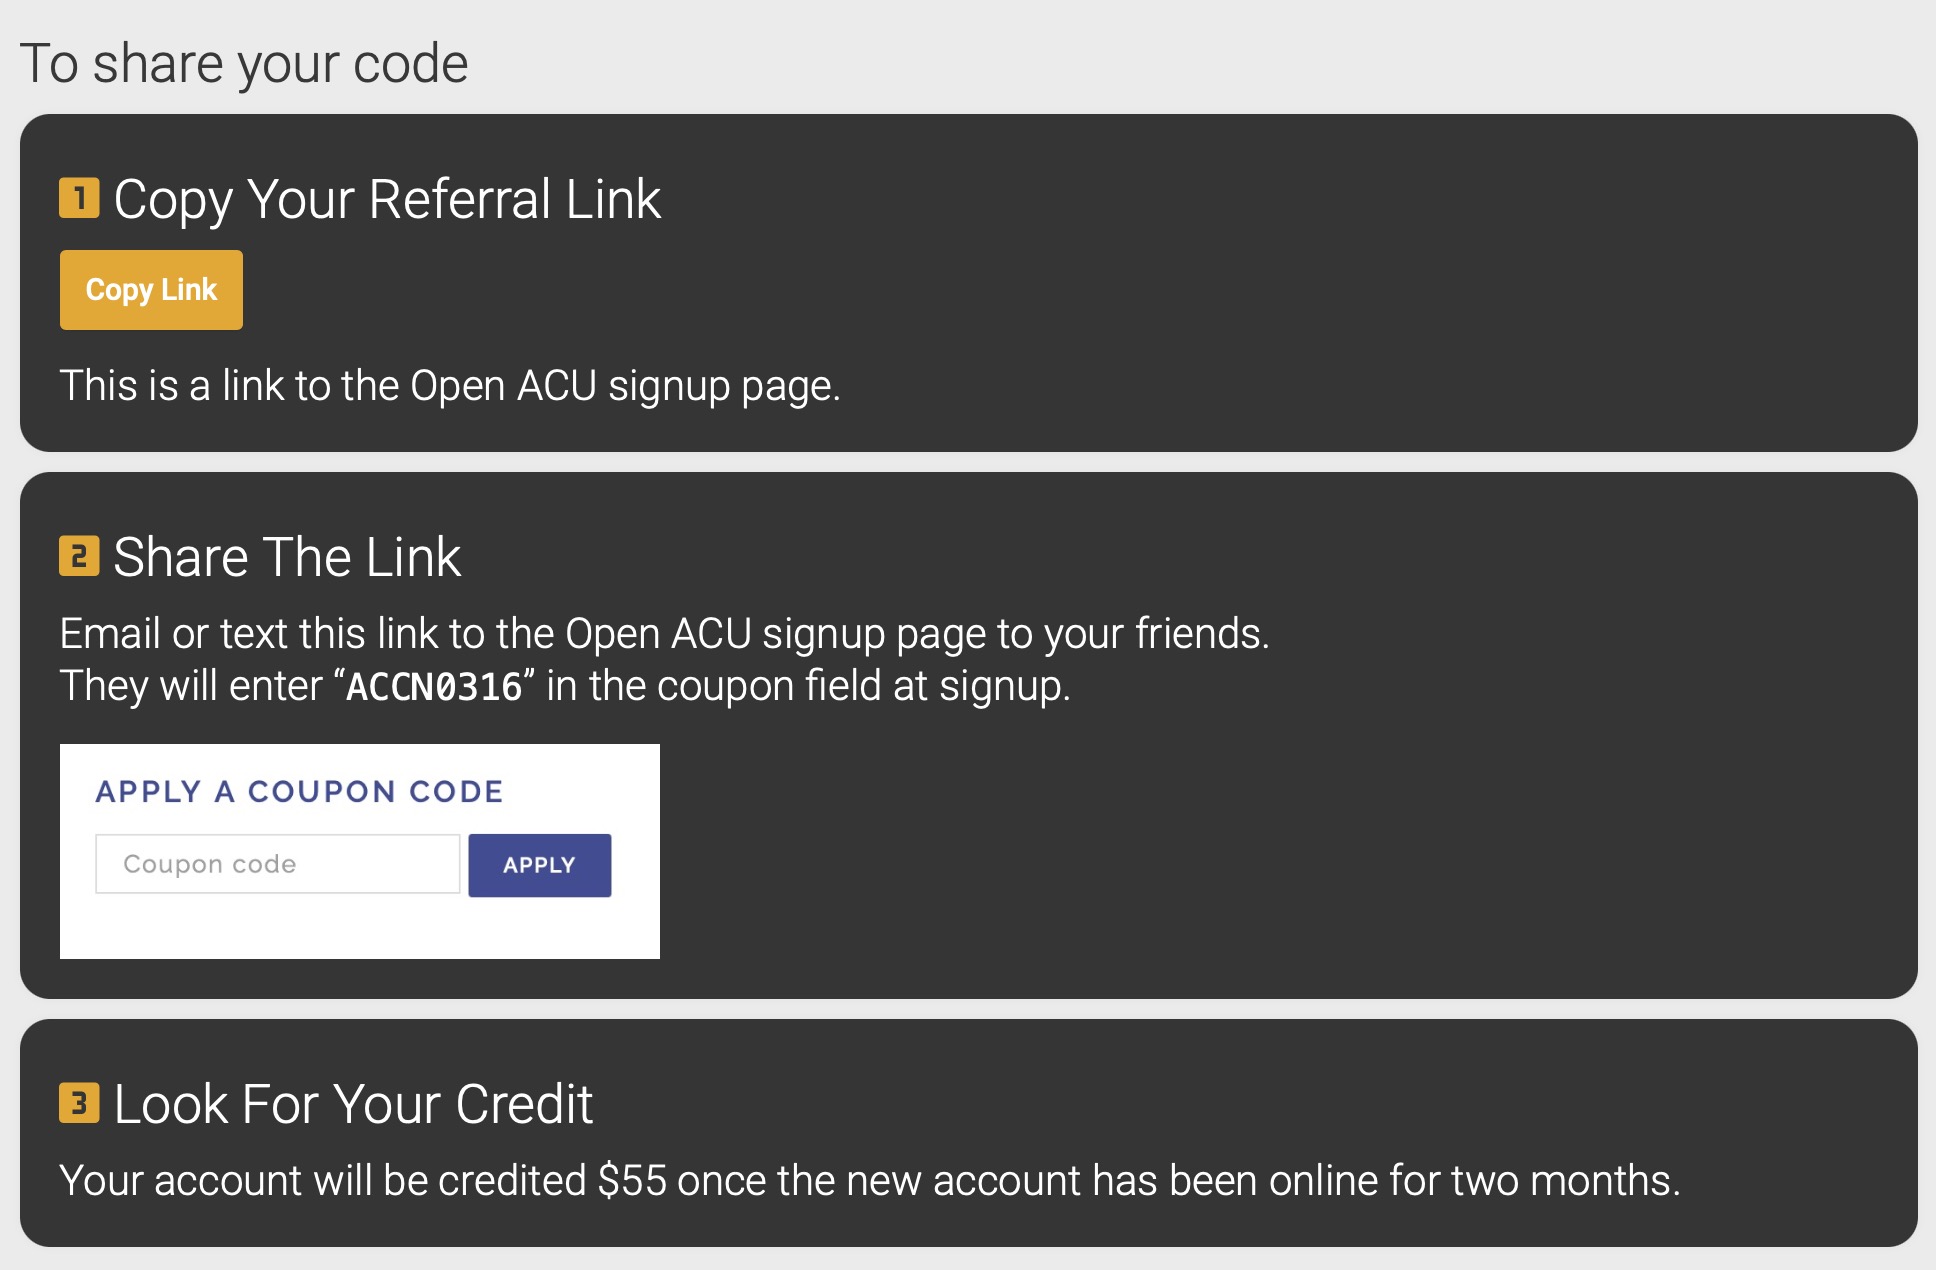
The Details
To qualify, your referee must sign up for Open ACU using your clinic's unique referral link, and complete two months of service with Open ACU. You will receive a $55 credit to your account, which will be applied to the next month's service fee. If you refer multiple new customers and earn multiple $55 credits, those will be applied on subsequent months. Referee Terms: To qualify, you must sign up for Open ACU using a referral link. This will subtract $55 from the amount due at signup. The standard $75 signup fee will still be due at the time of signup.
Events and Group Scheduling
How to schedule group events in Open ACU.
Create an Event in Open ACU
Open ACU allows you to schedule group events with multiple participants.
Video overview:
Read on for step-by-step instructions...
1. Create a new event
Select your date on the schedule. At the top of the day's page, click Day Tools --> New Group Event:

2. Event Setup
You'll now follow the Event Setup steps to enter all the details about your event:
Setup
On the Setup page, you'll enter:
- Event Name
- Start date (see this article for multiday events)
- Maximum number of attendees (zero = unlimited attendees)
- Location (you can select your clinic location, a custom location, or an online location such as Zoom)
- Event image
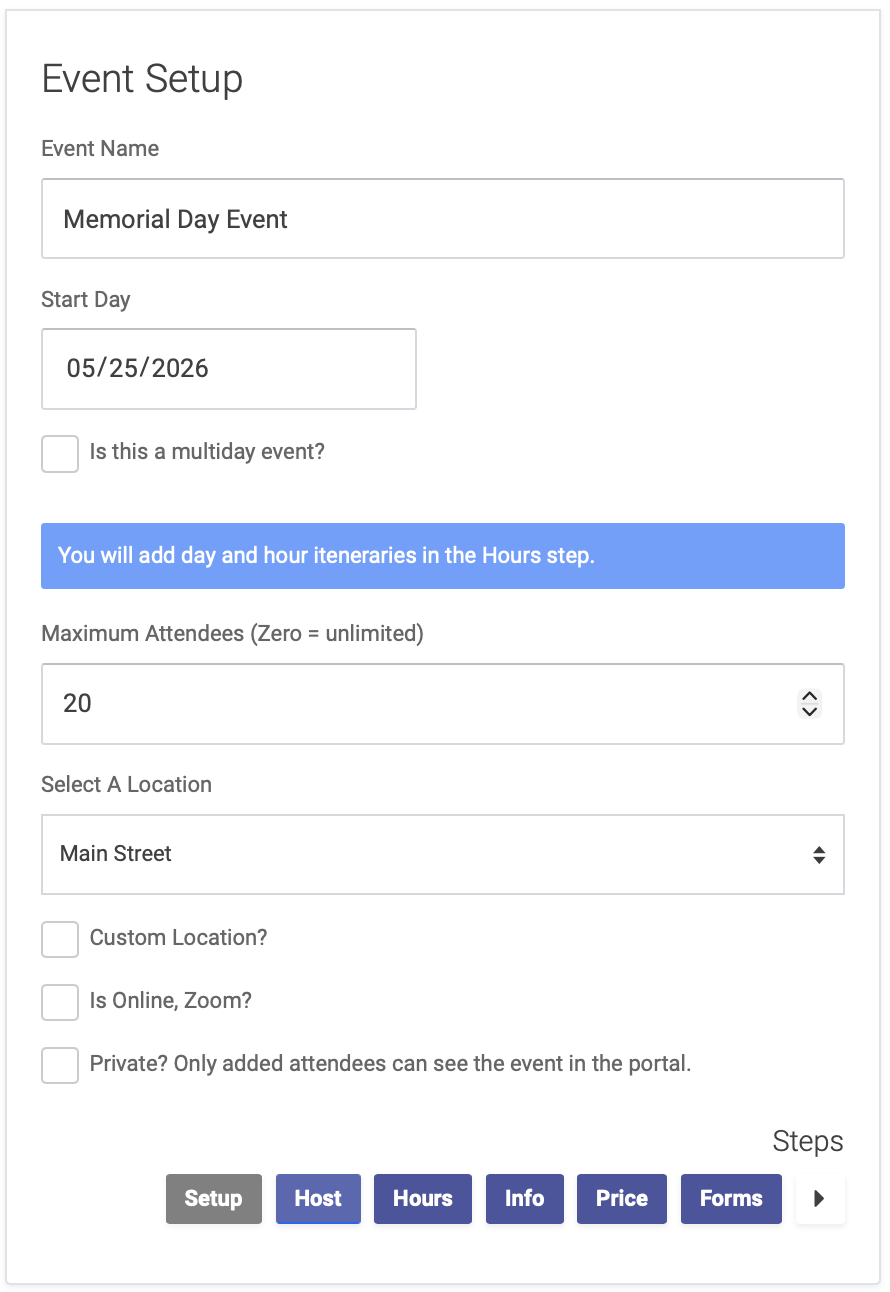
Click the right arrow at the bottom of the page to advance to the next step: Host
Host
On the Host page, you'll enter:
- Event Host from a dropdown menu of your clinic's Practitioners. To add a Practitioner, select their name from the dropdown menu, then click the Add Practitioner button. You can add multiple practitioners per event.
- Click the "Add EHR notes to this event" checkbox if you want to enter and save health records for this event.
- If you have other event presenters or hosts who are not on the menu of your clinic's Practitioners, you can add their name in the Other Presenters box
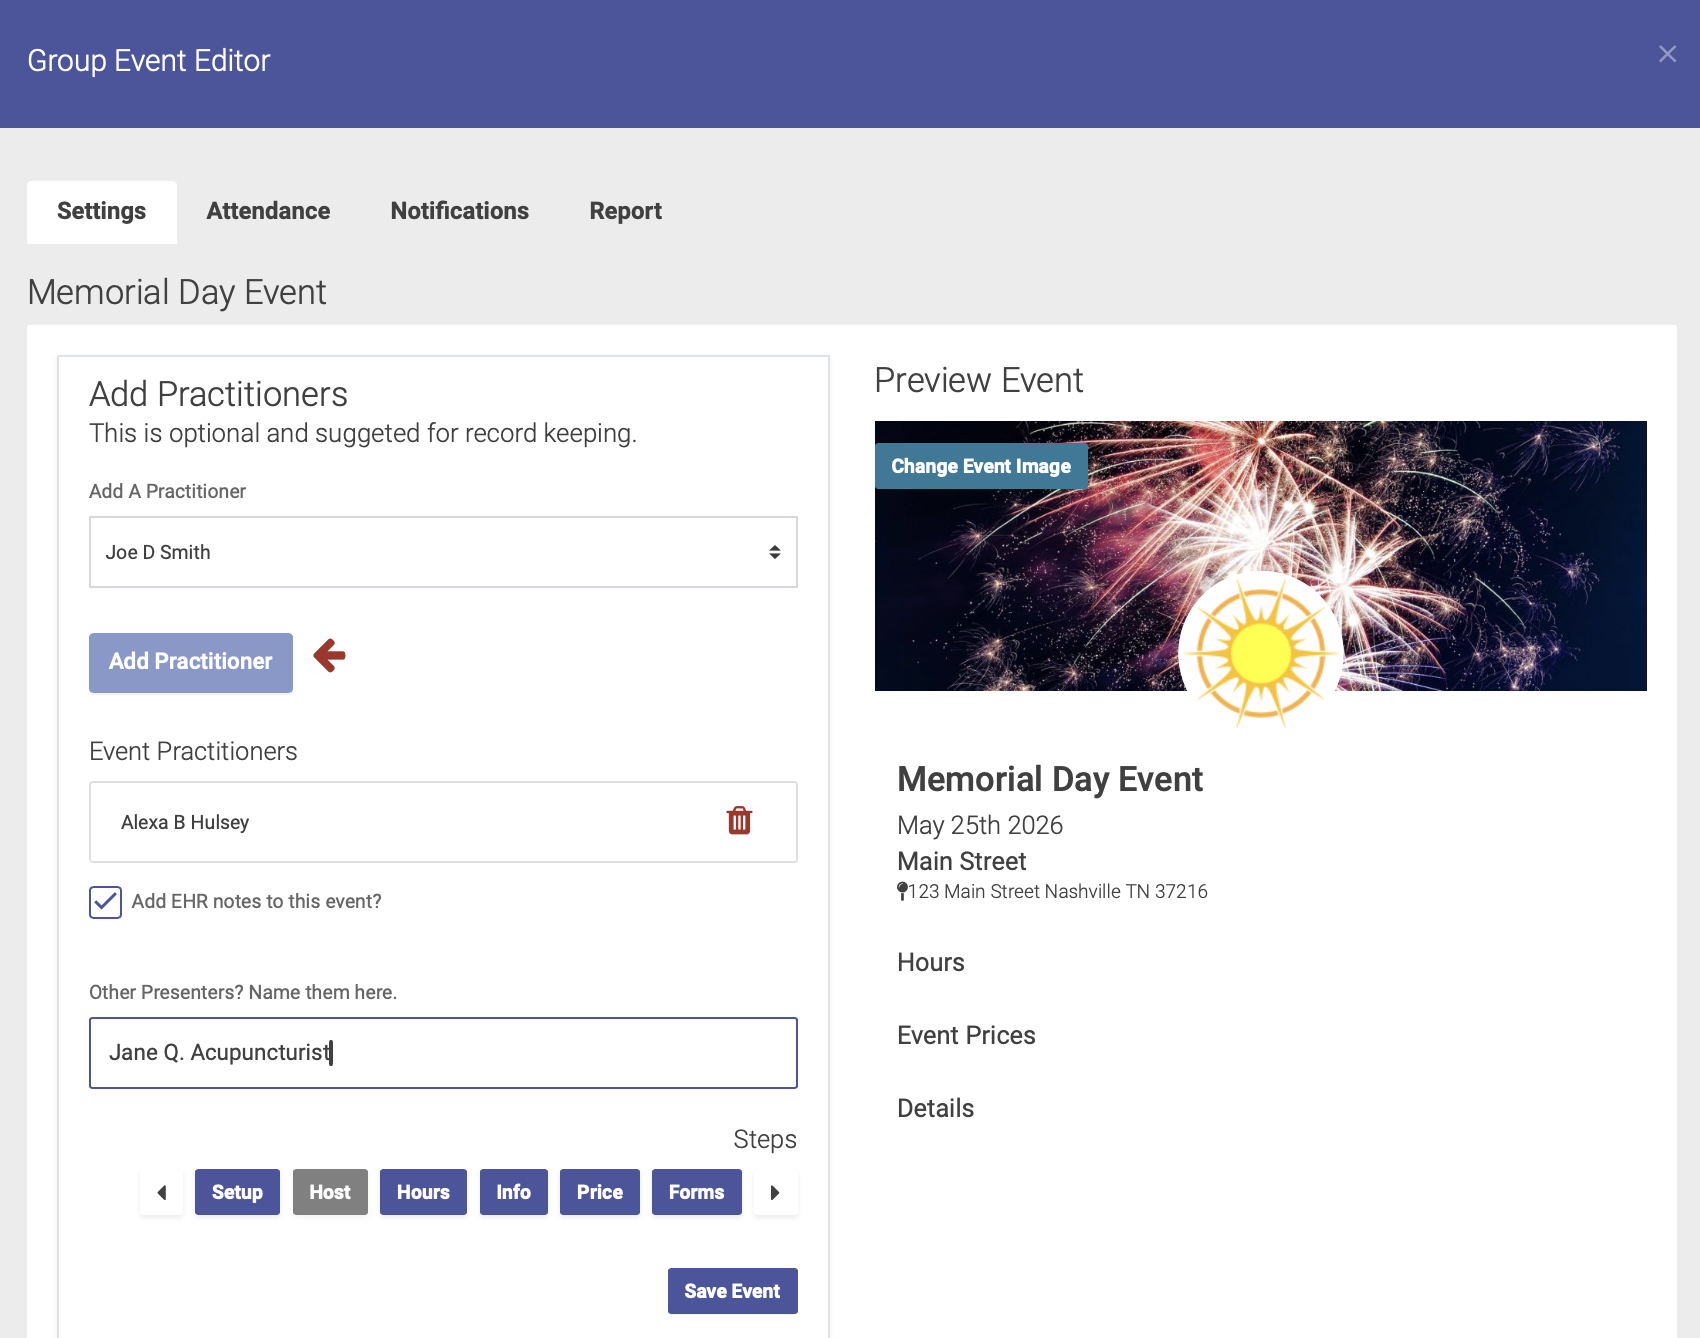
Click the right arrow at the bottom of the page to advance to the next step: Hours
Hours
On the Hours page, enter the start and end times for your event:
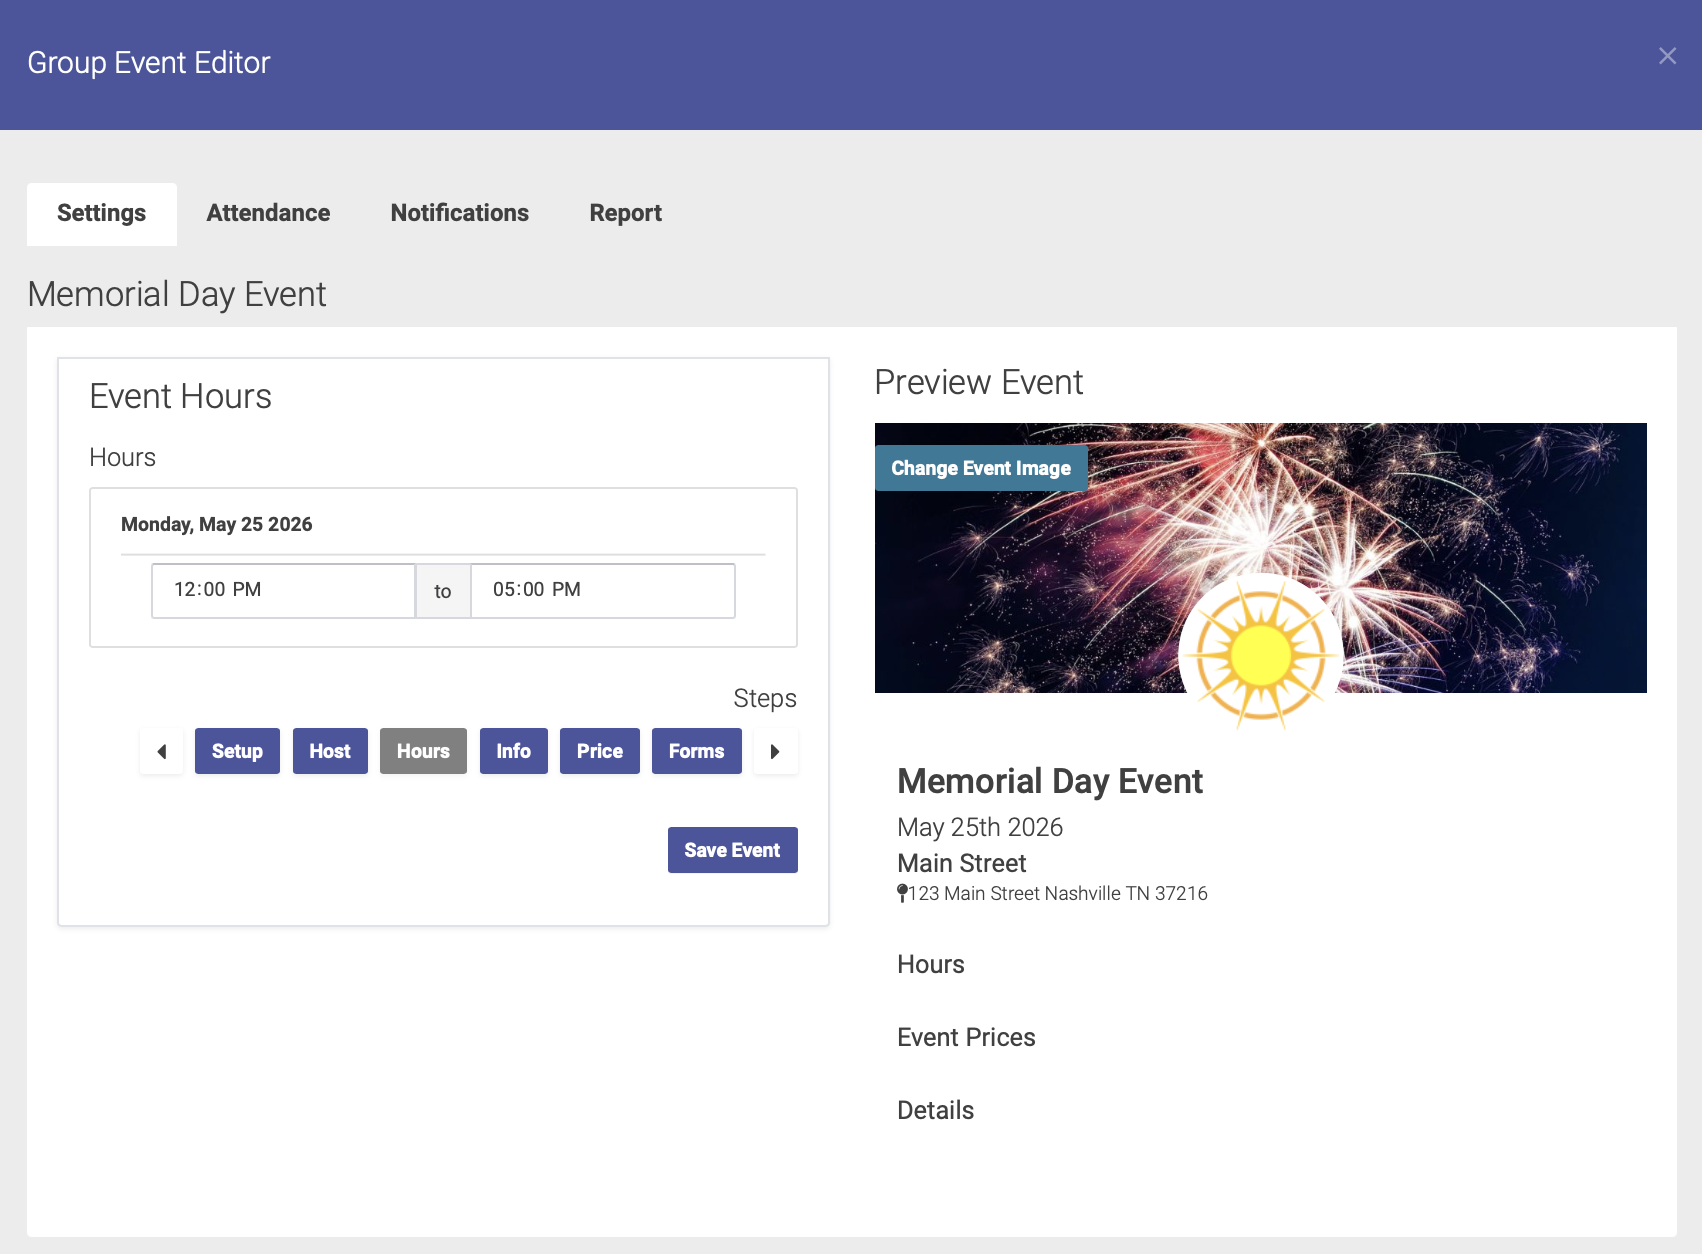
Click on the right arrow at the bottom of the page to advance to the next step: Info
Info
On the Event Info page, you'll enter more details about your event:
- Event Description: enter a description of your event so attendees know what to expect
- Event Details: here's where you'll enter the fine print such as cancellation policy, parking information, etc
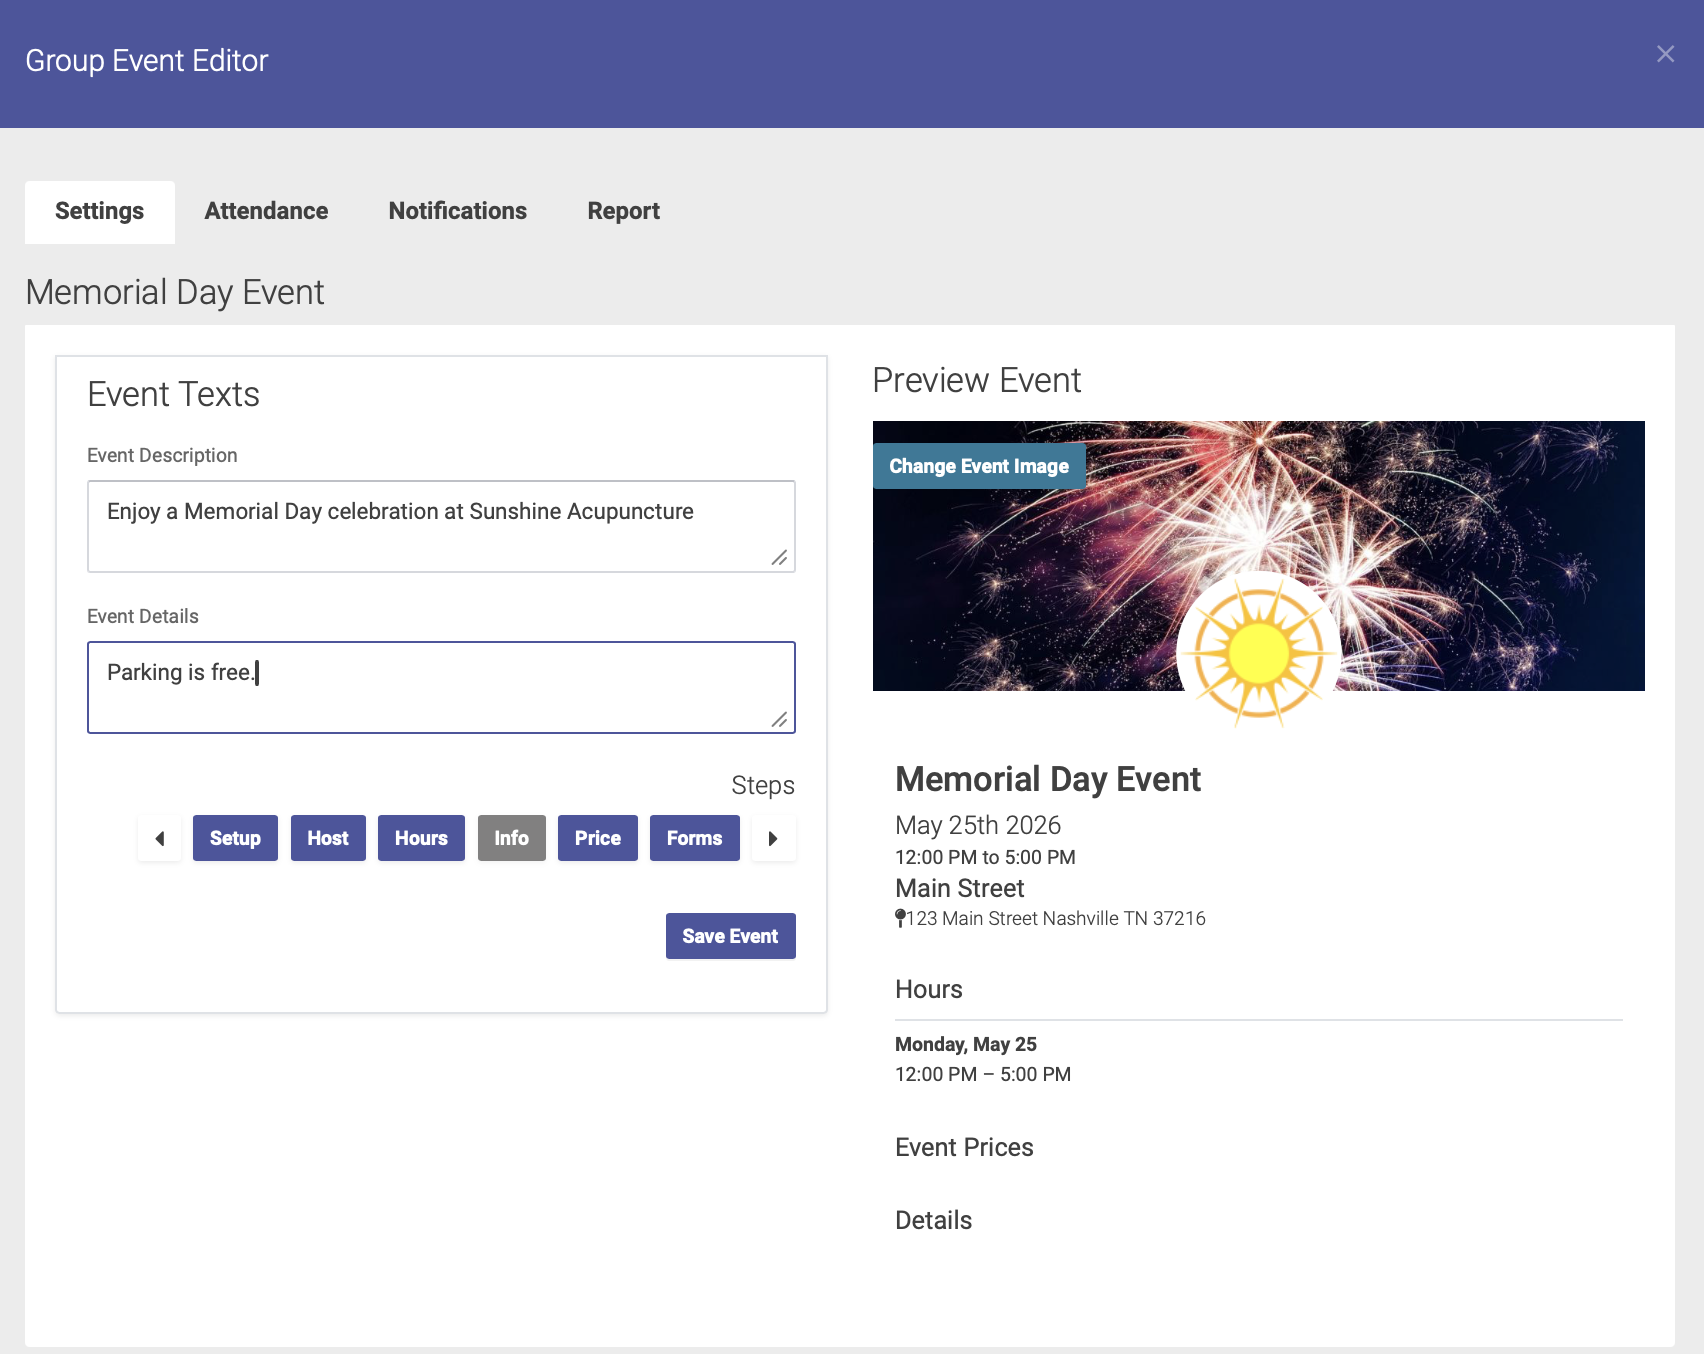
Click on the right arrow at the bottom of the page to advance to the next step: Price
Price
On the Price page, you'll enter your pricing for the event.
For a free event: Enter your price title and 0.00 for your price amount. Click the Add Price button to save:
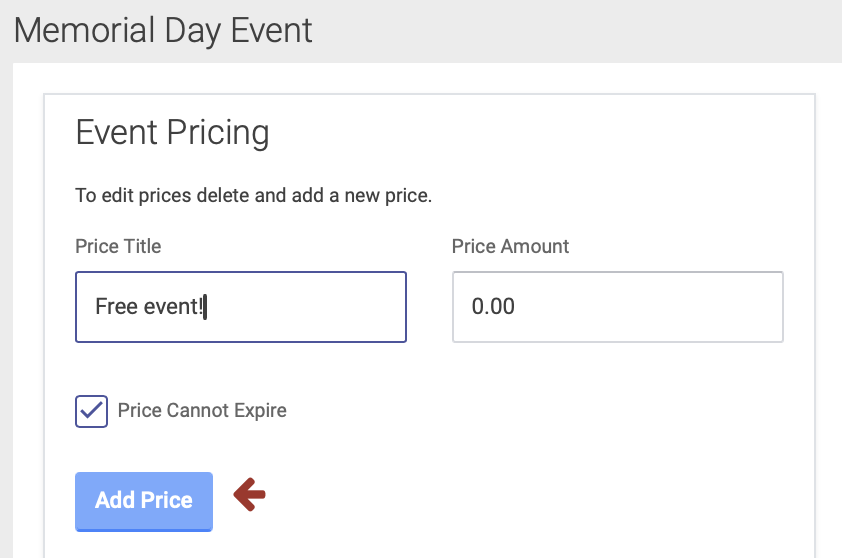
For a paid event:
- Enter your price title, amount, and expiration date (if applicable). Then click the Add Price button.
- You can add expiration dates to a price for an early-bird pricing option.
- If you want to require prepayment, click the Prepayment Required box (note: you must use Open ACU's Stripe integration feature to enable prepayment for Events).
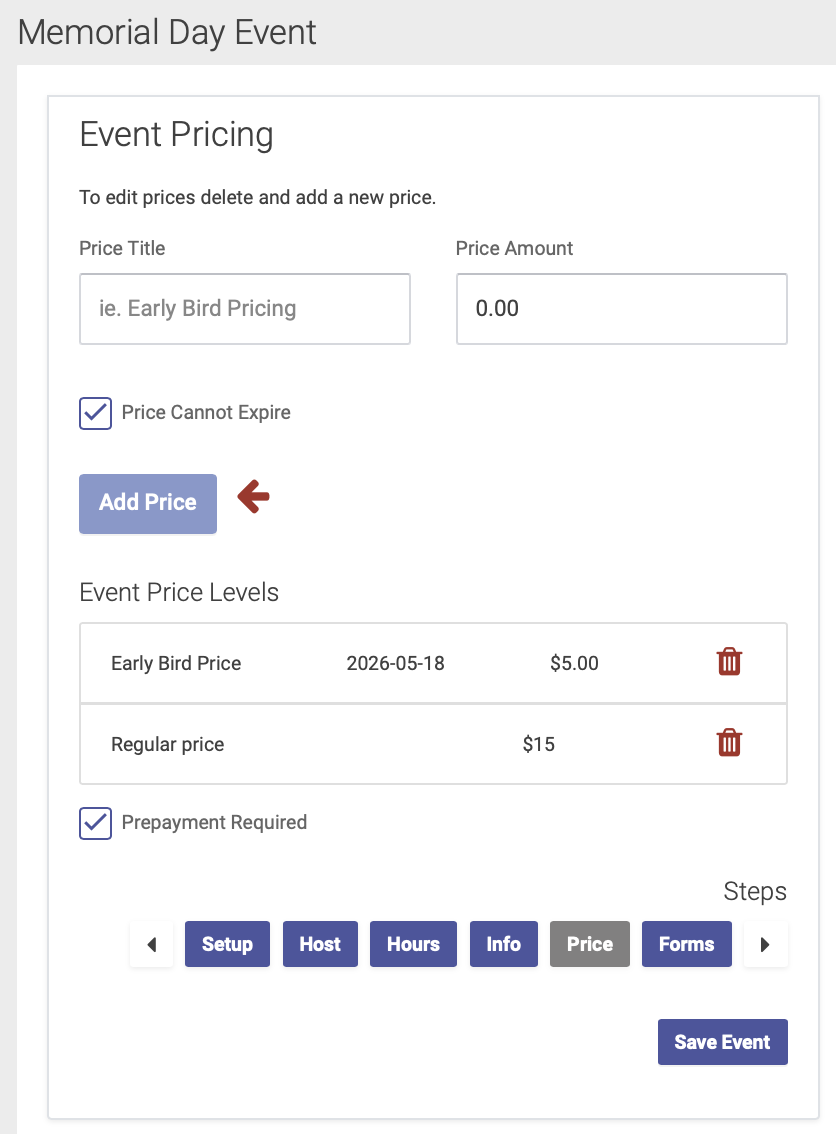
Click on the right arrow at the bottom of the page to advance to the next step: Forms
Forms
On the Forms page, you have the option of sending forms to attendees, to be completed in advance of the event.
- Select the forms you'd like to send from your clinic's Intake Form options,
- Or click the Create a New Form to create a new form for your event. This will take you to your Intake Settings page.
- You can skip this step if you do not require attendees to fill out a form for this event.
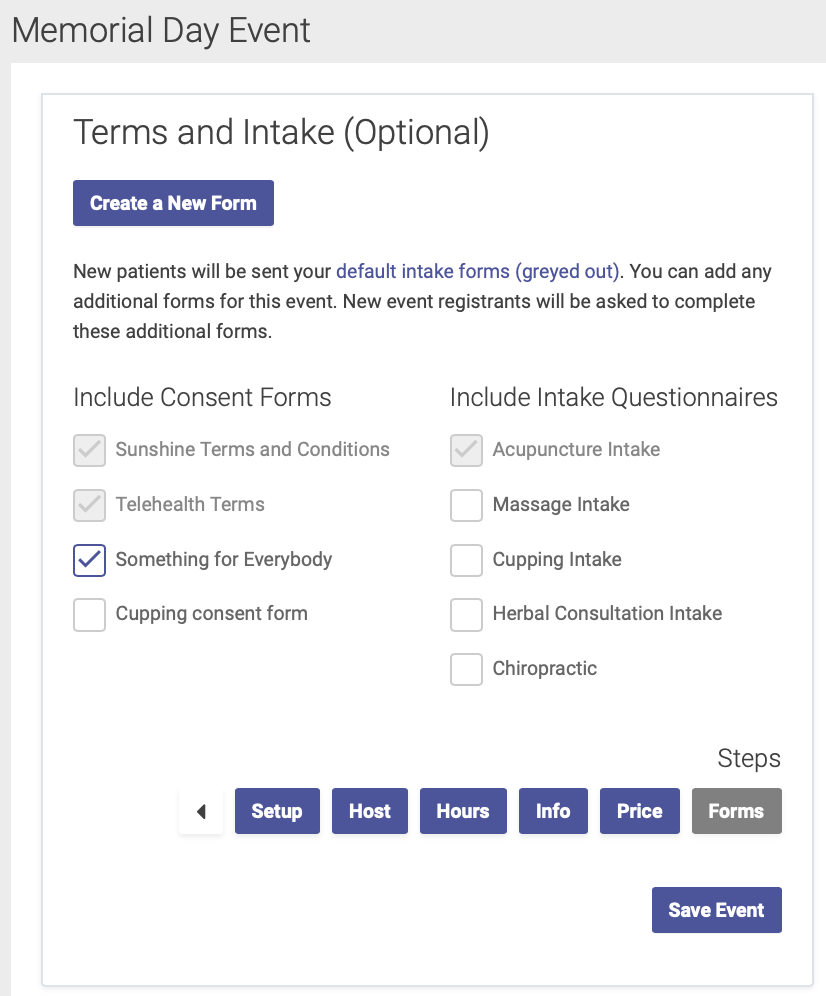
Click Save Event to finish the event setup process
Next step: Event Notifications
Event Notifications
You can create notifications for your event by clicking on the Notifications tab on the Event Editor. Click Add A Notification to start:
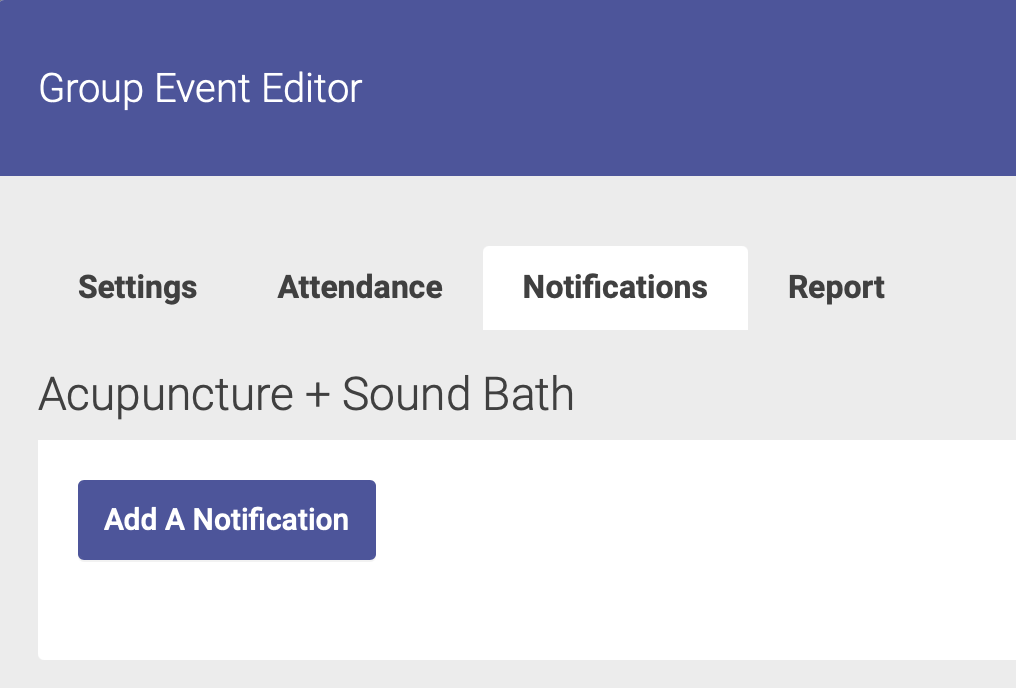
Step 1: Choose Notification Date
Select your notification date from the drop-down menu, then click the Add Notification button below the menu:
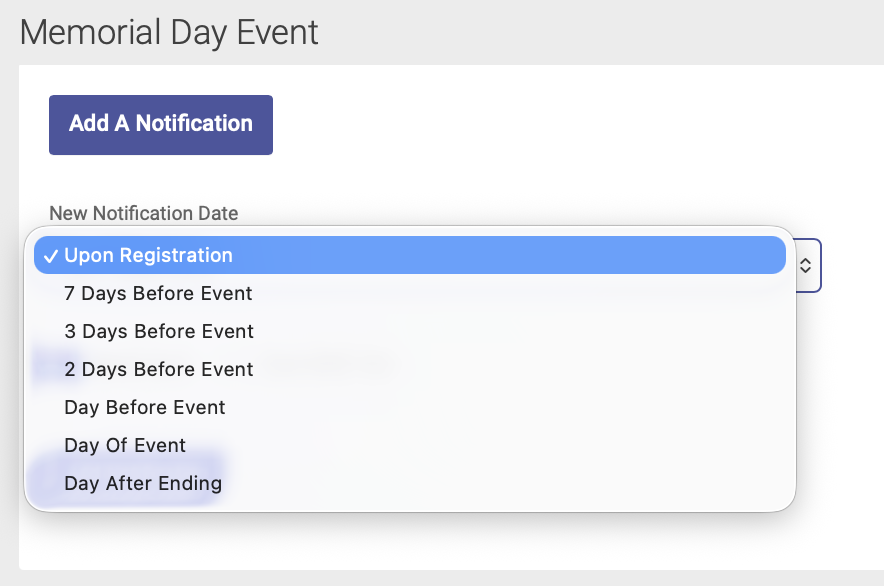
Step 2: Add Email and/or Text Message Details
Add your email subject and body text, and/or text message details:
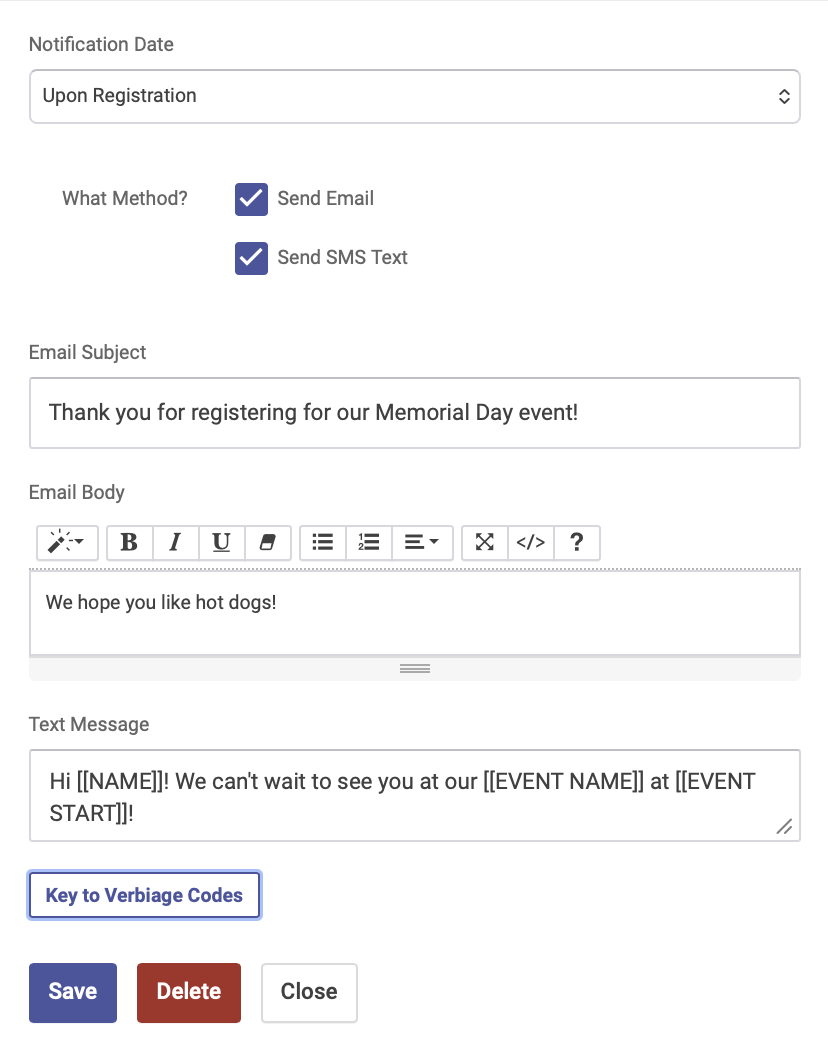
Click the Key to Verbiage Codes button to see your options for text message notifications:
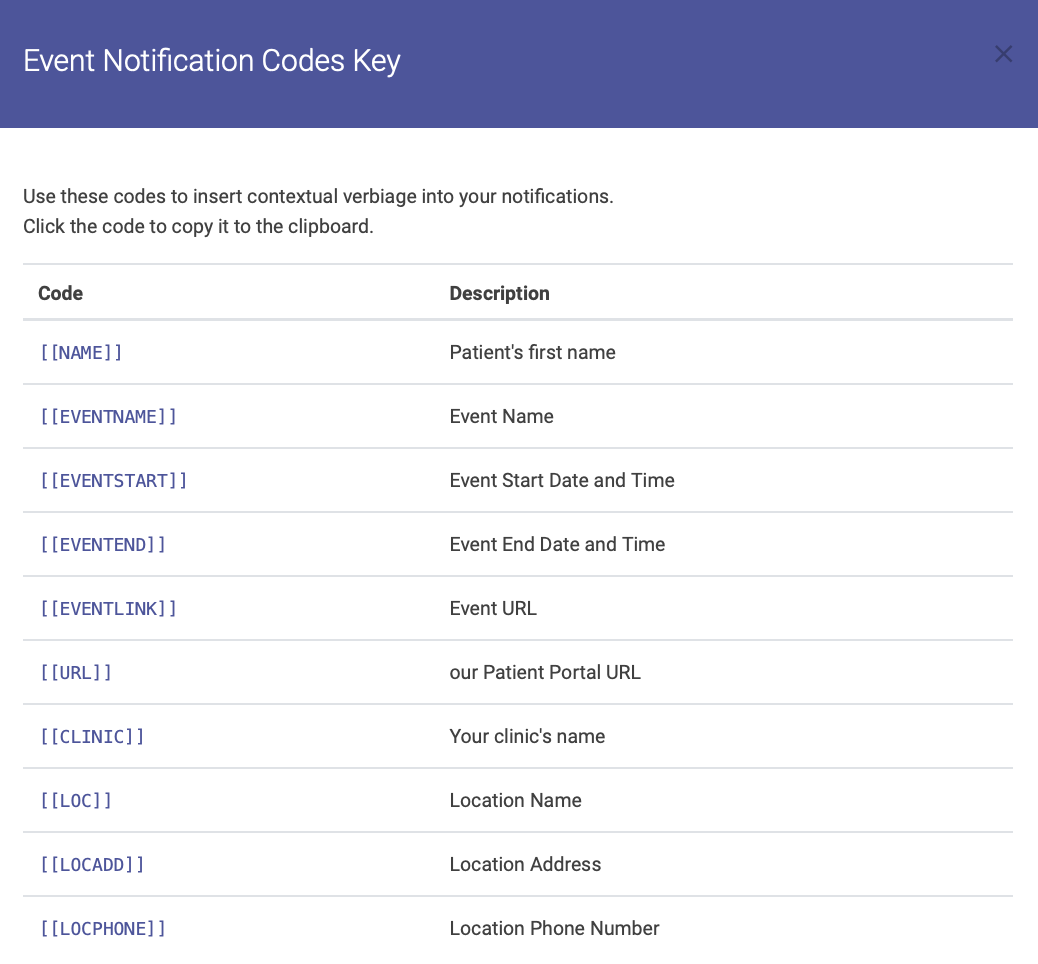
Click Save when you're finished to save your notifications.
Managing Notifications
You can add multiple notifications per event. Your saved notifications will appear on the Notifications tab:
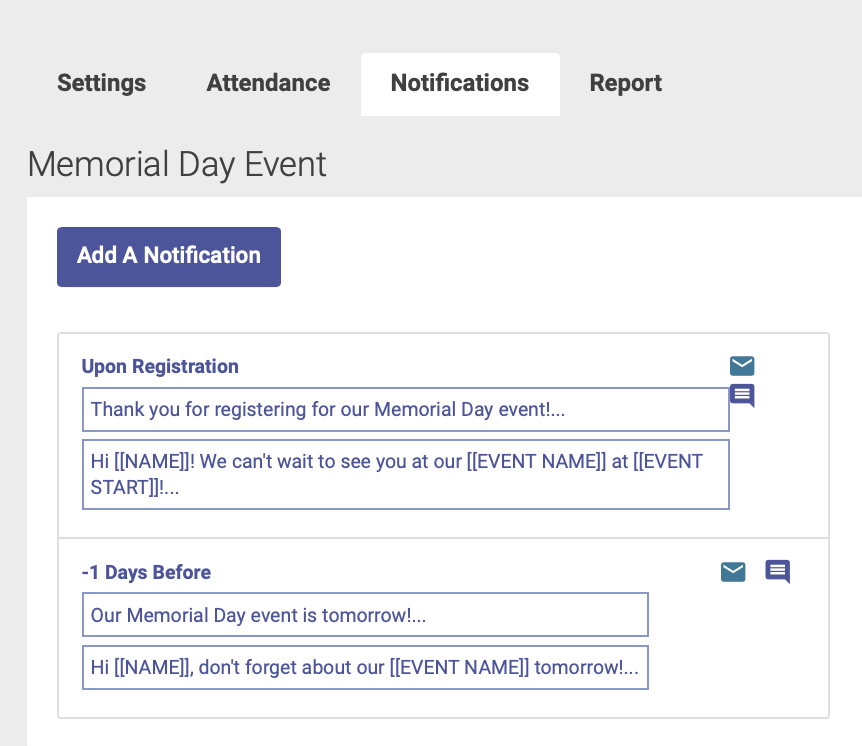
Editing or Deleting Notifications
To edit or delete a notification, click on the notification you wish to edit from your list. The notification details will appear on the right hand side of the page, and from there you can edit and save your notifications, or use the delete button at the bottom to delete a notification:
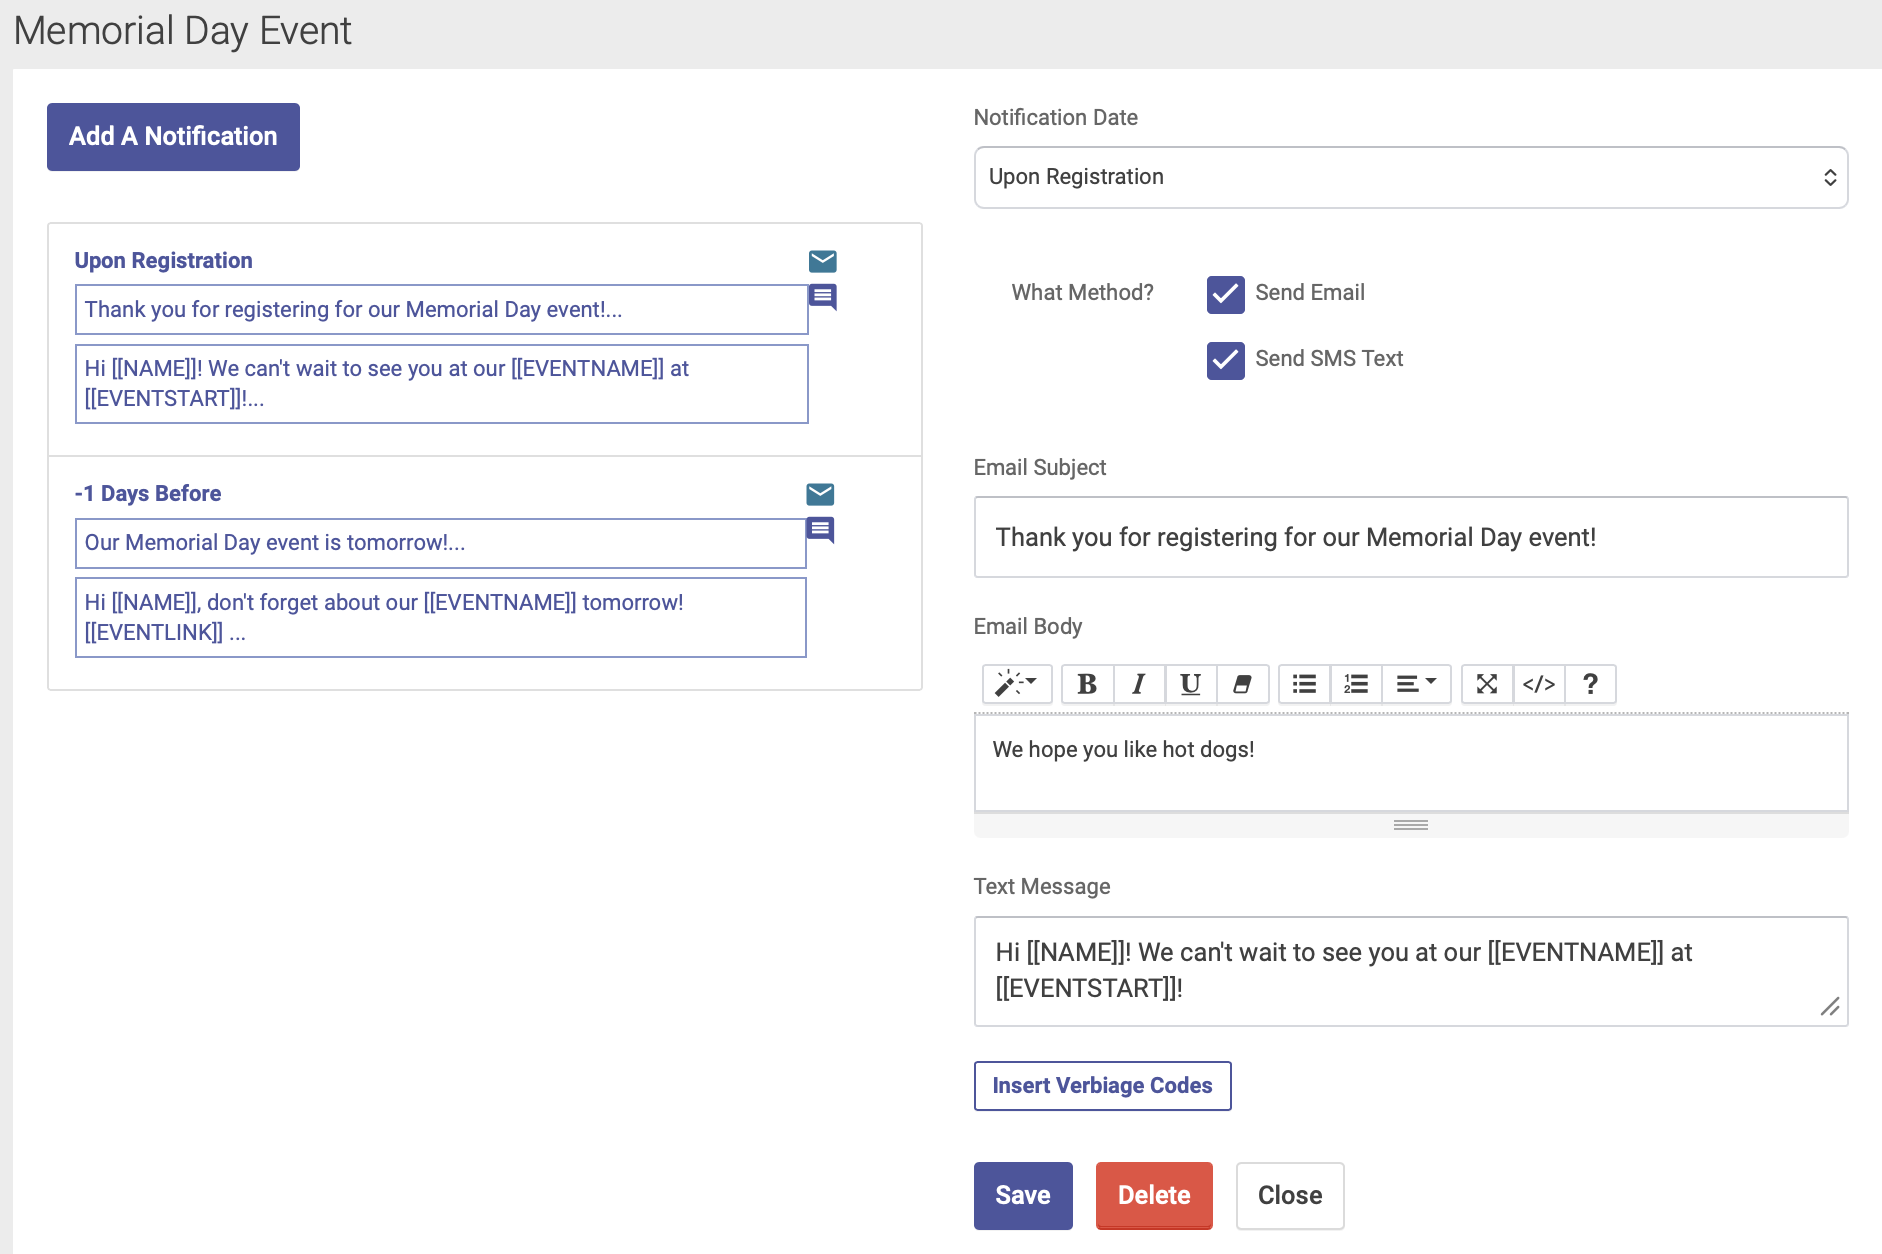
Adding EHR Notes to an Event
If your event includes EHR notes, the process is very similar to recording EHR notes for appointments. You'll record your notes on the EHR by Event page, which is on the left-hand side menu:
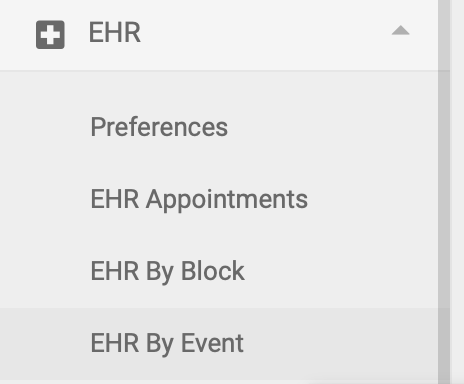
Note: only Users with Practitioner level access can add EHR notes to an Event.
Step 1:
On the EHR Event page, click your Event title to highlight it and open the list of attendees on the right hand side of the page:
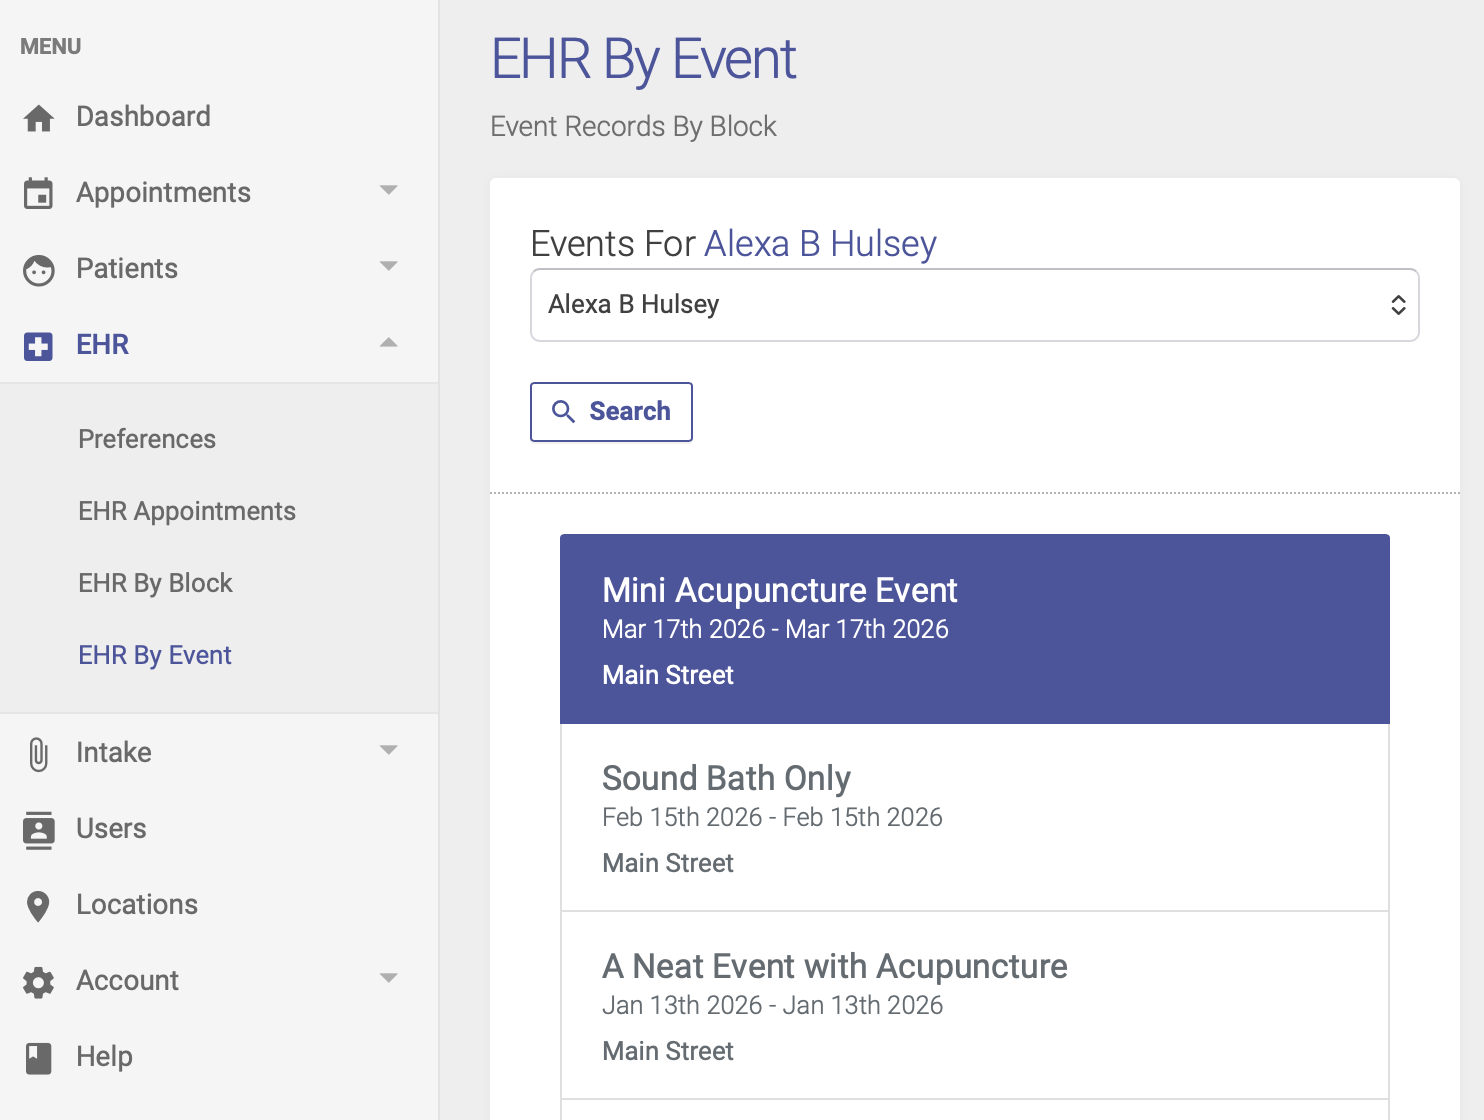
Step 2:
Once your list of attendees appears on the right hand side of the page, click the pencil icon to record your EHR notes for the event:
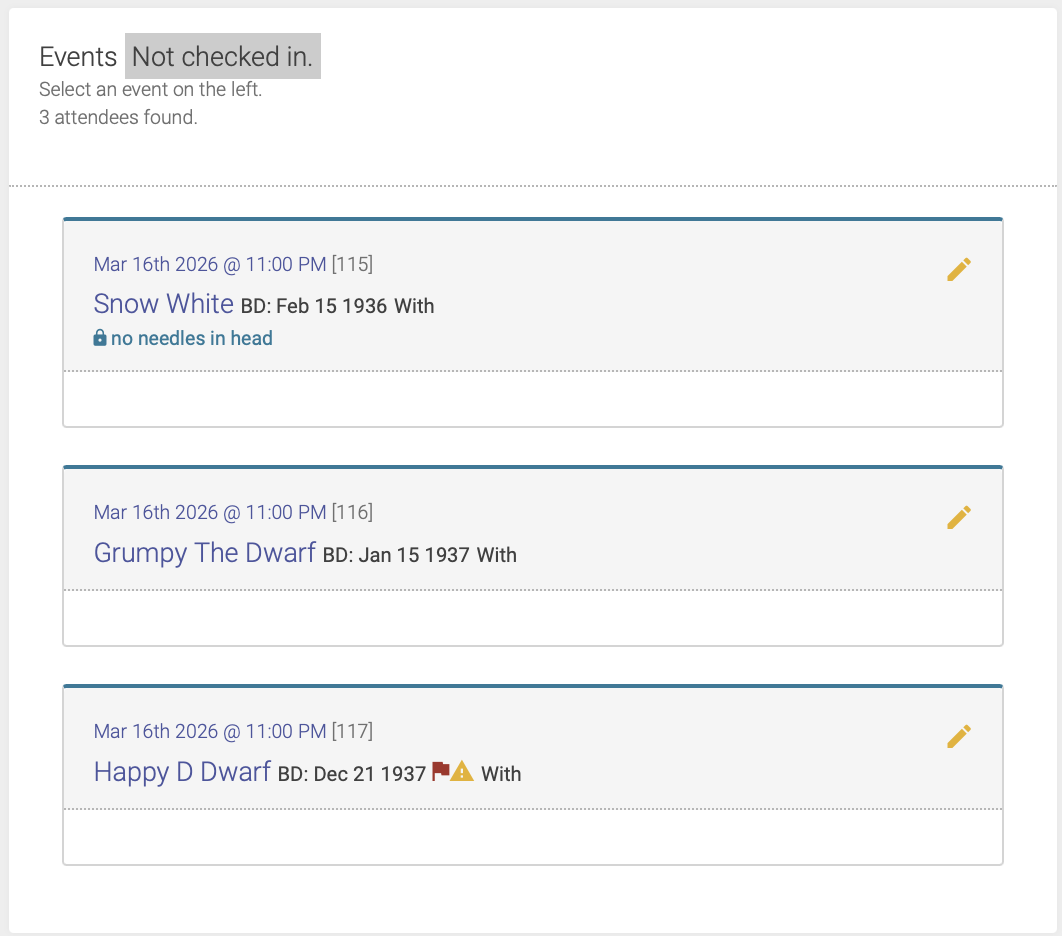
Note: You will only be able to enter EHR notes after the attendee has been checked in.
Step 3:
You can then enter your notes and points into the corresponding fields, just like you would for EHR notes for a regular appointment.
Once you've entered your notes, you'll click Save to save your notes, then Lock to approve and lock the record.
Creating a Multi-day Event
Our Events function allow you to create an event that spans multiple dates. Here's how to do that.
Event Setup
On the Event Setup page, click the box next to "Is this a multiday event?" You can then enter the start and end dates for your event:
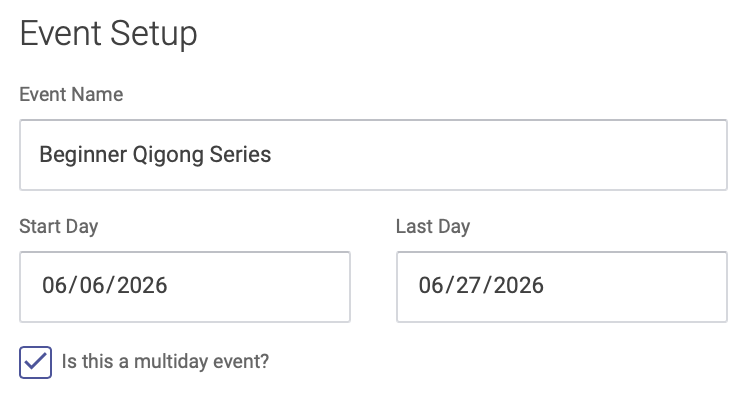
Note: You'll select individual dates for your event on the Hours tab.
Click the right arrow at the bottom of the page to advance to the next step: Host
Host
On the Host page, you'll enter information about the event host(s), the same as you would for a single-day event:
- Add Event Host from a dropdown menu of your clinic's Practitioners. To add a Practitioner, select their name from the dropdown menu, then click the Add Practitioner button. You can add multiple practitioners per event.
- Click the "Add EHR notes to this event" checkbox if you want to enter and save health records for this event.
- If you have other event presenters or hosts who are not on the menu of your clinic's Practitioners, you can add their name in the Other Presenters box
Click the right arrow at the bottom of the page to advance to the next step: Hours
Hours
On the Hours page, you'll enter the hours for each of your separate dates. Click the box below "Session Dates" and a drop-down calendar will appear. Click dates on the calendar to select each date of your multi-day event, then click Add Dates:
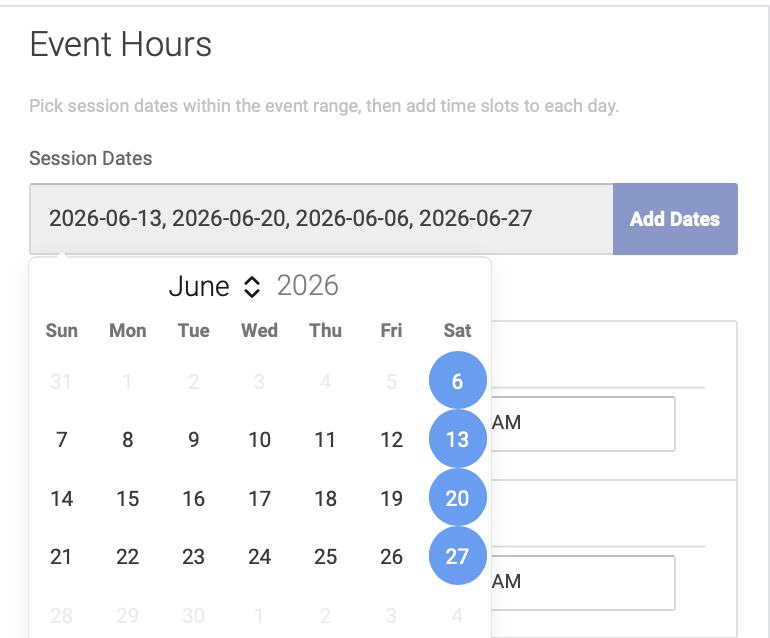
You will then enter the hours for that date. By default, the hours at set to start time 9:00AM and end time 11:00AM. Simply highlight the hours to edit them:
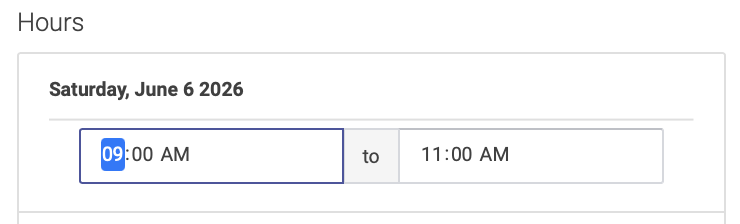
To delete a date from your multi-day event, click the X box next to the event date (note: you cannot delete the start or end date of a multi-day event):
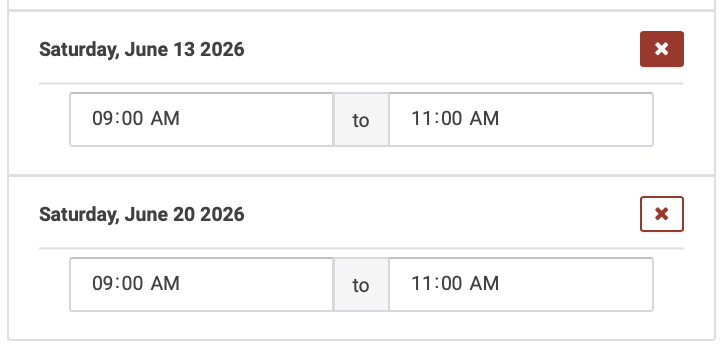
Click the right arrow at the bottom of the page to advance to the next step: Event Info
Event Info
Enter your description and details for the event, like you would for a single-day event.
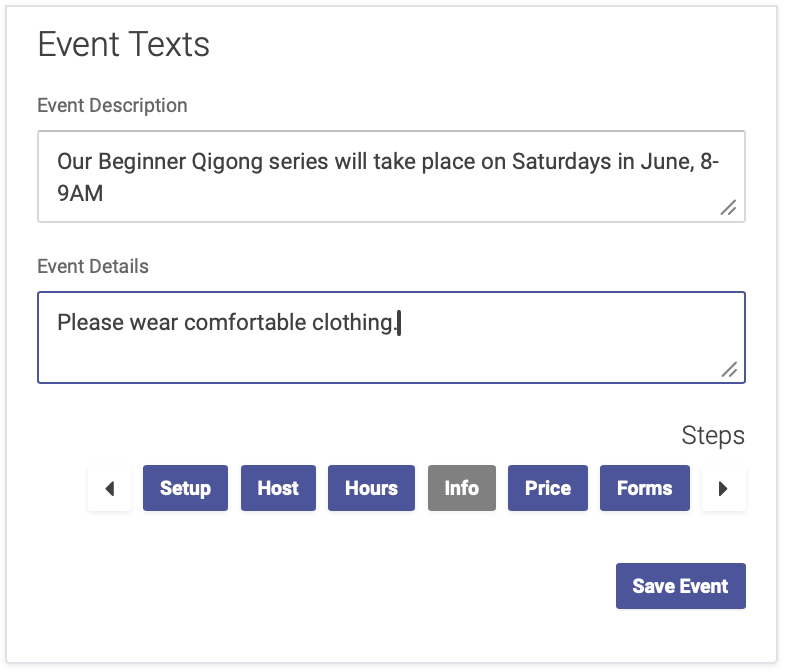
Click the right arrow at the bottom of the page to advance to the next step: Price
Price
On the Price page, you'll enter your pricing for the event, the same as you would for a single-day event. You can add expiration dates to a price for an early-bird pricing option.
- Enter your price title, amount, and expiration date (if applicable). Then click the Add Price button.
- If you want to require prepayment, click the Prepayment Required box (note: you must use Open ACU's Stripe integration feature to enable prepayment for Events).
Click the right arrow at the bottom of the page to advance to the next step: Forms
Forms
On the Forms page, you have the option of sending forms to attendees, to be completed in advance of the event.
- Select the forms you'd like to send from your clinic's Intake Form options,
- Or click the Create a New Form to create a new form for your event. This will take you to your Intake Settings page.
- You can skip this step if you do not require attendees to fill out a form for this event.
Click Save Event to finish the event setup process
Next step: Event Notifications
Register Attendees for an Event
To register attendees for an event, navigate to the event date on the calendar, then click the Attendees tab:
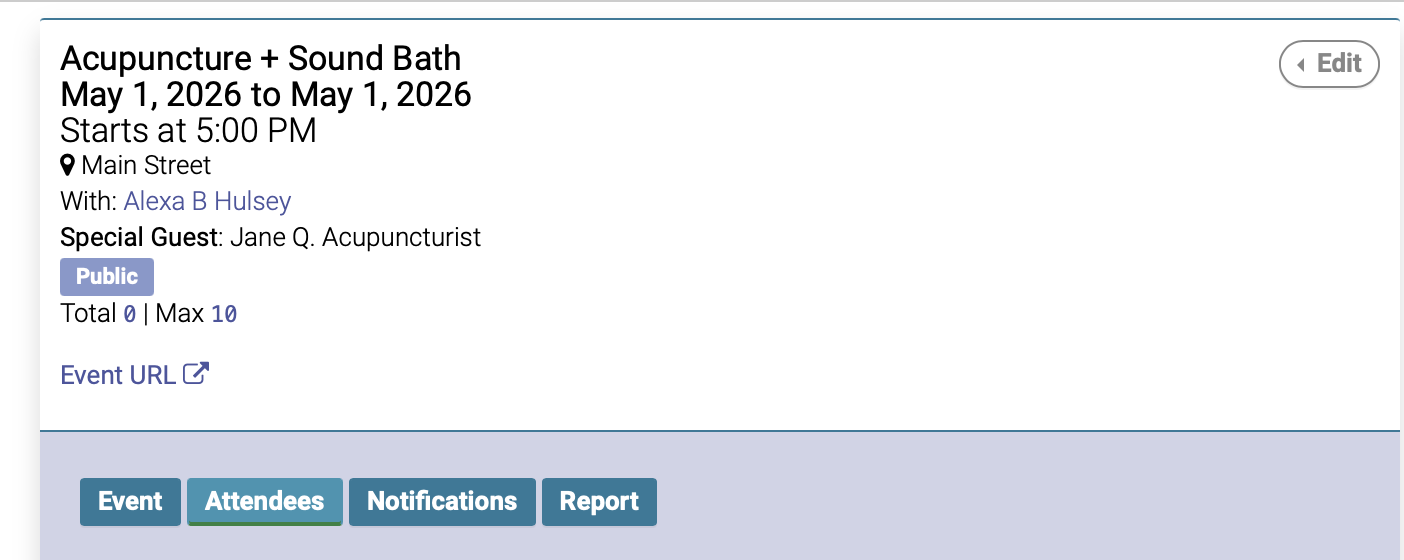
If the attendee is an existing patient:
If the attendee is already an existing patient in your database, start typing their name into the Patient Search box:
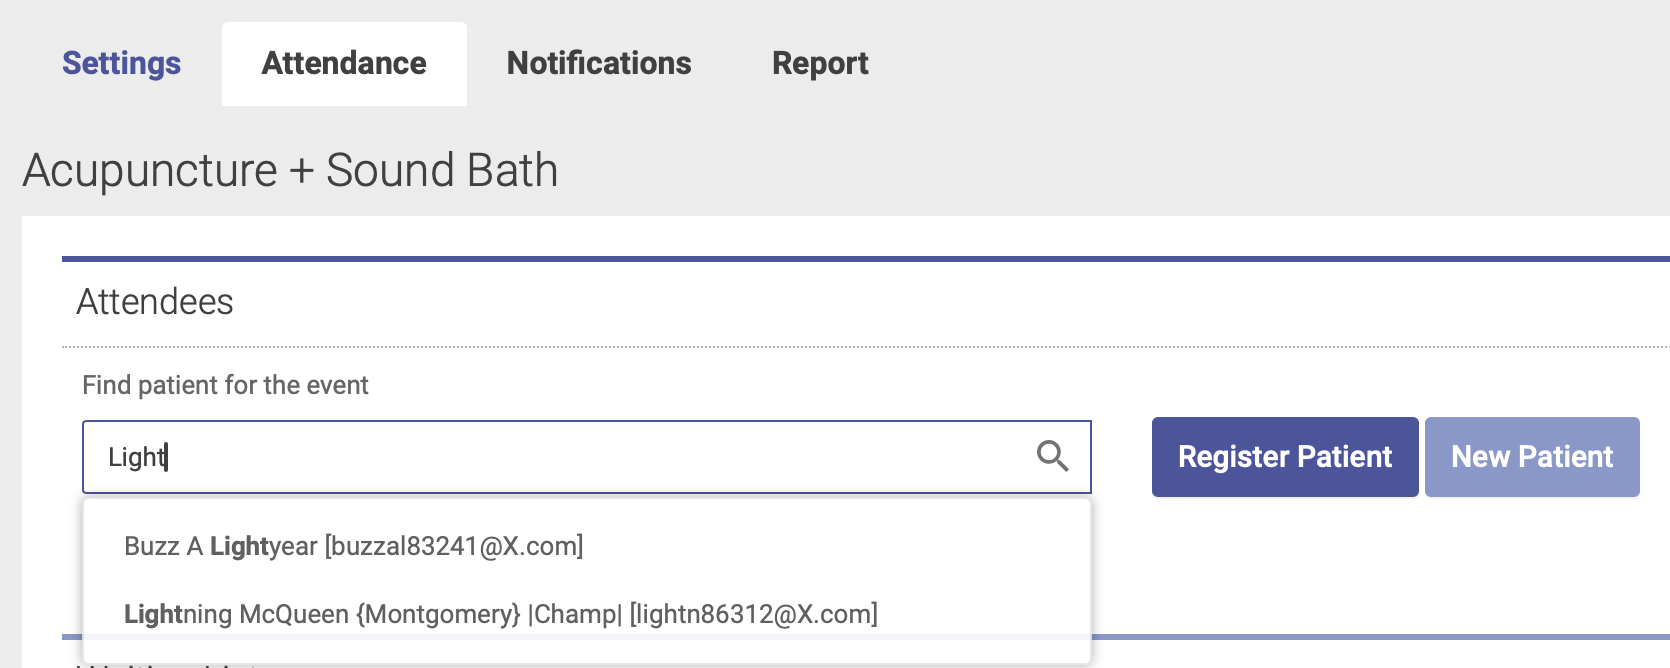
Then highlight their name, and click Register Patient - just like you would do for scheduling an appointment:
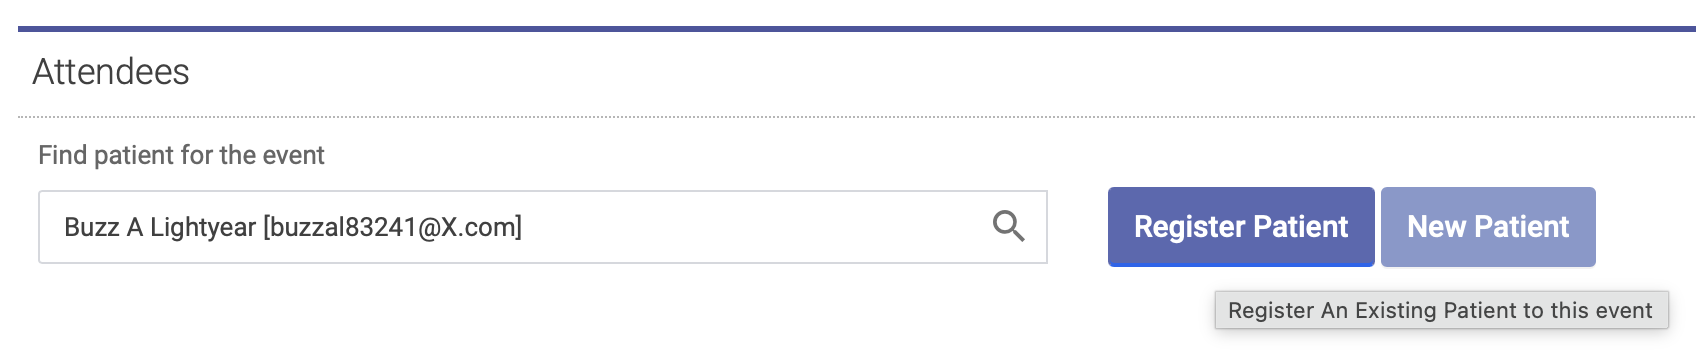
One the patient is registered, you'll see their name on the Attendees list:
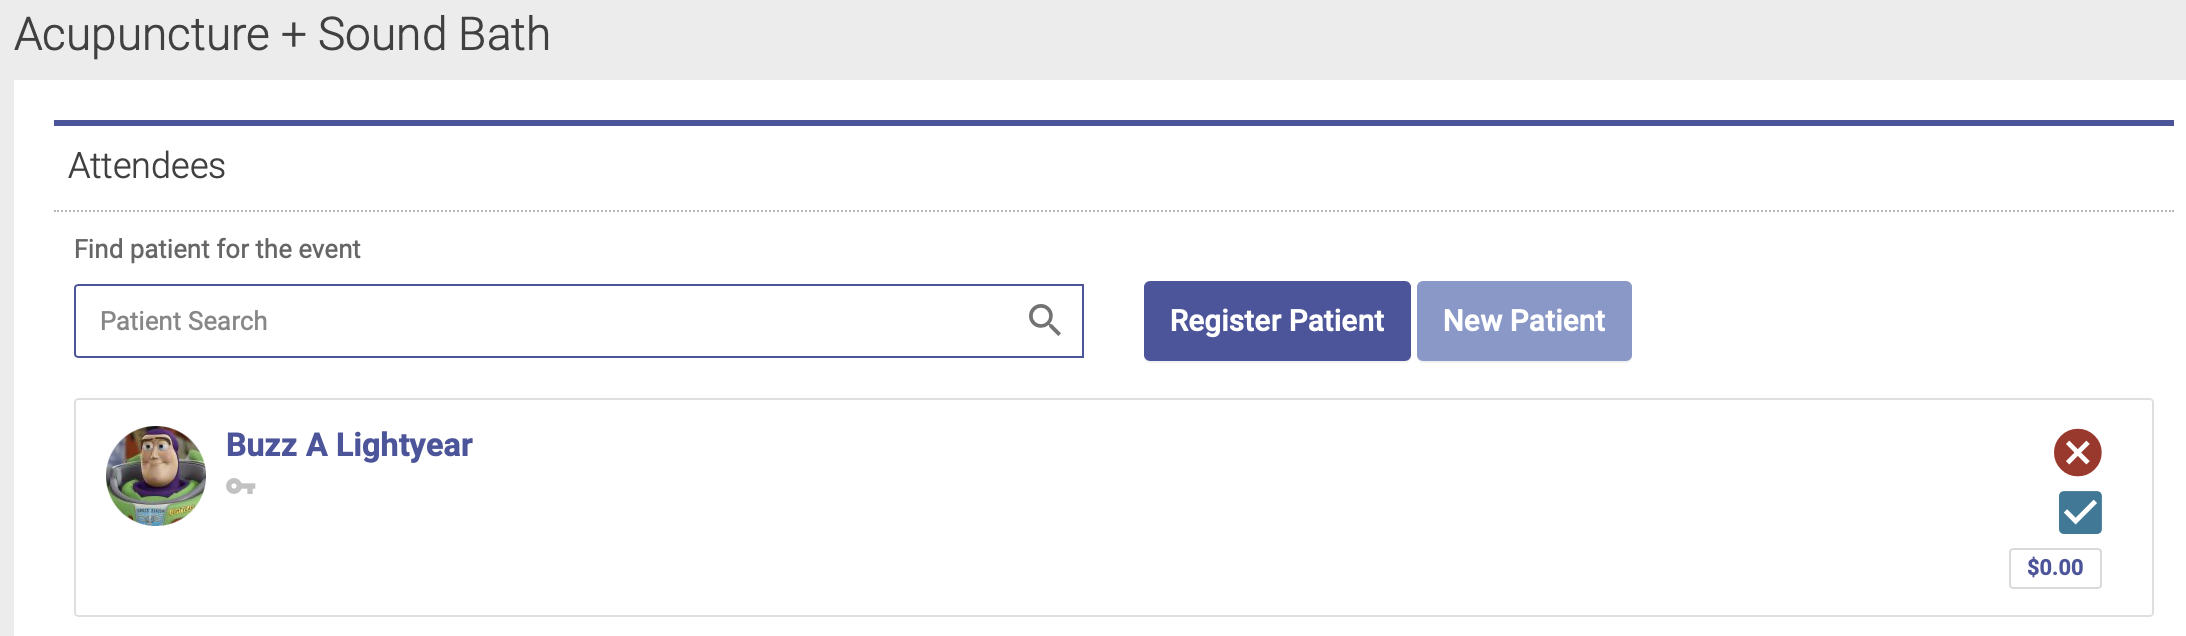
If the attendee is NOT an existing patient:
If the attendee is not already an existing patient in your database, you'll first need to create a New Patient account for them. Click the New Patient button to create a new patient account:
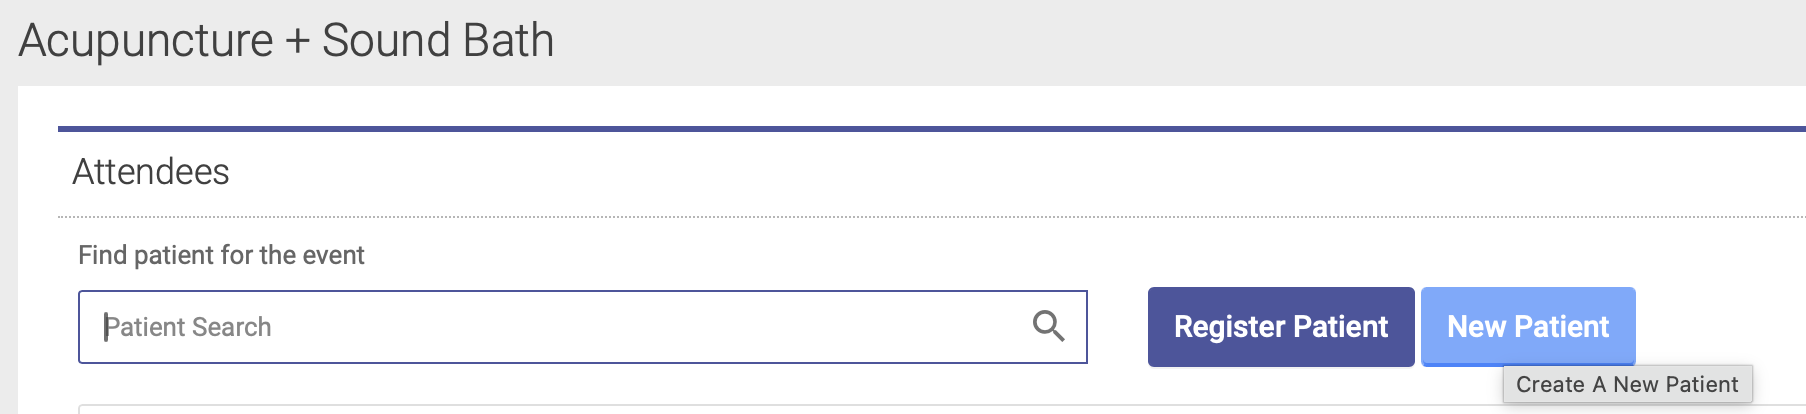
You'll then be prompted to walk through the steps of adding them as a new patient. Once they're added to your database, you can then complete the registration steps like you would for an existing patient.
See This Article for information on how participants can register themselves for an event via the Event URL on the patient portal.
All Events page
Your All Events page shows a list of all past and future events. On the left-hand side menu, click Appointments --> All Events:
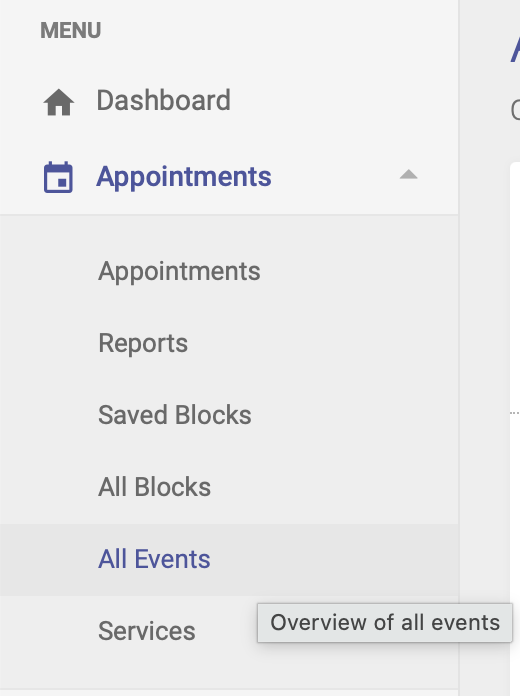
When you click on an Event listing, you'll be taken to the Event date on the calendar:
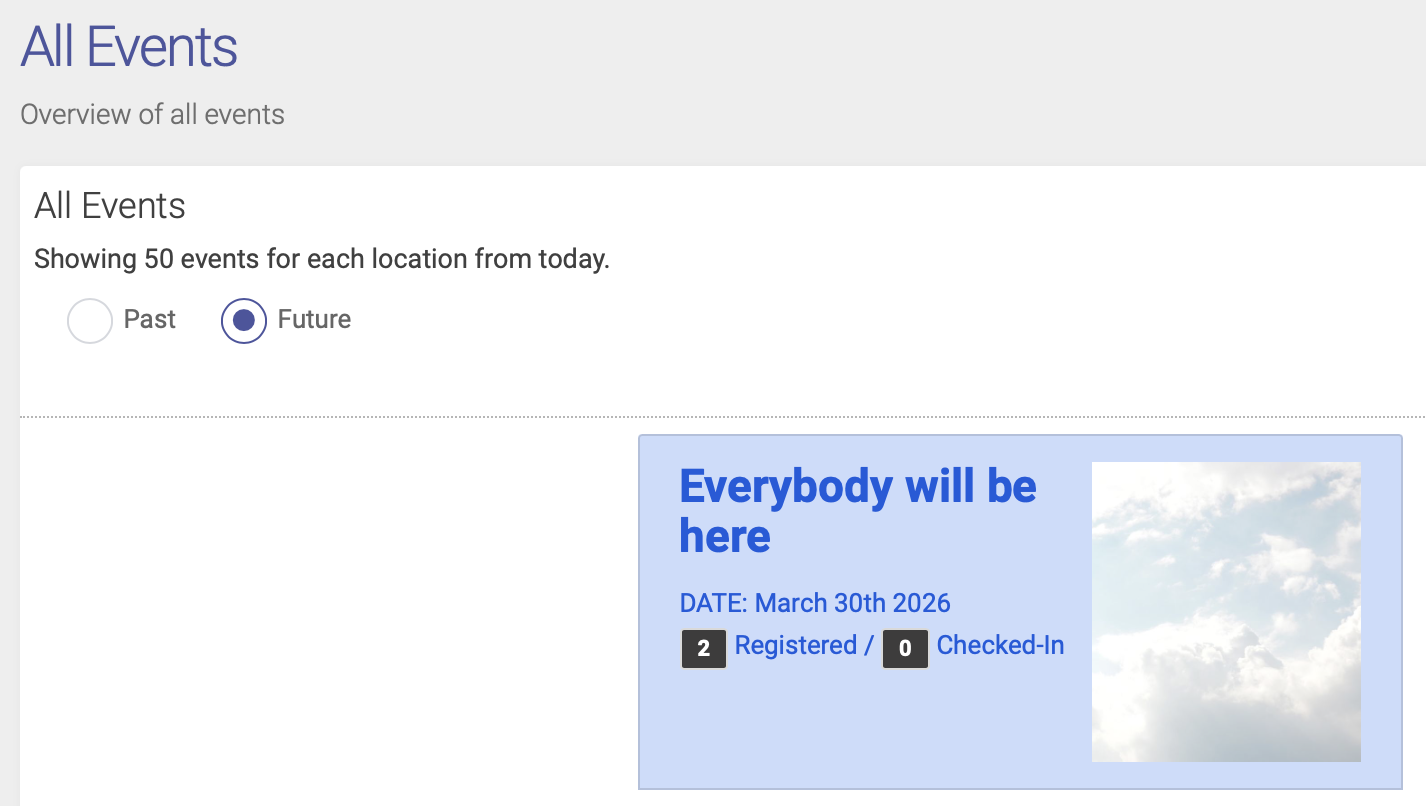
From there, you can edit your event, register attendees, edit notifications, and view reports.
Event Waiting List
If your event registration is full, you can add people to the waiting list.
Add someone to the waiting list
To add someone to the event waiting list, open the Attendees tab on your Group Event Editor and scroll down to the Waiting List section. Type a patient's name into the search field, highlight their name, then click Add to Waiting List:
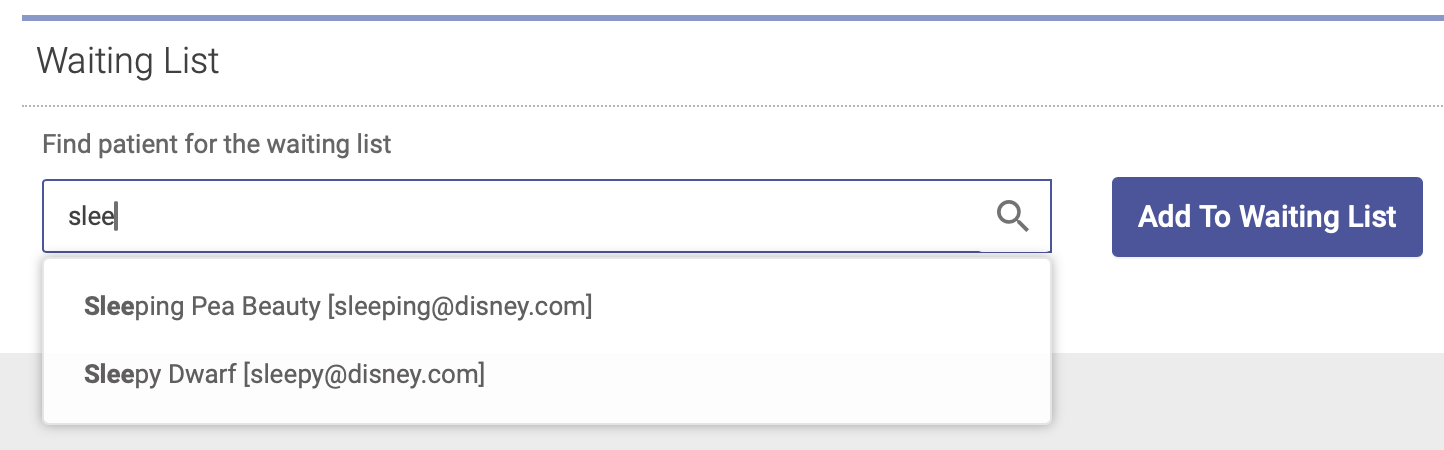
You will now see their name on the event waiting list, under the list of registered attendees:
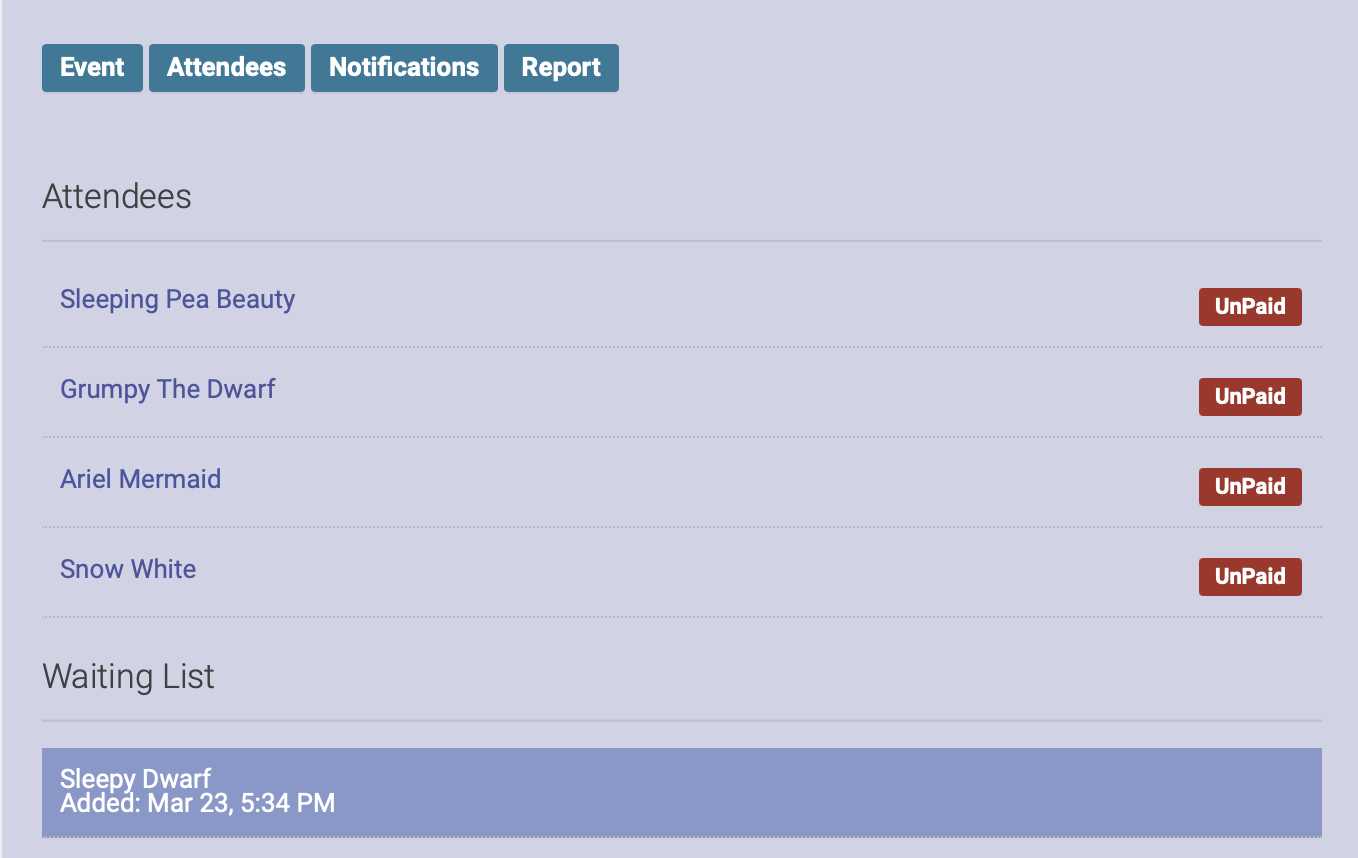
Register someone on the waiting list for the event
If a spot opens up and you want to register someone on the waiting list for the event, open up the Attendees tab. Click on the plus sign (+) next to the person's name. This will move them off the waiting list and register them for the event:
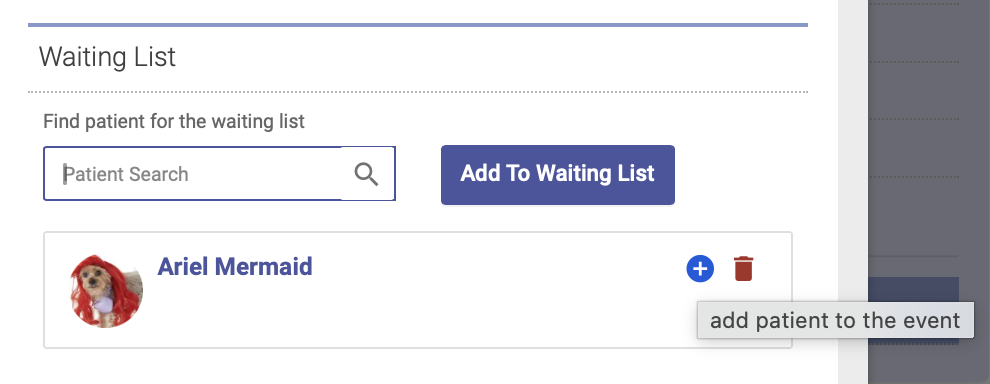
Remove someone from the waiting list
To remove someone from the waiting list, open the Attendees tab, then click on the trash can icon next to their name. This will remove them from the waiting list:
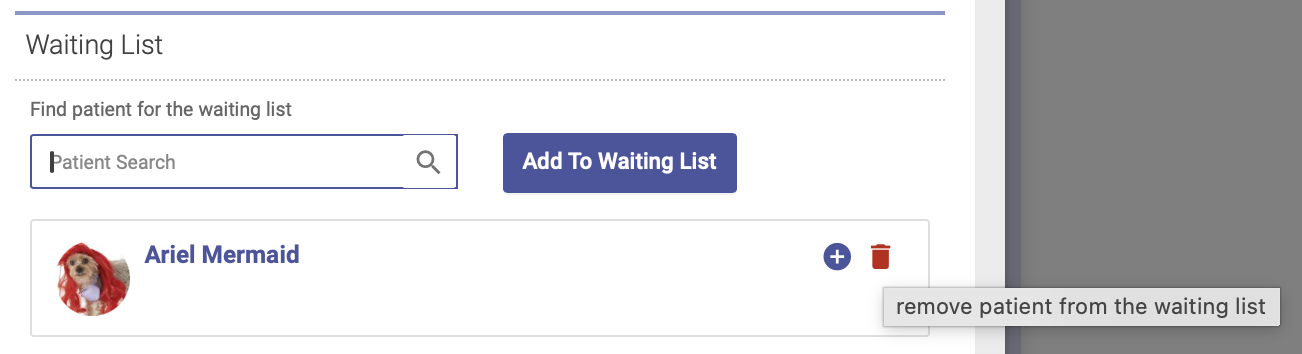
Waiting list via Patient Portal
People can also add themselves to the waiting list via the event URL.
If registration is full, the event URL will display a message that registration is full, with a button for people to add themselves to the waiting list:
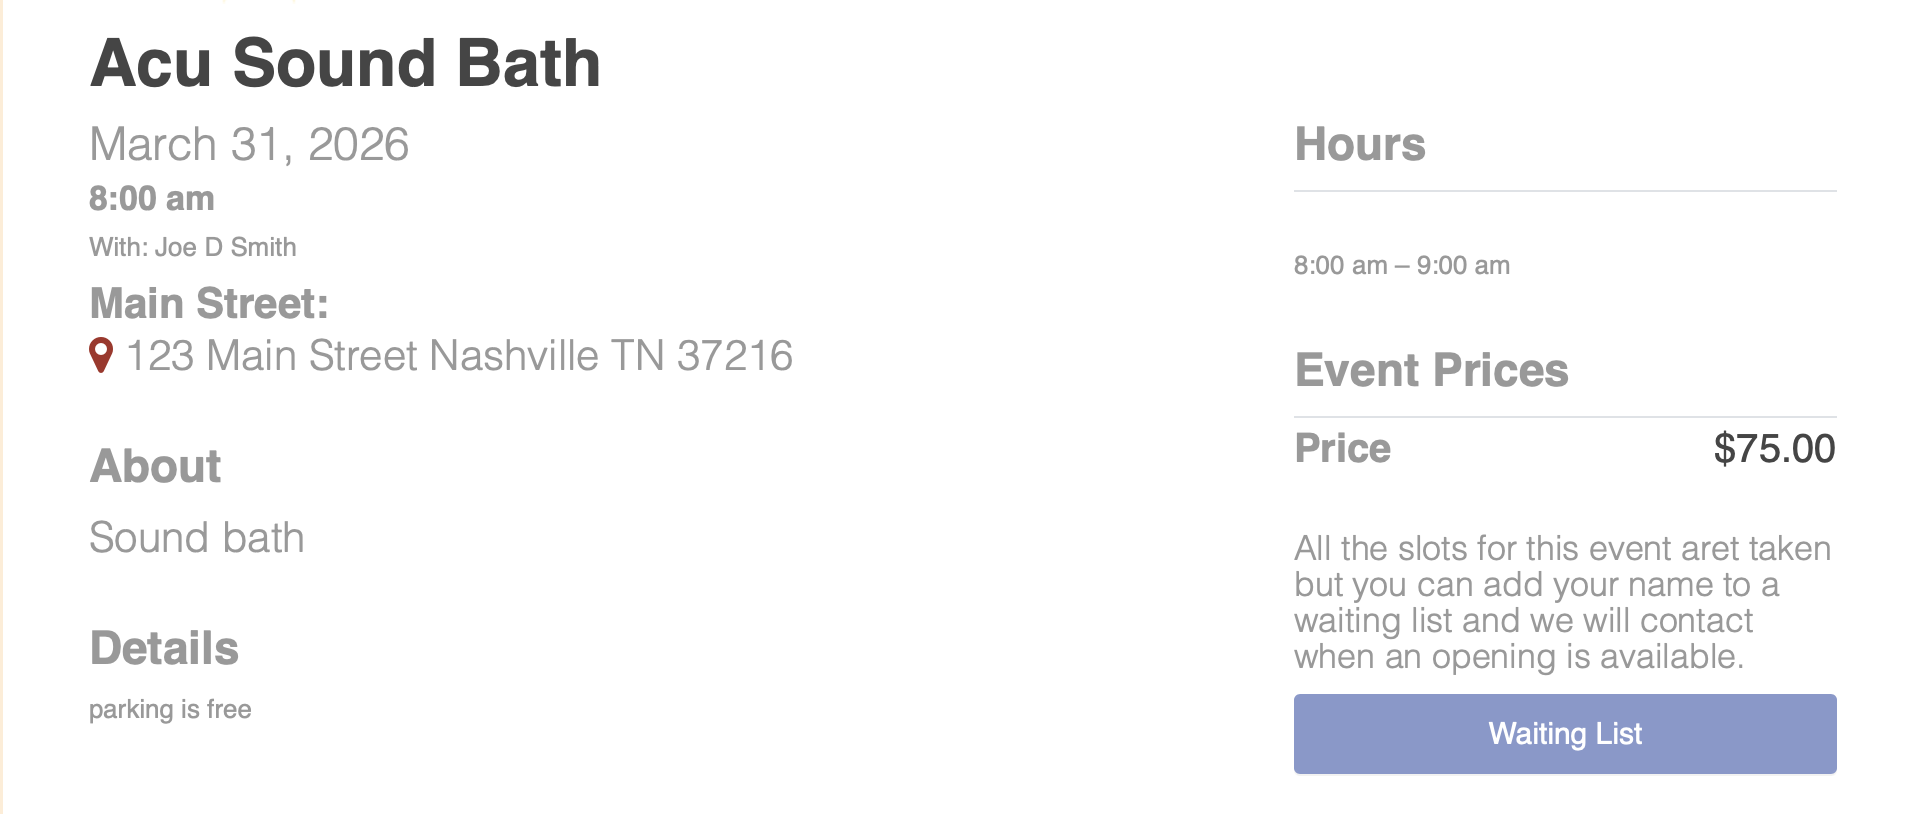
Once they click that button, they'll be prompted to sign in and complete the steps to add their name to the waiting list:

The event URL will then show a message that they've successfully added their name to the waiting list. They can click the "Remove Me from Waiting List" button to take their name off the waiting list:
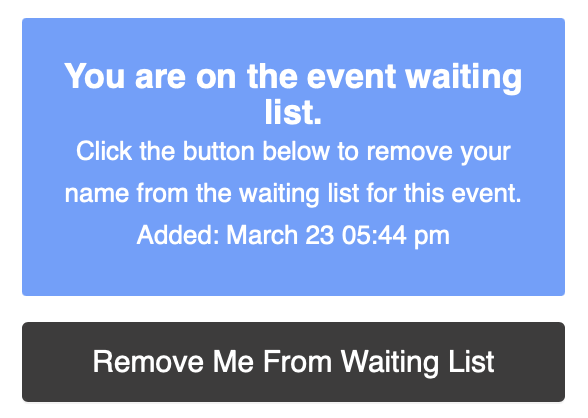
Event Report
The Event Report tab shows you a list of event attendees, registration and check-in dates, payment amounts and payment methods.
Click the Report tab on your Event Block:
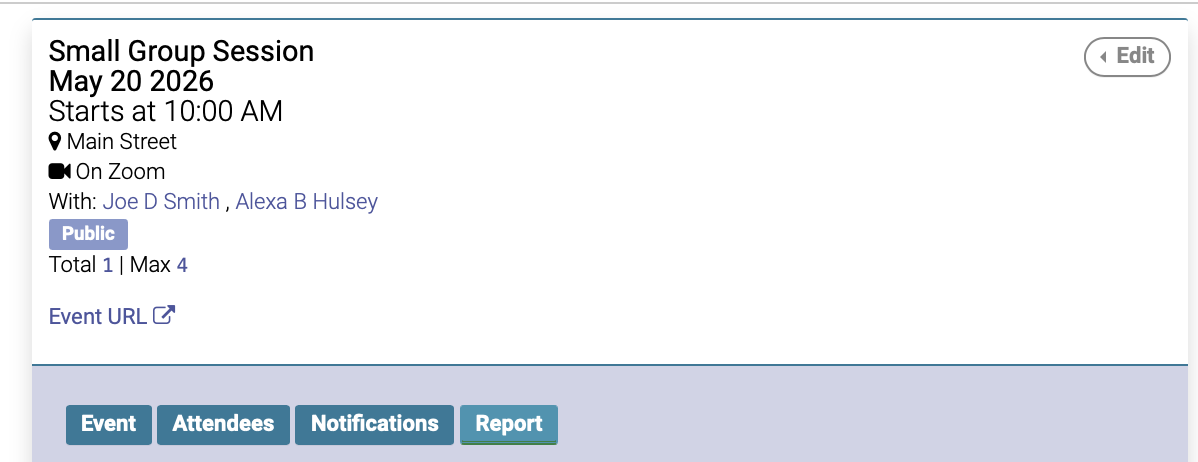
You will then see a report that shows Attendees, Date registered and checked in, and payment information:
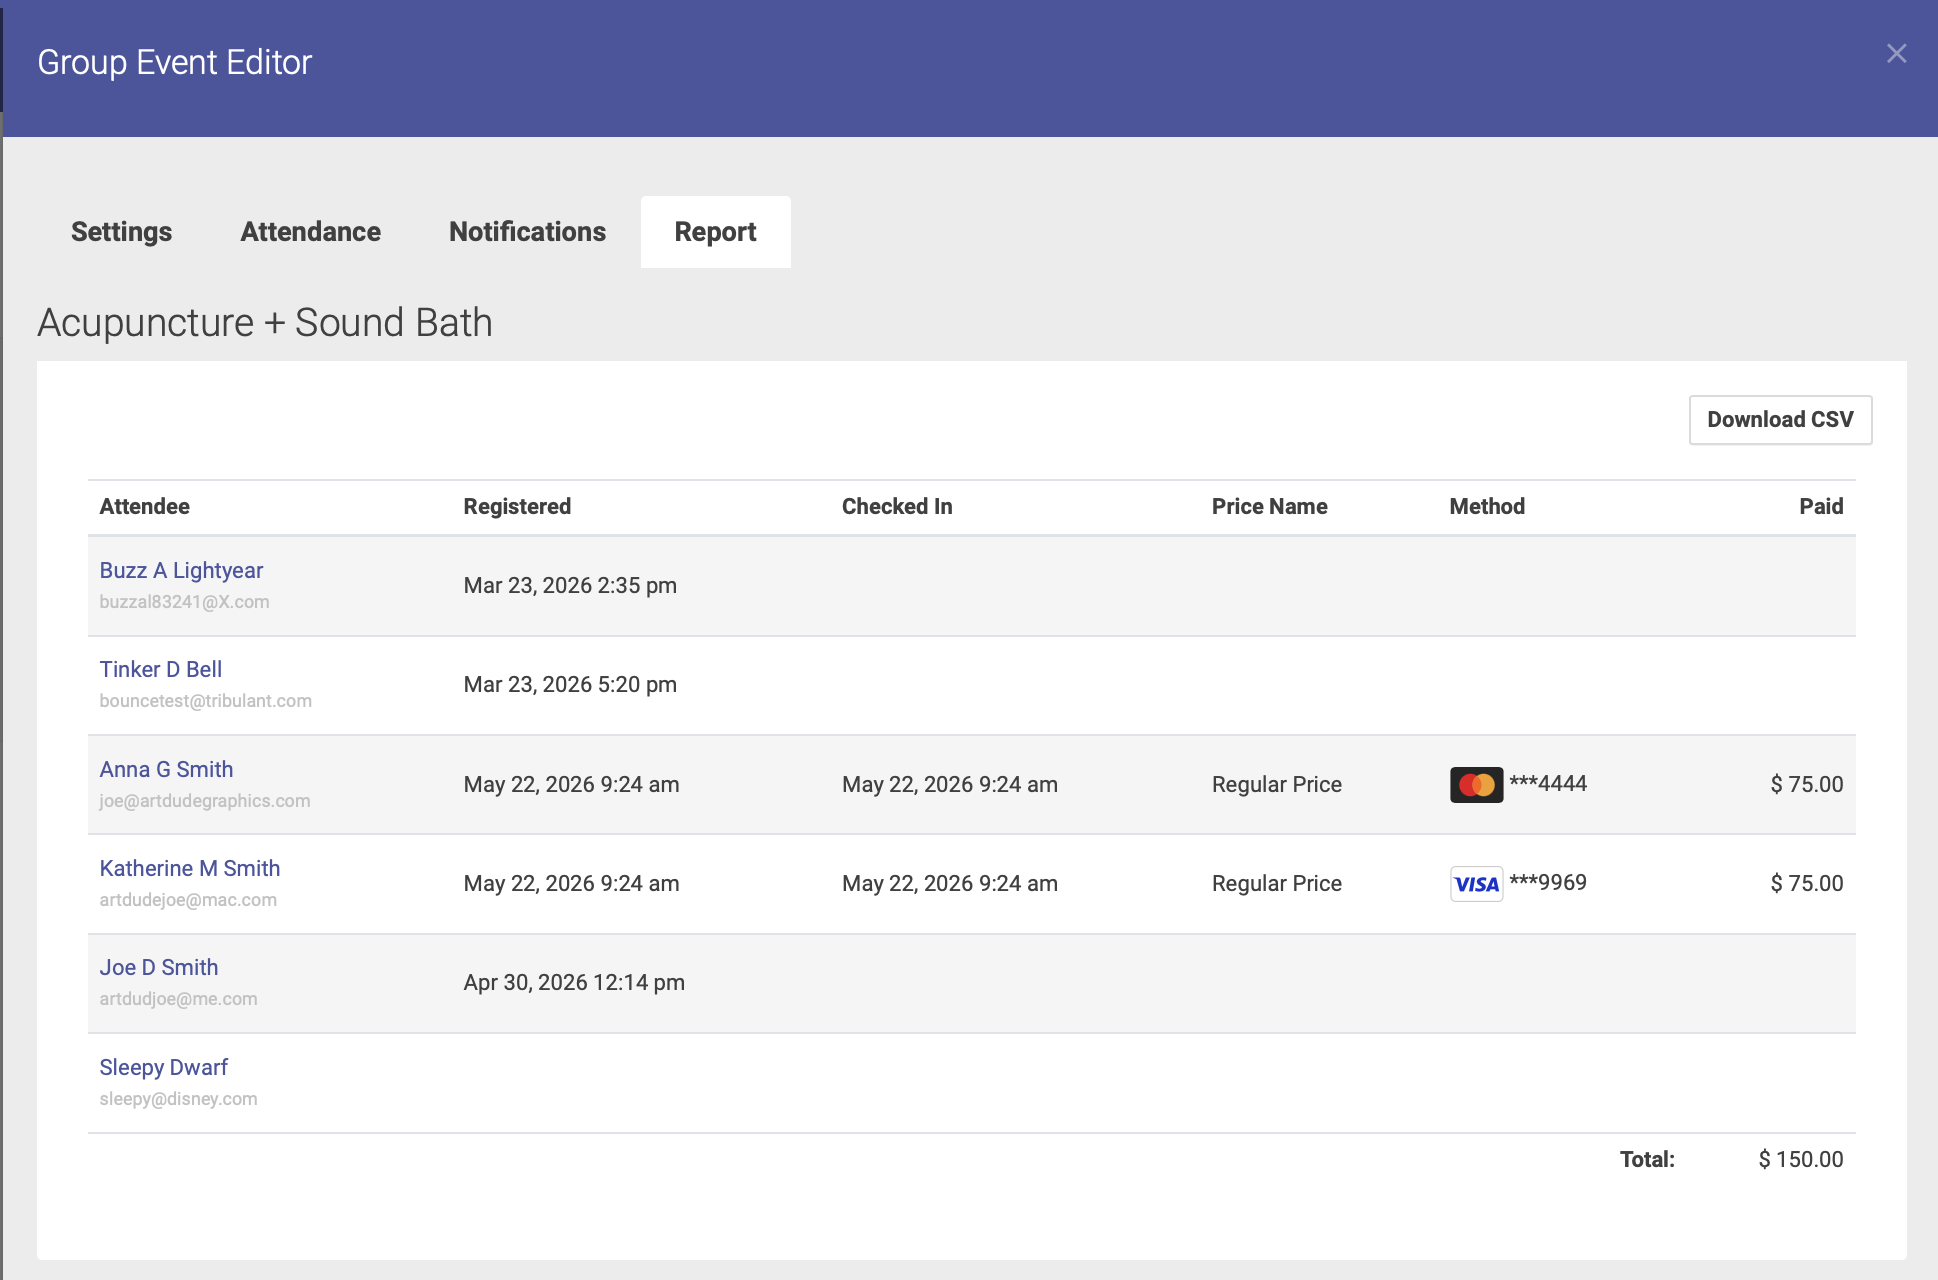
You can click the Download CSV button to download your report to a spreadsheet.
Registering for an Event: Patient Portal
Participants can register themselves for an event via the Event URL on the patient portal.
Step 1: Sign In
If you are not already signed in to your account, you can sign in on the clinic's Patient Portal home page.
Step 2: Event Page
On the Event page, click the "Register for This Event" button at the bottom of the page:
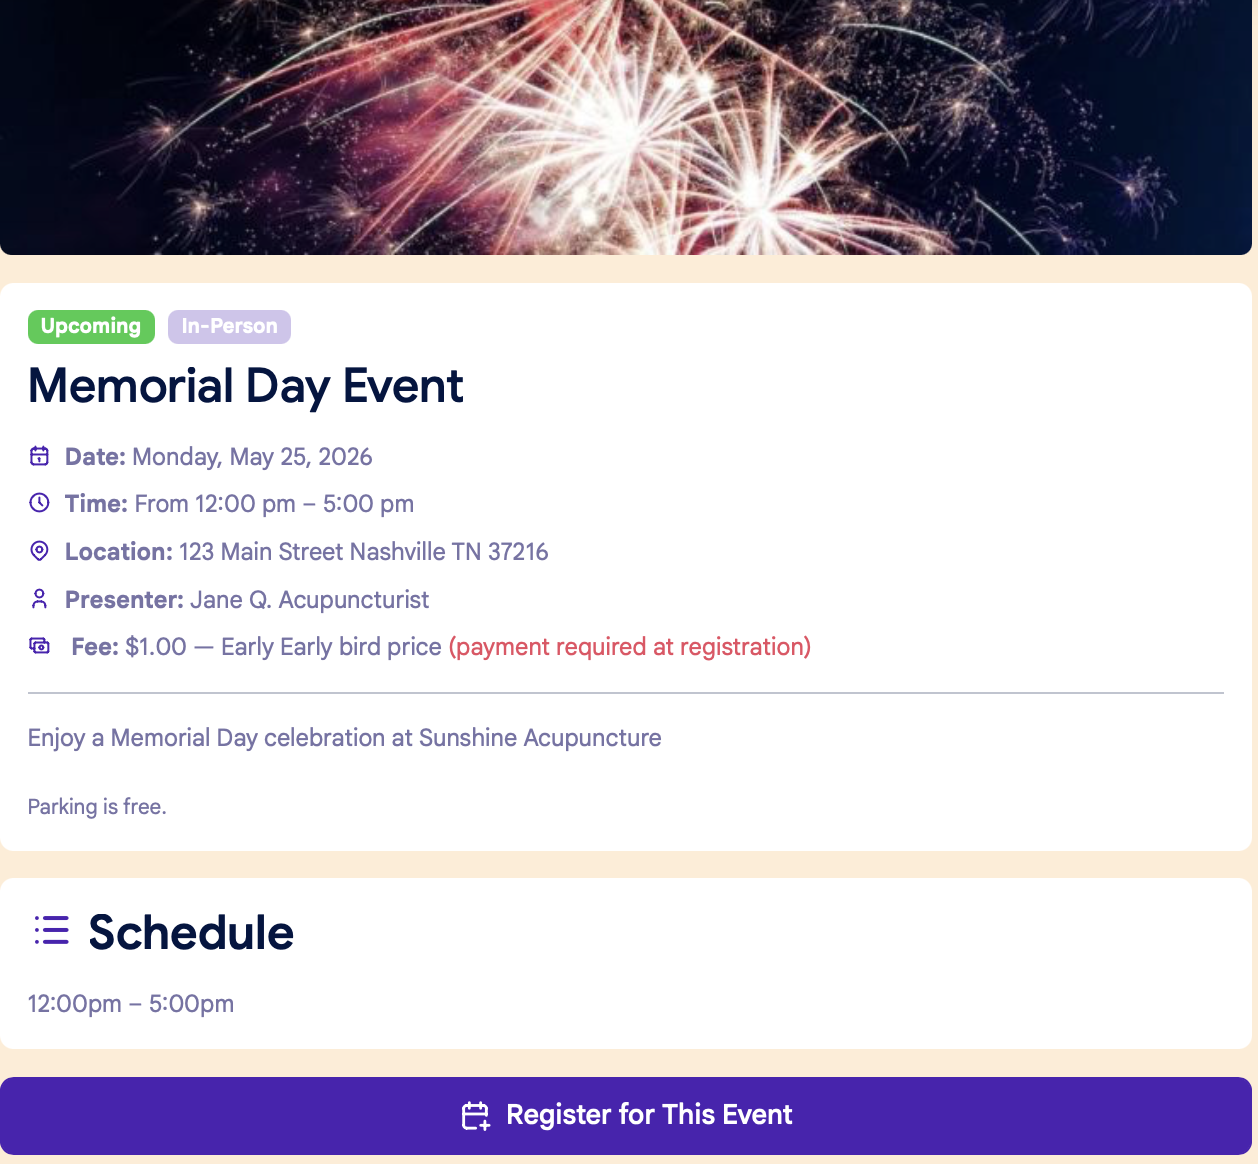
Step 3: Confirm info
You'll see a popup window to confirm your information:
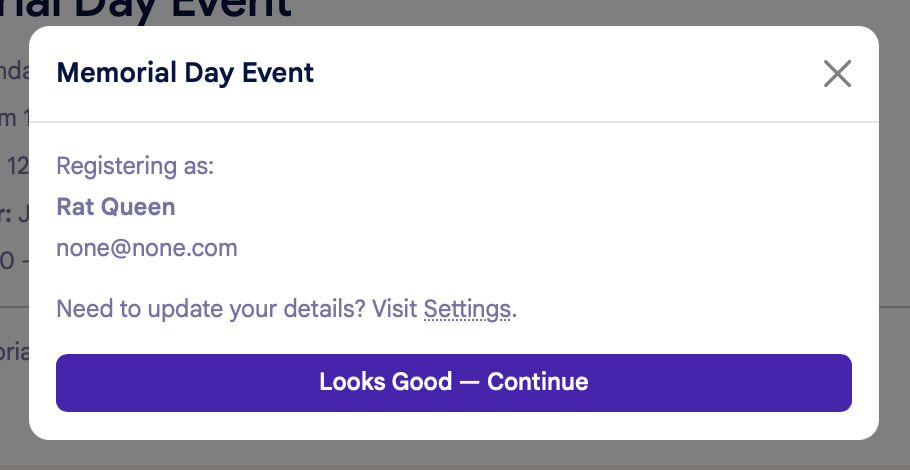
After the you confirms your information, the next step will vary based on payment options.
Free Events:
Click the green "Complete Registration" button to confirm your registration:

If prepayment is required and you do NOT have a card on file:
You'll be prompted to enter your credit card details to complete your registration:
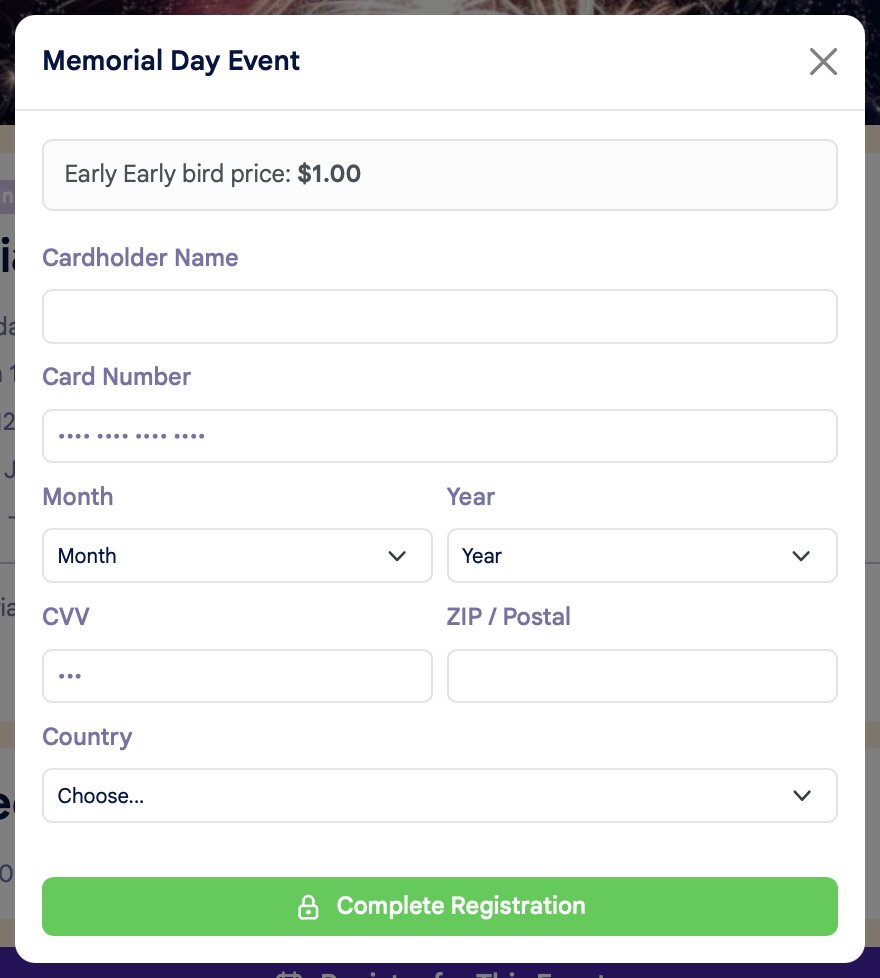
If prepayment is required and you DO have a card on file:
You'll be asked to confirm your credit card details, or you have the option to use another card:
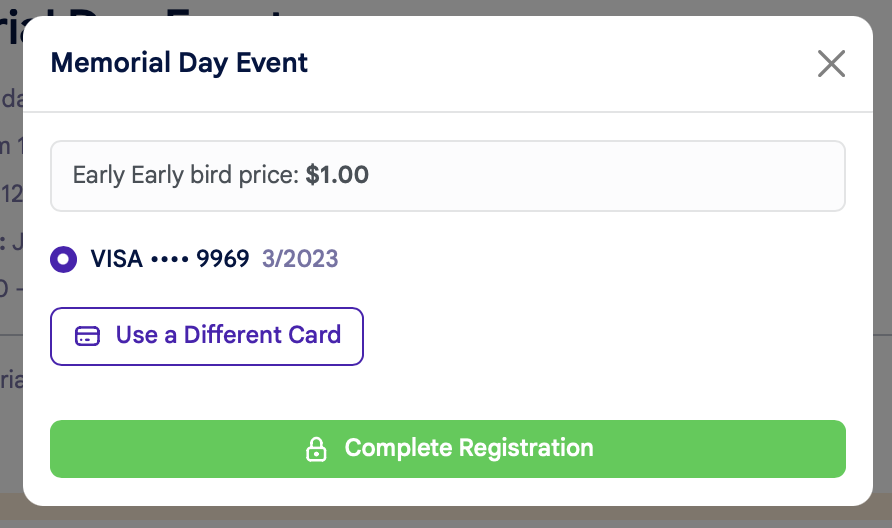
Once you've completed your registration, you'll see a confirmation page:
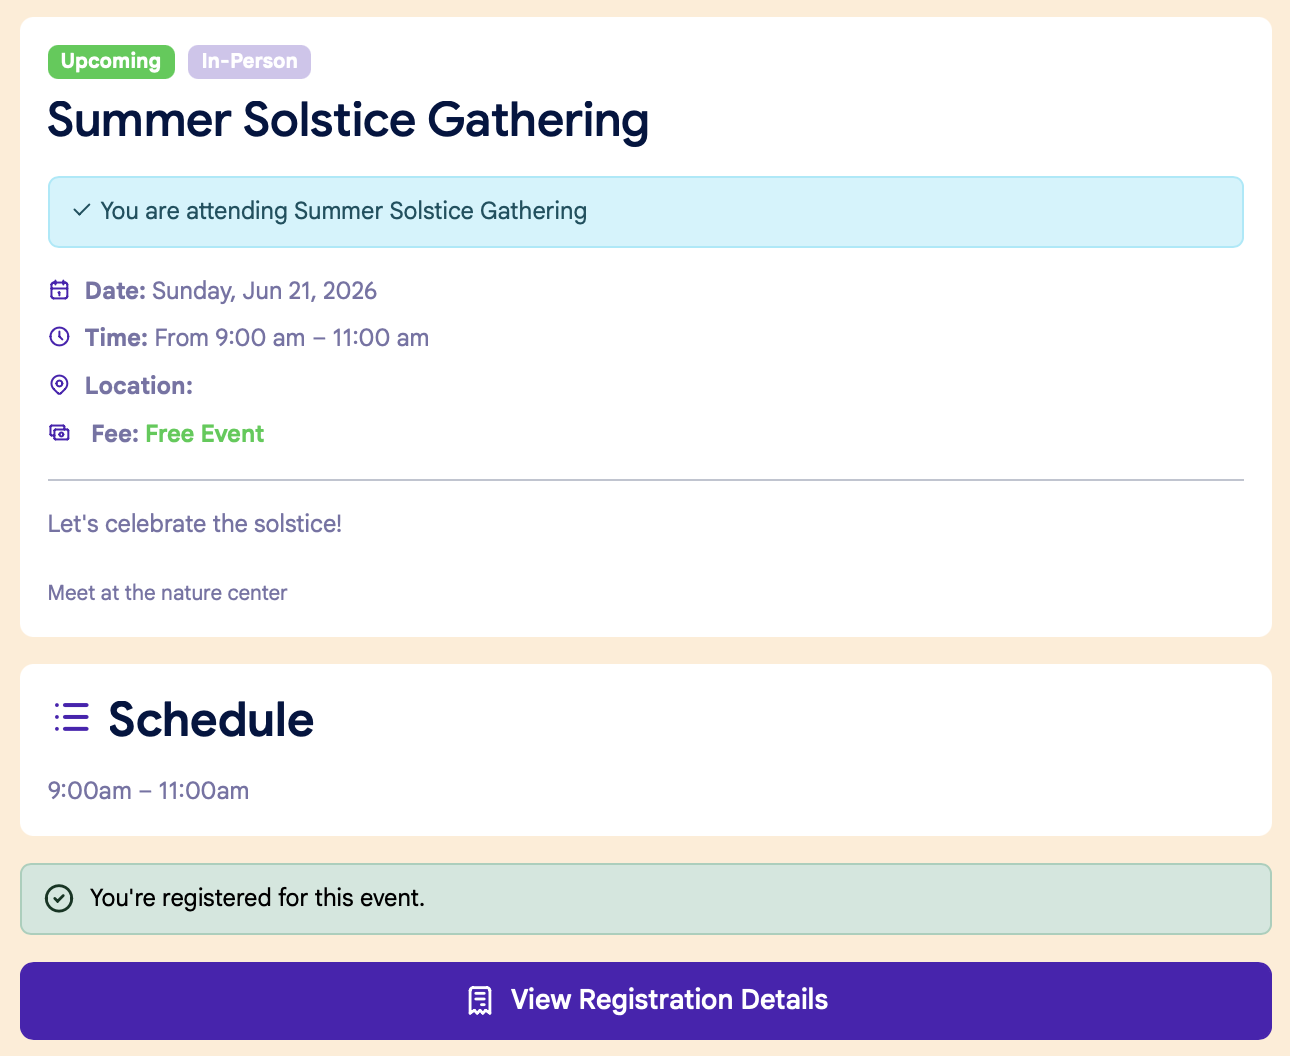
Collecting Payment for an Event
There are two ways to collect payment for an Event:
1. At the time of registration
You can collect payment for an Event at the time of registration only if you use Open ACU's Stripe integration.
To require payment at the time of registration, click the "Prepayment Required" checkbox on the Event Pricing tab:
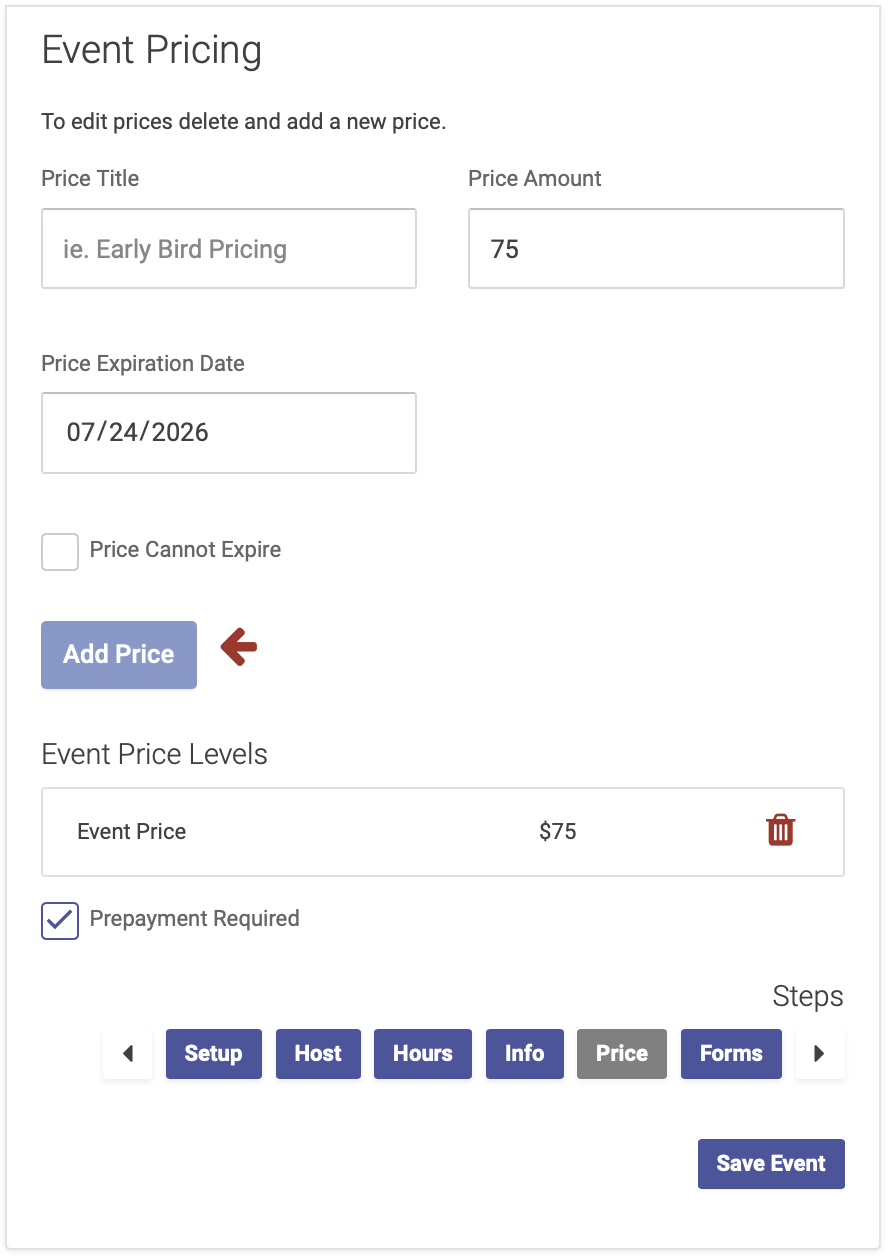
Participants will then be prompted to enter their payment details at the time of registration in order to reserve their spot.
2. At the time of the Event
You can also collect payment at the time of the Event. In this case, you won't check the "Prepayment Required" button on the Event Pricing page when creating your Event.
Attendees will be able to complete their registration without paying, and on the registration confirmation page, they'll see a message that payment is due at the door:
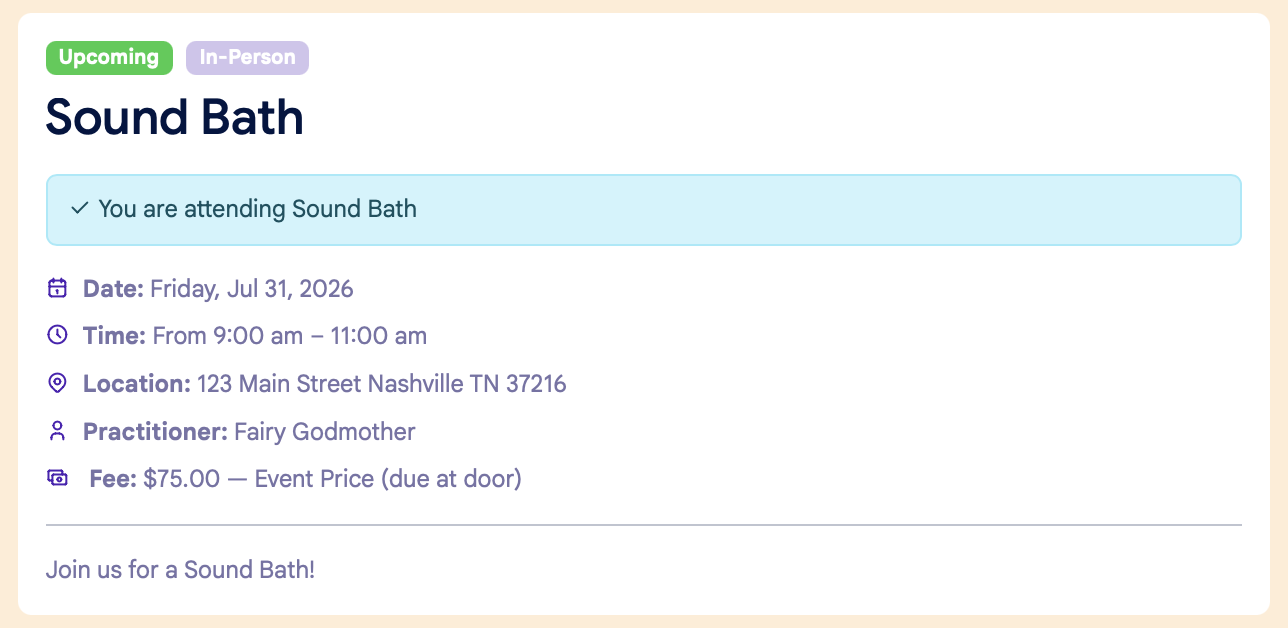
You can then collect payment when an attendees checks in for the event, like you would when checking in for an appointment.
Issuing a Refund for an Event
To issue a refund for an event, go to the Event date on the calendar, then click on the Attendees tab for the Event:
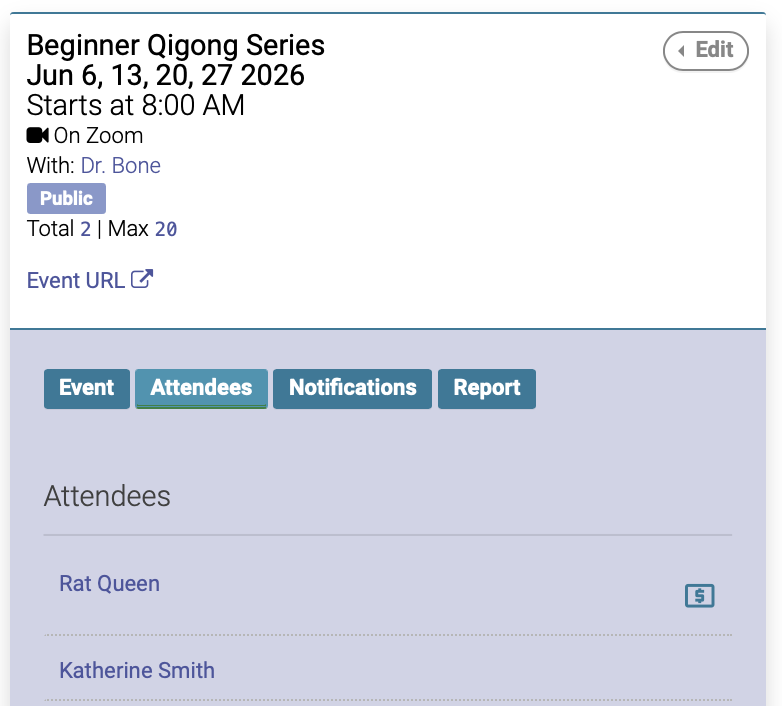
The green dollar sign next to the attendee's name will indicate that they have paid:
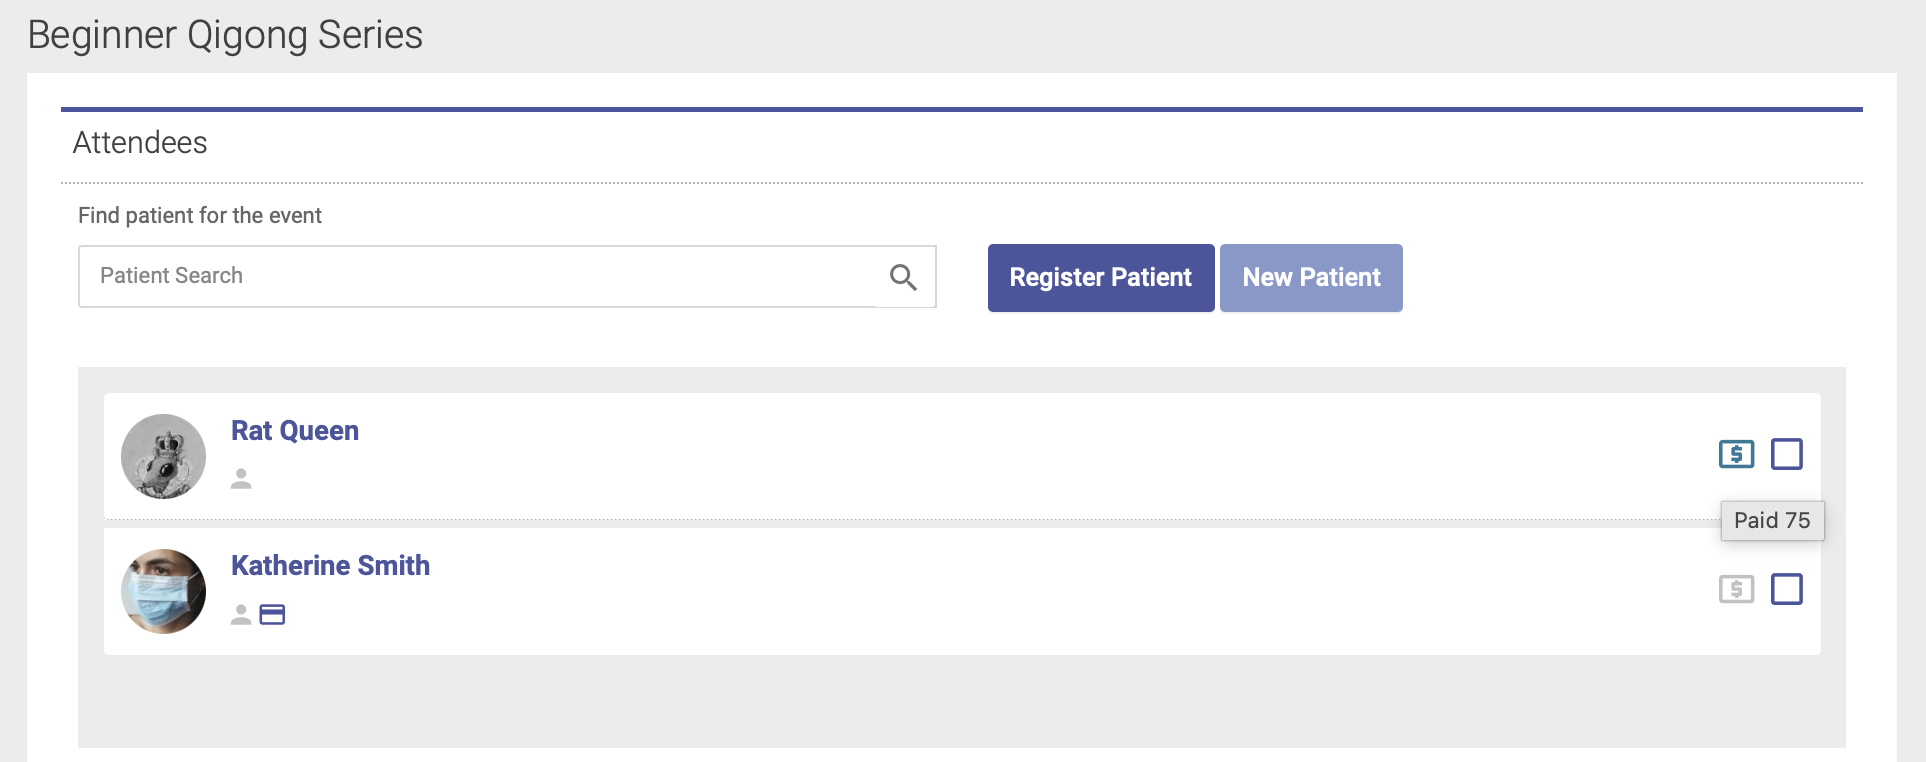
Click the checkbox next to the dollar sign to expand, then click the red Refund Payment button. If they have paid via credit card using Stripe, their payment will be refunded to their card:
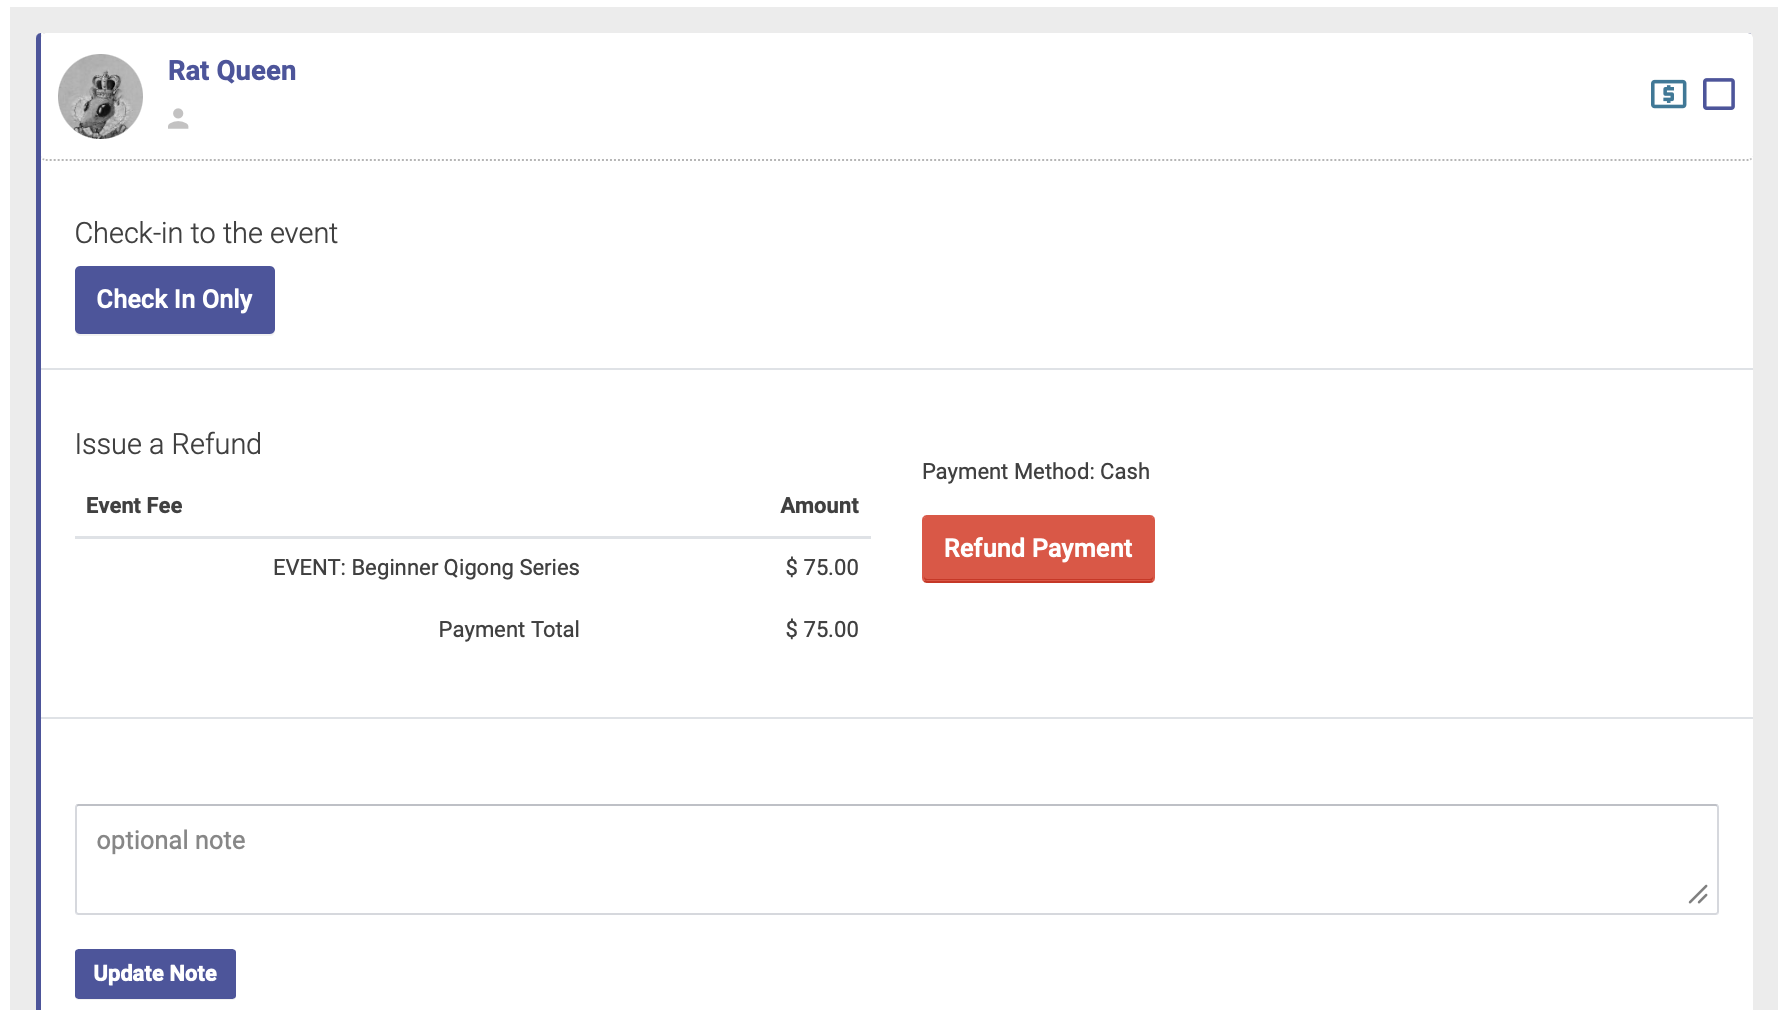
Online Events
If you're scheduling an online or virtual event, you'll enter the Event URL on the Event Setup page.
How to Create an online Event
Check the box that says "Is Online, Zoom?" and then enter your video conferencing URL (Zoom link, Google meet, etc):
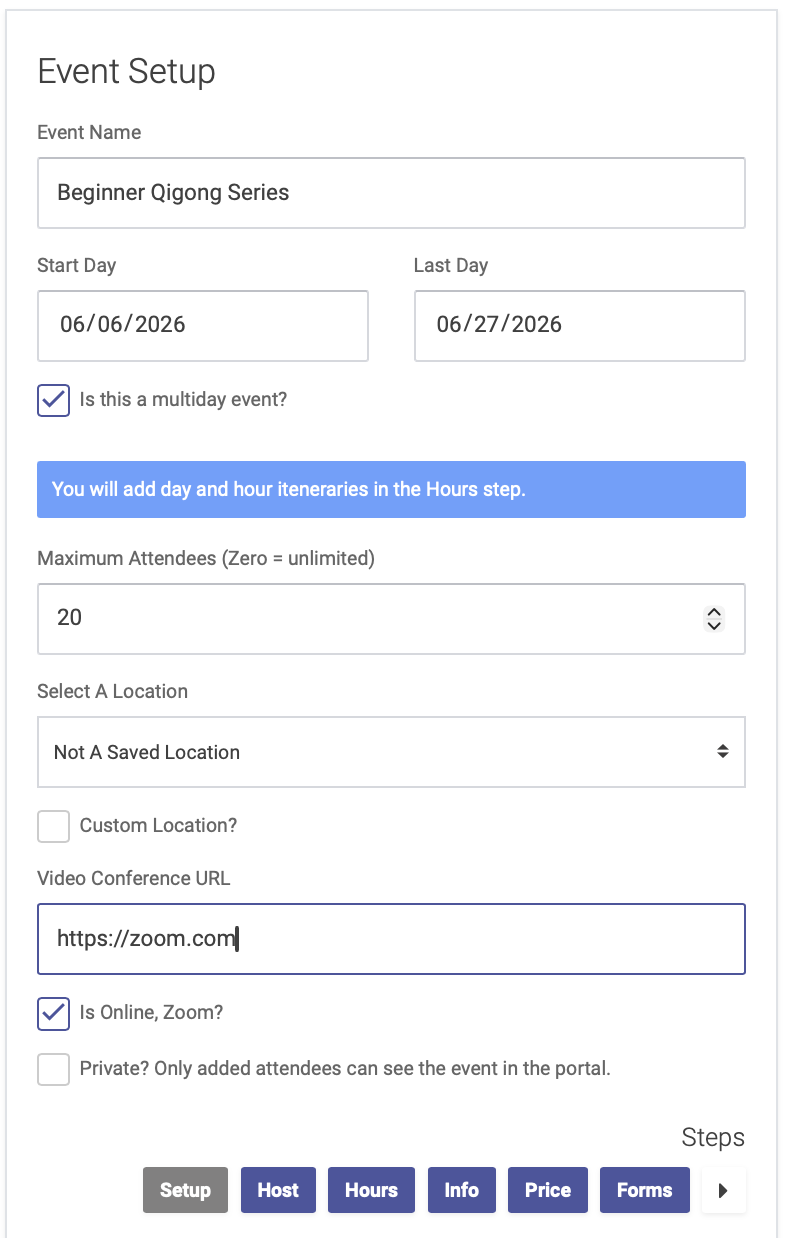
How to join an online Event
Attendees can join the online event by clicking the link, which will appear in several places:
All Events Page
The All Events page on the patient portal will list all upcoming events. Attendees can click "Join Online Event" to join:

Event URL
The individual event URL will also have an event link:

Email and SMS Notifications
We also recommend adding your video conferencing URL to your email and SMS reminders, which you can do from the Notifications tab for your Event.
Checking in Event Attendees
At the time of your Event, you'll check in attendees when they arrive, similar to checking in for an appointment.
Step 1:
Go to the Event date on the calendar, then click the Attendees tab. If an attendee has a dollar sign icon next to their name, that means they have pre-paid for the Event:
Step 2:
To check in an attendees, click the checkbox icon next to their name on the Attendees tab:
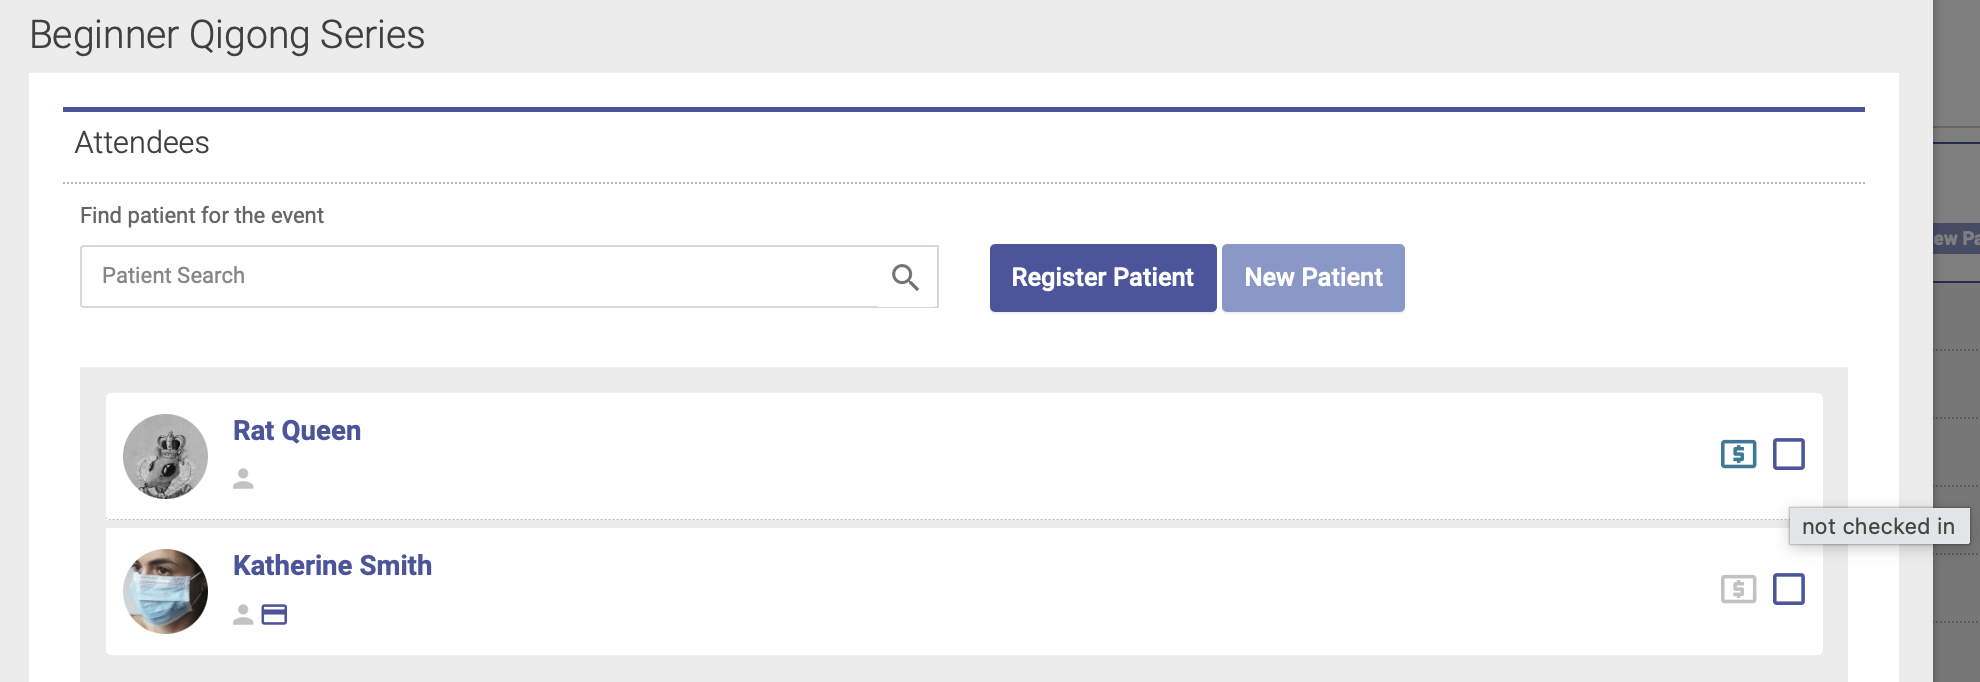
Step 3:
A window will now appear where you can check in the attendees, and complete their payment if needed:
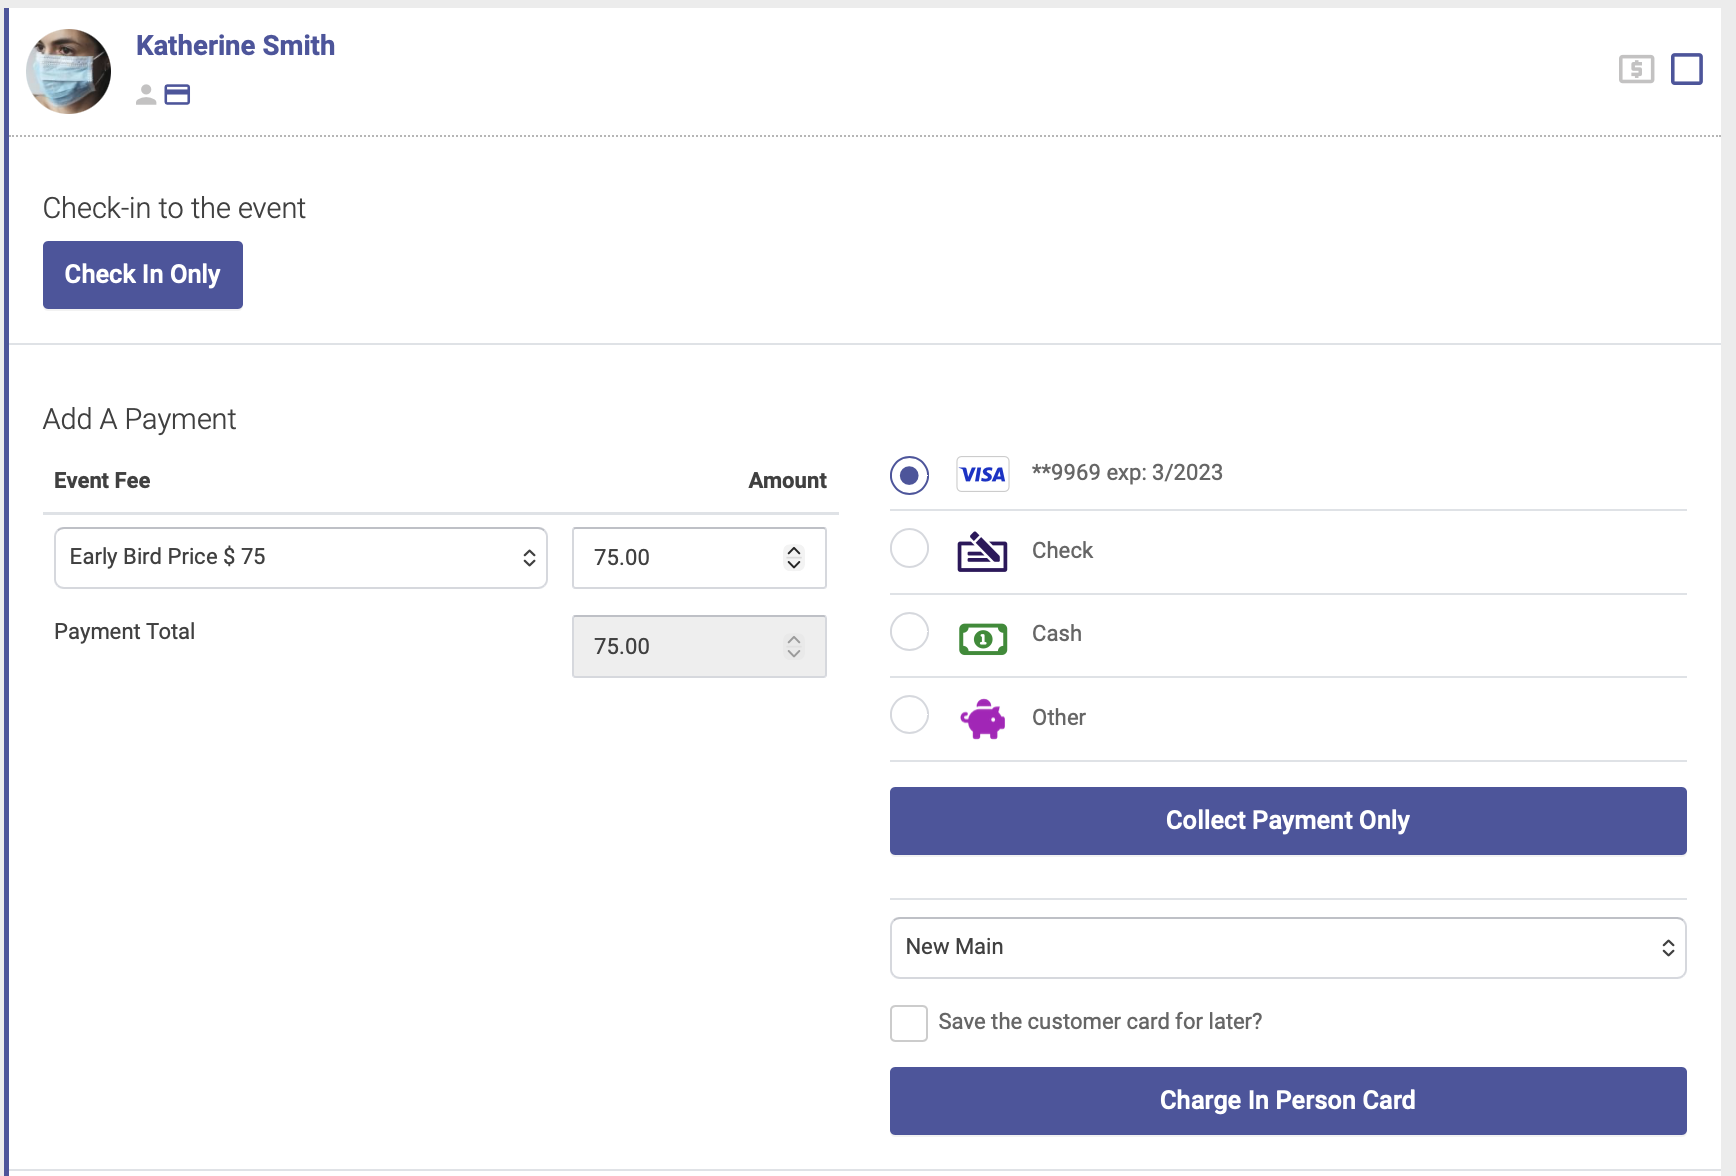
Once you've completed the checkin, a check will appear next to their name on the Attendees tab:

If your event includes EHR notes, you must check in an attendee first before recording EHR notes.
Event URL
When you create an Event in Open ACU, each Event will have its own unique Event URL which you can share on your website, social media, email newsletters, etc.
To see your Event URL, go to the Event date on the calendar. Under the Event information heading, you'll see a Event URL link:
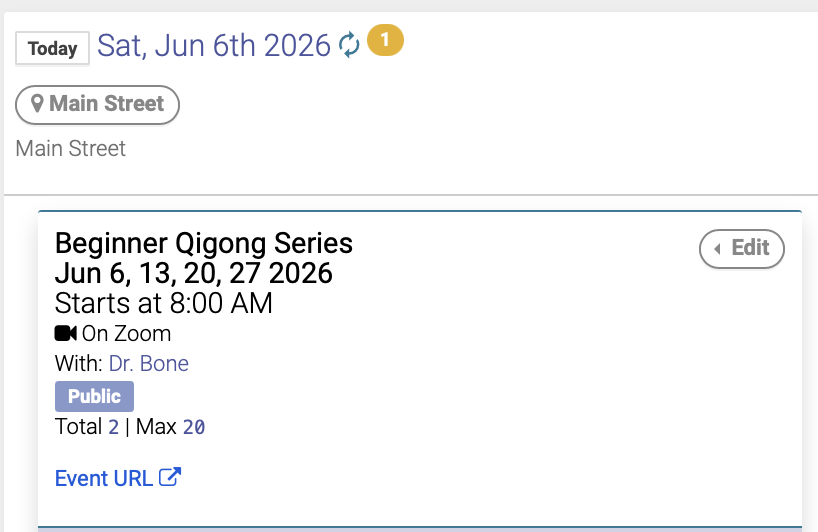
The Event URL will be housed on the Events page on your patient portal, and will contain all the information about your Event you entered when you created the Event:
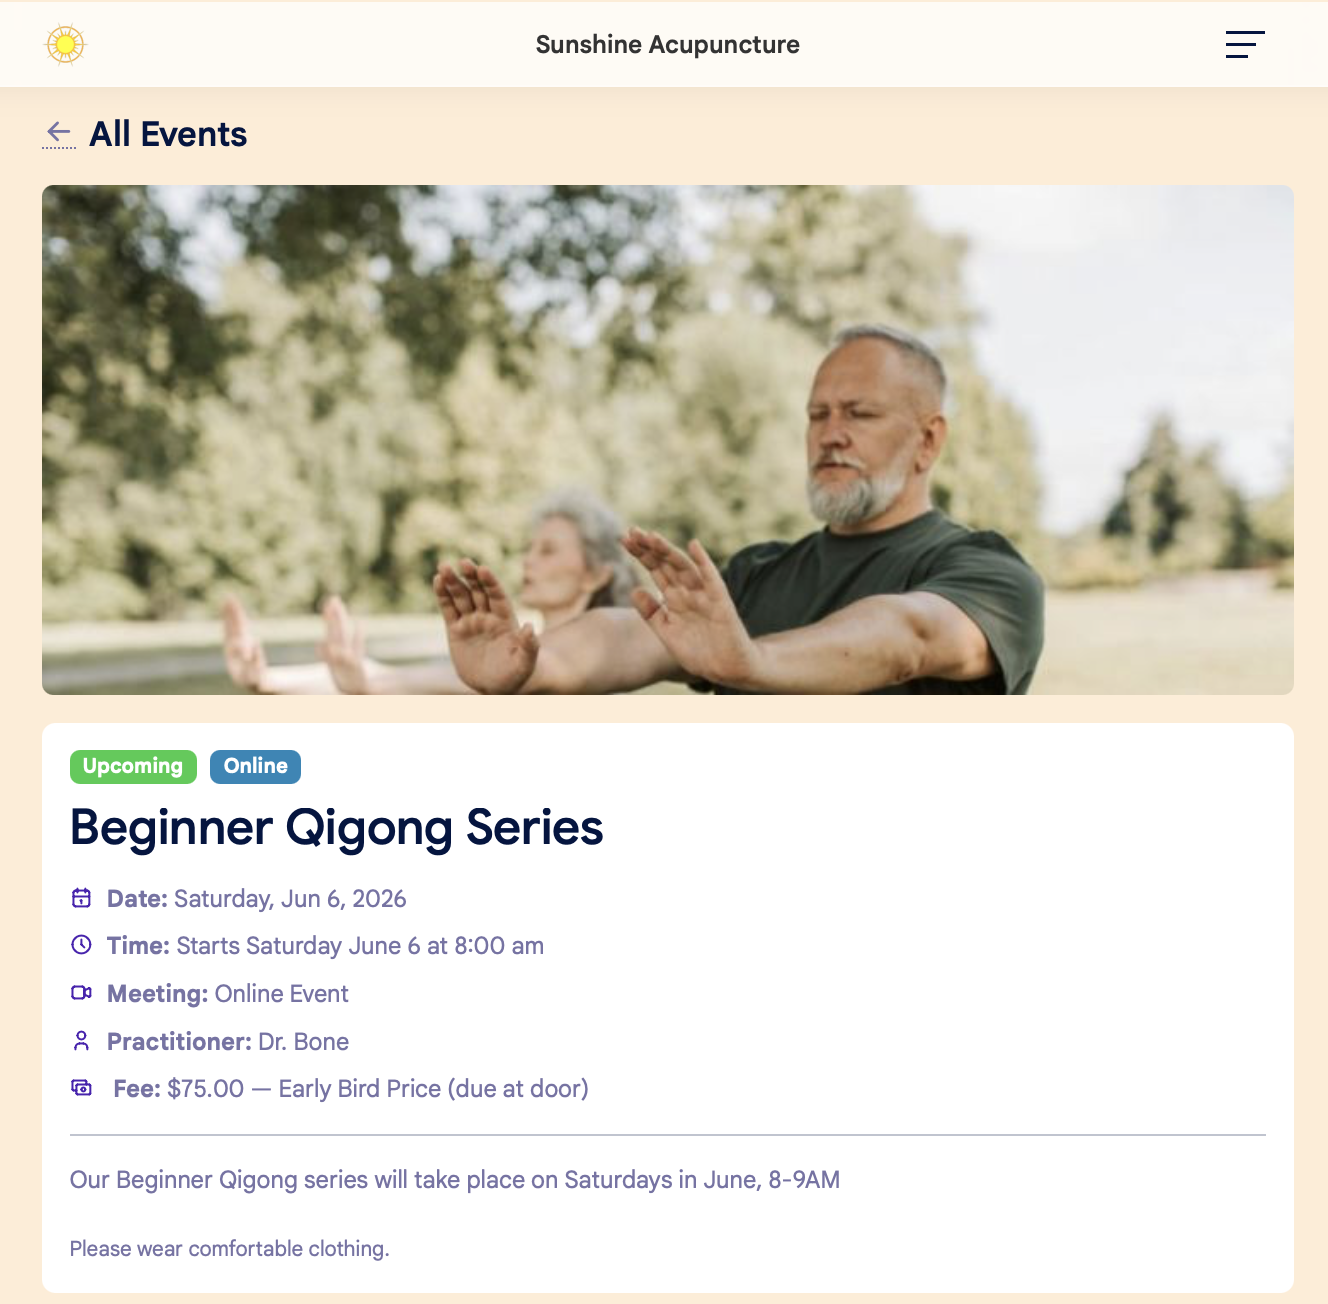
Potential attendees do NOT need to be logged in to the patient portal to view the details on the Event URL. However, they must be logged in to their patient account to register. If they don't have a patient account, they will be prompted to create one.
Remove an Attendee from an Event
To remove a registered attendee from an Event, go to the Event date on the calendar and click the Attendees tab.
Select the attendee you'd like to remove by clicking the checkbox next to their name on the Attendees tab:
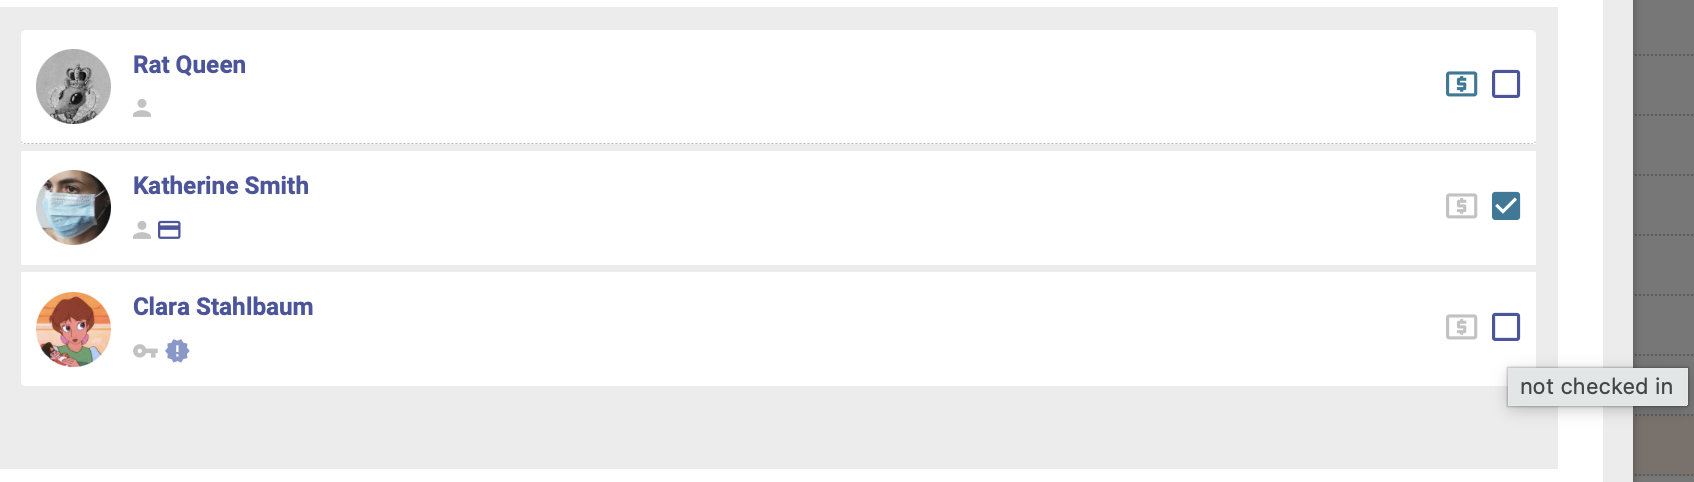
In the window that opens, click the red Remove Attendee button:
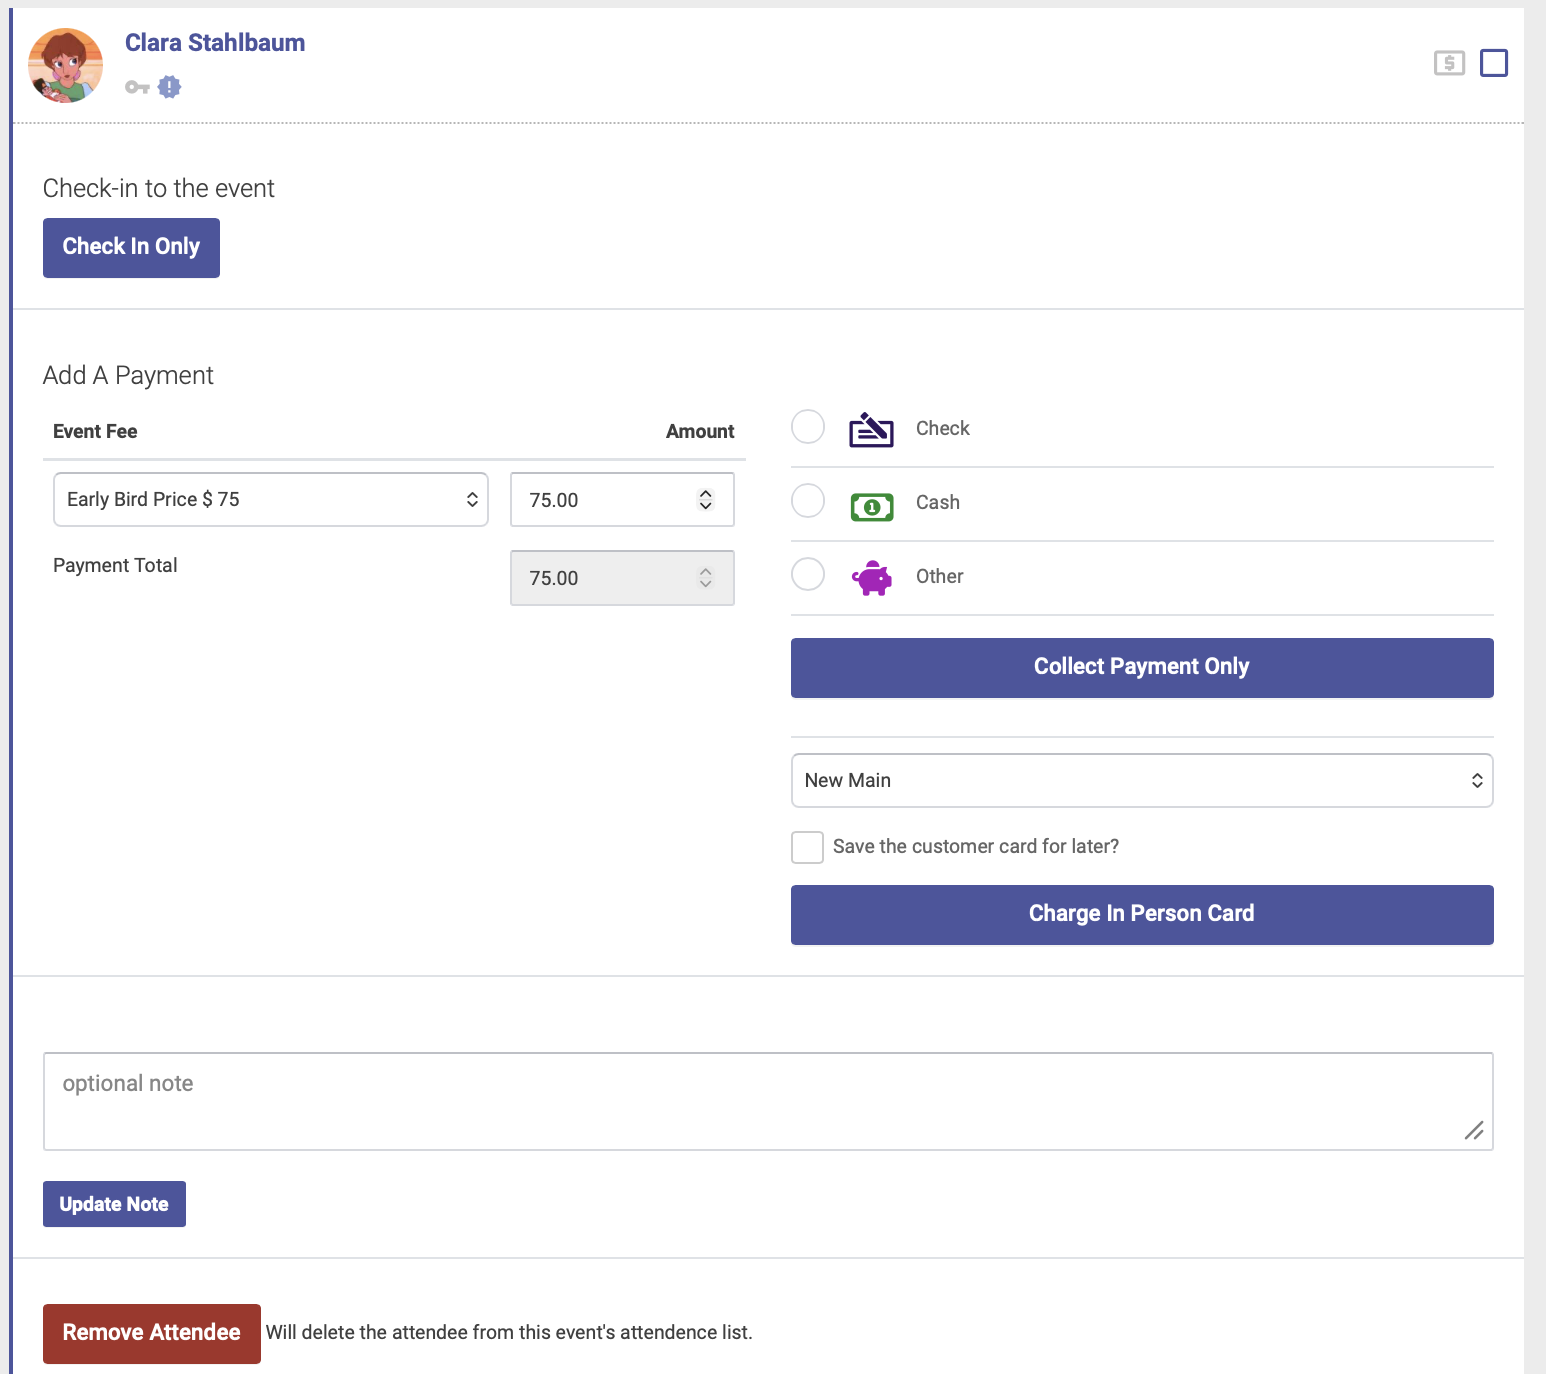
Click OK to confirm:
Cancel an Event
To cancel an Event, go to the Event date on the calendar, then click the Event tab to open the Event editor:

Click the red Cancel Event button at the top of the Event editor window: