Electronic Health Records
Use Open ACU to record secure health records.
- Treatment Codes
- Treatment Groups
- EHR Preferences
- Private EHR Note
- EHR By Block Page
- Entering EHR Notes
- EHR Appointments Page
- Viewing Treatment History
- Viewing Unlocked Records
- Printing Health Records
- Users Who Can Enter Records
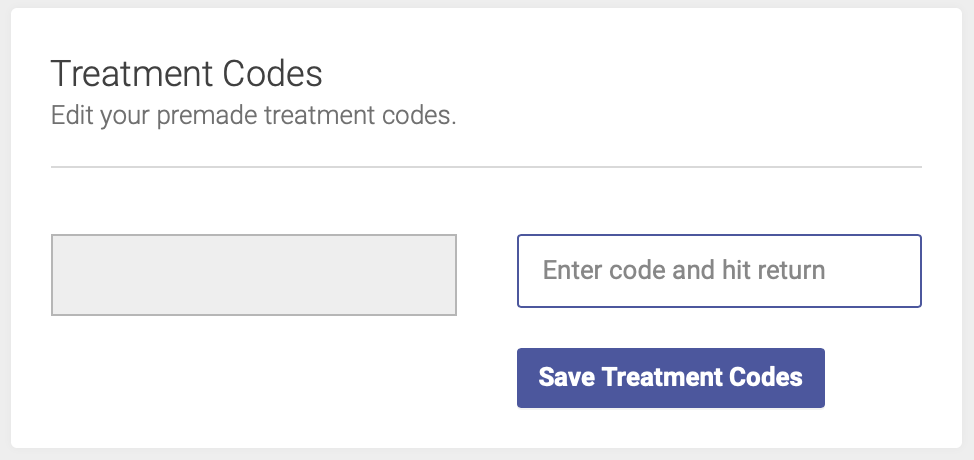
Treatment Codes
Treatment codes are shorthand for the points that a practitioner uses most frequently. Each practitioner can create their own list of treatment codes. To do so, go to EHR -> Preferences.
Any time you add or remove codes, you must click Save Treatment Codes before navigating away from the page in order to save your changes.
Here's a quick video look:
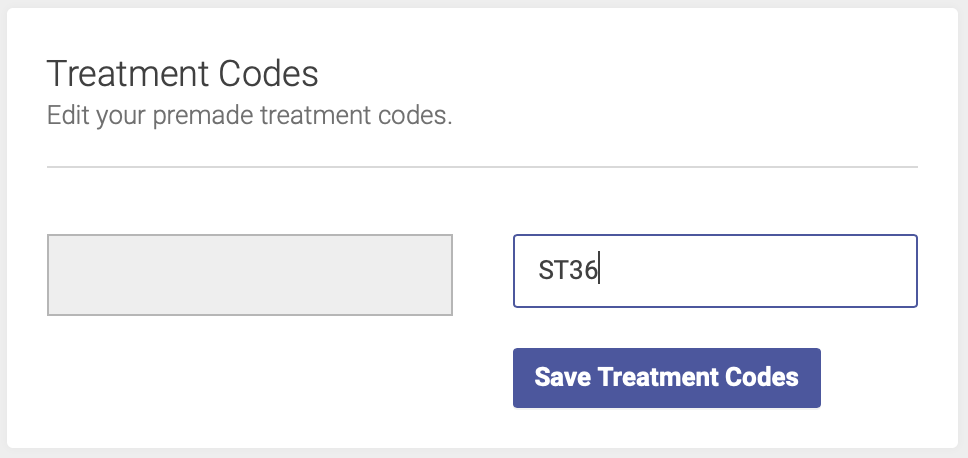
To add a code, enter the point name/abbreviation in the empty Treatment Codes box:
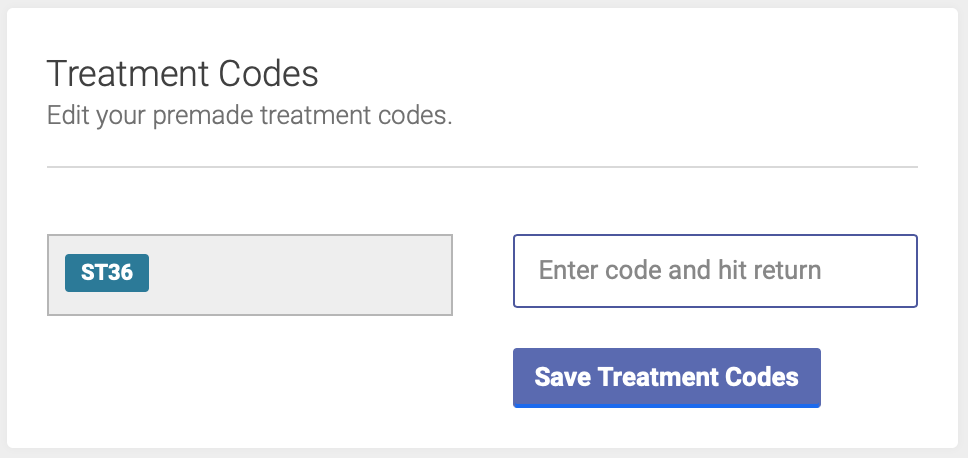
Once you hit Return, the code will be saved in your list:
Note: You can enter up to 20 alphanumeric characters for your Treatment Codes. Underscore (_) is the only punctuation allowed. If you enter a space, it will automatically correct to an underscore, i.e. "ST 36" will change to "ST_36"
To delete a code, simply click on the code abbreviation - this will remove it from your list of codes.
Remember, any time you add or remove codes, you must click Save Treatment Codes before navigating away from the page in order to save your changes.
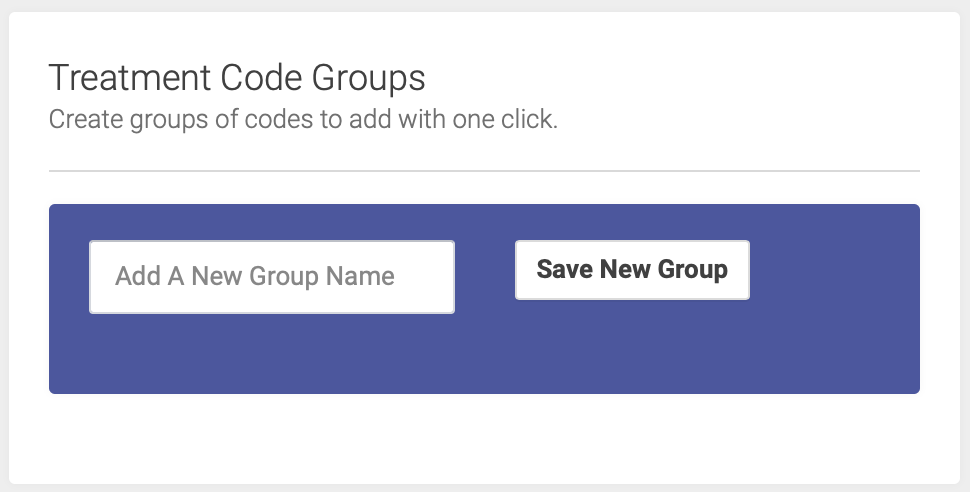
Treatment Groups
Treatment groups are your point combinations. Each practitioner can create their own list of treatment groups, based on the point combinations they use most frequently. To do so, go to EHR -> Preferences.
Any time you make changes to a Treatment Group, click Save Group to save your changes.
Here's a quick video look:
To create a group, enter the group name in the Add a New Group Name box and click Save New Group:
Once you've created some groups, you'll see a list of your groups with options to make changes to the group:
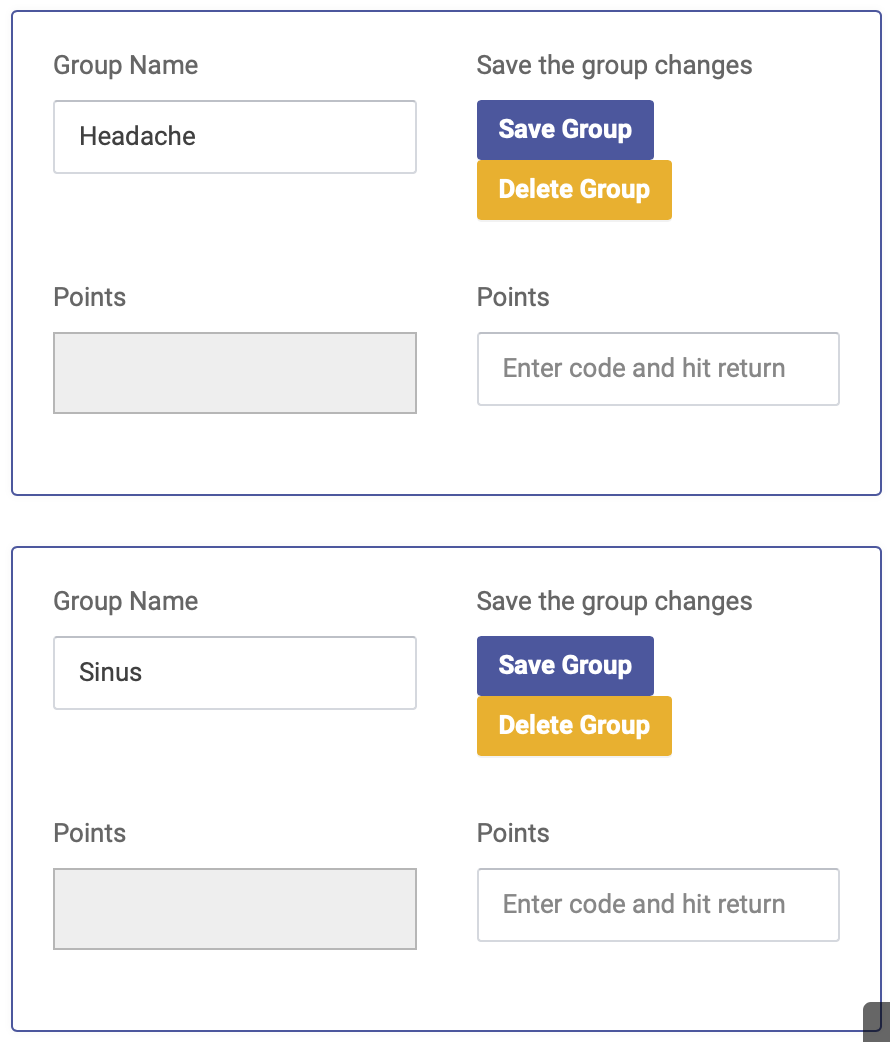
To add points to a group, enter the code for each point and hit Return. You'll see the points for each group under the group name:
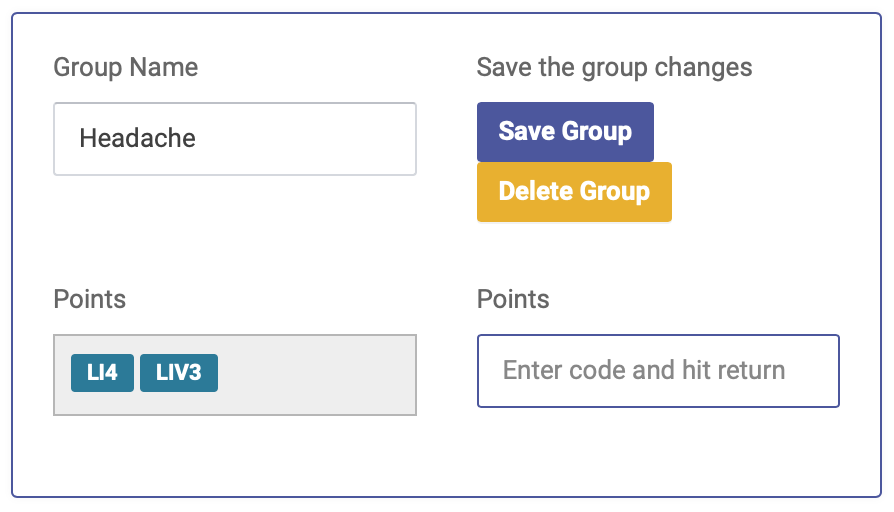
To remove a point from a group, simply click on the treatment code for that point.
Remember that any time you make changes to a Treatment Group, click Save Group to save your changes.
To delete a group, simply click the Delete group button.
EHR Preferences
Note Labels
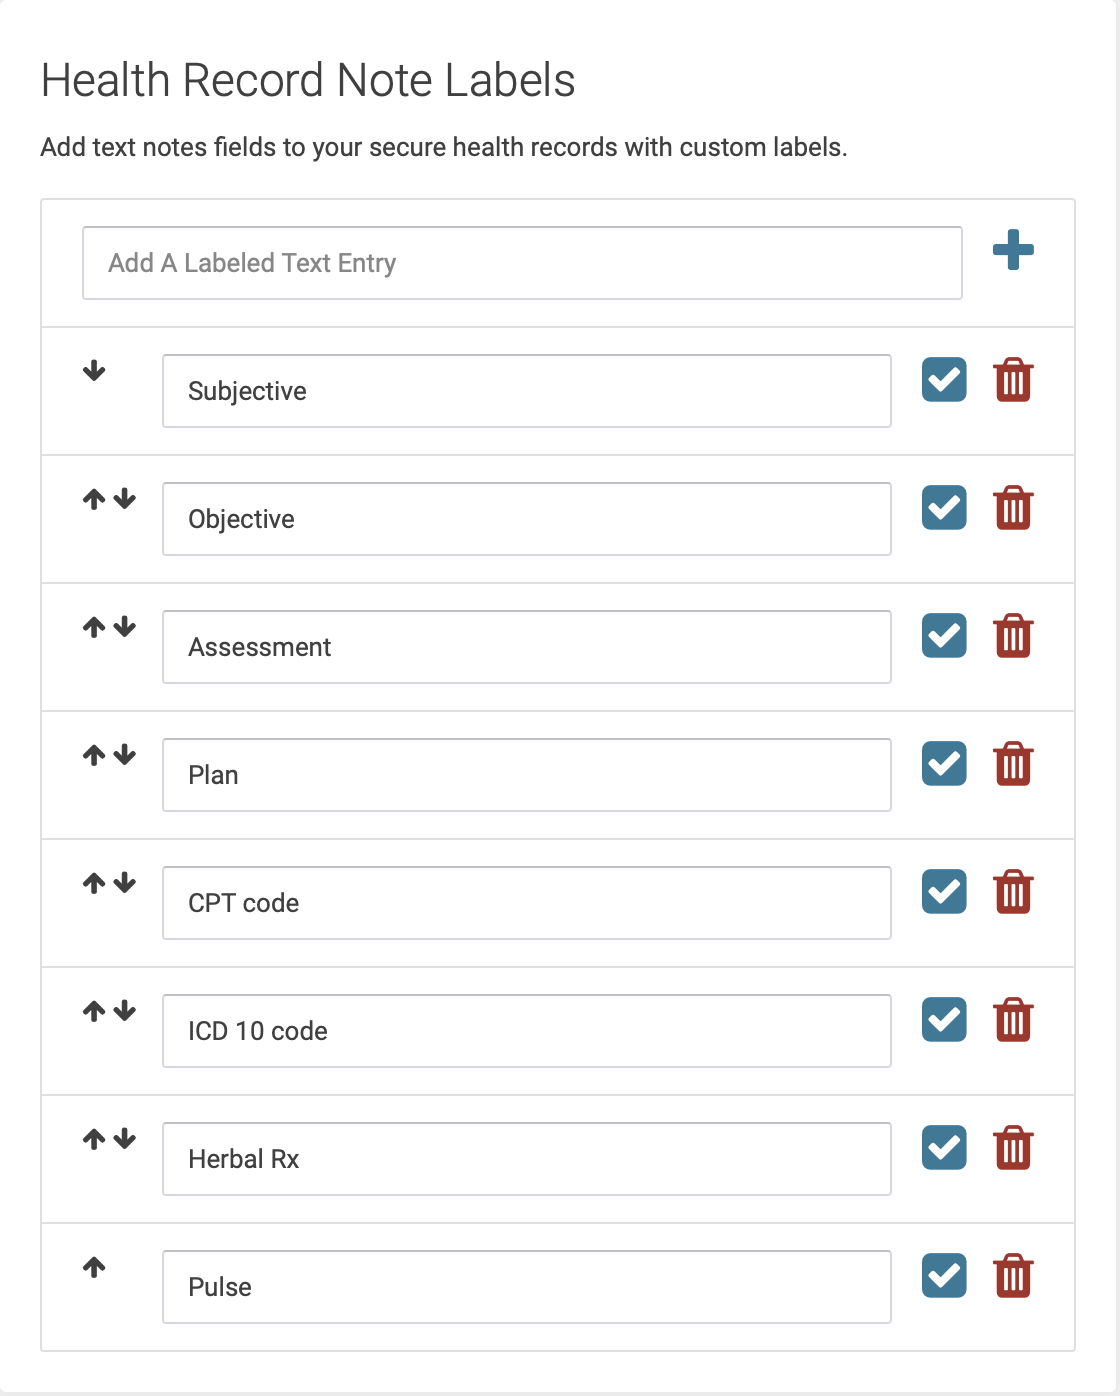
By default, your EHR notes will contain two fields: Note and Plan. If you want to add more fields, you can do that on your EHR Preferences page.
You can create up to 12 fields, and each of the fields you create will appear when you enter your EHR notes for each treatment.
You can add or delete fields, and use the arrows to change the order in which your fields appear in your EHR notes.
This is what you'll see on the EHR Preferences page, where you create your Note Labels:
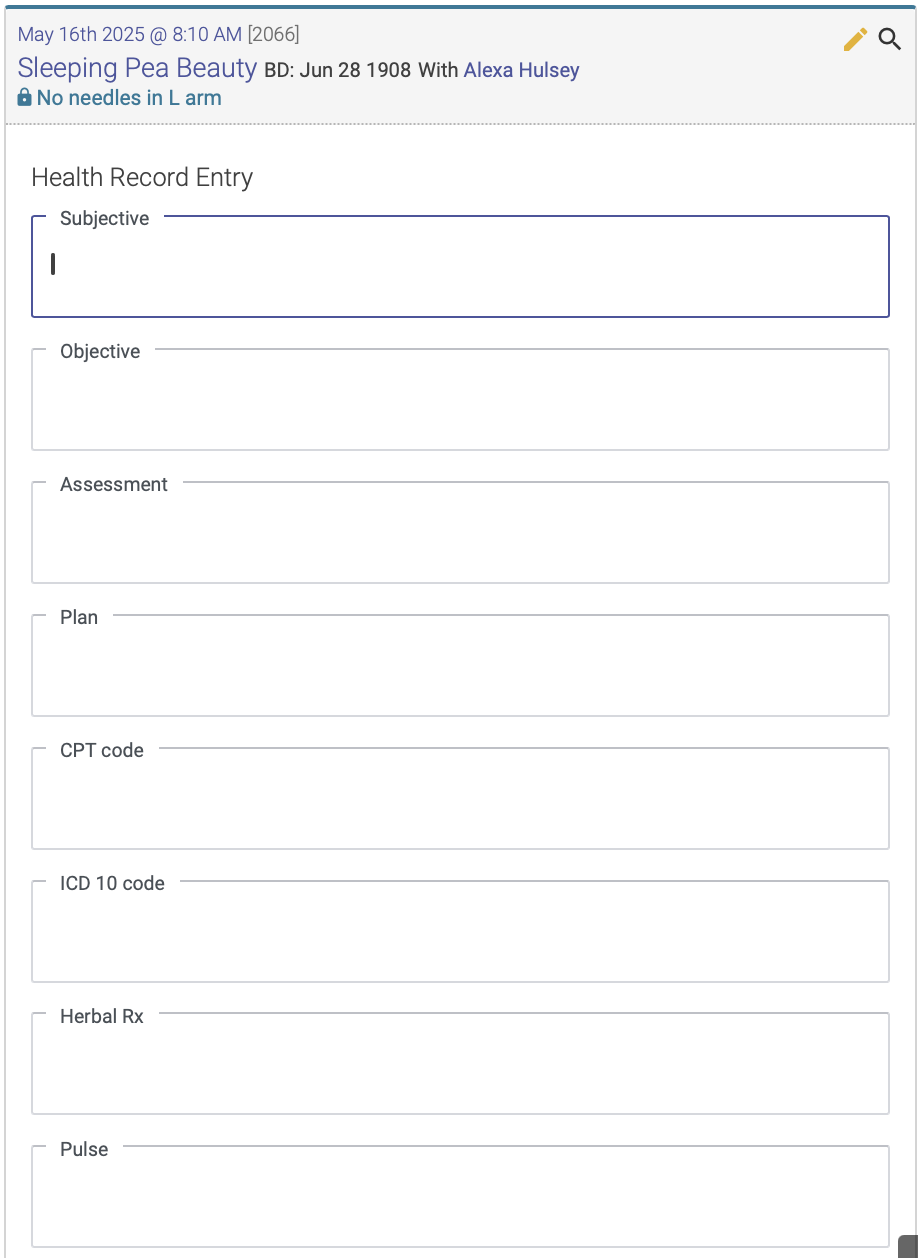
This is how it will appear when you enter a chart note:
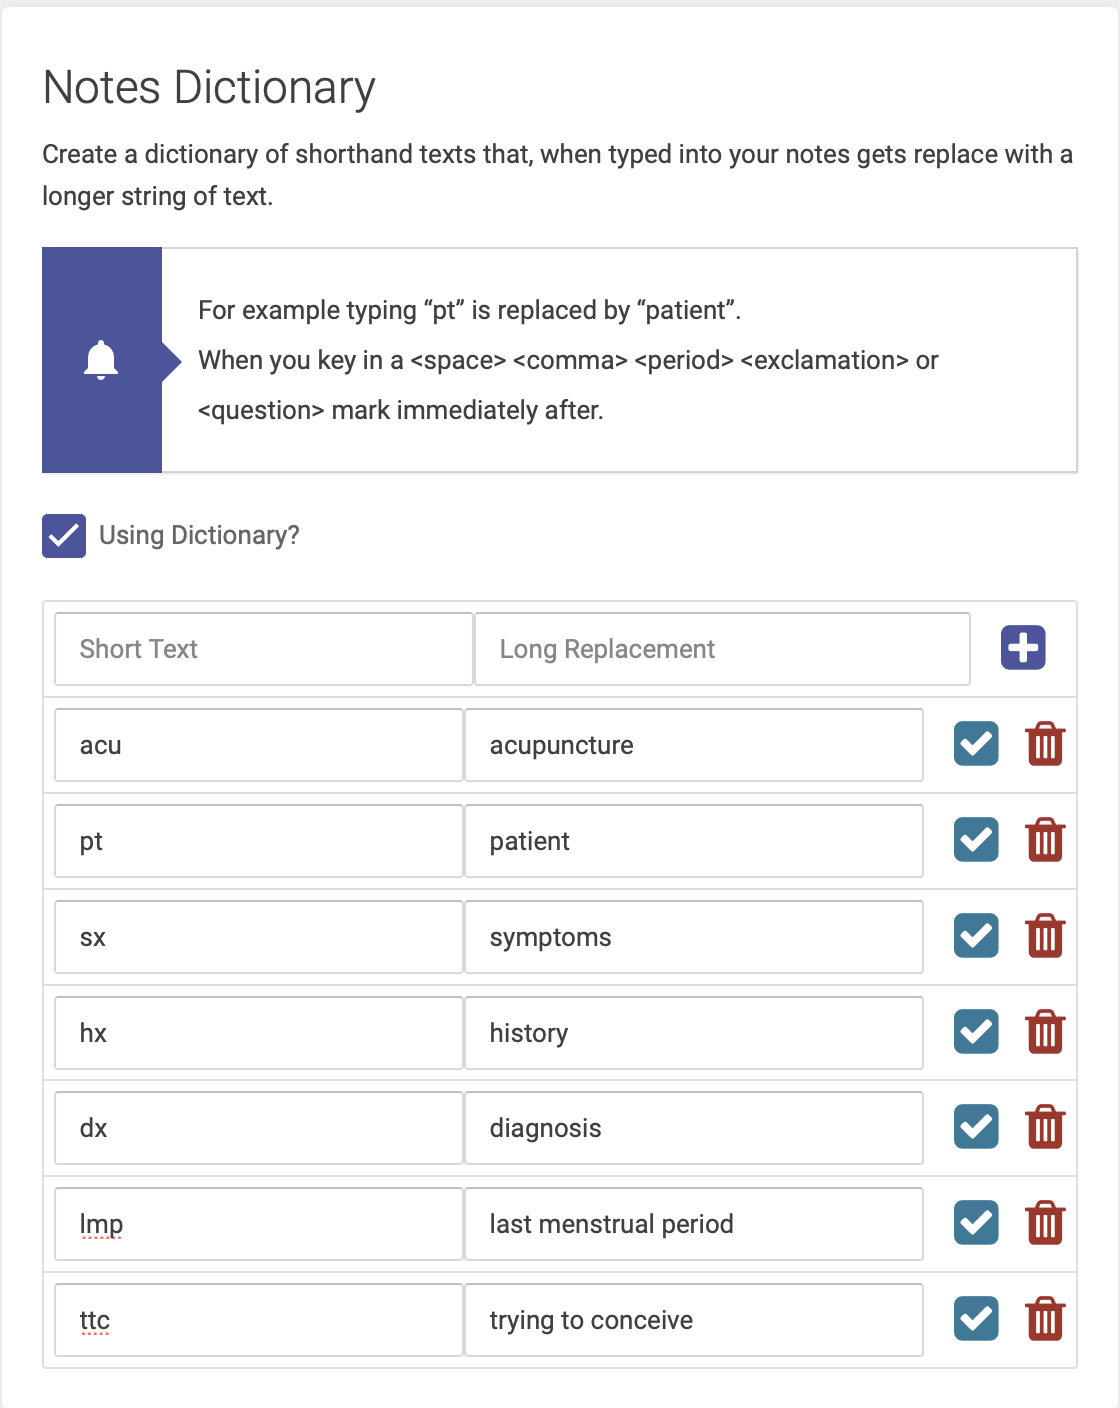
Notes Dictionary
The Notes Dictionary gives you the ability to create text shortcuts for faster charting. For example, you can type "pt", and it will automatically convert to "patient" in your EHR note.
To enable the Notes Dictionary, check the "Using Dictionary" checkbox. Then create your list of text shortcuts in the table, by entering the short text and long replacement:
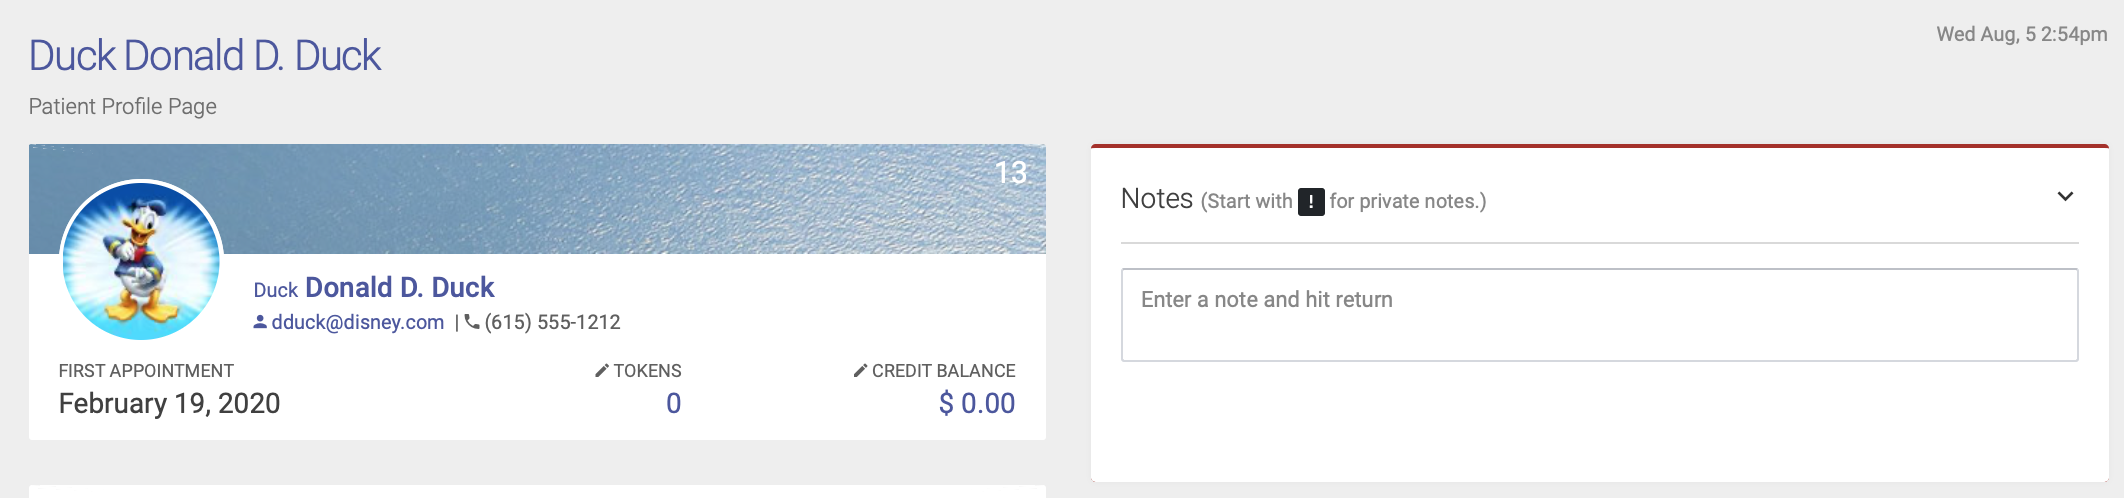
Private EHR Note
Private EHR notes can be viewed by users with Practitioner permissions by not by Admin users. The private EHR note should be used to document medical or treatment-related information that needs to be viewed on an ongoing basis.
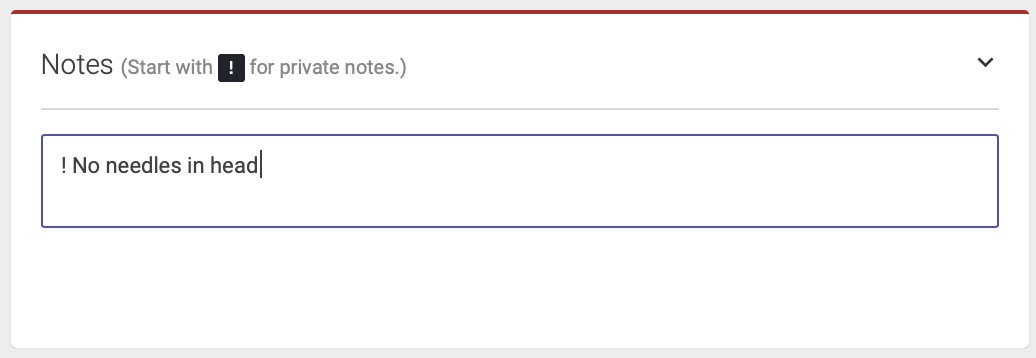
For example, let’s say a patient has a strong adverse reaction anytime needles are placed in his head, so you want practitioners to avoid needling the head. You’d want every Practitioner to be aware of this, but it’s not something relevant for Admin users. So you’d document this as a Private EHR note.
To record a Private EHR note, click on the patient’s name from either the schedule or the EHR. This will take you to their patient profile page, where you’ll use the Notes section in the upper right corner:
Type an exclamation point (!) first, and then enter the note. Enter return to save your note:
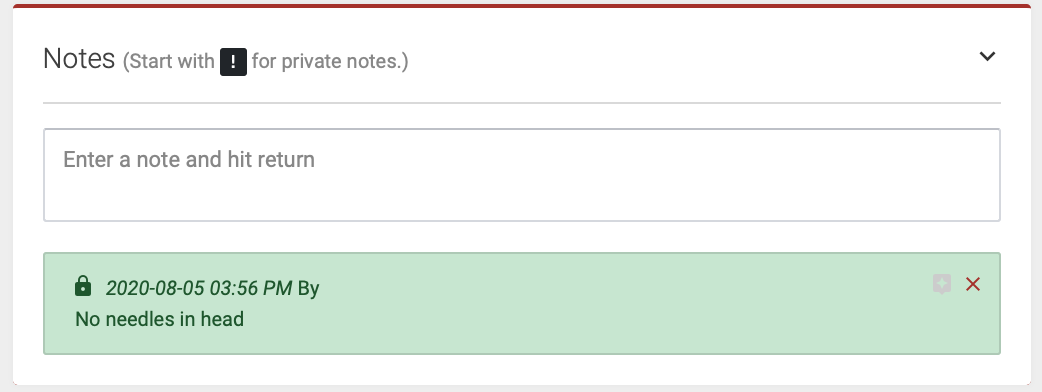
The Private EHR Note will now appear on the patient profile page, but only users with Practitioner permission will be able to see it:
The Private EHR Note will also appear under the patient’s name on the EHR:

To delete a Private EHR Note, simply click the red X next to the note entry on the patient profile page.
EHR By Block Page
The EHR By Block page is where practitioners can enter their EHR notes. Notes can also be entered on the EHR Appointments page. Select the practitioner and click Search to show a list of blocks:
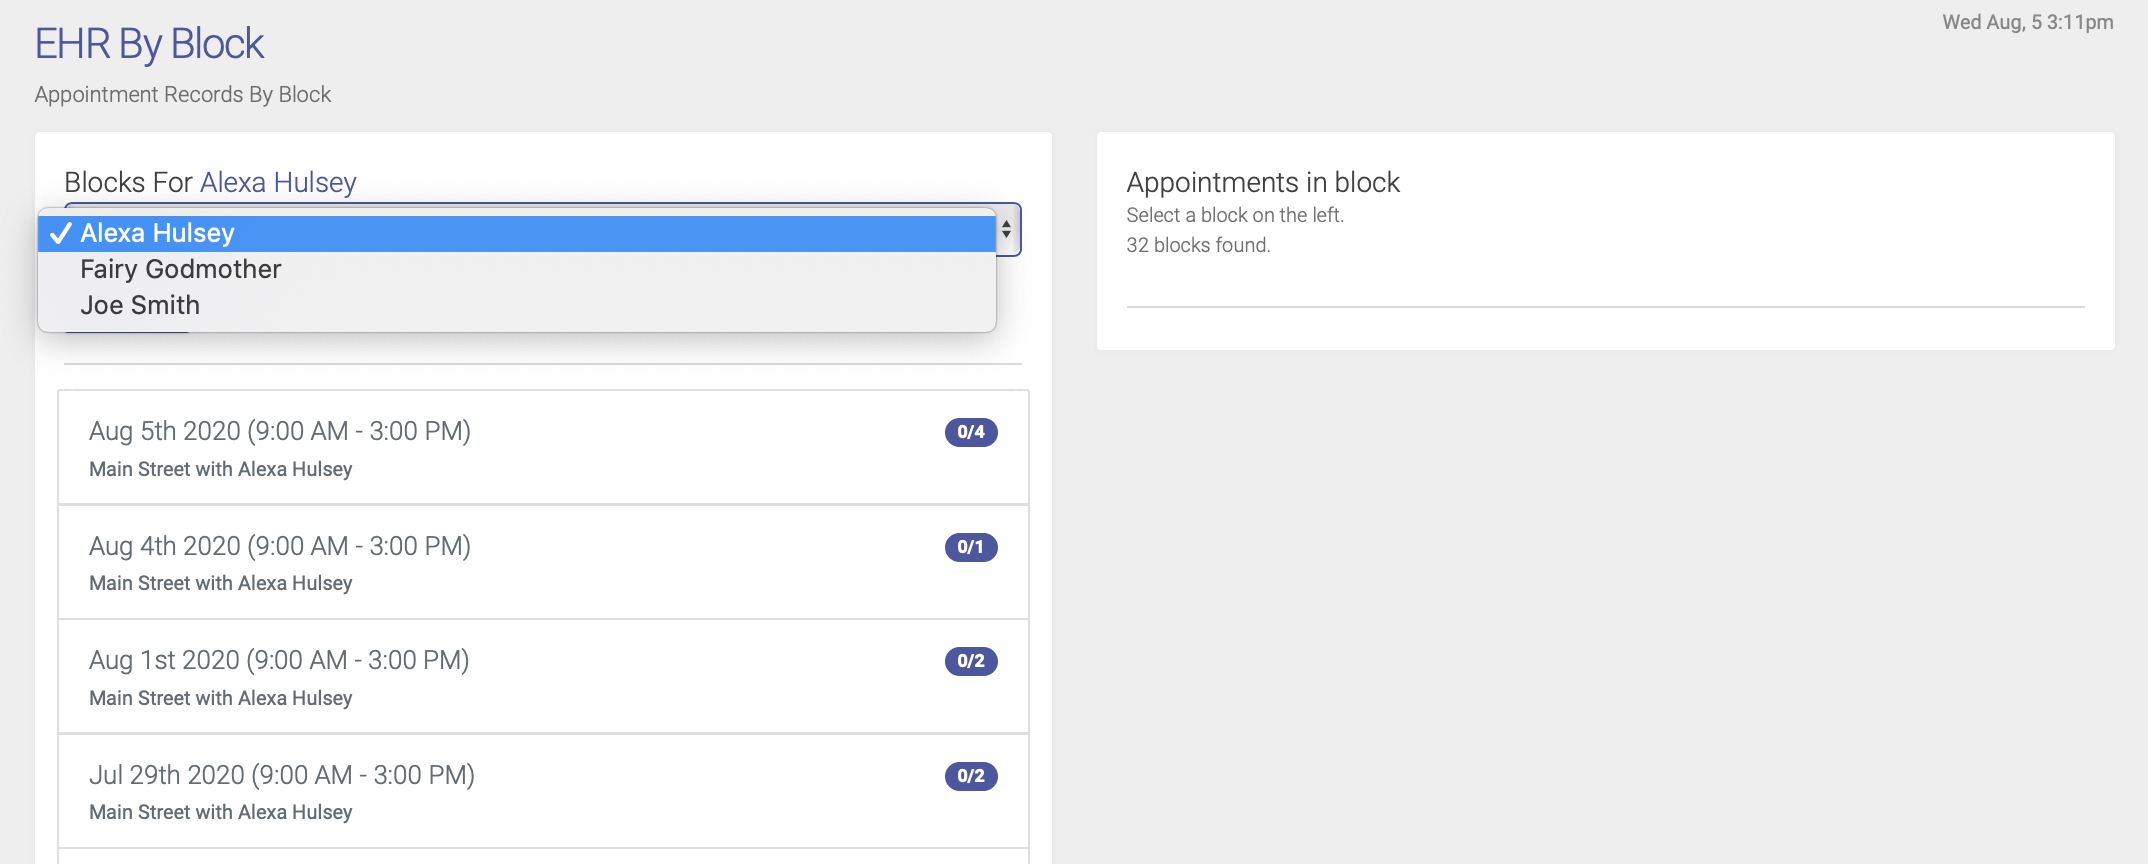
The counter next to each block date shows the number of records that have/have not been completed for each block.
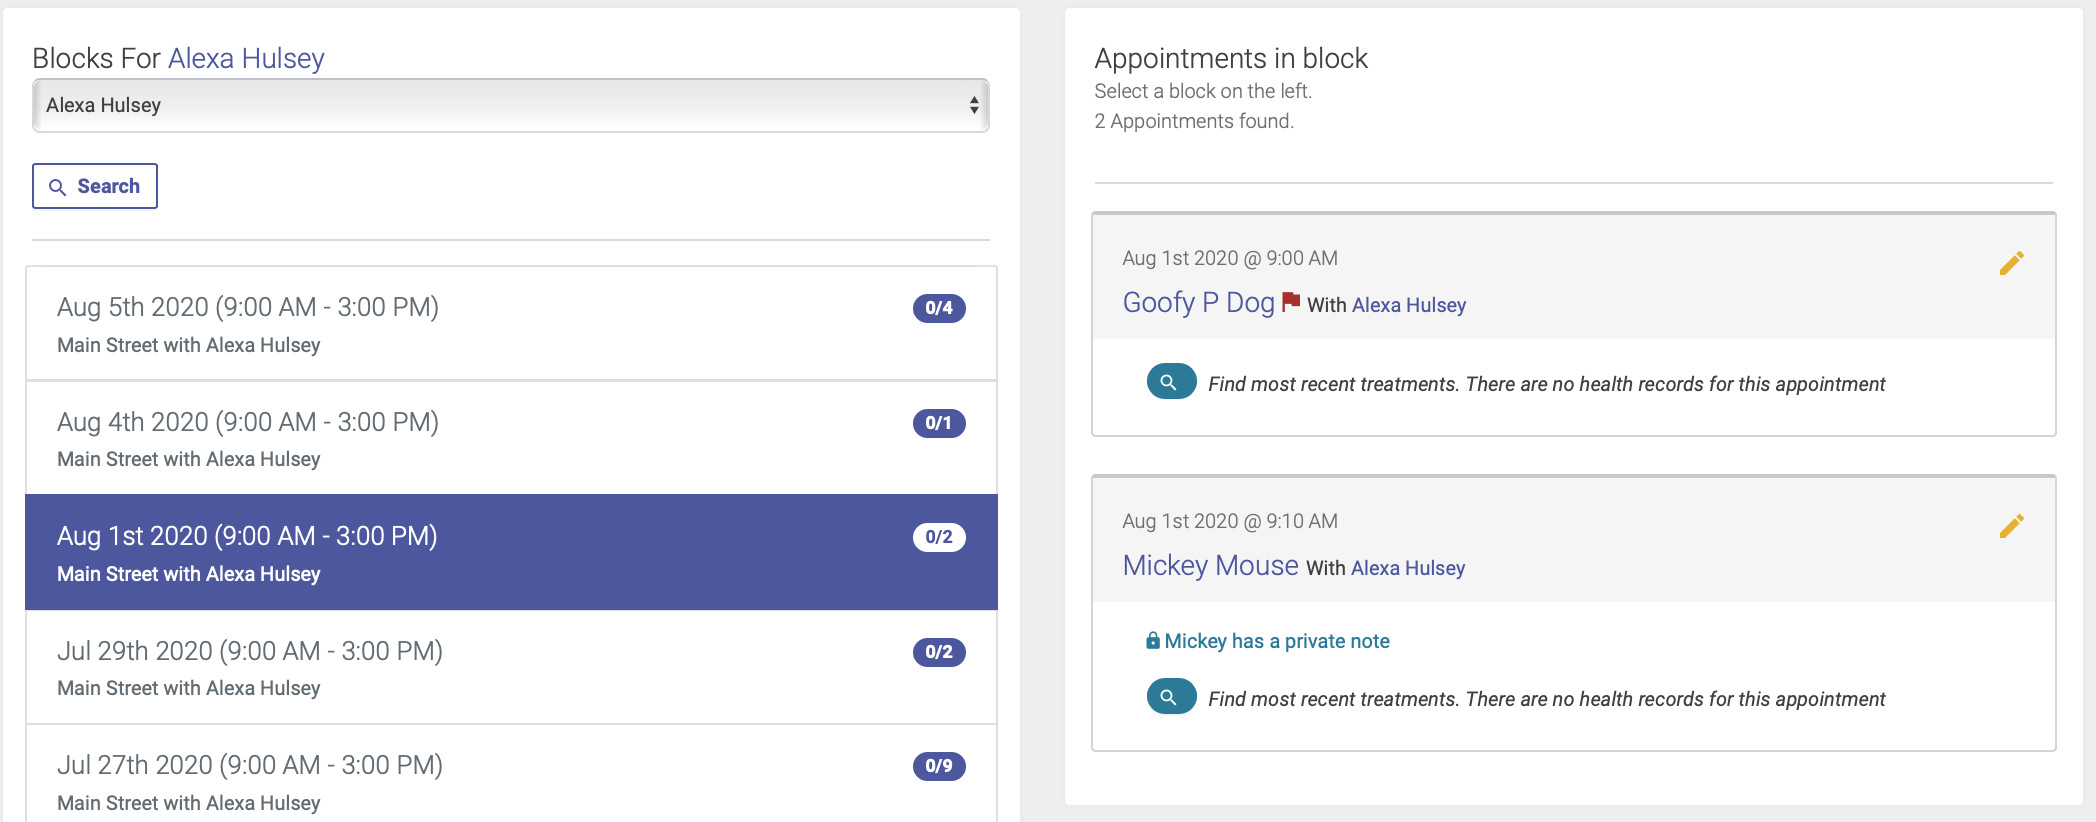
Click on a block to view the appointments for each block page and enter your notes:
Entering EHR Notes
You'll enter your EHR notes from the EHR By Block page or the EHR Appointments page.
Here's a quick video look at how it works:
Entering a New Note
To enter an EHR note, click on the pencil icon next to the patient’s name:
The Health Record Entry fields will appear. The format for the fields is based on your clinic’s EHR preferences, and will appear in either in plain field format:

Or in SOAP format:
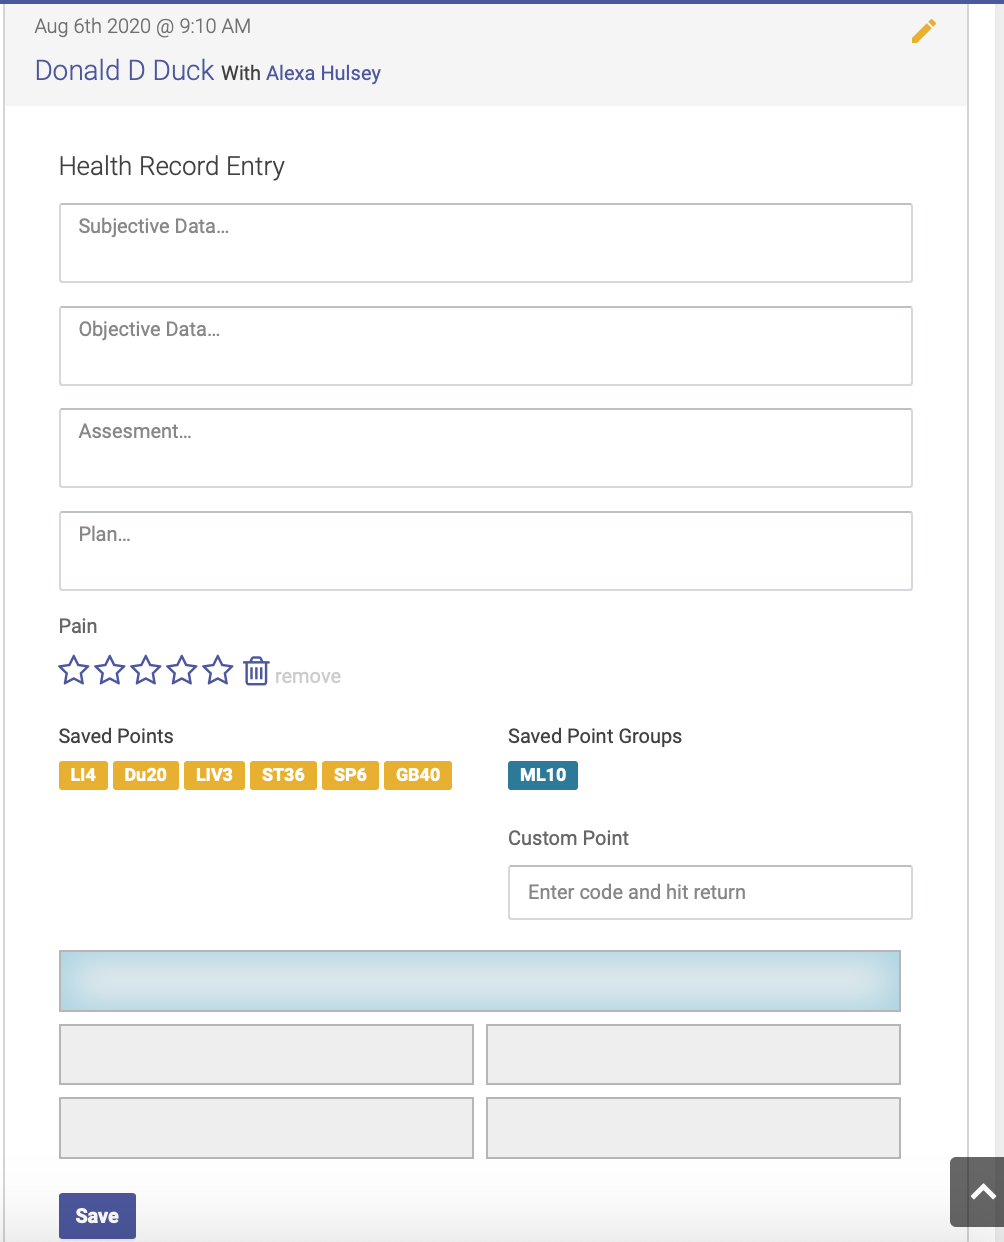
Complete each field, and add your points. First highlight the field for the area of the body: use the top box for head points or bilateral points, and the four quadrant fields for distal or unilateral points. Then click on your saved points or saved point groups to populate each field with points. You can also add points that aren’t saved in your list of treatment codes by using the custom point box.
Make sure you click Save after you've added or changed points. The points will not be saved in the record without doing so. Even if you Lock the records.
Repeating Past Treatments
You can repeat a prior treatment from either the EHR Blocks or EHR Appointments page.
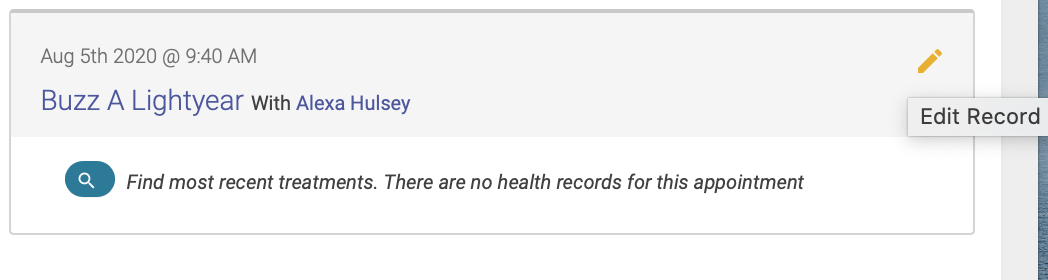
To repeat a past appointment, first you'll need to click on the magnifying class by the patient's name to view their treatment history:
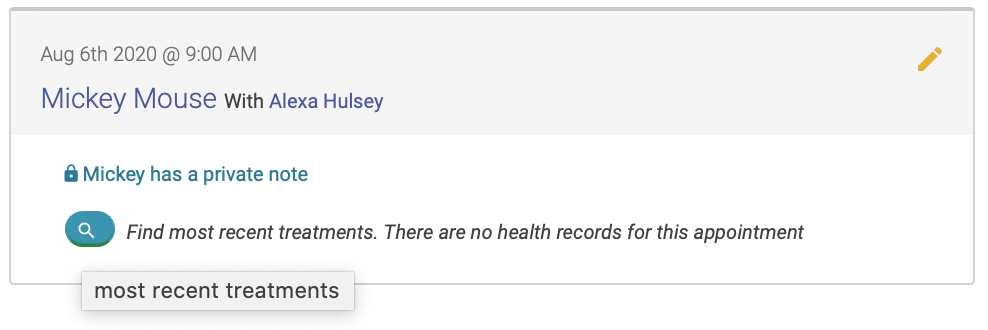
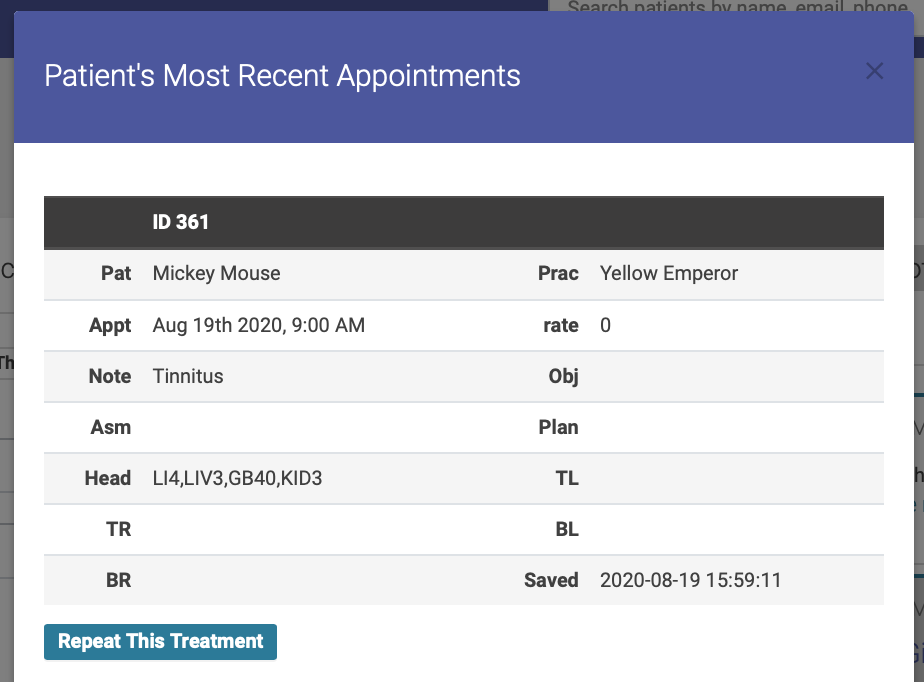
Their treatment history will appear in a popup modal. Simply click "Repeat This Treatment" below the treatment you'd like to repeat:
You can then modify your treatment notes and point selections before saving and locking.
Locking Notes
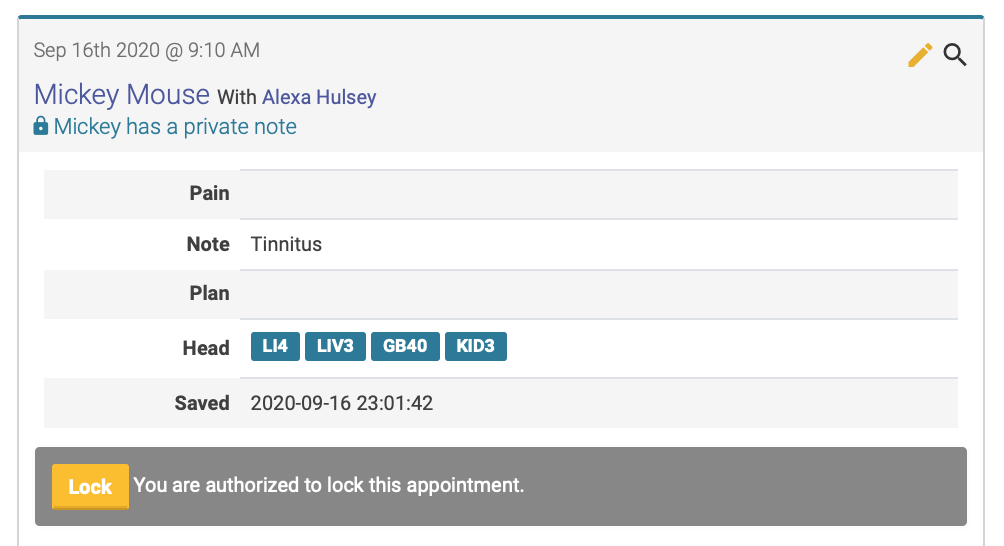
Once you've entered a complete treatment note, you should finalize your entry by locking the note.
Once you've locked a note, you will be unable to make any further modifications to the note. This ensures the security of your EHR records.
Before you lock a note, you'll see a yellow Lock button below your note entry for that treatment:
Once you've locked a note, the locked record will be date and time stamped:

Adding a Note Addendum
To add an addendum to a locked Note, enter your text in the field below the locked time and date stamp, then hit return. This will save your addendum, and add a time and date stamp:

EHR Appointments Page
The EHR Appointments page is where practitioners can enter their EHR notes. Notes can also be entered on the EHR By Block page.
Select your date range, location and practitioner and click Search to show a list of appointments:

Simply click the pencil icon next to a patient's name to enter your notes.
Viewing Treatment History
You can view a patient’s treatment history, including notes entered by any practitioner for all past appointments, from the EHR Blocks page, the EHR Appointments page, or the Patient Profile page.
EHR Blocks page
To view a patient’s EHR history from the EHR Blocks page, click on the magnifying glass icon below the patient’s name to view their most recent treatments:

Once you click the icon, a modal will appear showing their most recent treatments:

You can also repeat the notes from a previous from this popup modal.
EHR Appointments page
You can view a patient’s EHR history from the EHR Appointments page in the same way as you would from the EHR Blocks page. Click on the magnifying glass icon below the patient’s name to view their most recent treatments.
Patient Profile page
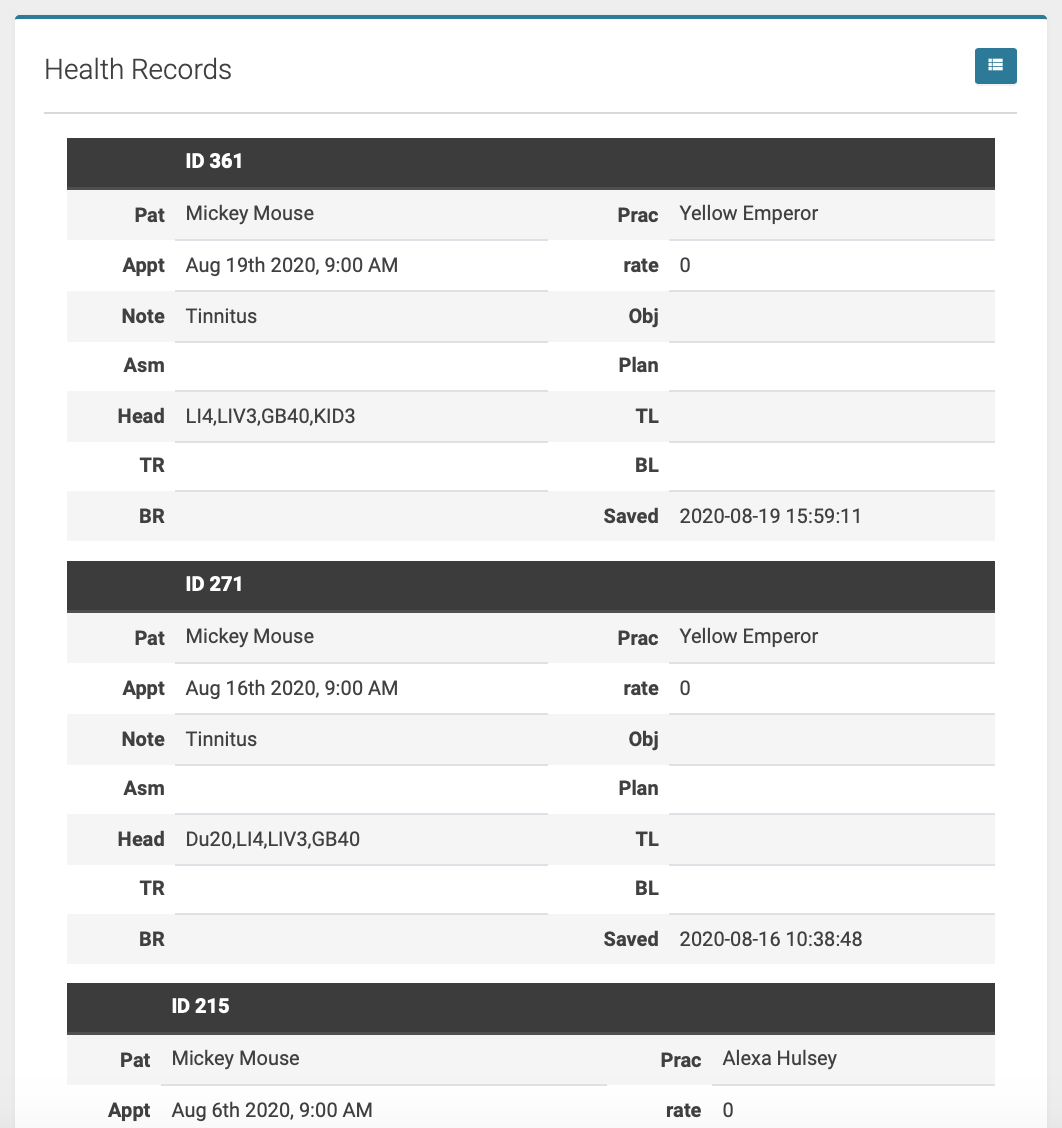
To view a patient’s EHR history from the Patient Profile page, click on the Health Records icon below their name and details:
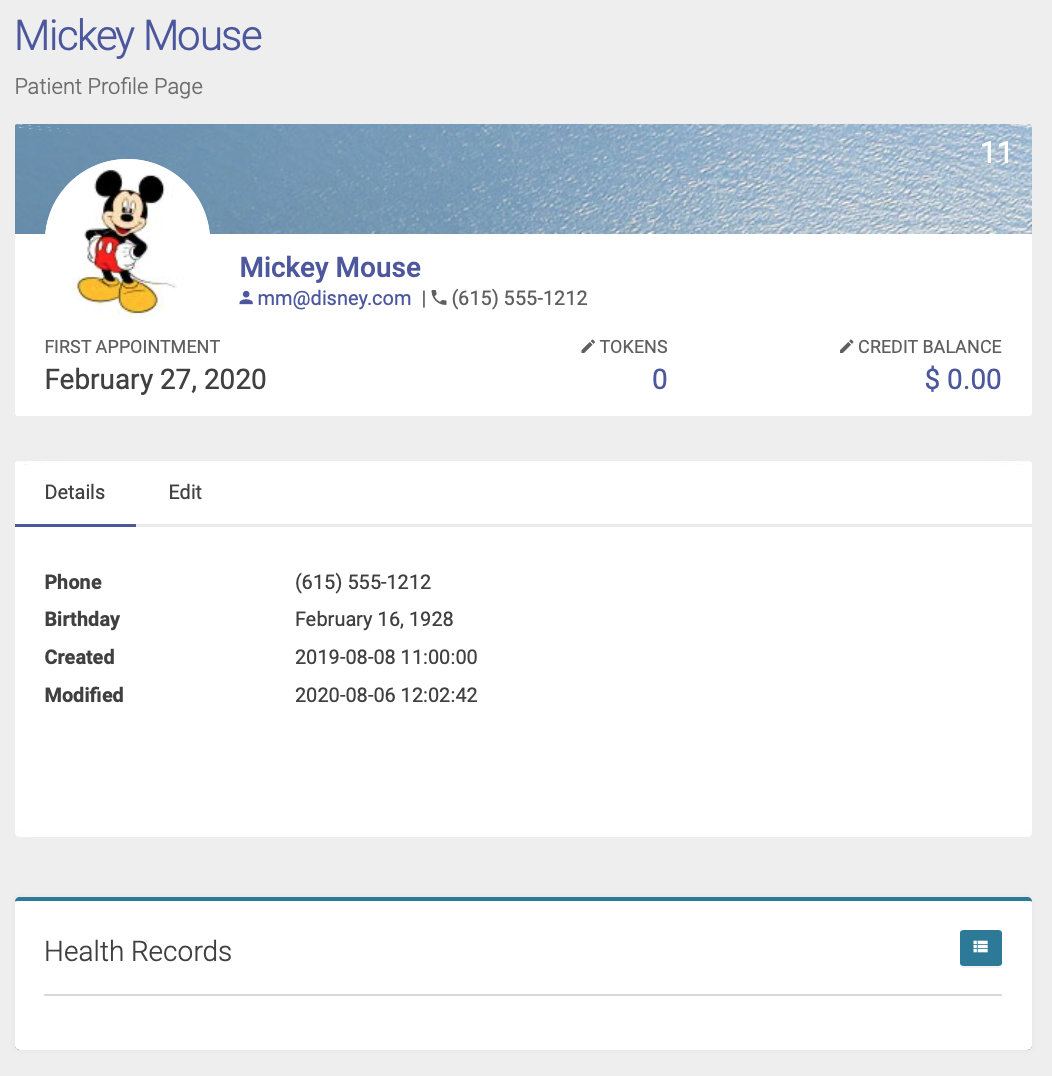
You’ll then see their most recent appointment records with EHR records:
Viewing Unlocked Records
To view a list of health records that have not yet been approved and locked, go to the EHR Appointments page.
Enter your date range and check the box that says Unlocked Records Only: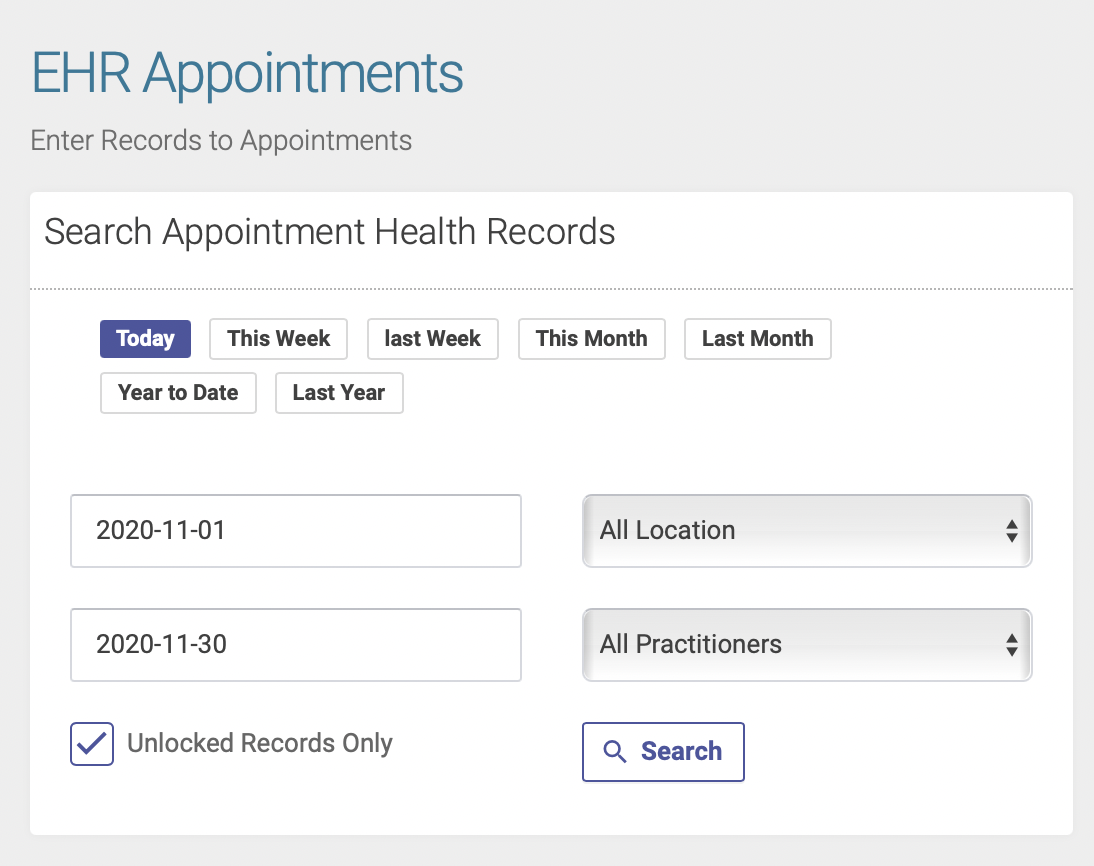
The list of records that need to be approved and locked will appear to the right.
Printing Health Records
If you need to print a patient's health records, you'll do so from the Patient Profile page.
Once you're on a patient's profile page, click the printer icon next to the patient's name at the top of the page:
![]()
A date range search box will appear. Enter your date range and click the magnifying glass to see your search results:
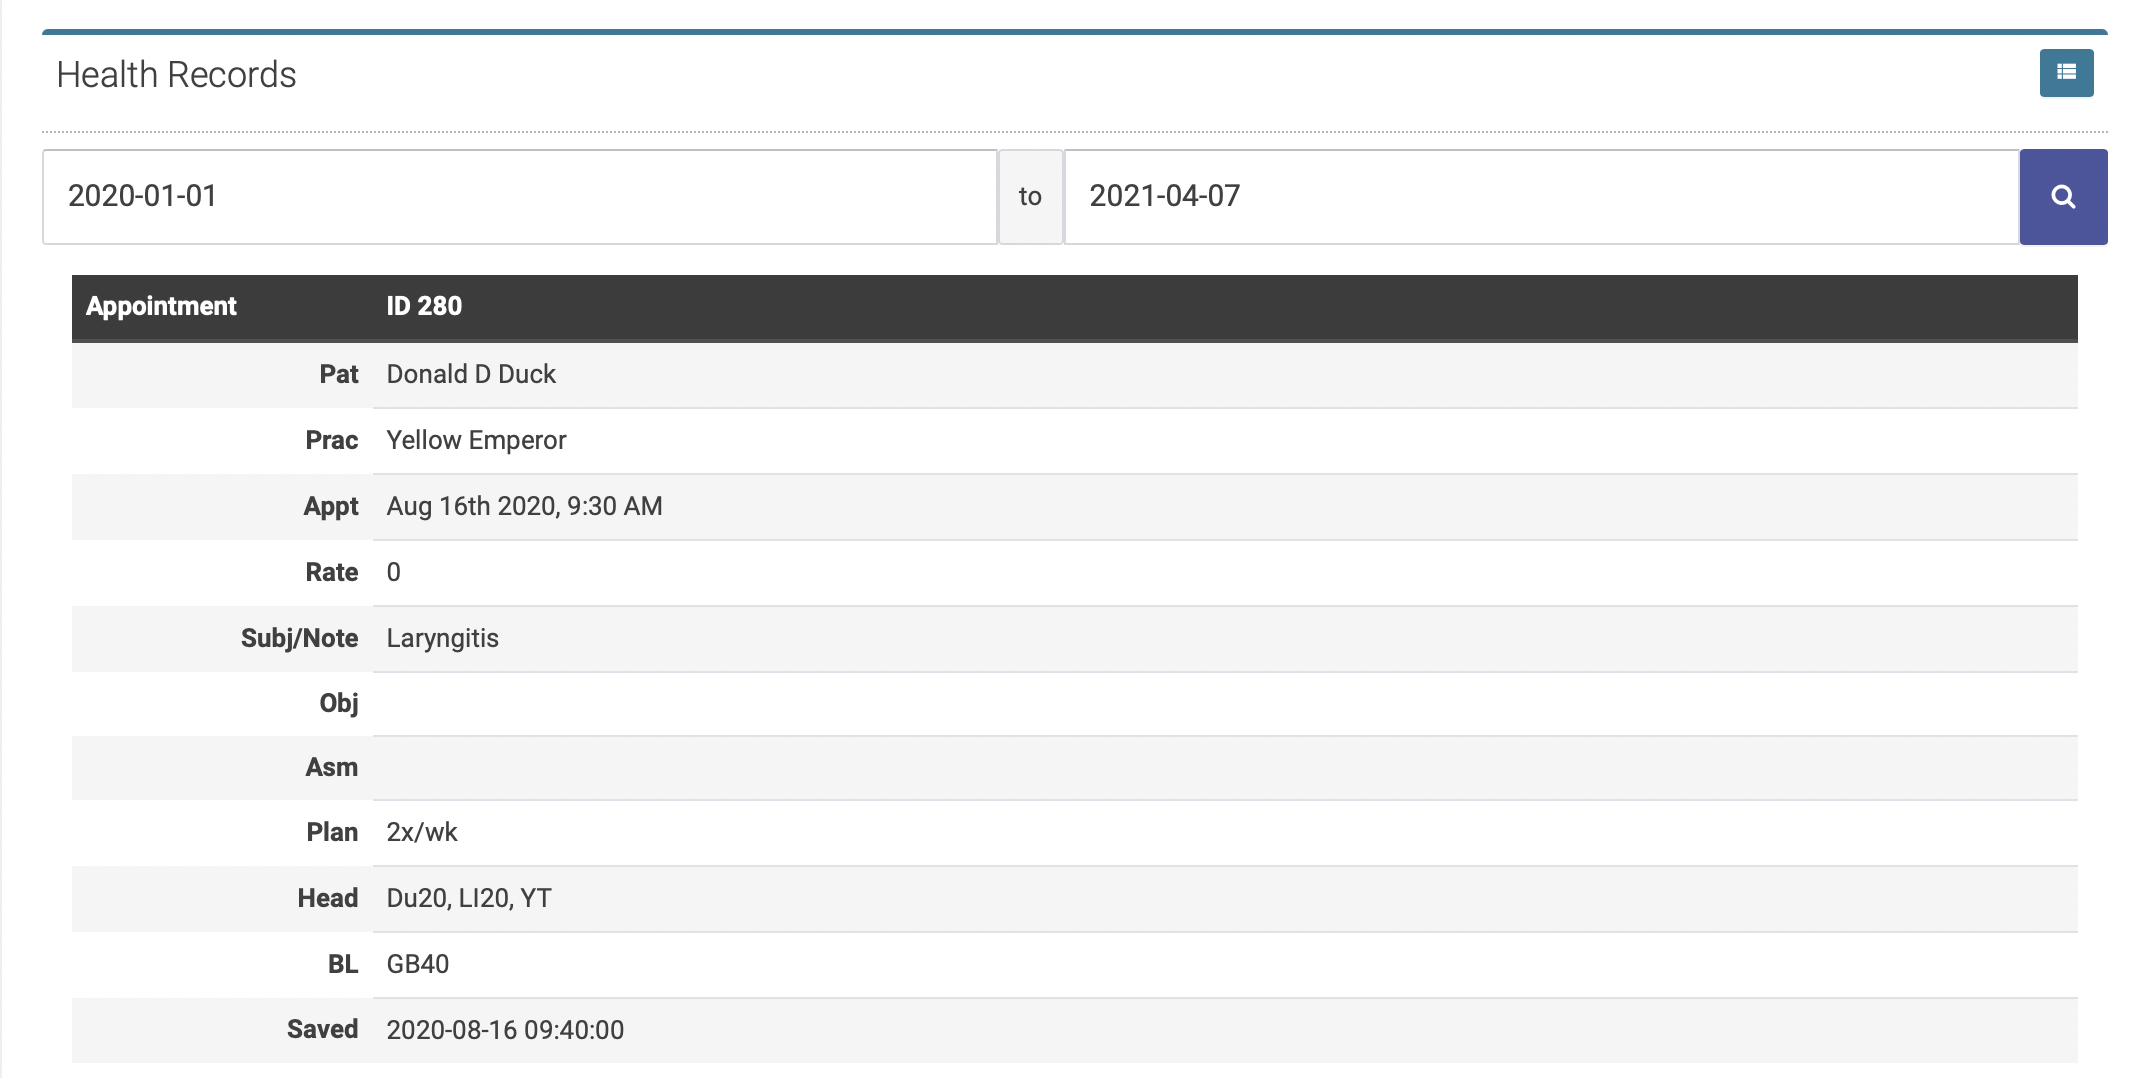
The health records for your selected date range will appear below the search fields in reverse chronological order.
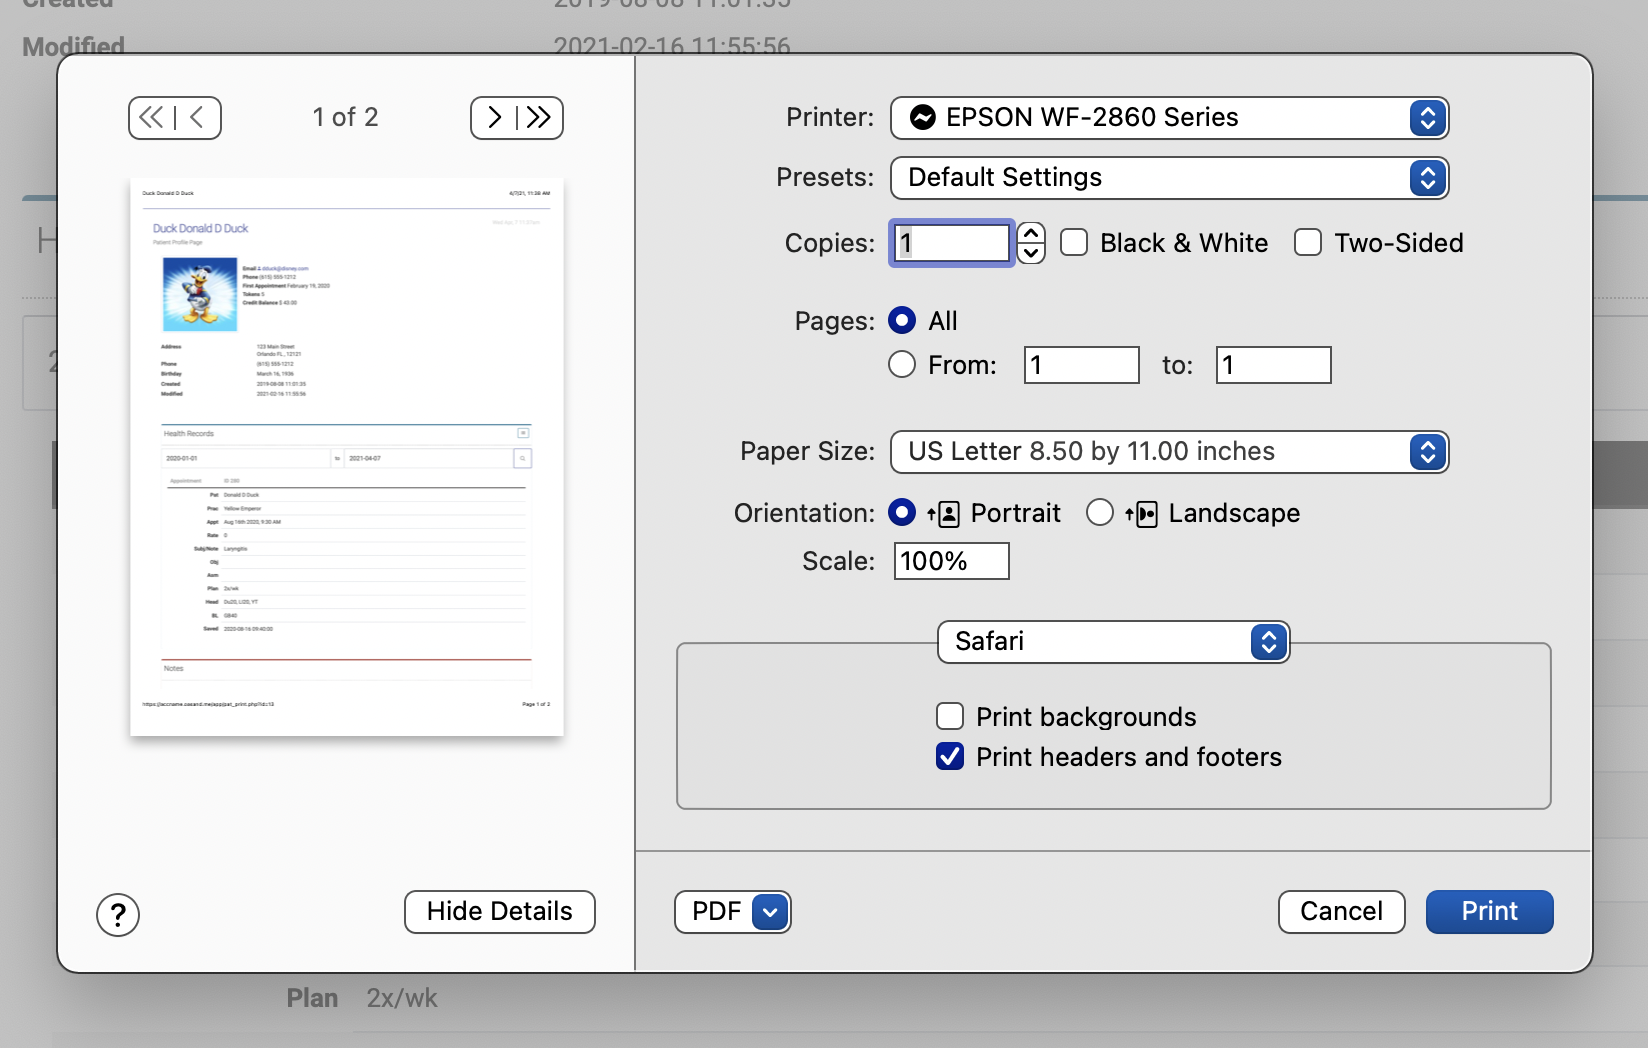
Click Control P to print your records:
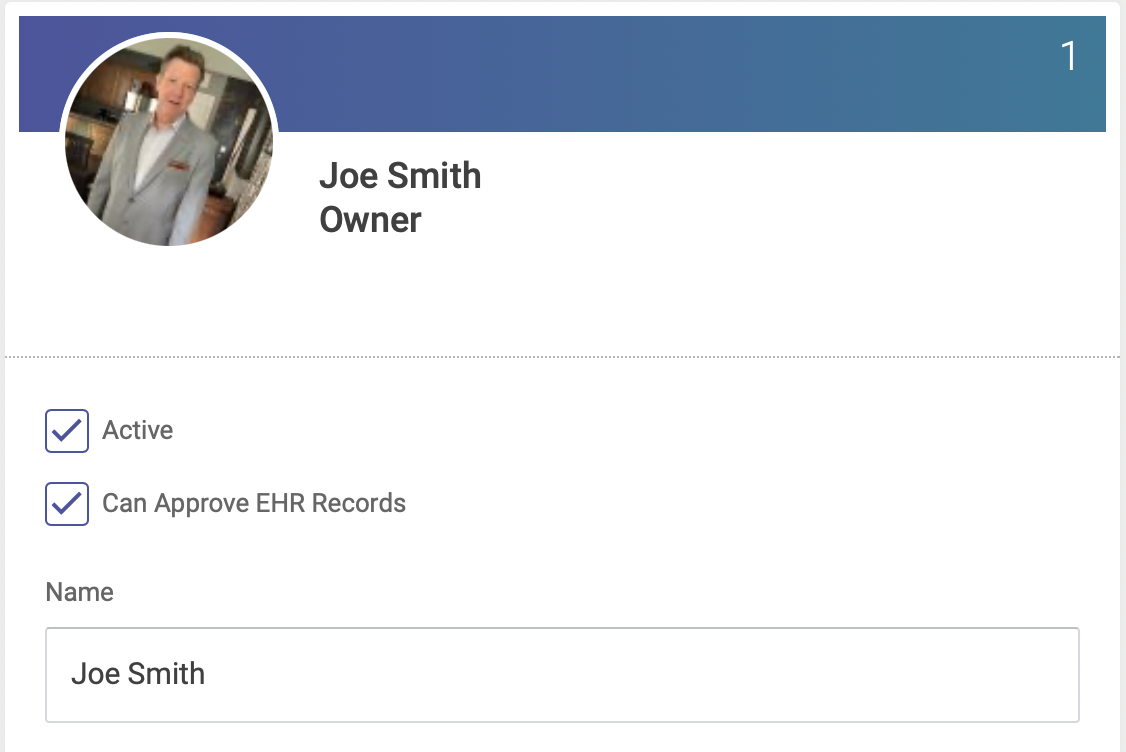
Users Who Can Enter Records
In Open ACU only owners and practitioners can enter health records.
To allow a practitioner or owner to approve and lock appointment health records
- Go to the Users page
- Select the user you wish to edit (if you are a practitioner or owner)
- Check the Can Approve EHR Records checkbox
- Click Save
To change a user's permission level
Only owners and practitioners can edit other users, all others can only edit their own profile.
- Go to the User's Page
- Select the user you wish to edit (if you are a practitioner or owner)
- Change the user level
- Make any other changes you wish to make
- Click save
- Owners cannot change their user level.