Patients
Everything regarding the patient for editing and interacting with the information. You can download all patients from the patients page using the download icon in the top right of the table of patients.
- The Open ACU Patient Portal
- Creating New Patients
- Importing Patients
- Patient Profile
- Patient Icons
- Include or Omit Insurance Fields on Patient Portal
- Duplicate Patients
- Inactive Patients
- Patient activity logs
- Printable Transaction Statement for a Patient
- Appointment Notes on Invoices
The Open ACU Patient Portal
Your patients can interact with their account and your clinic through the Open ACU Patient Portal. This is a secure website specific to your clinic.
The Patient Portal URL
The specific URL for your patients is based upon your account name. You can derive your account name from the URL of your admin. If, for example, you login to your admin at https://ACCNAME.openacu.net "ACCNAME" is your account name.
The patient portal URL is https://ACCNAME.openacu.me , where ACCNAME is your account name.
Go to the Patient Portal directly from your admin
Once you've logged into your Open ACU admin, you can go directly to your Patient Portal from the user menu in the top right.

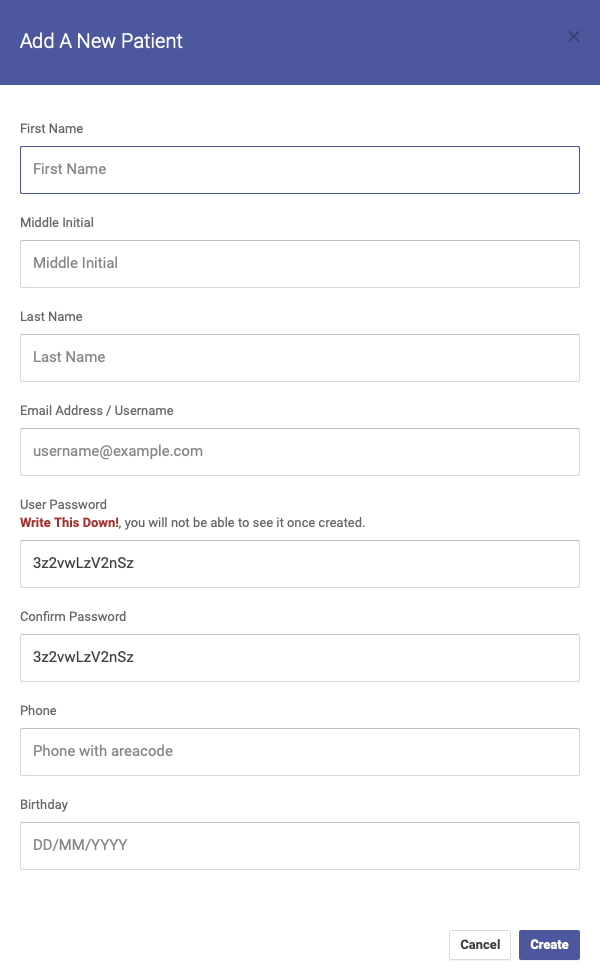
Creating New Patients
A patient remains "New" until they checkin to their first appointment. Or you uncheck the "new" in their profile. "New" patients can be restricted in various ways in their portal.
There are three places you can create new patients.
From any page go to Patients : New Patient. OR
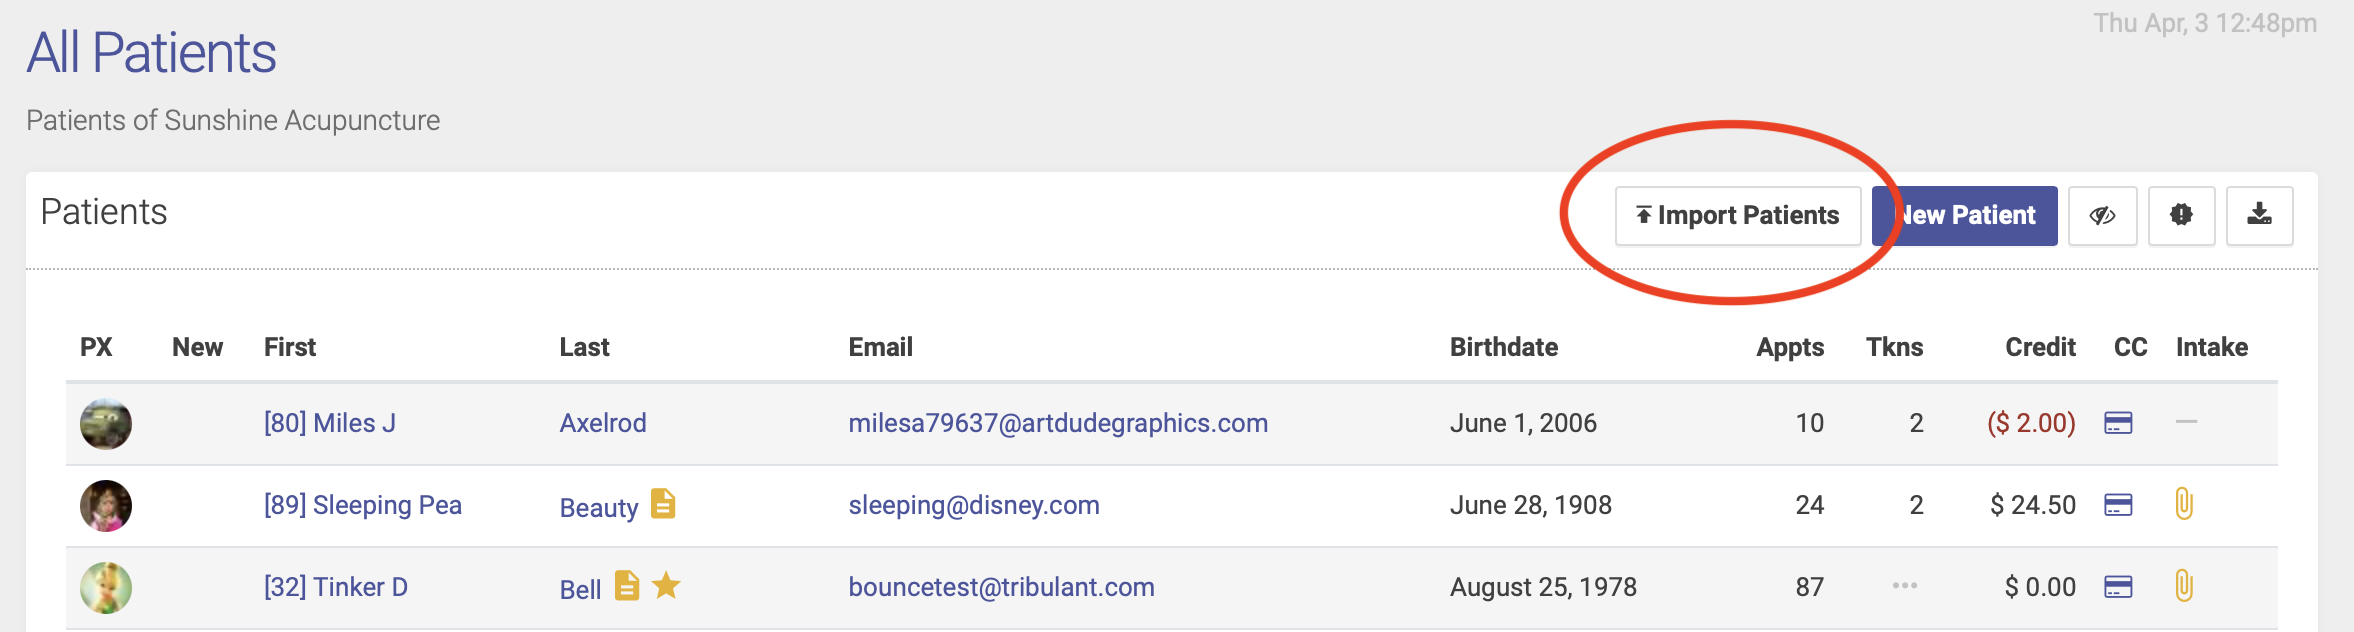
From the Patients: All Patients page use the "New Patient" button at the top right. This will open a new modal window form for creating a new patient.
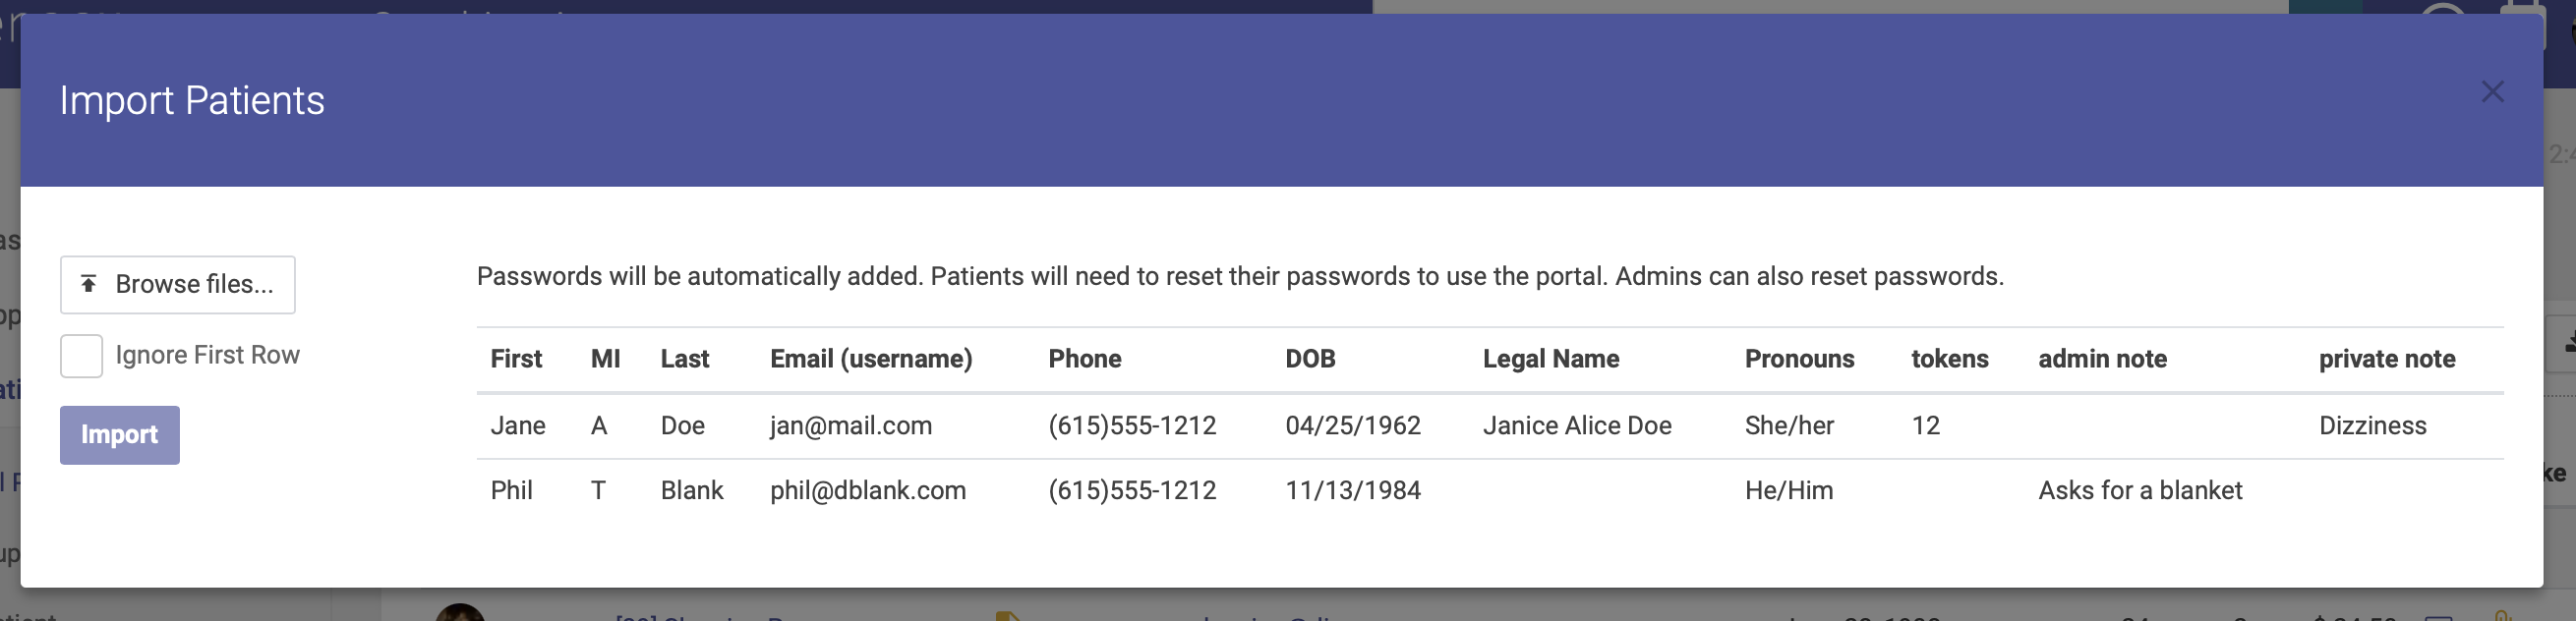
Also from the patients list page you can import a group of patients by uploading a CSV (comma delimited values) file. The popup modal window explains how to format the CSV.

Download all patients in your database from the Patients : All Patients page. Click the ![]() download icon to the top right of the patients listing table.
download icon to the top right of the patients listing table.
Importing Patients
You can import patients if you have a CSV file of the patients you wish to add.
To Import Patients From a CSV File
- Go to the Patients > All Patients page using the menu on the left.
- Click the "Import Patients" button found in the top right of the list.
- Click "Browse Files" to and navigate to your CSV file.
- Click Import.
- The next screen will show you a summary of all the patients that will be imported.
- If there are any problems it will highlight them. You will need to correct these errors and try again.
- Click "Import" to finish.
Screenshots
Find the "Import Patients" button on the All Patients page.
The import modal with an example of the columns required. How to create a CSV from an Excel, Open Office or Google Sheet document. How to create a CSV file from an Apple Numbers document.
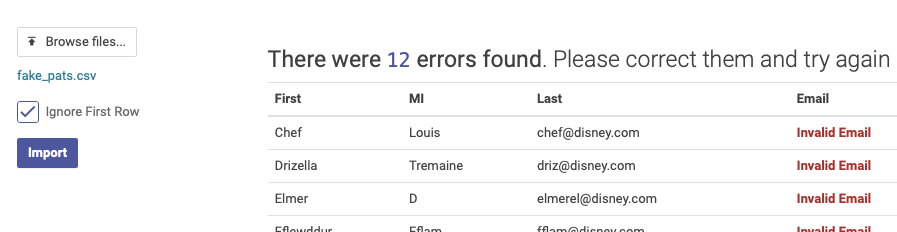
Once you've uploaded your CSV data Open ACU checks your file for any errors. You must correct these errors to complete the import.
Patient Profile
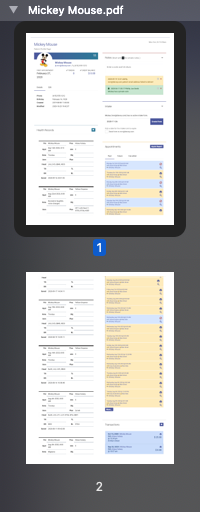
Each patient has an extensive profile page with a lot of interactive information available. The profile page has a several sections to edit, capture information or use to create entries. Click the image below to enlarge and for and overview of all the sections. The patient profile page is designed to be printed. Simply open and load all patient records (appointments, EHR records or Transactions) then print from the browser. In most modern browsers you can save the printable pages as a PDF. See the image at the bottom of this section for an example of printing.
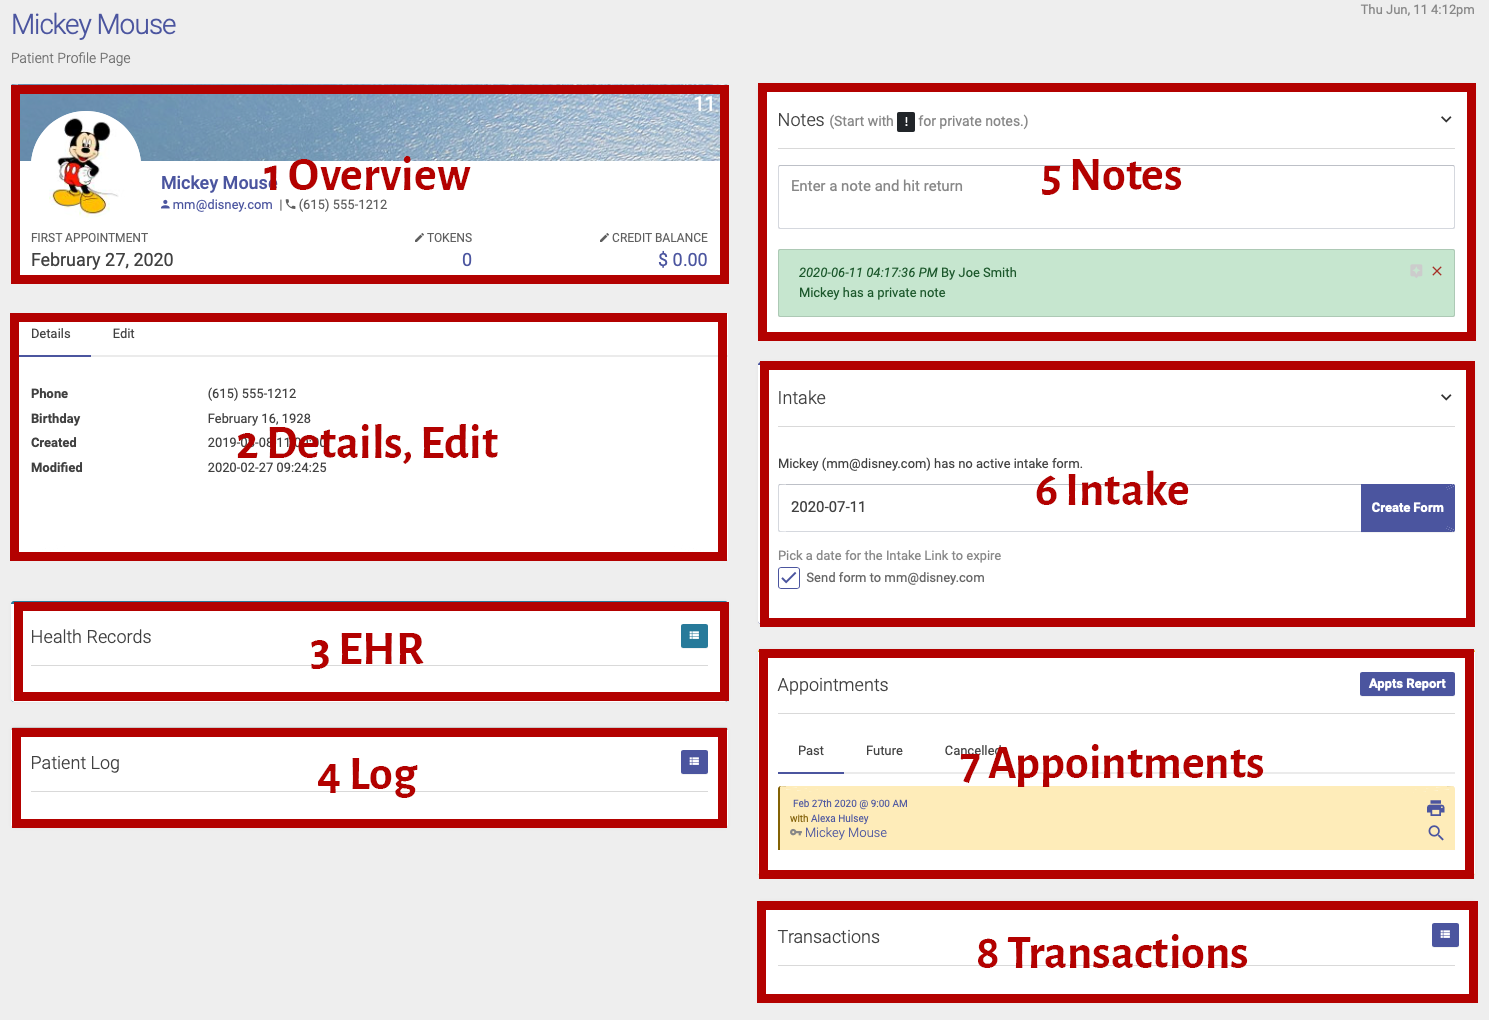
Going from the top left, down and then the top right and down the sections are as follows.
- The patient overview
This section is a quick overview of the patient.- Their ID is top right.
- The image can be changed, just click the image and use the upload form.
- To add or view tokens simply click.
- Same for credits or debits, click to see entries and make and entry
- Patient Details
This section is all the important information about the patient like their name and contact information.- Click the Edit tab at the top of the section to reveal the edit form.
- Make any changes you need and click saved details
Inactive patients cannot make an appointment. - For emergency contact information make changes and click Save Emergency/Insurance
- To change a patient's password enter the new password twice and click Save Password
Patient passwords can not be seen in Open ACU as they are double encrypted. You can only reset their password. Patients are able to change their own password.
- Electronic Health Records
- If you are logged in as a user with permission to view EHR records you can see the patient's records by expanding the list via the expand icon to the right.
- If you do not have permission you will not see this section on the patient profile page.
- Patient Log
- Click the expand icon to load the log.
- This log shows any changes made to the patient and by what user.
- This is a raw log so it shows every detail when something changes.
- Patient Notes
- Simply enter a note and hit return to save a new note.
- Start the note with a "!" to make that note private.
- Only users with EHR permission can add private notes
- Without permission users cannot see private notes
- All notes are encrypted.
- Any note can be deleted at anytime.
- Any note can be "pinned" to the top using the pin icon.
- Intake
- Here you can create an intake form for a patient and have it emailed to them.
- If you have EHR permissions you can see a patient's answers.
- Otherwise you only see if they've filled out a form or not.
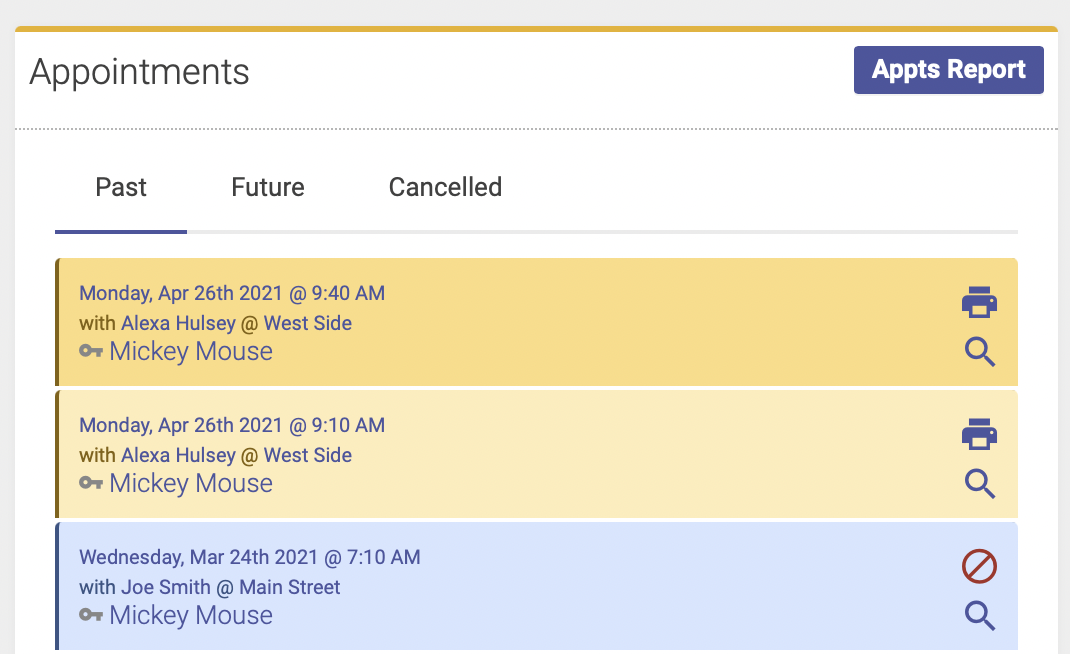
- Appointments
- As may be obvious, this section displays the patient's appointments. There are three tabs to choose from.
- By default it shows appointments in the past.
- Click "Future" to see upcoming appointments.
- "Cancelled" for a list of every appointment this patient has cancelled.
- Clicking the magnifying glass will show you a log of the appointment's activity, including:
- When and who made the appointment
- If it was cancelled, when and who cancelled.
- If a reminder email was sent
- If that email was delivered
- If that email failed
- If it failed a note will appear in the notes section stating their email bounced
- Email failure will also OPT-OUT the patient from any further emails.
- If they were checked in
- If a checkin was reversed
- If it was cancelled
- Clicking the printer icon (only if a transaction has occurred for the appointment) opens a new window for a printable receipt of the transaction. Patients have access to this in their account as well.
- As may be obvious, this section displays the patient's appointments. There are three tabs to choose from.
- Transactions, click the expand icon to load the patient's transactions
- Transactions are any financial transaction with your clinic.
- Appointments can have transactions.
- Open ACU also offers non-appointment transactions. They will show up here.
An example of a printed patient profile page.
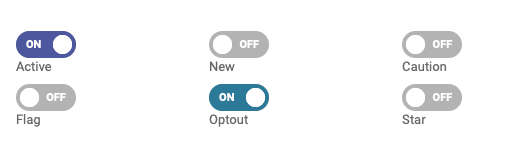
Patient Icons
On the schedule grid or the All Patients page each patient can have a number of icons displayed with their names that have significance. These are available as a way of seeing information at a glance for patients on your schedule. Here are all the possible icons (double sized here for clarity). These are shown in the context of an appointment.

![]() Key to the left. Appointment made by an Admin. (Look into the appointment log to see which admin)
Key to the left. Appointment made by an Admin. (Look into the appointment log to see which admin)![]() Person to the left. Appointment made by the Patient.
Person to the left. Appointment made by the Patient.![]() Block 1. This is the patient's first appointment
Block 1. This is the patient's first appointment![]() Red flag. This patient has a red flag. (Use this feature however you wish)
Red flag. This patient has a red flag. (Use this feature however you wish)![]() Yellow Caution. This patient has a caution. (Use this feature however you wish)
Yellow Caution. This patient has a caution. (Use this feature however you wish)![]() Paper clip. This patient has a completed intake form.
Paper clip. This patient has a completed intake form.![]() Sideways Paper clip. This patient has an intake that hasn't been completed. (Intakes expire so you may need to generate a new one.)
Sideways Paper clip. This patient has an intake that hasn't been completed. (Intakes expire so you may need to generate a new one.)![]() Token. This patient has at least one token. See the patient profile page or the checkin popup for the most accurate token total.
Token. This patient has at least one token. See the patient profile page or the checkin popup for the most accurate token total.![]() Green Dollar. This patient has at least $0.01 of credit.
Green Dollar. This patient has at least $0.01 of credit.![]() Red Dollar. This patient has at least -$0.01 of a debit.
Red Dollar. This patient has at least -$0.01 of a debit. ![]() Yellow Note. This patient has a note. When you mouse over this icon the most recent or pinned note will display.
Yellow Note. This patient has a note. When you mouse over this icon the most recent or pinned note will display.

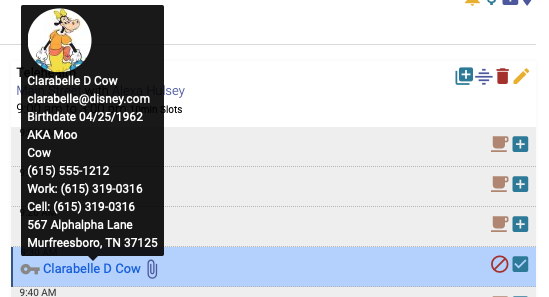
Patient Info Popup.
In the schedule and the patient list on All Patients mousing over the patient's name gives you an info window with useful information about the patient. Here is an example where much of what is available from the patient's profile pops up.
Include or Omit Insurance Fields on Patient Portal
When a patient logs into the patient portal they are given a profile to manage. This profile enables them to update contact information, their password, appointments and other things specific to their account. A group of items that patients can enter or change themselves in their insurance information. Your clinic may not take insurance as payment so you may wish to omit those fields in the patient portal.
To change the preference for including or omitting insurance fields do the following:
- Log into your Open ACU account if you haven't already.
- Go to the settings page
- Only ownership users can see the settings page. If you are not an owner ask the owner of your clinic to do this for you.
- You can also click your clinic's name in the header of any page to go to the settings page.
- Find the New Patient's settings on the left side of the settings page.
- Check or Uncheck "Include Insurance" checkbox and click save to change your setting.
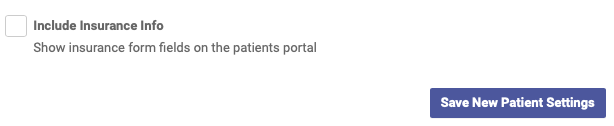
Patients will either see or not see the insurance information fields in the patient portal.
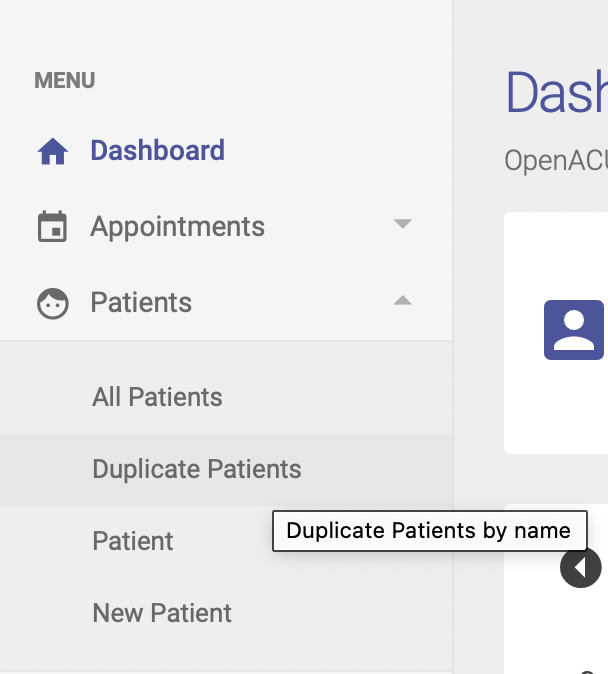
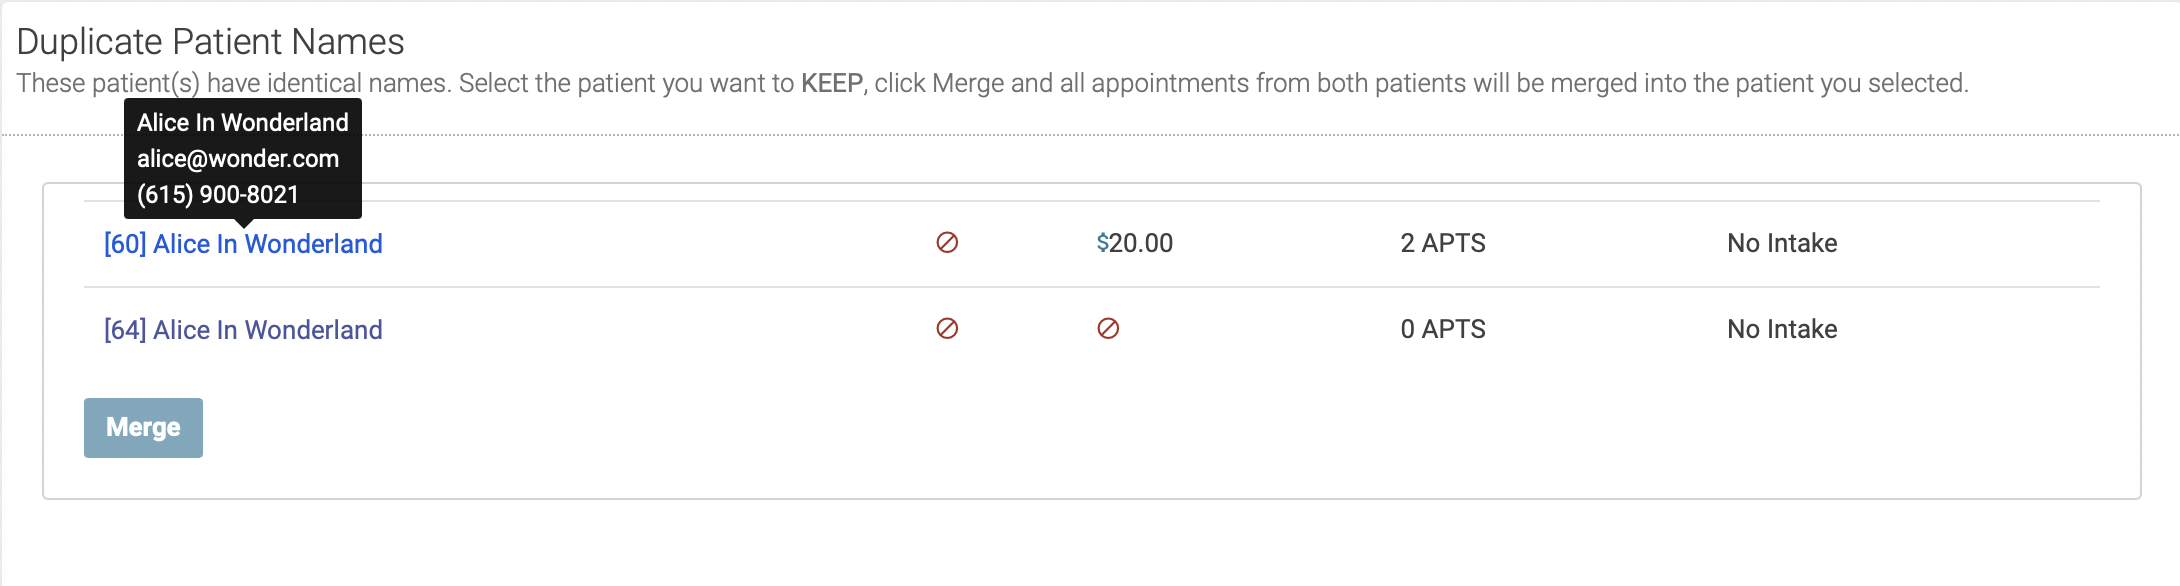
Duplicate Patients
The Duplicate Patients page shows a list of patients with duplicate names. You can get to this page by clicking Duplicate Patients under Patients on the sidebar menu:
When two patients share the same name
When two or more patients share the same name, we recommend adding a middle name or initial to identify each patient. This can be done from the Patient Profile page.
When one patient has created multiple accounts with their name
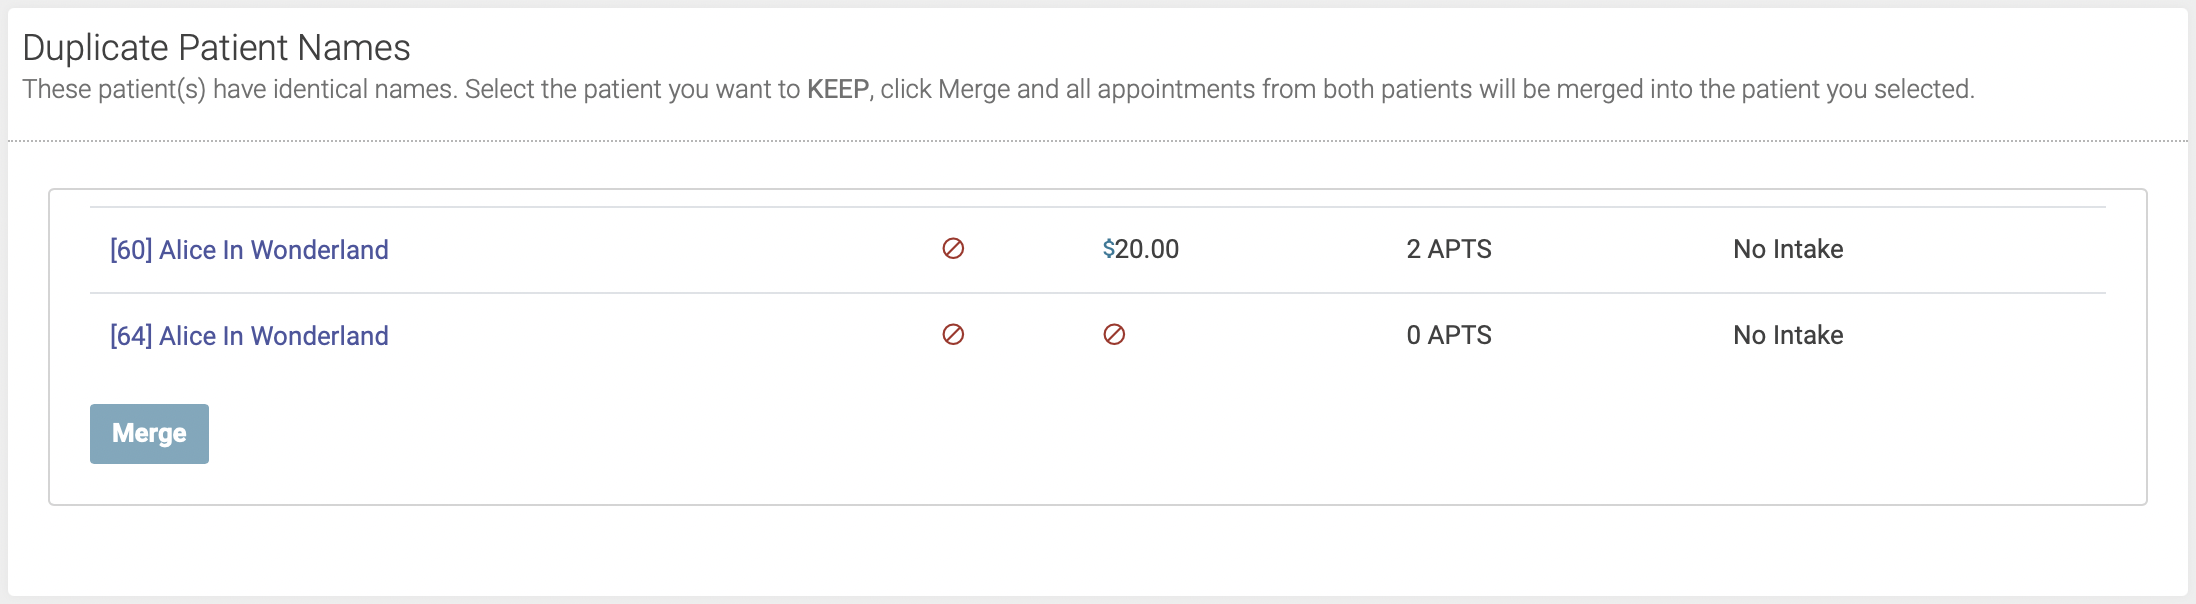
Sometimes a patient will create multiple accounts with their name. When this happens, you'll need to merge the accounts. To do so, first navigate to the Duplicate Patients page.
You'll see a list of duplicate patient names, including their number of past treatments, credit balance, and whether they've completed an intake form:
When you mouse over each patient's name, you'll see their email address, phone number, and other demographic info:
 Select the patient you want to KEEP by clicking anywhere on the line next to their name. This will highlight the patient you want to keep:
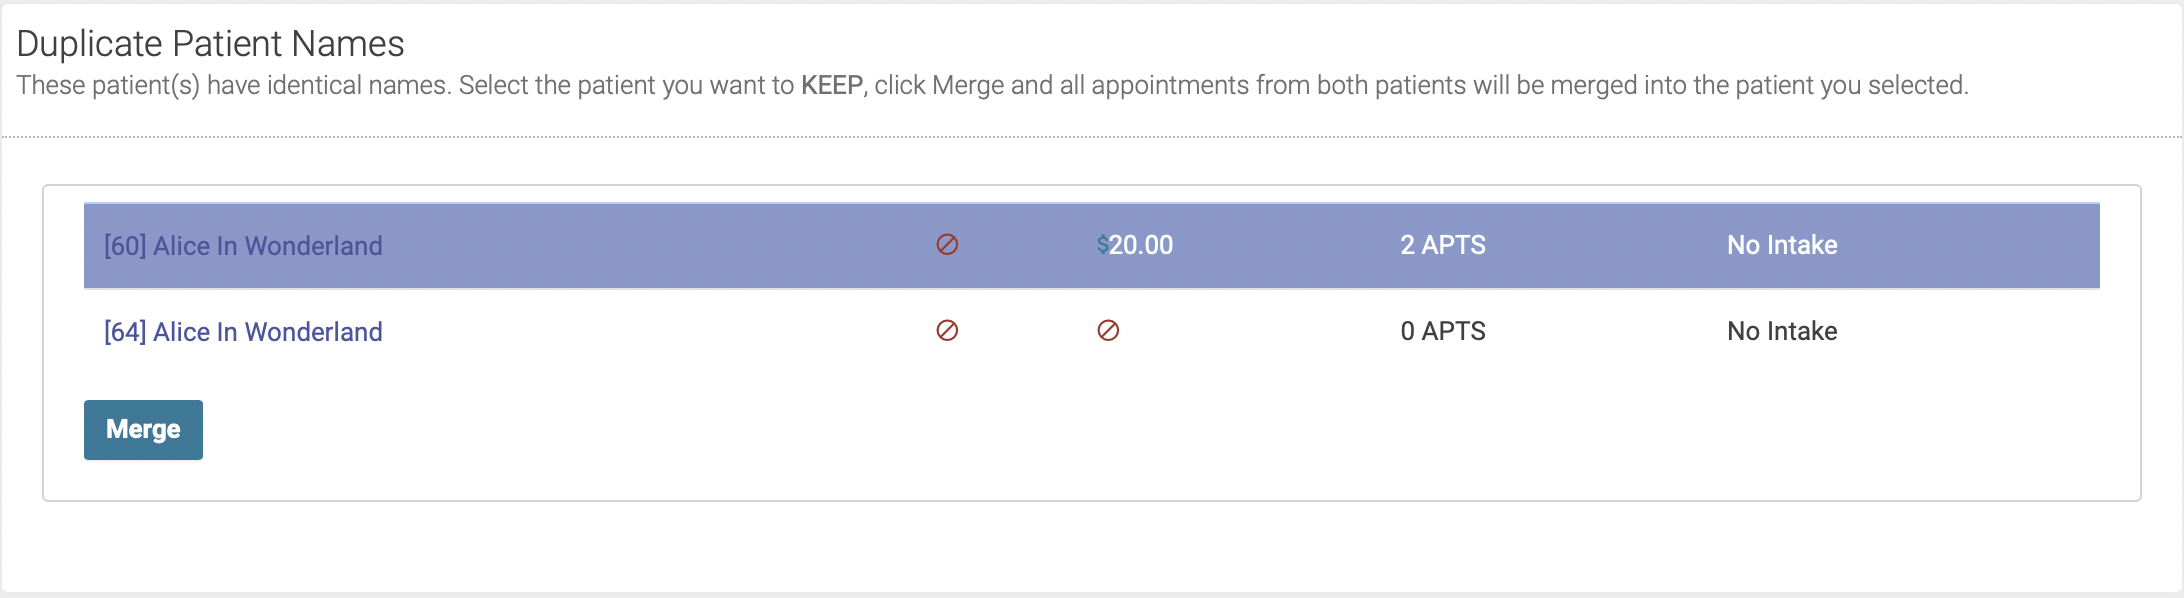
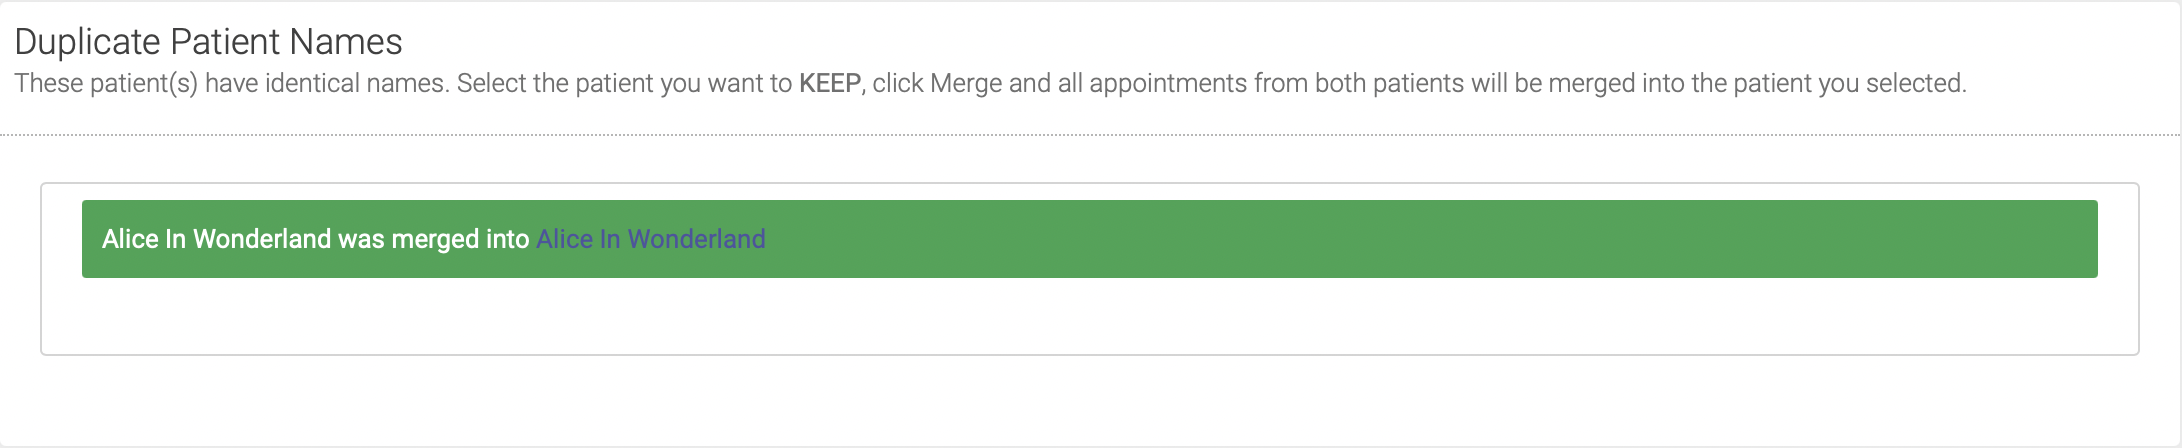
Click Merge. All appointments from both patients will be merged into the patient you selected, and you'll see this confirmation message:
Inactive Patients
Sometimes you need to prevent a patient from making appointments or for your receptionist from doing so. You can do this by making them "Inactive". Inactive patients cannot log in. Some patients will create a new account. They will not be able to use the same email address as an inactive (or active) patient.
To make a patient inactive
- Go to their profile page in the admin.
- Choose the Edit tab in the Details / Edit tabs
- Find the toggle switches under the name fields
- Click Active, making sure it is in the "Off" position
- Save the details

The button to see all inactive patients
 Showing the inactive patients.
Patient activity logs
All patient activity is logged on the Patient Profile page.
Patient Log
The Patient Log shows all activity related to a patient's account: account creation, changes to account information, creation of intake forms, and account password reset activity.

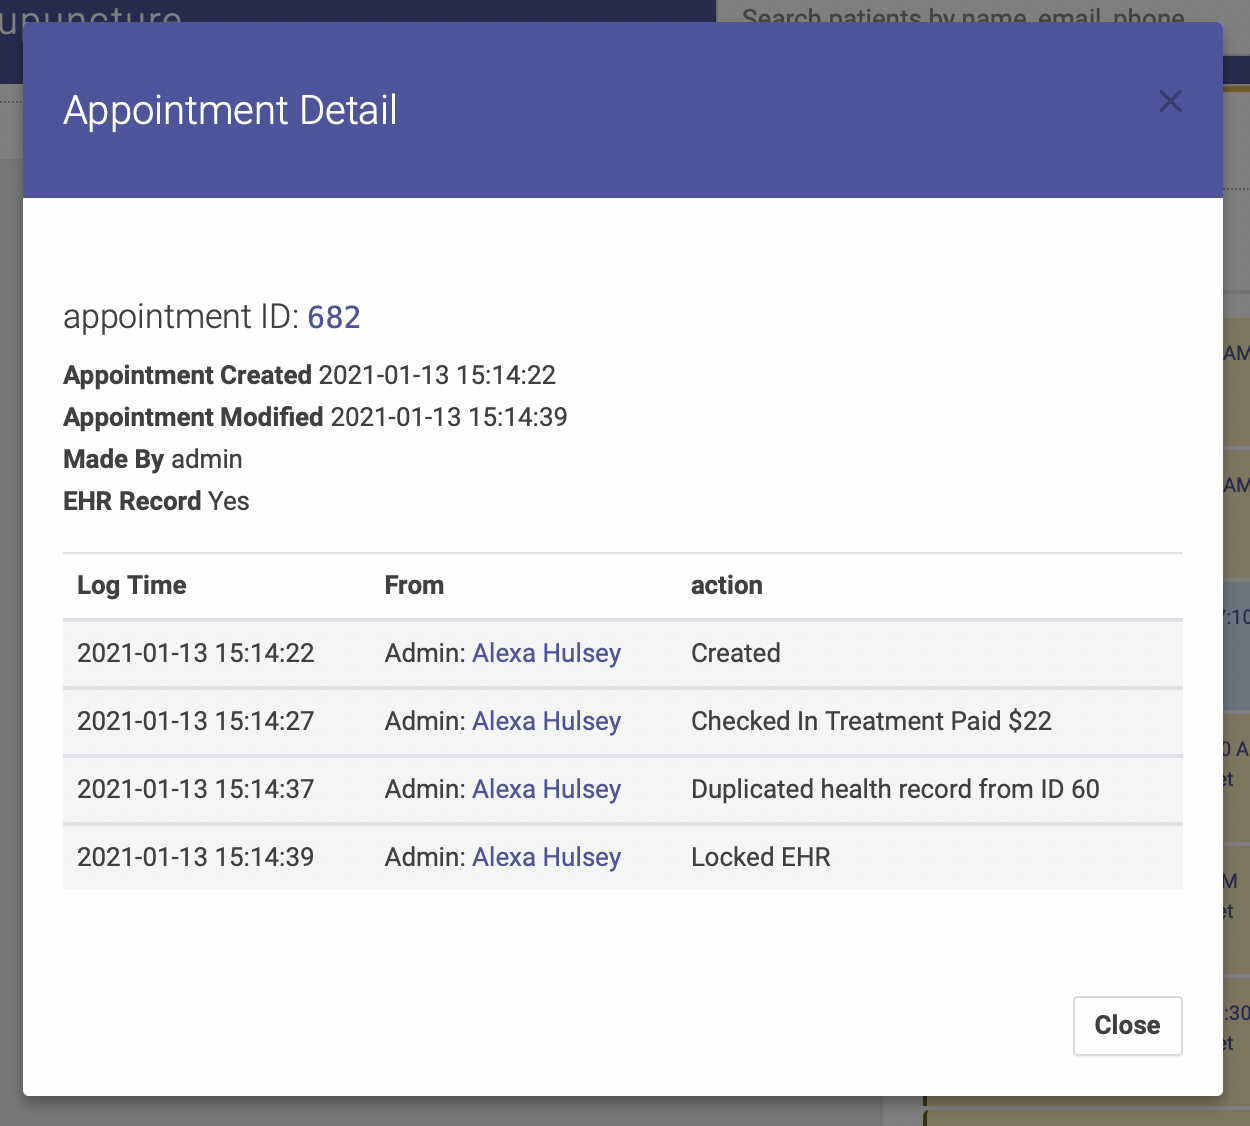
Appointment Detail Log
A popup window will appear showing all activity related to this specific appointment:
Intake Log
Before a patient's intake form is completed, all activity related to their intake is logged in the Intake section on their Patient Profile Page. This will show you when intakes were created and sent, and if the intake forms failed to deliver.
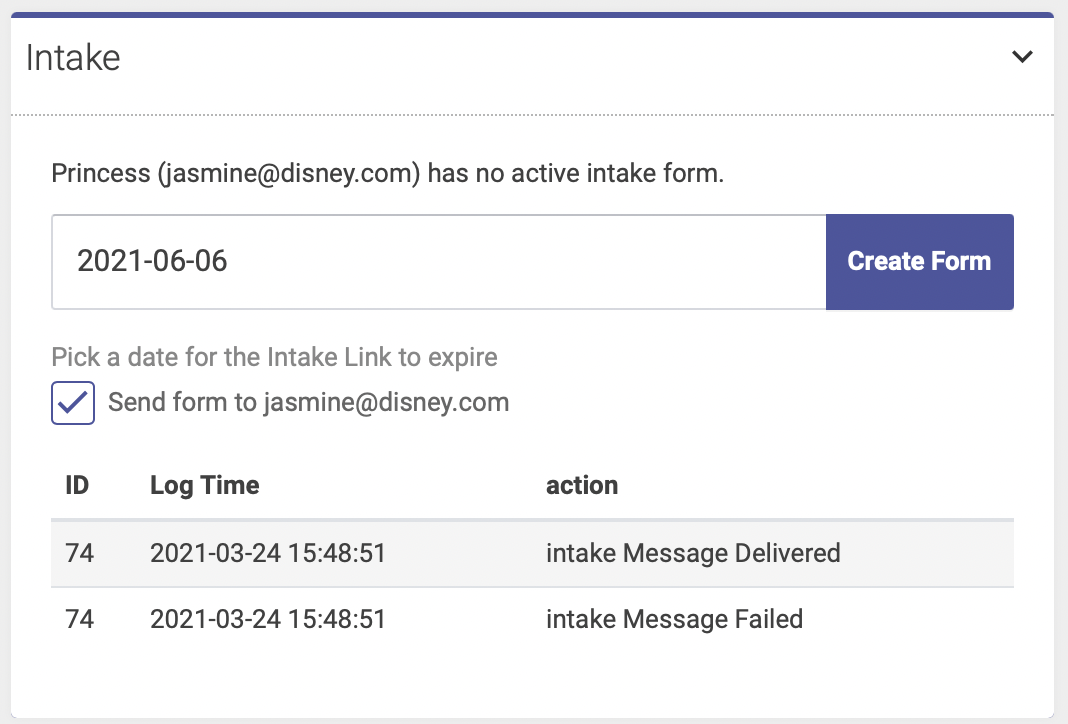
Once the intake form is complete, the log will be replaced by their intake form, which is visible only to users with Practitioner level access.
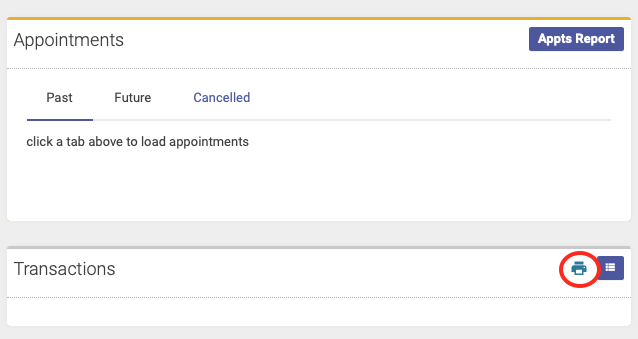
Printable Transaction Statement for a Patient
From the patient's profile page you can print a styled and branded transaction statement for patients that includes transaction details. Transactions can be narrowed down by date range and the page prints to a printer or PDF for emailing. Unlike the transaction report this report is designed to be printed and has your clinic brand in the header.
To Print Transactions for a Patient
- Log into your Open ACU Admin.
- Go to the patient's profile page for whom you'd like to report.
- Locate the "Transaction" section of the patient profile page.
- Click the printer icon in the section header.
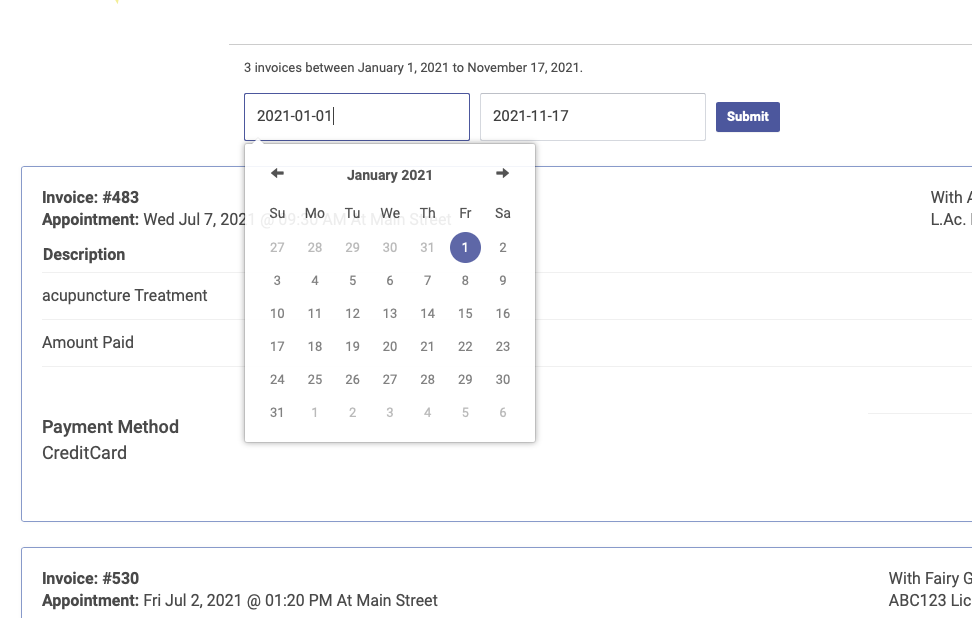
This will open a new browser window or tab. By default all year to date transactions are loaded. You can change the date range and reload the page to your preferred dates.
Printing from a web page in most modern browsers allows you to save the file as a PDF. Please refer to your specific browser's instructions for creating PDFs from a web page.
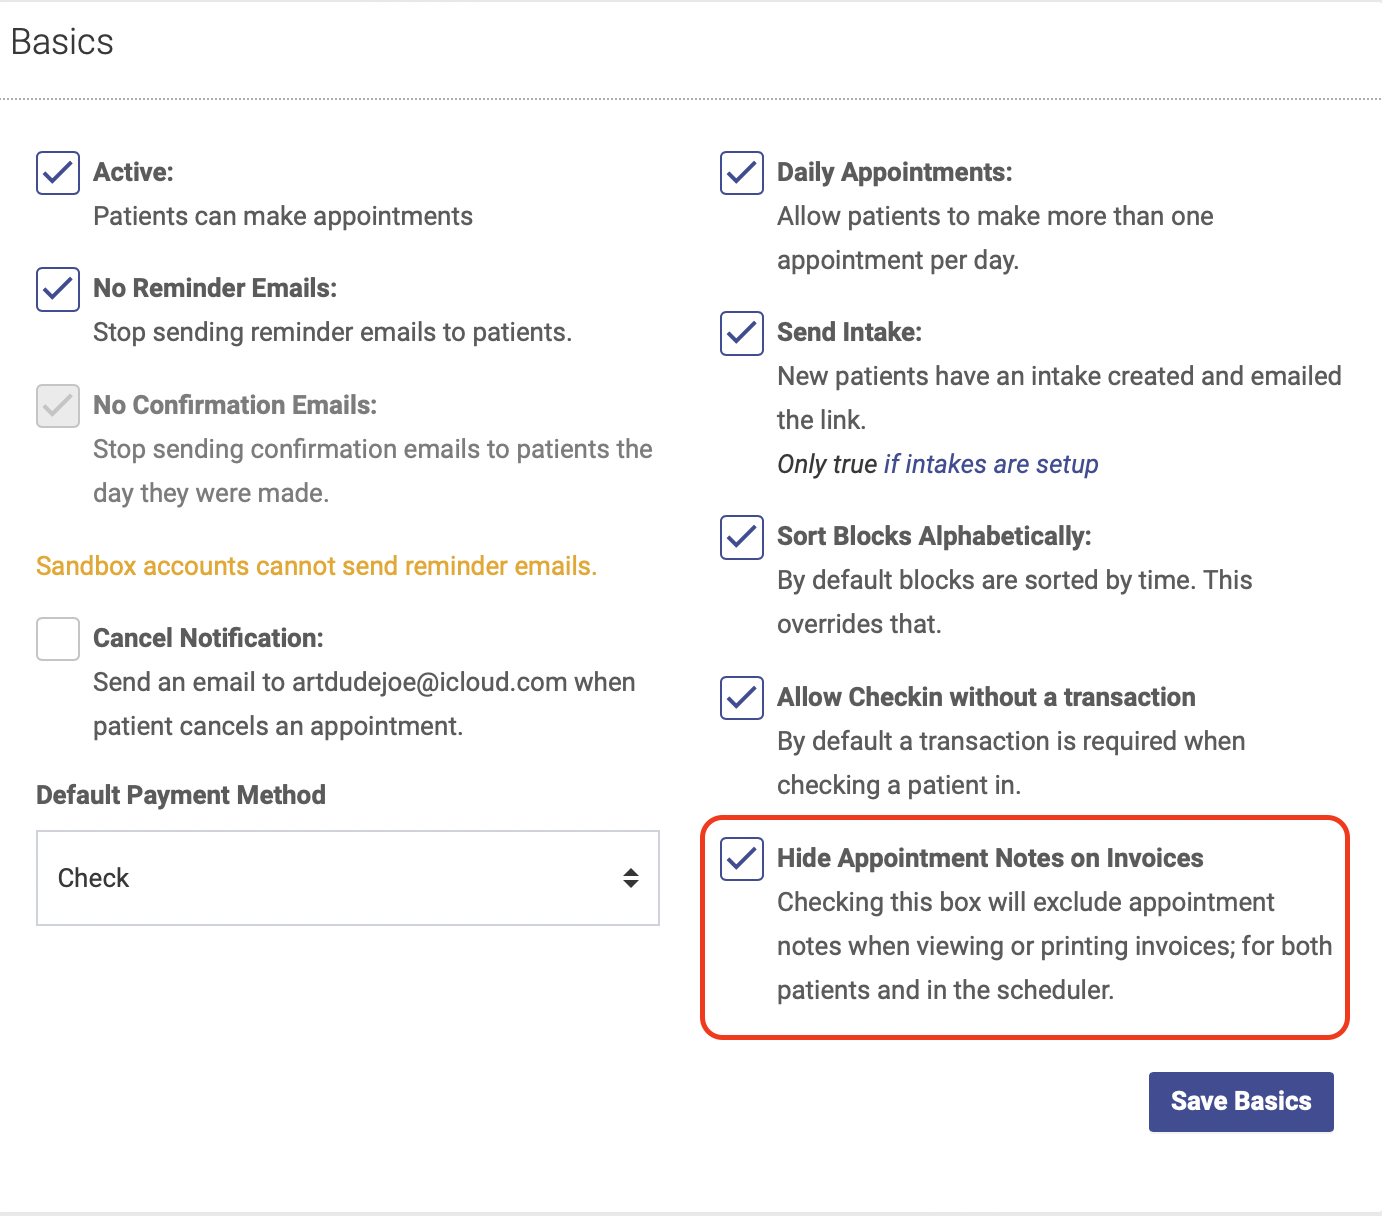
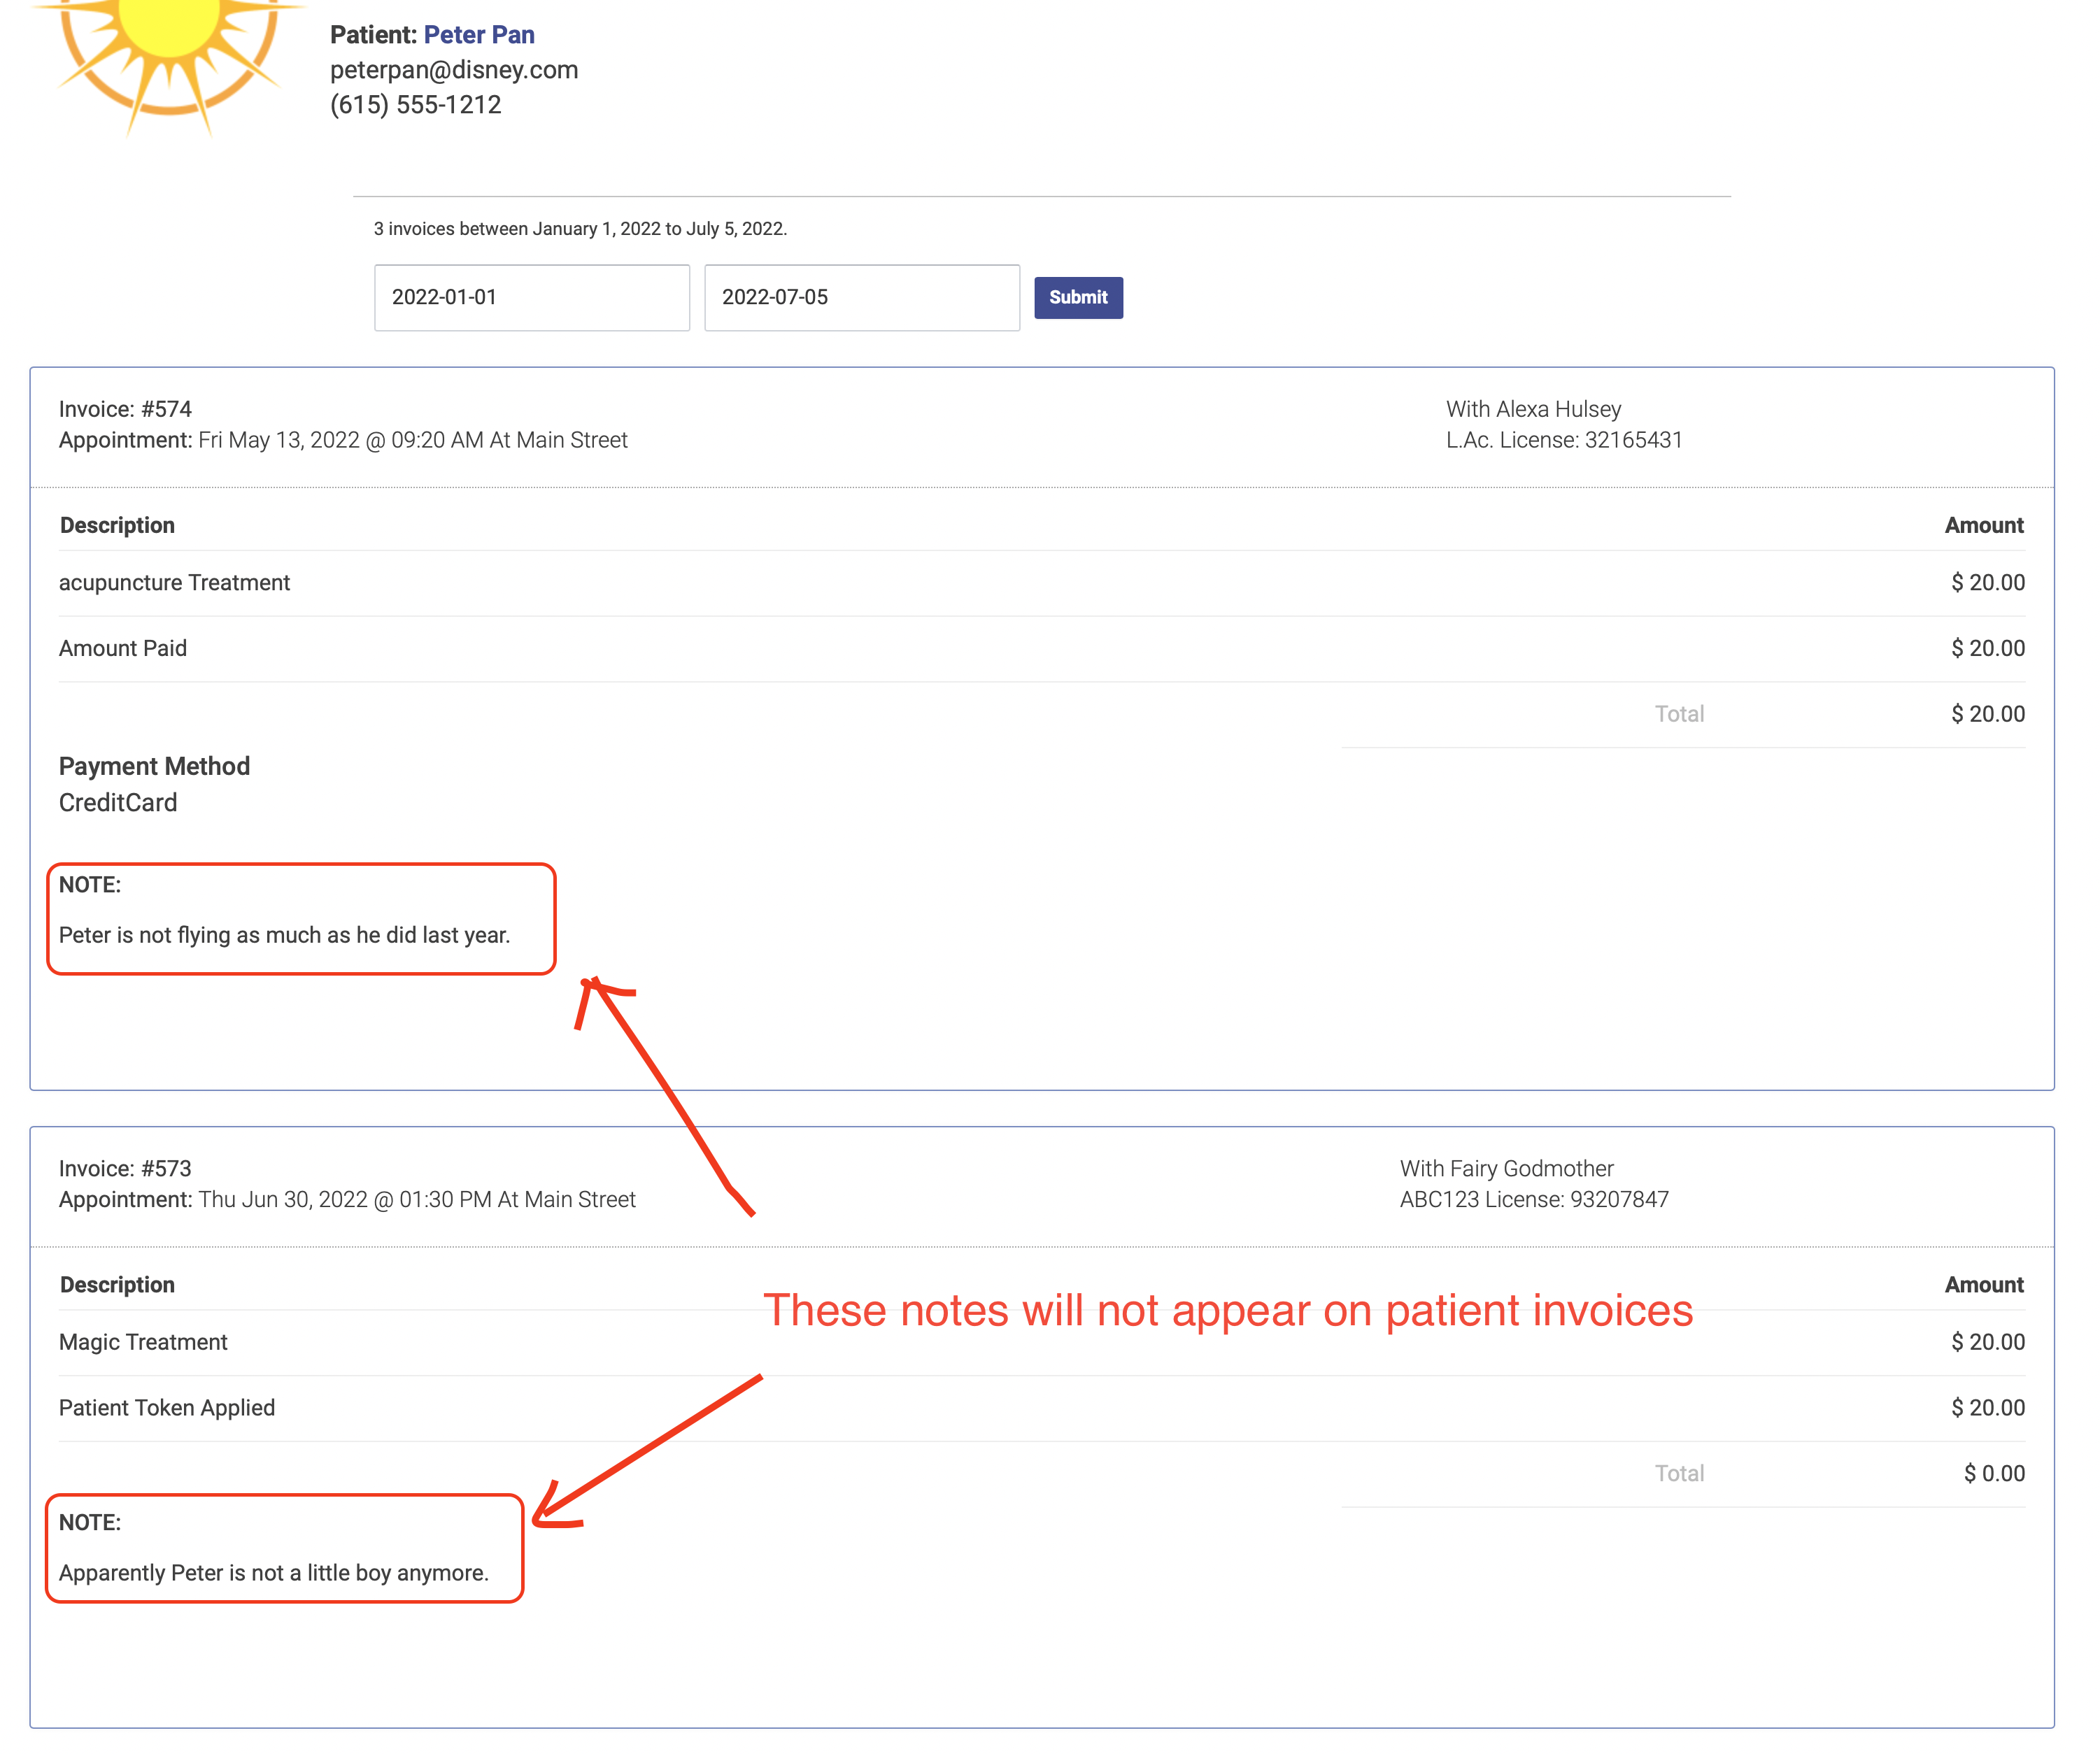
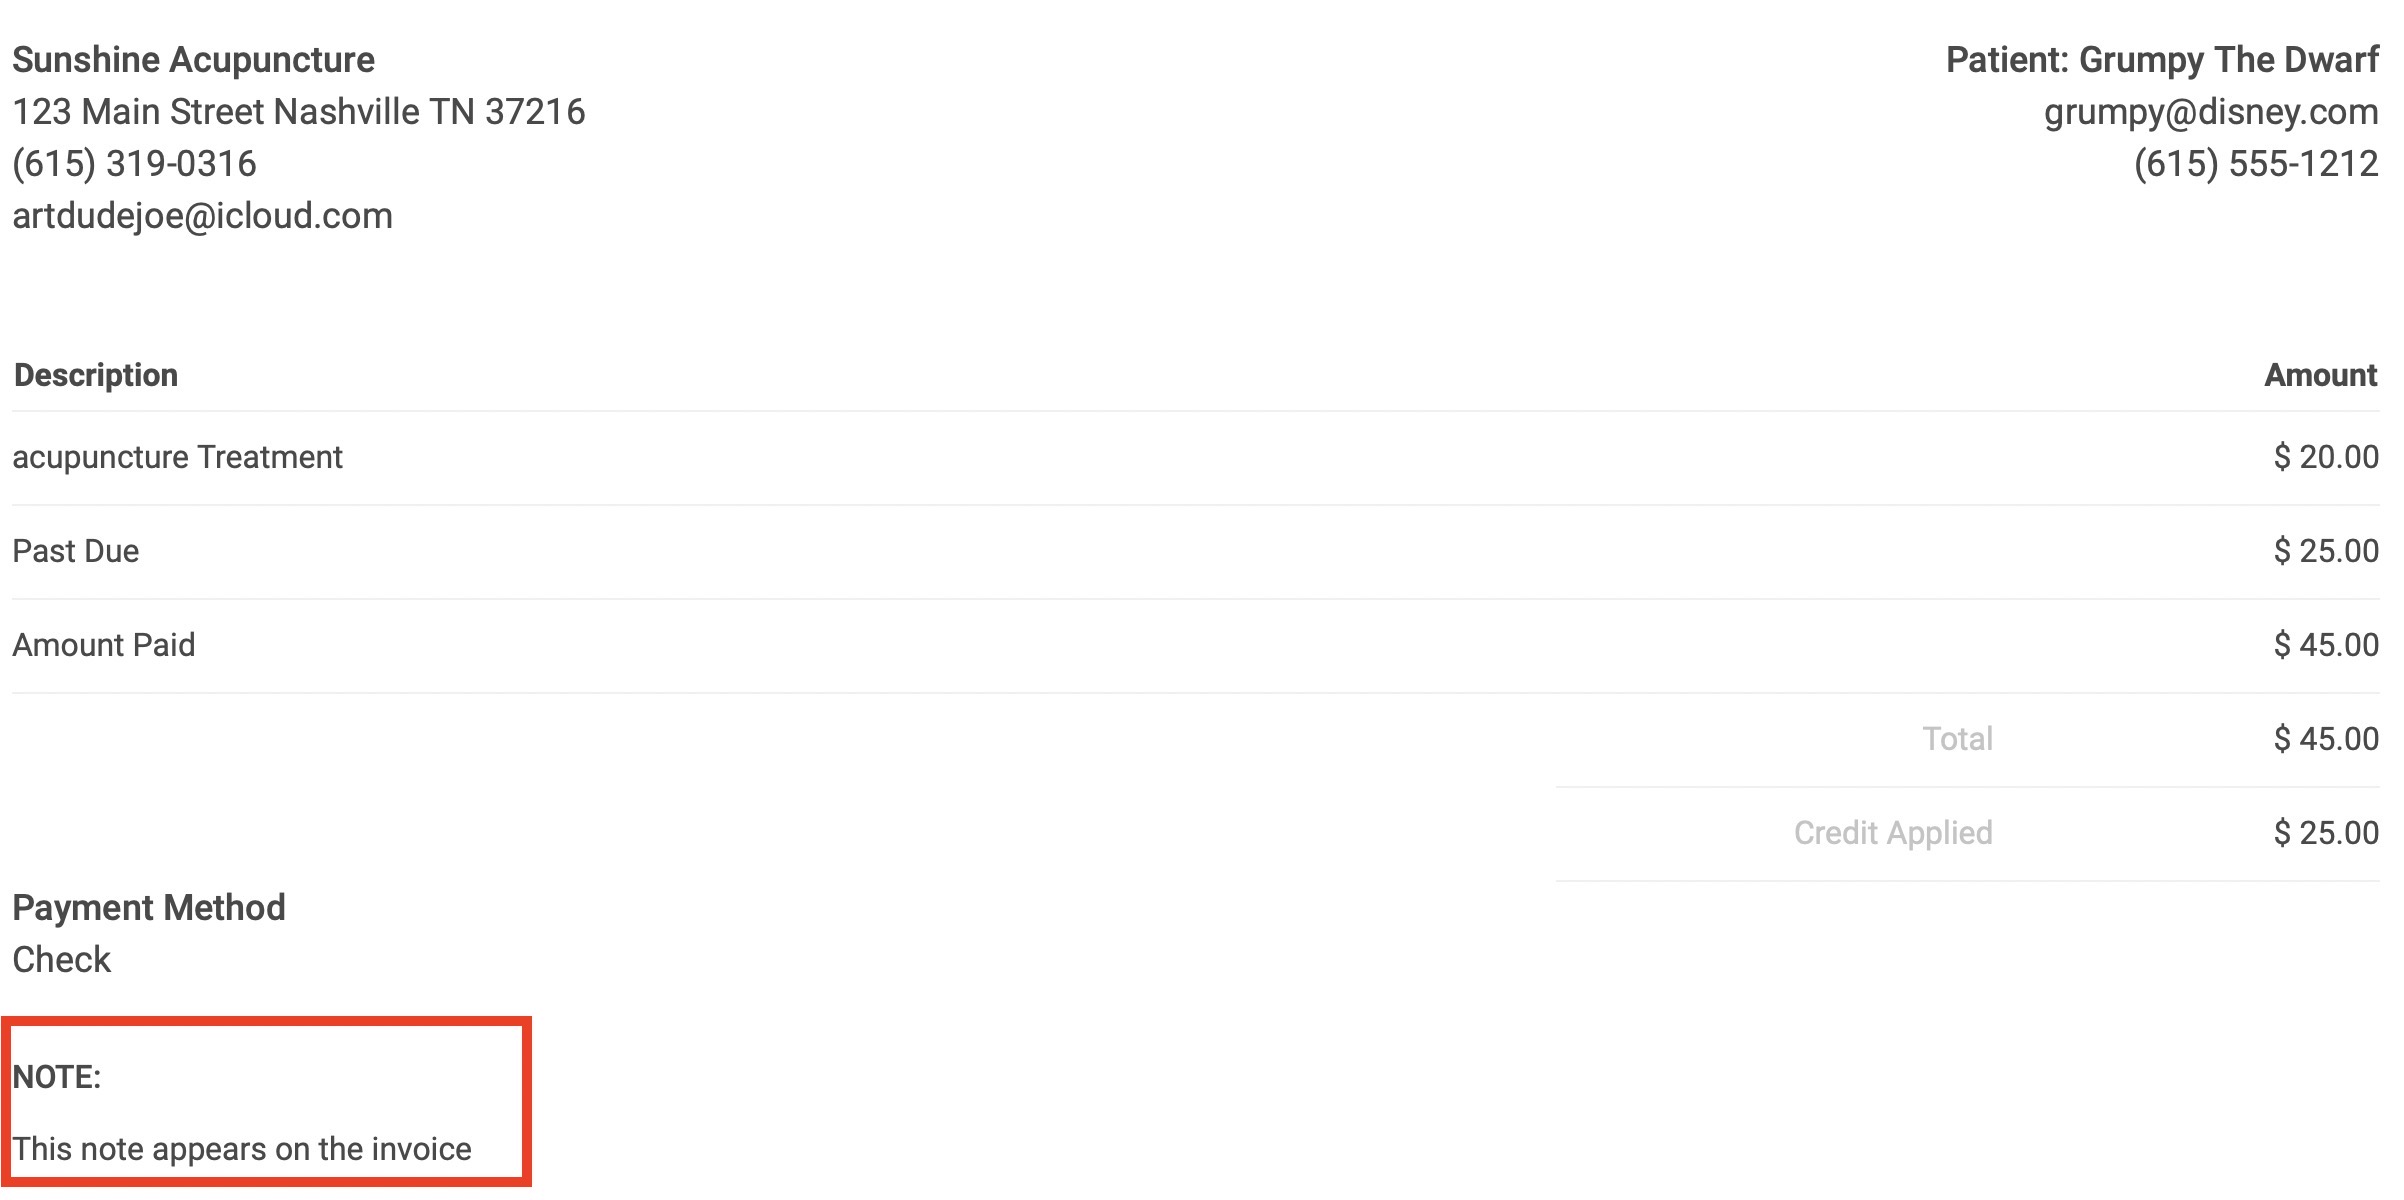
Appointment Notes on Invoices
When you check in a patient and record their transaction, any notes you record in the Add a Note field will appear on the printable invoice, which can be viewed by patients:
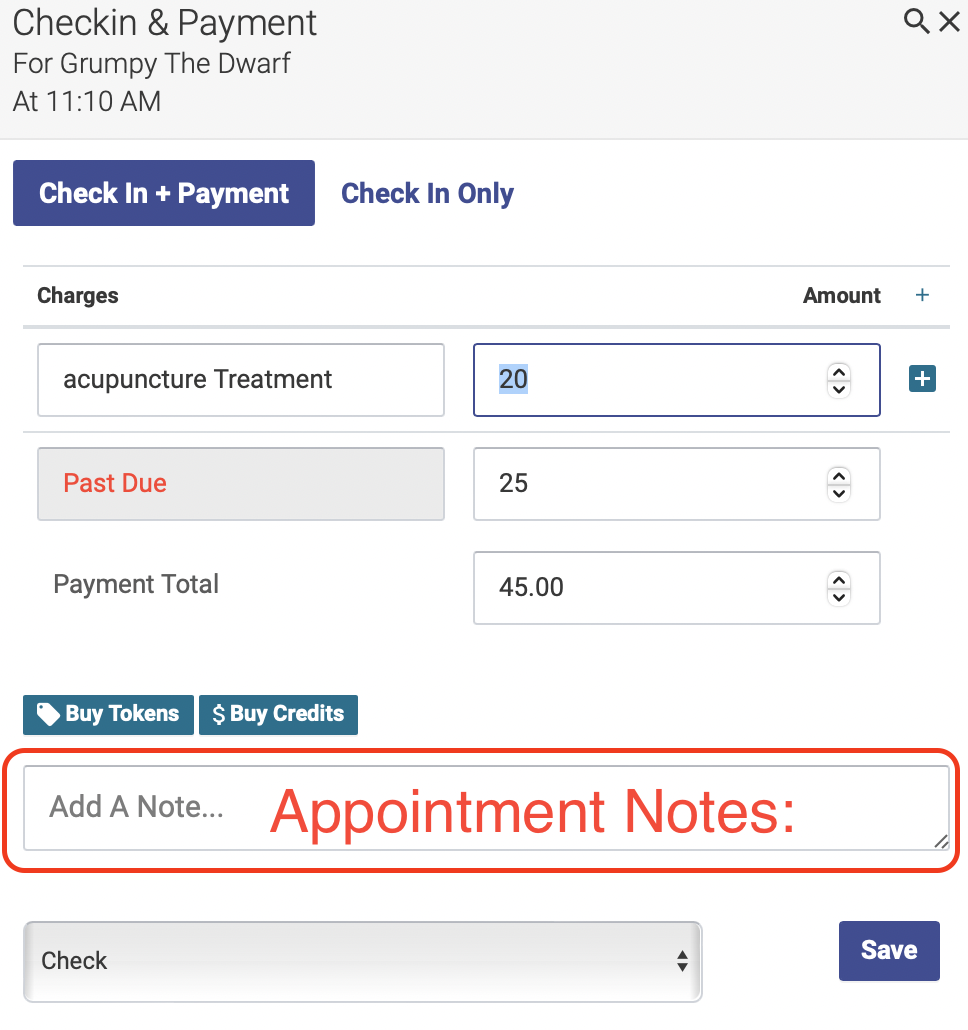
Hiding appointment notes
If you do NOT want these notes to appear on invoices, you can change this setting on your Settings page, in the Basics section - just click the Hide Appointment Notes on Invoices box: